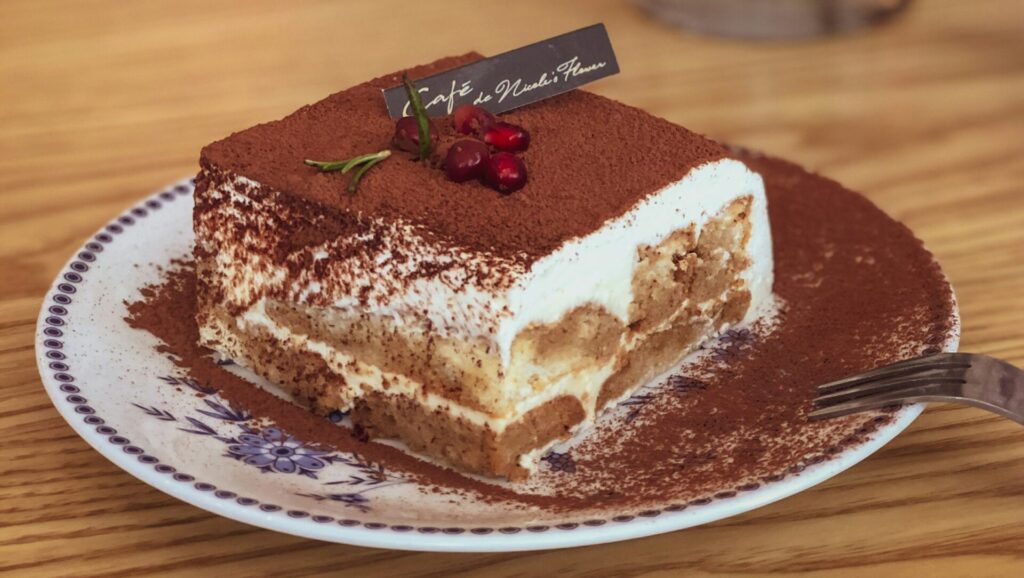
Tiramisu is a classic Italian dessert made with espresso-soaked ladyfingers and a rich mascarpone cream. It’s smooth, lightly sweet, and layered with deep coffee flavor in every bite.
This version keeps things simple and authentic. There’s no baking, no complicated steps, and no hard-to-find ingredients.
Just real flavor and clear instructions that guide you from start to finish.
The cream is silky and airy. The ladyfingers are soft but not soggy. A dusting of cocoa on top brings everything together beautifully.
If you want a dessert that feels impressive but is actually easy to make, this is it. Follow along, take your time, and you’ll have a homemade tiramisu that tastes as if it came straight from Italy.
What Is Tiramisu?
Tiramisu is a classic dessert from Italy, believed to have originated in the Veneto region in the 1960s, and it quickly became one of the country’s most loved sweets because of its simple ingredients and bold flavor.
The name tiramisu means “pick me up” in Italian, which makes perfect sense once you taste it—the espresso gives you a gentle boost, and the creamy layers feel comforting and satisfying at the same time.
At its heart, tiramisu is built from three key components that work together beautifully.
First are ladyfingers, lightly dipped in strong espresso; they should be soaked just enough to absorb flavor without turning mushy, creating a soft yet structured base.
Next comes the mascarpone cream, made from rich mascarpone cheese blended into a smooth, airy filling that adds body and a mild sweetness without overpowering the coffee.
Finally, a generous dusting of unsweetened cocoa powder goes on top, adding a slight bitterness that balances the cream and ties every layer together.
When these elements are layered and chilled, they transform into a dessert that is creamy, flavorful, and perfectly balanced, which is exactly why tiramisu has stood the test of time.
Why You’ll Love This Tiramisu Recipe
No Baking Required
This tiramisu comes together without ever turning on the oven. That means no worrying about overbaking, cracked tops, or uneven textures.
You simply mix, layer, and chill. The refrigerator does the hard work while you relax. It’s a great choice for warm days or when you want a stress-free dessert that still feels special.
Simple Ingredients
Every ingredient in this recipe has a clear purpose. Ladyfingers provide structure, espresso brings bold flavor, mascarpone creates richness, and cocoa adds balance.
There are no complicated techniques or hard-to-find items.
If you can whip cream and dip cookies in coffee, you can make this dessert confidently. Keeping the ingredient list simple also lets each flavor shine.
Make-Ahead Friendly
Tiramisu actually tastes better after resting. The layers need time to set, and the flavors deepen as they chill together. You can prepare it the night before and let it sit in the fridge overnight.
This makes planning easier and removes last-minute pressure. When it’s time to serve, it’s already done.
Perfect for Entertaining
This dessert looks elegant once sliced, with its clean layers and cocoa-dusted top. It feels impressive, yet it’s surprisingly simple to assemble.
You can make it in one large dish for easy serving or prepare individual portions for a polished presentation. Guests recognize tiramisu instantly, and it always feels like a treat.
Balanced Sweetness
This version is creamy and rich without being overly sugary. The espresso and cocoa powder add slight bitterness, which keeps the dessert from tasting heavy.
Each bite feels smooth, light, and flavorful rather than overwhelming.
Even those who don’t love very sweet desserts usually enjoy this one, and that balance is what makes it truly satisfying.
Ingredients You’ll Need
For the Coffee Layer
- 1 ½ cups (360 ml) strong brewed espresso or very strong coffee, cooled completely
- 2 tablespoons coffee liqueur (such as Kahlúa) – optional, but adds depth and warmth
Tip: The coffee must be cool before dipping the ladyfingers to prevent over-soaking.
For the Mascarpone Cream
- 16 oz (450 g) mascarpone cheese, room temperature
- 4 large egg yolks
- Egg-free option: Omit egg yolks and use an additional ½ cup (120 ml) heavy cream, whipped to stiff peaks
- ½ cup (100 g) granulated sugar
- 1 cup (240 ml) heavy cream, cold
- 1 teaspoon pure vanilla extract
Make sure the mascarpone is soft but not warm. This helps create a smooth, lump-free cream.
For Assembly
- 24–30 ladyfingers (Savoiardi biscuits)
- 2 tablespoons unsweetened cocoa powder, for dusting
- ¼ cup (30 g) dark chocolate shavings – optional, for garnish
Ingredient Notes & Substitutions
Can I Use Cream Cheese Instead of Mascarpone?
Mascarpone gives tiramisu its smooth, mild, and slightly sweet flavor. It blends easily and creates a soft, creamy texture without tasting heavy.
If you cannot find mascarpone, you can use full-fat cream cheese as a substitute, but expect a slightly tangier flavor and firmer texture.
To make it closer to mascarpone, let the cream cheese come fully to room temperature and mix it with 2–3 tablespoons of heavy cream until smooth.
This helps loosen it and improves the overall consistency of the filling.
What If I Don’t Have Espresso?
Strong espresso gives tiramisu its signature bold flavor, but regular coffee works well too. Brew it stronger than usual so the flavor doesn’t fade once absorbed by the ladyfingers.
Instant espresso powder dissolved in hot water is another reliable option. Whatever you use, let it cool completely before dipping.
Warm coffee will oversoak the biscuits and make the layers too soft.
Alcohol-Free Option
Coffee liqueur adds depth, but it is not essential. You can simply leave it out and use plain espresso for a fully alcohol-free version.
If you want extra flavor without alcohol, add ½ teaspoon of vanilla extract or a small splash of almond extract to the coffee.
This keeps the dessert rich and aromatic while staying family-friendly.
Eggless Variation
Traditional tiramisu uses egg yolks for richness and structure. If you prefer not to use eggs, you can omit them and increase the whipped heavy cream slightly to maintain volume.
Whip the cream to stiff peaks before gently folding it into the mascarpone and sugar mixture.
The result will still be creamy and stable, just slightly lighter in texture. Chill it well so it sets properly before slicing.
Store-Bought vs Homemade Ladyfingers
Store-bought ladyfingers are convenient and work perfectly for most home bakers. Look for crisp, dry Savoiardi biscuits, not soft cake-style ones.
The crisp texture helps them absorb coffee without collapsing. If you enjoy baking from scratch, homemade ladyfingers offer a fresher flavor and slightly softer bite.
Either option works well, as long as you dip them quickly and avoid soaking them too long.
Step-by-Step Instructions
Step 1: Prepare the Coffee
Start by brewing strong espresso or very strong coffee. You want bold flavor, since the ladyfingers will absorb it quickly.
Once brewed, pour it into a shallow bowl and let it cool completely. This step matters. Warm coffee will make the biscuits too soft and difficult to layer.
If you’re using coffee liqueur, stir it into the cooled espresso now. Taste it. The flavor should be rich and slightly intense, not weak.
Step 2: Make the Mascarpone Cream
In a mixing bowl, whisk the egg yolks and sugar together until the mixture becomes pale and slightly thickened.
This helps create a smooth and stable base. If you are making the eggless version, simply mix the sugar directly with the mascarpone until smooth.
Next, gently fold the mascarpone into the yolk mixture. Do not overmix. Stir just until creamy and fully combined. Overworking it can cause the mixture to loosen.
In a separate bowl, whip the cold heavy cream until stiff peaks form. The cream should hold its shape but still look smooth.
Slowly fold the whipped cream into the mascarpone mixture using gentle, upward motions. Take your time here. This step keeps the filling light and airy instead of dense.
Step 3: Assemble the Layers
Working one at a time, dip each ladyfinger into the cooled coffee for about one second per side. Do not soak them. They should absorb flavor but still feel firm.
Arrange a single layer of dipped ladyfingers tightly across the bottom of your dish. Spread half of the mascarpone cream evenly over the top using a spatula.
Smooth it out gently to create an even layer. Repeat the process with another layer of dipped ladyfingers, then finish with the remaining mascarpone cream.
Level the top carefully so it chills evenly.
Step 4: Chill
Cover the dish tightly and refrigerate for at least 4–6 hours. This resting time allows the layers to set and the flavors to blend together.
If possible, let it chill overnight. The texture improves, and slicing becomes much cleaner.
Step 5: Finish & Serve
Just before serving, dust the top generously with unsweetened cocoa powder. Use a fine sieve for an even layer. If you like, add dark chocolate shavings for extra flavor and a beautiful finish.
Slice with a sharp knife, wiping it clean between cuts for neat portions. Serve chilled, and enjoy the creamy, coffee-soaked layers you’ve just created.
Tips for Perfect Tiramisu
Don’t Oversoak the Ladyfingers
Dip each ladyfinger quickly, about one second per side. They should absorb coffee but still feel slightly firm when you place them in the dish.
If you let them sit too long, they will become soggy and collapse, which leads to a watery base. A quick dip gives you flavor without losing structure. When in doubt, dip less rather than more.
Use Room Temperature Mascarpone
Cold mascarpone can be stiff and harder to mix smoothly. Let it sit at room temperature for about 20–30 minutes before using.
This helps it blend easily with the sugar and egg yolks without forming lumps. Smooth mascarpone means a silky filling, and that texture is what makes tiramisu feel luxurious.
Chill Long Enough for Clean Slices
Tiramisu needs time to set properly. A minimum of 4–6 hours in the fridge allows the cream to firm up and the layers to hold together.
If you try to slice it too soon, it may look messy and soft. The longer it chills, the cleaner your slices will be. Patience here truly pays off.
Use High-Quality Cocoa Powder
Cocoa powder sits right on top, so its flavor stands out. Choose a good-quality unsweetened cocoa for the best result.
It should taste rich and slightly bitter, not flat or dusty. Sift it over the top for an even layer that looks beautiful and balanced.
Let Flavors Develop Overnight
Tiramisu improves with time. As it rests, the coffee softens the ladyfingers just enough, and the cream absorbs the espresso flavor more deeply.
Making it the day before serving often gives the best texture and taste. If you can plan ahead, an overnight chill will give you a dessert that tastes complete and well-balanced.
Common Mistakes to Avoid
Runny Mascarpone Filling
A loose filling usually happens when the mascarpone is overmixed or too warm. Mix just until smooth and combined. Stop as soon as the texture looks creamy and uniform.
If you keep stirring, the mixture can thin out and lose structure. Also, make sure the whipped cream is beaten to stiff peaks before folding it in.
The filling should hold its shape when spread, not slide across the dish.
Soggy Base
Ladyfingers absorb liquid very quickly. If you soak them instead of dipping them briefly, they will become too soft and break apart.
This leads to a heavy, wet bottom layer that does not hold up when sliced. Dip quickly and place them straight into the dish.
They will continue to soften as the tiramisu chills, so there is no need to overdo the coffee.
Overwhipping Cream
Whipped cream gives the filling its light texture. If you underwhip it, the mixture will be too loose. If you overwhip it, the cream can turn grainy and start separating.
Watch closely as you mix. Stop once the cream forms firm peaks that stand upright but still look smooth. This balance keeps the filling stable and airy.
Not Chilling Long Enough
Tiramisu needs time to set. Cutting into it too early will result in messy slices and layers that slide apart. Refrigerate it for at least 4–6 hours, and longer if possible.
The chilling time allows the cream to firm up and the flavors to blend. Giving it enough time ensures a clean slice and a better overall texture.
Variations to Try
Eggless Tiramisu
If you prefer to skip the eggs, you can still enjoy a rich and creamy tiramisu. Replace the egg yolks with extra whipped heavy cream to keep the filling light and stable.
Whip the cream to stiff peaks before folding it into the mascarpone and sugar. Chill it well so it sets properly.
The texture will be slightly lighter, but the flavor remains smooth and satisfying.
Chocolate Tiramisu
For a deeper chocolate flavor, add melted dark chocolate or a few tablespoons of cocoa powder to the mascarpone mixture.
You can also sprinkle mini chocolate chips between the layers for extra texture. Keep the coffee layer, as it enhances the chocolate rather than overpowering it.
The result is richer and more indulgent while still balanced.
Strawberry Tiramisu
This fresh twist replaces the espresso with strawberry puree or lightly sweetened strawberry juice. Layer sliced strawberries between the cream and ladyfingers for added texture.
The flavor becomes lighter and fruit-forward, making it perfect for spring or summer. Chill it well so the fruit juices blend gently into the layers without making them too soft.
Nutella Tiramisu
Spread a thin layer of Nutella over each layer of mascarpone cream for a hazelnut-chocolate version. Keep the coffee dip for contrast, or reduce it slightly if you prefer a milder flavor.
The Nutella adds sweetness and richness, so avoid adding extra sugar. This version feels indulgent but is very easy to assemble.
Individual Tiramisu Cups
Instead of building it in one large dish, layer the ingredients into small glasses or dessert cups. This makes serving simple and keeps portions neat.
It also creates a beautiful layered presentation. Chill the cups just as you would the full-size version. They are perfect for gatherings or dinner parties.
Tiramisu Cheesecake
For a more structured dessert, combine the flavors of tiramisu with a baked or no-bake cheesecake base. Use espresso in the crust or filling, then top with mascarpone cream and cocoa powder.
Chill thoroughly before slicing to maintain clean layers. This version offers the same familiar flavor with a firmer, sliceable texture.
Storage & Make-Ahead Tips
How Long It Lasts in the Fridge
Tiramisu should be stored in the refrigerator at all times. Cover it tightly with plastic wrap or a lid to prevent it from absorbing other fridge odors. It will stay fresh for up to 3 days.
After that, the texture may become too soft and the flavors less balanced. For the best taste and structure, try to enjoy it within the first 48 hours.
Can You Freeze Tiramisu?
Yes, you can freeze tiramisu if needed. Wrap it tightly in plastic wrap and then a layer of foil to protect it from freezer burn. It can be frozen for up to 1 month.
When ready to serve, thaw it overnight in the refrigerator. Keep in mind that the texture may be slightly softer after thawing, but the flavor will still be delicious.
Best Container for Storing
Store tiramisu in the same dish you assembled it in, as long as it has a tight-fitting lid. If not, cover it well with plastic wrap pressed gently against the surface to protect the cocoa topping.
For individual portions, airtight containers work best. Proper sealing helps maintain freshness and prevents the dessert from drying out.
Can It Be Made 1–2 Days Ahead?
Tiramisu is actually better when made ahead. Preparing it 1 day in advance allows the flavors to deepen and the layers to set properly.
You can even make it 2 days ahead for convenience. Just keep it well covered in the fridge and add the cocoa powder dusting right before serving for the freshest look and flavor.
Final Thoughts
Tiramisu may look elegant, but it is surprisingly simple to make. With a few basic ingredients and a little patience, you can create a dessert that feels truly special.
Take your time with the layers and let it chill properly. The result is creamy, balanced, and worth every step. Once you try it, you’ll see how easy it is to make again and again!
FAQs
Can I make tiramisu without alcohol?
Yes. Simply skip the coffee liqueur and use plain espresso. The flavor will still be rich and authentic.
Is it safe to eat raw eggs?
Traditional tiramisu uses raw egg yolks. Use fresh, high-quality eggs or pasteurized eggs for extra safety. You can also make an eggless version if preferred.
Can I use cream cheese instead of mascarpone?
Yes, but the flavor will be slightly tangier and the texture firmer. For a smoother result, mix cream cheese with a little heavy cream before using.
Why is my tiramisu runny?
It may be from overmixing the mascarpone, underwhipping the cream, oversoaking the ladyfingers, or not chilling long enough. Proper technique and enough fridge time help it set.
How long does tiramisu need to chill?
At least 4–6 hours. Overnight chilling gives the best texture and flavor.
How to Make Authentic Tiramisu at Home (Step-by-Step Guide)
Difficulty: Easy9
servings25
minutes8
hours5
minutesA creamy, no-bake Italian dessert made with espresso-soaked ladyfingers, smooth mascarpone filling, and a dusting of cocoa powder.
Ingredients
- Coffee Layer:
1 ½ cups (360 ml) strong brewed espresso, cooled
2 tablespoons coffee liqueur (optional)
- Mascarpone Cream:
16 oz (450 g) mascarpone cheese, room temperature
4 large egg yolks
½ cup (100 g) granulated sugar
1 cup (240 ml) heavy cream, cold
1 teaspoon vanilla extract
- Assembly:
24–30 ladyfingers (Savoiardi)
2 tablespoons unsweetened cocoa powder
¼ cup (30 g) dark chocolate shavings (optional)
Directions
- Prepare Coffee: Combine cooled espresso and liqueur in a shallow bowl.
- Make Cream: Whisk egg yolks and sugar until pale. Fold in mascarpone until smooth. In a separate bowl, whip heavy cream to stiff peaks. Gently fold into the mascarpone mixture with vanilla.
- Assemble: Quickly dip ladyfingers into coffee (about 1 second per side). Arrange a layer in a 9×9-inch dish. Spread half the mascarpone cream on top. Repeat layers.
- Chill: Cover and refrigerate at least 6 hours, preferably overnight.
- Finish: Dust with cocoa powder and add chocolate shavings before serving. Slice and serve chilled.
Notes
- Do not oversoak the ladyfingers.
- Use room temperature mascarpone for a smooth filling.
- For an eggless version, omit egg yolks and increase whipped cream slightly.
- Best enjoyed within 2–3 days.

Hi, I’m Sorenna Blythe, the baker and writer behind Mix Whisk Bake. I share simple, reliable recipes and honest kitchen moments to help home bakers bake with confidence and joy. When I’m not testing new treats, you’ll find me sipping coffee and dreaming up my next bake.


