
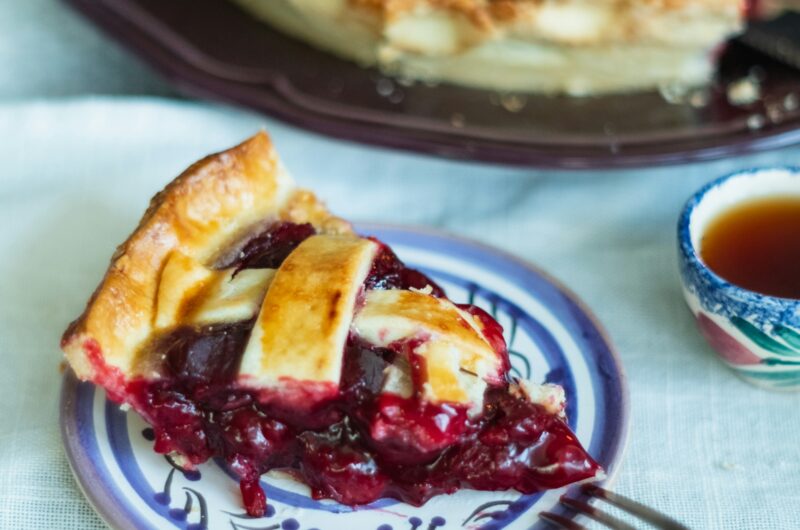
There’s a reason cherry pie never goes out of style. It’s bright, comforting, and packed with that perfect balance of sweet and tangy flavor in every bite.
Sweet cherries give you a rich, candy-like taste. Tart cherries bring a bold, slightly sharp kick.
In this recipe, you’ll learn how to use either one and still get a filling that’s balanced, thick, and full of real cherry flavor.
No runny centers. No soggy crust. Just clear steps, simple ingredients, and a method that works every time.
If you’ve ever felt unsure about baking a pie, this is the recipe that will change that.
Why You’ll Love This Cherry Pie
Buttery, Flaky Crust
A good cherry pie starts with the crust. This one is buttery, tender, and crisp around the edges without being dry or tough.
Cold butter is the key. When it melts in the oven, it creates small pockets of steam that give you those beautiful flaky layers.
You don’t need special tools or complicated steps — just keep your ingredients cold and handle the dough gently.
The result is a crust that holds the filling well and still melts in your mouth with every bite.
Perfect Sweet-Tart Balance
Cherry pie should never taste flat. It needs brightness and depth at the same time.
This recipe carefully balances sugar and lemon juice so the cherries shine. If you’re using sweet cherries, they stay rich but not overly sugary.
If you’re using tart cherries, the sugar softens the sharpness without taking away their bold flavor.
Every slice tastes fresh, vibrant, and naturally fruity — not artificial or overly sweet.
Thick, Glossy Filling (Not Watery!)
No one wants a runny pie that spills everywhere when sliced. This filling sets beautifully.
Cornstarch thickens the juices as the pie bakes, creating a smooth, glossy texture that holds its shape.
Letting the pie cool fully is just as important. That cooling time allows the filling to finish setting properly.
When you cut into it, you’ll get clean slices with juicy cherries in every forkful.
Great for Holidays, Summer, or Weekend Baking
Cherry pie fits any occasion. It looks impressive on a holiday table and feels just right at a summer barbecue.
It’s also simple enough to bake on a quiet weekend when you want something homemade and comforting. Serve it warm with ice cream or at room temperature with coffee.
Once you make it, you’ll see how easily it becomes a go-to recipe you return to again and again.
Ingredients
For the Pie Crust (Double Crust – Top & Bottom)
- 2 ½ cups (315g) all-purpose flour
- 1 teaspoon salt
- 1 tablespoon granulated sugar (optional)
- 1 cup (226g) unsalted butter, cold and cut into cubes
- 6–8 tablespoons ice water
For the Cherry Filling
- 5 cups (750–800g) fresh or frozen cherries, pitted
- ¾–1 cup (150–200g) granulated sugar (adjust depending on the sweetness of the cherries)
- ¼ cup (30g) cornstarch
- 1 tablespoon fresh lemon juice
- 1 teaspoon vanilla extract
- ¼ teaspoon almond extract (optional)
- 1 tablespoon unsalted butter, cut into small pieces
For the Topping
- 1 large egg + 1 tablespoon milk (for egg wash)
- 1 tablespoon coarse sugar (optional, for sprinkling)
Best Cherries to Use
The type of cherries you choose will shape the flavor of your pie, so it helps to know the difference.
Sweet cherries like Bing or Rainier are naturally sugary and mild, which means you may need slightly less sugar in the filling to keep it balanced; they create a rich, dessert-like flavor that many people love.
Tart cherries, such as Montmorency, are brighter and more tangy, giving you that classic bakery-style cherry pie taste with a bold contrast between sweet and sour.
Both work beautifully — it simply depends on whether you prefer a softer sweetness or a sharper kick. Fresh cherries offer the best texture and flavor when they’re in season, but frozen cherries are a reliable option year-round.
Just use them straight from frozen and account for a little extra juice by sticking closely to the thickener amount.
Canned cherry pie filling can be used in a pinch, but it often tastes overly sweet and less fresh, and you lose control over the sugar and texture.
For the best results, use fresh or frozen cherries and season them yourself so the flavor tastes real, balanced, and homemade.
How to Make Cherry Pie (Step-by-Step)
Step 1: Prepare the Pie Dough
Start by mixing the flour, salt, and sugar in a large bowl. Stir them together so everything is evenly combined. This ensures the crust has balanced flavor throughout.
Add the cold, cubed butter. Use a pastry cutter or your fingertips to work it into the flour until the mixture looks like coarse crumbs with small pea-sized pieces of butter still visible.
Those small butter pieces are what create a flaky crust.
Drizzle in the ice water one tablespoon at a time. Gently mix after each addition just until the dough begins to come together.
Stop as soon as it holds when pressed — overmixing can make the crust tough.
Divide the dough into two discs, wrap them tightly, and chill for at least 1 hour.
Chilling relaxes the gluten and firms up the butter, which helps prevent shrinking and keeps the crust tender.
Step 2: Make the Cherry Filling
If using fresh cherries, pit them carefully and check for any stems. If using frozen cherries, keep them frozen until mixing so they don’t release too much liquid too early.
Place the cherries in a large bowl and add the sugar, cornstarch, lemon juice, vanilla extract, and almond extract if using.
Stir gently, but thoroughly, so the cherries are evenly coated. The cornstarch is essential — it thickens the juices as the pie bakes.
Let the mixture rest for about 10–15 minutes. This allows the sugar to draw out some of the cherry juices and helps the filling start to blend together before baking.
Step 3: Assemble the Pie
Roll out one chilled dough disc on a lightly floured surface until it’s about 12 inches wide. Carefully transfer it to your pie dish and press it gently into the corners without stretching the dough.
Pour the cherry filling into the crust, spreading it evenly. Dot the top with small pieces of butter. This adds richness and helps the filling bake smoothly.
Roll out the second dough disc. You can place it whole over the top and cut a few slits for steam, or create a lattice pattern for a classic look.
Either way, make sure there are openings so steam can escape during baking.
Trim any excess dough, then seal the edges by pressing the top and bottom crusts together. Crimp with your fingers or a fork to secure the seal and create a neat finish.
Step 4: Bake to Perfection
Preheat your oven to 400°F (200°C). A properly heated oven helps the crust set quickly and stay flaky.
Place the pie on the middle rack and bake for about 45–55 minutes. If the edges brown too quickly, cover them loosely with foil.
You’ll know the pie is done when the crust is golden brown, and the filling is bubbling thickly through the vents or lattice.
The bubbling is important because it means the cornstarch has activated and the filling has thickened.
Step 5: Cool Before Slicing
Once baked, remove the pie from the oven and place it on a wire rack. This step requires patience.
Cooling allows the filling to finish setting. If you slice too early, the juices may run even if the pie was baked properly.
Let the pie cool for at least 3–4 hours before cutting. The wait makes a big difference. When you finally slice into it, you’ll get clean cuts and perfectly set cherry filling in every piece.
Tips for the Perfect Cherry Pie
Preventing a Soggy Bottom Crust
A soggy crust usually happens when the filling releases too much liquid before the bottom has time to set.
To prevent this, always bake your pie in a fully preheated oven at 400°F (200°C). The initial high heat helps the bottom crust firm up quickly.
You can also place your pie on the lower oven rack for the first 15–20 minutes. This directs more heat to the base.
If you want extra insurance, lightly brush the bottom crust with beaten egg white before adding the filling. It creates a thin barrier that helps keep moisture out.
How to Avoid a Runny Filling
Runny pie filling is almost always caused by not enough thickener or not baking long enough. Measure your cornstarch carefully and avoid reducing it, even if the mixture looks thick before baking.
Make sure the filling is bubbling in the center before removing the pie from the oven. Bubbling activates the cornstarch and ensures it thickens properly. If it isn’t bubbling, it isn’t ready.
Most importantly, let the pie cool completely. Cutting too soon is one of the most common reasons filling spills out.
Preventing Crust from Over-Browning
Cherry pie needs time to bake, and sometimes the crust browns faster than the filling cooks. If you notice the edges turning dark too quickly, loosely cover them with aluminum foil or use a pie shield.
Avoid covering the entire pie tightly, as this can trap steam and affect the texture. A light cover over just the edges is enough to protect the crust while the center finishes baking.
Thickening Tricks
If you’re using very juicy cherries, especially frozen ones, stick to the full amount of cornstarch listed in the recipe. Don’t reduce it. Juicier fruit needs proper structure.
You can also mix one teaspoon of cornstarch with the sugar first before adding it to the cherries. This helps distribute it evenly and prevents clumps.
Finally, trust the process. Proper measurements, full bubbling during baking, and patient cooling will give you a filling that slices cleanly and holds its shape every time.
Variations & Add-Ins
Cherry Almond Pie
Cherry and almond are a natural match. If you enjoy a slightly nutty flavor, increase the almond extract to ½ teaspoon and reduce the vanilla slightly so it doesn’t overpower it.
You can also sprinkle 2–3 tablespoons of finely ground almonds or almond flour over the bottom crust before adding the filling.
This adds subtle richness and helps absorb extra juices. The flavor becomes deeper without changing the texture of the pie.
Cherry Berry Pie
For a softer, more layered fruit flavor, replace 1 cup of cherries with fresh or frozen raspberries, blueberries, or strawberries. Berries add natural sweetness and a bit more color.
Keep the cornstarch amount the same, since mixed berries can release extra juice. Stir gently to avoid crushing delicate fruit.
The result is a bright, slightly more complex filling that still lets the cherries shine.
Crumb Topping Instead of Lattice
If you prefer a crisp, buttery top, skip the second crust and make a simple crumb topping.
Mix ¾ cup flour, ½ cup brown sugar, and ½ teaspoon cinnamon, then cut in 6 tablespoons cold butter until crumbly. Sprinkle it evenly over the filling.
The topping bakes into a golden, crunchy layer that contrasts beautifully with the soft cherries underneath. It’s quicker than weaving a lattice and just as impressive when served.
Mini Cherry Pies
Mini pies are perfect for parties or individual servings. Divide the dough and press it into muffin tins, then fill each with cherry mixture and top with small dough circles or mini lattice strips.
Reduce the baking time to about 25–30 minutes, or until the crust is golden and the filling bubbles. Let them cool fully before removing from the pan.
They’re easier to serve, travel well, and make portion control simple.
Storage & Make-Ahead Tips
Once your cherry pie has cooled completely, you can store it covered at room temperature for up to 2 days, as long as your kitchen isn’t too warm; loosely tent it with foil or plastic wrap to protect the crust while keeping it from getting soggy.
If you prefer longer storage, refrigerate the pie tightly covered for up to 4–5 days, knowing the crust may soften slightly but will still taste great.
For make-ahead baking, you can freeze the fully baked pie after it has cooled by wrapping it well in plastic wrap and foil, then freezing it for up to 3 months; thaw it overnight in the refrigerator before reheating.
You can also freeze the unbaked assembled pie, wrapped tightly, and bake it straight from frozen — just add about 10–15 extra minutes to the baking time and cover the edges if they brown too quickly.
To reheat, warm slices in a 325°F (160°C) oven for 10–15 minutes to bring back that fresh-baked texture; avoid the microwave if possible, as it softens the crust.
What to Serve with Cherry Pie
Cherry pie is delicious on its own, but the right pairing makes it even better.
A scoop of vanilla ice cream is the classic choice because the cold, creamy texture melts into the warm cherries and balances their sweet-tart flavor.
If you prefer something lighter, freshly whipped cream adds softness without overpowering the fruit; lightly sweeten it so it complements rather than competes with the filling.
For a richer option, warm custard poured over a slice creates a smooth, comforting dessert that feels extra special and slightly more indulgent.
And if you’re serving pie in the afternoon or after dinner, a cup of coffee is the perfect match — a medium or dark roast works especially well, as its slight bitterness balances the sweetness of the cherries.
FAQs
Why is my cherry pie runny?
Your pie may be runny if it didn’t bake long enough, didn’t have enough cornstarch, or was sliced before fully cooling.
Make sure the filling bubbles in the center and let it cool for at least 3–4 hours.
Can I use frozen cherries?
Yes, frozen cherries work very well. Use them straight from frozen and keep the same amount of thickener to handle the extra juices.
Do I need to cook the filling first?
No, it’s not necessary. The filling thickens properly in the oven as long as it reaches a full bubble during baking.
How do I keep my bottom crust from getting soggy?
Bake in a fully preheated oven and place the pie on the lower rack for the first part of baking. You can also brush the bottom crust lightly with egg white before adding the filling.
Can I make cherry pie ahead of time?
Yes. Bake it a day in advance and store it covered at room temperature or in the fridge. You can also freeze it baked or unbaked for longer storage.
Cherry Pie Recipe (Easy, Homemade & Perfectly Juicy)
Difficulty: Intermediate8
Slices25
minutes45
minutes2
hours30
minutesA classic homemade cherry pie with a flaky, buttery crust and a thick, perfectly balanced sweet-tart filling that slices cleanly every time.
Ingredients
- For the Crust:
2 ½ cups (315g) all-purpose flour
1 tsp salt
1 tbsp sugar (optional)
1 cup (226g) cold unsalted butter, cubed
6–8 tbsp ice water
- For the Filling:
5 cups (750–800g) cherries, pitted
¾–1 cup (150–200g) sugar
¼ cup (30g) cornstarch
1 tbsp lemon juice
1 tsp vanilla extract
¼ tsp almond extract (optional)
1 tbsp butter, cut into small pieces
- For Topping:
1 egg + 1 tbsp milk (egg wash)
1 tbsp coarse sugar (optional)
Directions
- Mix flour, salt, and sugar. Cut in cold butter until crumbly. Add ice water gradually until the dough forms. Divide, wrap, and chill for 1 hour.
- Mix cherries with sugar, cornstarch, lemon juice, and extracts. Let it sit for 10–15 minutes.
- Roll out the bottom crust and place it in a pie dish. Add filling and dot with butter. Top with the second crust or lattice. Seal edges.
- Brush with egg wash and sprinkle with sugar.
- Bake at 400°F (200°C) for 45–55 minutes, until crust is golden and filling bubbles.
- Cool 3–4 hours before slicing.
Notes
- Make sure the filling bubbles in the center before removing from the oven.
- Always cool completely to prevent a runny pie.
- Cover crust edges with foil if they brown too quickly.
- Frozen cherries can be used straight from frozen.

Hi, I’m Sorenna Blythe, the baker and writer behind Mix Whisk Bake. I share simple, reliable recipes and honest kitchen moments to help home bakers bake with confidence and joy. When I’m not testing new treats, you’ll find me sipping coffee and dreaming up my next bake.


