Brioche looks fancy, but don’t let that fool you. It’s simply a soft, buttery bread that feels like a warm hug in loaf form. Beginners can make it without stress, even if yeast still intimidates you a little.
Think of brioche as the perfect mix between bread and dessert because it’s light, fluffy, and rich enough to make you smile after one bite.
And with clear step-by-step guidance, you won’t get lost along the way.
So roll up your sleeves. You’re about to make a bakery-style brioche right in your own kitchen!
What Is Brioche Bread?
Brioche is a French enriched bread made with a high proportion of butter and eggs, which gives it a richer, almost cake-like base compared with plain yeast breads.
Unlike a lean loaf that relies mostly on flour, water, yeast, and salt, brioche folds in fat and eggs early on, so the crumb becomes tender and soft instead of chewy.
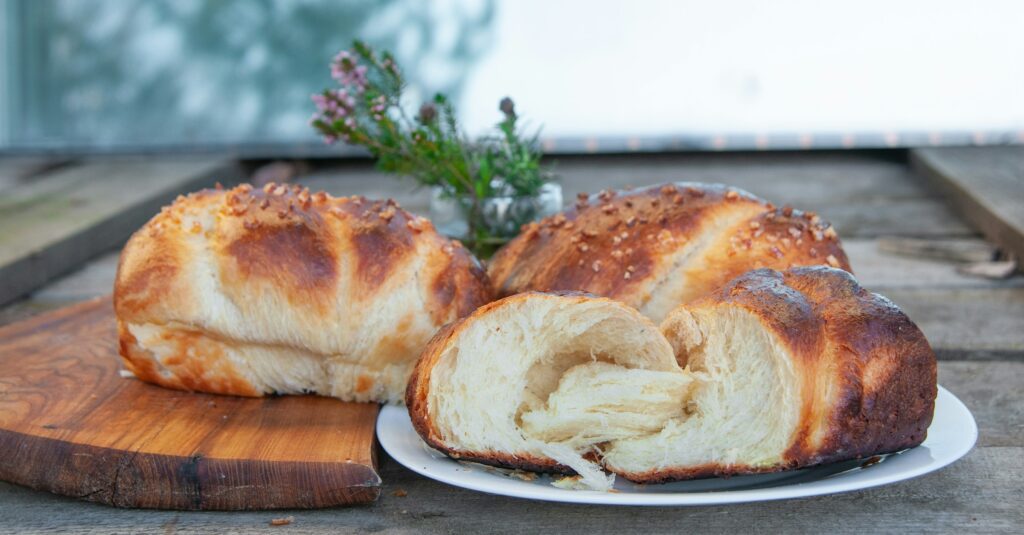
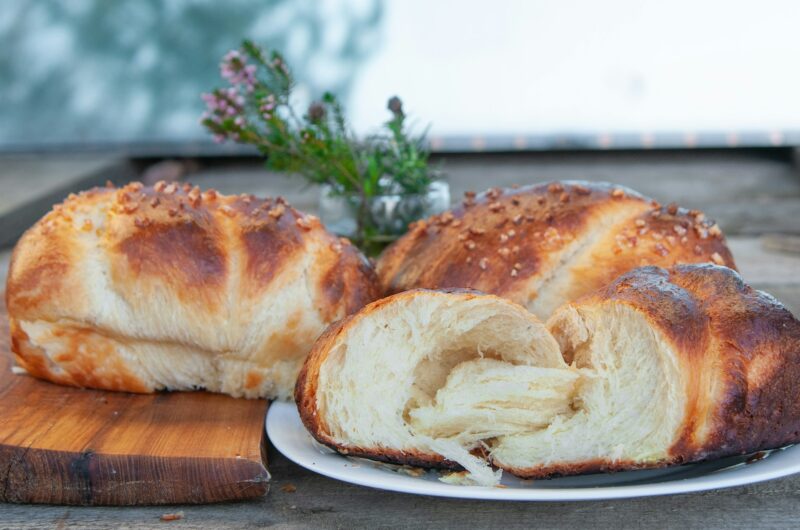
The texture is pillowy and light, with a fine, slightly springy crumb that tears into fluffy ribbons when you pull a slice apart.
Flavor-wise, it’s buttery and subtly sweet, but not cloying—think of it as bread with a velvet lining.
That richness makes brioche a team player in the kitchen: slice it for toast, cradle a fried egg in it for breakfast, swap burger buns for brioche rolls, or use day-old pieces to make decadently soft French toast or bread pudding.
Why You’ll Love This Brioche Recipe
Beginner-friendly method with minimal kneading
You don’t need ninja-level dough skills to make this brioche. The recipe uses a short, gentle knead or a brief spin in a stand mixer, but just enough to bring the dough together and develop gluten.
That means less elbow grease and fewer “why won’t this look like the pictures?” moments.
If your hands are busy or you’re new to yeast, this method is forgiving; the dough will still rise and behave as expected.
Uses simple pantry ingredients
No specialty stores. No rare imports. This brioche calls for flour, eggs, butter, milk, yeast, sugar, and salt, which are things most kitchens already have.
Substitutions are easy when needed (I’ll note the safe swaps later). Keeping the ingredient list straightforward saves time and stress.
It also makes this recipe budget-friendly and perfect for last-minute baking urges.
Works for breakfast, sandwiches, or desserts
Brioche is like a Swiss Army Knife of bread. Slice it for toast and spread with jam in the morning. Use it for a rich sandwich that holds together under juicy fillings.
Turn stale slices into decadent bread pudding or French toast that steals the show. One dough, many uses—so you’re getting culinary mileage from a single bake.
Reliable, consistent results
This recipe is built for repeatability. Clear measurements, predictable proofing cues, and simple shaping steps reduce guesswork.
Follow the steps, and you’ll get the same fluffy, buttery loaf again and again.
Beginners love that: fewer surprises, more slices. If something goes sideways, troubleshooting tips are nearby to get you back on track fast.
Ingredients You’ll Need
- Bread flour or all-purpose flour – Bread flour gives brioche more structure and height, while all-purpose flour creates a slightly softer, more tender loaf. Both work well, so use what you have.
- Butter (room temperature) – Soft butter blends smoothly into the dough, creating that rich, silky crumb. Cold butter won’t mix evenly and can slow everything down.
- Eggs – Eggs enrich the dough, add moisture, and help with that golden color everyone loves. They’re a big part of brioche’s signature softness.
- Milk – Warm milk activates the yeast and makes the dough soft and supple. It also adds a gentle sweetness and helps with browning.
- Yeast (active dry or instant) – Either type works. Active dry needs a quick activation in warm liquid, while instant can go straight into the flour. Both will give you a tall, fluffy rise.
- Sugar – Just enough to feed the yeast and enhance the buttery flavor. It doesn’t make the bread overly sweet, but just balanced.
- Salt – Essential for flavor. Salt rounds everything out and keeps the dough from tasting flat.
Tools & Equipment
- Mixing bowls – You’ll need at least one large bowl for mixing and proofing the dough. A second, smaller bowl helps keep ingredients organized.
- Stand mixer with dough hook (optional) – Not required, but it makes life much easier. Brioche dough is soft and slightly sticky, and a mixer saves your arms while ensuring a smooth, well-kneaded texture.
- Loaf pan – This helps the brioche keep its shape while baking and gives you that classic, tall loaf with a golden top.
- Rolling pin (optional) – Useful if you want to shape your brioche into rolls or braid it neatly, but your hands can do the job just fine.
- Kitchen scale (recommended) – Brioche is more predictable when ingredients are weighed. A scale keeps measurements accurate and leads to consistent, bakery-style results.
Step-By-Step Instructions (Overview)
1. Activate yeast (if needed)
If you’re using active dry yeast, warm the milk to about 38–43°C (warm to the touch, not hot) and stir in the yeast with a pinch of sugar. Let it sit for 5–10 minutes until it becomes foamy.
That bloom is your yeast saying, “I’m awake.” Instant yeast can skip this and go straight into the dry ingredients.
2. Mix dry ingredients
Whisk together your flour, sugar, and salt in a large bowl so everything is evenly distributed.
This helps the yeast and salt not fight each other and gives a uniform crumb. Think of this as building the dough’s skeleton.
3. Add wet ingredients
Add the eggs and the foamy yeast mixture (or milk if using instant yeast) to the dry mix and stir until combined.
The dough will be shaggy at first; that’s normal. Add room-temperature butter a little at a time once the dough has come together.
4. Knead or mix until smooth
Knead by hand for 8–12 minutes or use a stand mixer on low for 6–8 minutes, until the dough is elastic and slightly tacky but not sticky.
You’re aiming for a silky, springy texture, as the dough should stretch without tearing easily. This is where the gluten forms and the magic happens.
5. First rise
Place the dough in a lightly greased bowl, cover, and let it rise in a warm spot until doubled in size — usually 1–2 hours depending on room temperature.
A slow, patient rise develops flavor; rushed dough is like a one-note song. If your kitchen is cool, give it time or proof in a slightly warmed oven.
6. Shape the dough
Gently deflate the dough and shape it for a loaf, braid, or rolls. Handle it with care; you want to keep as much air in the dough as possible.
Use a loaf pan for a classic shape or divide into balls for individual brioche buns.
7. Second rise
Place the shaped dough in its pan or tray, cover, and let it rise again until puffy and nearly doubled — usually 45–90 minutes.
The second rise sets the final shape and gives that tender crumb. It should feel light and airy when you press it gently.
8. Bake until golden
Brush the top with an egg wash for a glossy, deep-golden crust and bake at the recommended temperature until the loaf is deeply browned and sounds hollow when tapped.
Use a thermometer if you want to be precise because an internal temperature around 90–95°C (195–205°F) means done. Avoid underbaking; a soggy center is nobody’s friend.
9. Cool before slicing
Let the brioche cool in the pan for a few minutes, then transfer to a rack to cool completely before slicing.
Cutting too soon will gum up the crumb and steal the texture. Patience here rewards you with perfect slices.
Helpful Tips for Success
Working with sticky dough
Don’t panic, brioche dough will feel stickier than regular bread. Lightly flour your work surface and fingertips, but use flour sparingly; too much turns the dough dry and dense.
Keep a bench scraper handy to lift and fold the dough instead of digging at it with floured hands.
If the dough is unmanageably sticky, rest it for 10–15 minutes; the flour will hydrate, and the dough will become easier to handle.
You can also lightly oil your hands and the bowl because oil lets you shape without stealing moisture.
How to know when kneading is enough
Kneading isn’t about brute force; it’s about feel. Stop when the dough is smooth, elastic, and springs back when you poke it.
Try the windowpane test: stretch a small bit thin—if it forms a translucent sheet without tearing, the gluten’s developed enough.
If it snaps back aggressively or tears, keep kneading for a few more minutes.
Remember: slightly tacky is better than sticky goo.
Importance of room temperature butter
Butter that’s too cold won’t blend and will leave lumps. Butter that’s melted will ruin the dough’s structure.
Aim for room temperature — soft but still holding shape. Cut it into small cubes so it folds in smoothly and evenly.
Avoiding over-proofing
Too much proofing steals structure and leaves a collapsed loaf. Look for a rise that’s roughly doubled, not tripled.
Use the gentle poke test: press your finger into the dough. If the indentation springs back slowly and leaves a slight mark, it’s ready; if it never bounces back, it’s over-proofed.
To slow things down, proof in the fridge overnight; a cool proof builds flavor and buys you time.
How to get that signature golden crust
Egg wash is your best friend — a beaten egg or egg yolk brushed on top gives deep color and shine. Add a splash of milk or water to thin the wash so it spreads evenly.
Apply once before baking; for extra gloss, brush lightly again halfway through baking. Bake on the middle rack in a fully preheated oven and rotate the pan if your oven runs hot on one side.
If the top browns too fast, tent with foil for the final minutes. The goal is rich, even color without burnt spots.
Brioche Variations
Chocolate chip brioche
Fold chocolate chips into the dough after the first rise so they stay evenly distributed and don’t sink to the bottom.
Use smaller chips or chopped chocolate (about a handful to a cup, depending on how chocolatey you want it) so every bite has a hit of cocoa.
Chill the chips briefly if your dough is warm, because that helps them hold shape in the oven.
Bake slightly longer if the loaf feels very dense from add-ins, and let it cool well so the chocolate sets just right.
Cinnamon swirl brioche
Roll the dough out into a rectangle, spread a thin layer of softened butter, then sprinkle a cinnamon-sugar mix before rolling into a log.
This creates pretty, defined swirls and keeps the cinnamon from clumping. Use moderate pressure when rolling so the layers stay light and airy.
For an extra touch, drizzle a thin sugar glaze after baking or sprinkle coarse sugar on top before the oven for sparkle and crunch.
Brioche rolls
Divide the dough into equal pieces and shape into tight balls for soft, pillowy rolls.
Give them a snug second rise in a greased pan, so they bloom and touch each other because that’s how you get soft sides and fluffy tops. Brush with egg wash before baking for shine.
These are perfect for sliders, dinner sides, or making ahead and freezing for quick use.
Brioche buns
Shape slightly larger rounds for burger-worthy buns and press a gentle dimple in the center so toppings sit nicely.
Let them proof until puffy but not overblown; you want structure to hold a juicy filling. Sesame or poppy seeds can be sprinkled on top after egg wash for classic bakery vibes.
Toast lightly before assembly for extra flavor and to prevent sogginess under wet toppings.
Savory brioche options
Fold in grated cheese, chopped herbs, or softened caramelized onions for a savory take that plays well with soups and sandwiches.
Keep add-ins dry or well-drained so they don’t make the dough soggy. Balance salty ingredients by reducing added salt slightly in the dough.
These make excellent bases for breakfast strata, fancy grilled cheese, or as a standout side with a bowl of chili.
Serving Suggestions
Toast with butter and jam
Slice the brioche thick and toast it lightly so the edges crisp while the center stays soft.
Spread with butter that melts on contact, then finish with your favorite jam. The richness of the bread makes even a simple spread taste fancy, like breakfast at a cozy café.
French toast
Brioche is a superstar for French toast because it soaks up custard without falling apart. Dip each slice briefly, but don’t drown it, then cook until golden on both sides.
The result is fluffy, custardy, and just sweet enough. Add berries, syrup, or a dusting of powdered sugar for the full “weekend brunch” moment.
Brioche bread pudding
If your brioche is a day old, don’t worry, because you’re sitting on bread pudding gold. Tear it into chunks, pour over a creamy custard, and bake until the top is crisp and the inside is silky.
The buttery crumb transforms into a dessert that tastes far more complicated than it is.
Sandwiches
Use brioche for sandwiches when you want something soft but sturdy. It pairs beautifully with savory fillings like grilled chicken, ham, or eggs.
For a sweeter spin, try Nutella, peanut butter, or fresh fruit. Brioche adds that little “wow, this tastes expensive” touch to even the simplest combination.
Storage Instructions
Store brioche like you’d pamper a golden sweater: cool it completely, then wrap tightly in plastic wrap or place in an airtight container to keep air and drafts away — at room temperature, it stays fresh for about 1–2 days (any longer and the butter-rich crumb starts to dry out or go stale).
If you need longer storage, slice or portion the loaf, wrap each piece snugly in plastic, then seal in a freezer bag or wrap in foil and freeze; frozen brioche keeps well for up to 2–3 months and is way better than a sad, stale loaf.
To thaw, move wrapped portions to the fridge overnight or set them on the counter for a few hours until soft; don’t unwrap while still cold, or moisture will escape and make the crumb gummy.
To rewarm and revive that fresh-from-the-bakery feel, use the oven or toaster: for a whole or large portion, bake wrapped in foil at 160°C (320°F) for 15–25 minutes from frozen (or 8–12 minutes if thawed) until warmed through; for slices, pop them in a toaster or a hot skillet for a minute or two until edges are crisp and the center is warm.
Avoid long microwaving because, yes, it’s a quick fix, but turns brioche rubbery and if the top needs shine, a quick brush of butter after warming will bring it back to life.
Final Words
Brioche might look fancy, but now you know it’s totally doable, even if you’re just starting out.
One loaf gives you breakfast, dessert, and everything in between, so every minute spent making it is time well invested.
Give it a try, trust the process, and enjoy that first warm slice because it’s a small victory that feels big!
FAQs
Can I use all-purpose flour?
Yes, absolutely. All-purpose flour makes the brioche a bit softer and slightly less structured, but it still bakes into a beautiful, fluffy loaf. If that’s what you have, use it confidently.
Can I make brioche without a stand mixer?
You can. It’ll just take a little more elbow grease. Knead by hand until the dough becomes smooth, stretchy, and slightly tacky. It may feel sticky at first, but it will strengthen with patience.
Why did my dough turn too sticky?
Brioche dough naturally leans sticky because of the butter and eggs. But if it’s too sticky, your butter may have been too soft, or the dough may need a bit more kneading.
Let it rest for 10–15 minutes because this often fixes the issue. Add flour only as a last resort and in very small amounts.
How do I fix under-proofed or over-proofed brioche?
Under-proofed dough feels tight and bakes up dense. If you catch it early, just give it more time to rise.
Over-proofed dough looks deflated and overly soft; punch it down gently, reshape, and let it rise again. It won’t be perfect, but it’ll still taste great.
Can I let the dough rise overnight?
Yes, and it actually boosts flavor. Place the dough in the fridge during the first rise, cover it well, and let it chill overnight. This slows the yeast and makes the dough easier to handle the next day.
Easy Brioche Bread Recipe for Beginners
Difficulty: Easy1
loaf20
minutes30
minutes3
hoursA soft, buttery, beginner-friendly brioche loaf made with simple ingredients and minimal kneading. Perfect for breakfast, desserts, or sandwiches.
Ingredients
3 cups (360g) bread flour or all-purpose flour
¼ cup (50g) sugar
1 tsp salt
2 ¼ tsp (1 packet) active dry or instant yeast
½ cup (120ml) warm milk
3 large eggs (room temperature)
½ cup (115g) unsalted butter, softened
1 egg (for egg wash)
Directions
- Activate yeast (if using active dry): Mix warm milk and yeast; let sit 5–10 minutes until foamy. If using instant yeast, skip this step.
- Combine dry ingredients: Mix flour, sugar, and salt in a large bowl.
- Add wet ingredients: Add eggs and yeast mixture (or warm milk for instant yeast). Stir until a shaggy dough forms.
- Add butter: Mix in softened butter a little at a time until fully incorporated.
- Knead: Knead by hand for 8–12 minutes or in a mixer for 6–8 minutes until smooth and elastic.
- First rise: Place dough in a greased bowl, cover, and let rise 1–2 hours or until doubled.
- Shape: Gently deflate the dough and shape it into a loaf. Place in a greased loaf pan.
- Second rise: Cover and let rise 45–90 minutes until puffy.
- Bake: Brush with egg wash and bake at 180°C (350°F) for 25–30 minutes until golden brown.
- Cool: Let cool completely before slicing.
Notes
- Dough will be slightly sticky, so avoid adding too much flour.
- For a deeper flavor, let the dough rise overnight in the fridge.
- Tent with foil during baking if the top browns too quickly.
- Use leftovers for French toast, bread pudding, or sandwiches.

Hi, I’m Sorenna Blythe, the baker and writer behind Mix Whisk Bake. I share simple, reliable recipes and honest kitchen moments to help home bakers bake with confidence and joy. When I’m not testing new treats, you’ll find me sipping coffee and dreaming up my next bake.


