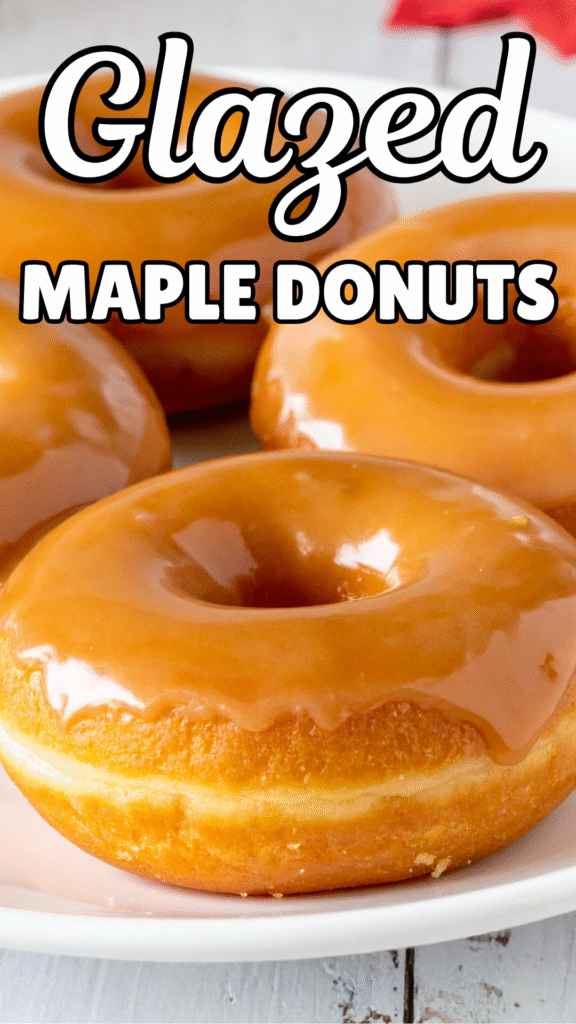
There’s nothing better than warm, fluffy donuts coated in a smooth maple glaze. That first bite is soft and tender, with a rich maple flavor that tastes cozy and just sweet enough.
The best part? You don’t need a bakery to enjoy them. This recipe is simple, reliable, and made with basic ingredients you likely already have at home. I’ll guide you step by step so you can get that perfect texture every time.
You can bake them for an easy, lighter option or fry them for a classic golden finish. Either way, you’ll end up with bakery-style glazed maple donuts made right in your own kitchen.
Why You’ll Love These Glazed Maple Donuts
Soft and Fluffy Texture
Texture makes or breaks a donut. These come out light, tender, and soft with every bite. The inside stays moist while the outside holds that smooth maple glaze beautifully.
The batter is mixed just enough to keep the crumb delicate, not dense. Follow the steps carefully, and you’ll get donuts that feel bakery-quality without being heavy or greasy.
Real Maple Flavor
The maple flavor is warm, slightly caramel-like, and naturally sweet. Using pure maple syrup gives the donuts a deeper taste that artificial syrups simply can’t match.
You’ll taste maple in both the donut and the glaze, which creates a balanced flavor in every bite. It’s sweet, but not overwhelming. Just rich enough to feel special.
Simple Pantry Ingredients
You don’t need anything complicated for this recipe. Most of the ingredients are likely already in your kitchen—flour, sugar, eggs, milk, butter, and maple syrup.
There’s no need for special equipment beyond basic baking tools. The steps are straightforward and easy to follow, even if you’re new to making donuts at home.
Perfect for Breakfast, Brunch, or Coffee Pairing
These donuts fit almost any occasion. Serve them warm for a cozy breakfast, add them to a brunch spread, or enjoy one with your afternoon coffee.
The maple glaze pairs especially well with coffee because it balances bitterness with gentle sweetness. It’s a simple treat that feels thoughtful and homemade.
Easy to Customize
Once you master the base recipe, you can easily make it your own. Sprinkle chopped pecans on top for crunch. Add crispy bacon bits for a sweet and salty twist.
You can even drizzle melted chocolate over the glaze for something extra indulgent. Small additions can completely change the flavor, giving you options without complicating the process.
What Do Glazed Maple Donuts Taste Like?
Glazed maple donuts have a warm, caramel-like maple flavor that feels comforting from the first bite, with a natural sweetness that tastes rich rather than artificial.
The maple notes are slightly buttery and deep, almost like brown sugar, which gives the donut a cozy, homemade feel.
Inside, the crumb is light and tender, soft enough to melt in your mouth but structured enough to hold its shape without feeling dry or heavy.
Each bite feels airy, not doughy, which makes them easy to enjoy without feeling overwhelmed.
On the outside, the glaze is smooth and glossy, gently setting over the warm donut to create a thin, delicate layer that adds just the right touch of sweetness.
It doesn’t crack harshly or feel sticky; instead, it blends into the surface and enhances every bite. Most importantly, these donuts are not overly sweet.
The maple flavor leads, the sugar supports, and everything stays balanced.
The result is a donut that feels indulgent but not overpowering—sweet, soft, and cozy in a way that keeps you reaching for just one more.
Ingredients You’ll Need
For the Donuts
- 2 cups (250g) all-purpose flour
- ¾ cup (150g) granulated sugar
- 2 teaspoons baking powder
- ½ teaspoon salt
- 2 large eggs (room temperature)
- ¾ cup (180ml) milk
- ¼ cup (60g) unsalted butter, melted and slightly cooled
- ¼ cup (60ml) pure maple syrup
- 1 teaspoon vanilla extract
For the Maple Glaze
- 1½ cups (180g) powdered sugar
- 3 tablespoons pure maple syrup
- 2–3 tablespoons milk or cream (adjust for thickness)
- Pinch of salt
Equipment Needed
- Mixing bowls – Use one large bowl for dry ingredients and another for wet ingredients. This keeps the batter smooth and prevents overmixing.
- Whisk – A simple whisk helps combine ingredients evenly and removes lumps without overworking the batter.
- Donut pan (for baked) or heavy pot + thermometer (for fried) –
- Use a nonstick donut pan if baking for an easy, lighter option.
- If frying, choose a heavy pot to maintain steady heat and a thermometer to keep the oil at the right temperature (around 175–180°C / 350–360°F). Consistent heat prevents greasy donuts.
- Cooling rack – Allows air to circulate under the donuts so they don’t become soggy while cooling. This step helps the glaze set properly.
- Piping bag (optional) – Makes it easier to fill the donut pan neatly and evenly. You can also use a zip-top bag with the corner snipped off.
How to Make Glazed Maple Donuts (Step-by-Step)
1. Prepare the Batter or Dough
Start by preheating your oven to 175°C (350°F) if baking, or begin heating your oil if frying.
In one bowl, whisk together the flour, sugar, baking powder, and salt so everything is evenly distributed. In a separate bowl, whisk the eggs, milk, melted butter, maple syrup, and vanilla until smooth.
Pour the wet ingredients into the dry ingredients. Gently mix until just combined. Stop as soon as you no longer see dry flour.
Overmixing can make the donuts dense instead of soft, so keep it light and simple.
2. Fill the Donut Pan / Shape and Fry Donuts
If baking, lightly grease your donut pan. Spoon or pipe the batter into each cavity, filling them about ¾ full to allow room for rising. Smooth the tops slightly if needed.
If frying, turn the dough onto a lightly floured surface and gently roll it out to about 1–1.5 cm thick. Cut out donut shapes using a donut cutter or two round cutters.
Carefully lower the donuts into oil heated to 175–180°C (350–360°F). Avoid overcrowding the pot, as this lowers the oil temperature and affects texture.
3. Bake or Fry Until Golden
For baked donuts, bake for 10–12 minutes, or until the tops spring back lightly when touched. They should look set and lightly golden around the edges.
For fried donuts, cook for about 1–2 minutes per side. Flip once the underside turns golden brown. Remove them with a slotted spoon and place them on paper towels briefly to absorb excess oil.
4. Cool Slightly
Transfer the donuts to a cooling rack. Let them rest for about 5–10 minutes. They should still be slightly warm when you glaze them, but not hot.
If they are too hot, the glaze will melt and slide off instead of setting properly.
5. Make the Maple Glaze
In a medium bowl, whisk together the powdered sugar, maple syrup, and two tablespoons of milk or cream. Stir until smooth and glossy.
If the glaze feels too thick, add a small splash of milk. If it’s too thin, add a little more powdered sugar.
The glaze should be thick enough to coat the donut but thin enough to drip slightly.
6. Dip and Let Set
Dip the top of each donut into the glaze. Lift it up and let the excess drip back into the bowl. Place the donut back on the cooling rack, glaze side up.
Allow the glaze to set for about 10–15 minutes. As it rests, it will form a smooth, slightly firm finish. Once set, your glazed maple donuts are ready to serve and enjoy.
Tips for Perfect Maple Donuts
Use Pure Maple Syrup (Not Pancake Syrup)
Pure maple syrup makes a real difference in flavor. It has a deep, natural sweetness with light caramel notes that artificial pancake syrup cannot match.
Pancake syrup is often made with corn syrup and flavoring, which can taste overly sweet and flat.
If you want that warm, rich maple taste to come through clearly, always choose 100% pure maple syrup. It gives the donuts a more balanced and authentic flavor.
Don’t Overmix the Batter
Once you combine the wet and dry ingredients, mix just until everything comes together. The batter does not need to be perfectly smooth.
A few small lumps are completely fine. Overmixing develops too much gluten, which can make the donuts dense and tough instead of soft and fluffy.
Stir gently and stop early. This simple step keeps the texture light and tender.
Let Donuts Cool Slightly Before Glazing
It’s tempting to glaze the donuts right away, but timing matters. If they are too hot, the glaze will melt and slide off instead of forming a smooth coating.
Let them cool for about 5 to 10 minutes on a rack. They should still feel warm, just not steaming. This helps the glaze stick properly and set with a clean, glossy finish.
Adjust Glaze Thickness as Needed
The perfect glaze should coat the donut without running off completely. If it feels too thick and doesn’t spread smoothly, add a small splash of milk.
If it looks too thin and watery, mix in a little more powdered sugar. Make small adjustments and stir well after each one.
A properly balanced glaze creates that classic bakery-style look and texture.
Variations & Add-Ins
Maple Bacon Donuts
If you love sweet and salty together, this variation is a must-try. Cook the bacon until crispy, then let it cool completely before chopping it into small pieces.
After glazing the donuts, sprinkle the bacon on top while the glaze is still wet so it sticks properly.
The smoky saltiness balances the sweetness of the maple glaze and adds a satisfying crunch. Use just enough bacon to enhance the flavor without overpowering the donut.
This version feels bold but still balanced.
Chopped Pecan Topping
For a simple crunch, add finely chopped pecans over the fresh glaze. Toast the pecans lightly in a dry pan for a few minutes to bring out their natural flavor. Let them cool before using.
The nuts add texture and a subtle buttery taste that pairs beautifully with maple. Sprinkle them evenly so each bite has a little crunch. This option keeps the donut classic while adding depth.
Cinnamon Maple Glaze
To add warmth, mix ½ teaspoon of ground cinnamon into the maple glaze. Stir well so the spice blends smoothly without clumps.
Cinnamon enhances the maple flavor and gives the donuts a cozy, slightly spiced finish.
It’s a small change, but it makes the flavor feel richer and perfect for cooler days. Adjust the cinnamon to your taste, but start light and build gradually.
Chocolate Drizzle
For a more indulgent touch, melt a small amount of chocolate and drizzle it over the set maple glaze. Use a spoon or piping bag for thin, even lines.
The chocolate adds contrast and a mild bitterness that balances the sweetness. Let the drizzle set fully before stacking or storing the donuts.
This variation is simple, but it makes the donuts look and taste extra special.
Storage & Make-Ahead Tips
Glazed maple donuts are best enjoyed the same day you make them because that’s when the texture is softest, and the glaze is perfectly set, but you can still store them properly to keep them fresh.
Place completely cooled donuts in an airtight container and keep them at room temperature for up to two days; avoid refrigerating them, as the fridge can dry them out and make the glaze sticky.
If you want to make them ahead, freeze the donuts without the glaze for best results.
Let them cool fully, then place them in a single layer in a freezer-safe container or bag, separating layers with parchment paper to prevent sticking.
Freeze for up to two months. When ready to enjoy, thaw them at room temperature and warm slightly before glazing.
To reheat, microwave a donut for about 8–12 seconds to soften it gently, or warm it in a low oven (around 150°C / 300°F) for a few minutes.
Heat just until soft, not hot, so the texture stays tender. Glaze after reheating if possible, or refresh the top with a light drizzle to bring back that fresh-made feel.
Final Thoughts
These glazed maple donuts are simple to make and truly worth the effort.
Follow the steps, take your time, and you’ll have soft, bakery-style donuts right at home.
Enjoy them warm with a cup of coffee or a homemade latte for the perfect pairing.
If you try this recipe, share your results and let me know how it turned out. I’d love to hear your favorite variation.
FAQs
Can I use pancake syrup instead of pure maple syrup?
You can, but the flavor won’t be as rich or natural. Pure maple syrup gives a deeper, more balanced taste.
Can I make these dairy-free?
Yes. Use plant-based milk and dairy-free butter. The texture will stay soft if measurements remain the same.
Can I fry instead of bake?
Yes. Fry at 175–180°C (350–360°F) for about 1–2 minutes per side until golden brown.
Why is my glaze too thin or too thick?
If it’s too thin, add more powdered sugar. If it’s too thick, add a small splash of milk and stir well.
How do I keep donuts soft?
Store them in an airtight container at room temperature and avoid refrigerating. Warm slightly before serving to refresh the texture.
Glazed Maple Donuts (Soft, Fluffy & Bakery-Style!)
Difficulty: Easy10
Donuts15
minutes10
minutes30
minutesSoft and fluffy glazed maple donuts made with real maple syrup. Bake or fry for a bakery-style treat at home.
Ingredients
- For the Donuts
2 cups (250g) all-purpose flour
¾ cup (150g) granulated sugar
2 teaspoons baking powder
½ teaspoon salt
2 large eggs
¾ cup (180ml) milk
¼ cup (60g) unsalted butter, melted
¼ cup (60ml) pure maple syrup
1 teaspoon vanilla extract
- For the Maple Glaze
1½ cups (180g) powdered sugar
3 tablespoons pure maple syrup
2–3 tablespoons milk or cream
Pinch of salt
Directions
- Preheat oven to 175°C (350°F) and grease a donut pan (or heat oil to 175–180°C / 350–360°F for frying).
- Whisk flour, sugar, baking powder, and salt in a bowl.
- In another bowl, whisk eggs, milk, melted butter, maple syrup, and vanilla.
- Combine wet and dry ingredients. Mix just until combined.
- Fill donut pan ¾ full and bake 10–12 minutes, or fry 1–2 minutes per side until golden.
- Cool for 5–10 minutes on a rack.
- Whisk glaze ingredients until smooth.
- Dip warm donuts into glaze and let set 10–15 minutes before serving.
Notes
- Use pure maple syrup for the best flavor.
- Do not overmix the batter to keep the donuts soft.
- Adjust glaze thickness with small amounts of milk or powdered sugar.
- Best enjoyed fresh, but can be stored in an airtight container for up to 2 days.

Hi, I’m Sorenna Blythe, the baker and writer behind Mix Whisk Bake. I share simple, reliable recipes and honest kitchen moments to help home bakers bake with confidence and joy. When I’m not testing new treats, you’ll find me sipping coffee and dreaming up my next bake.


