Cheesecake has a way of stealing the spotlight at any gathering. It’s rich, creamy, and just the right kind of indulgent. But baking one at home?
That can feel like walking a culinary tightrope, especially when cracks and soggy crusts lurk around every corner.
The good news? It’s easier than you think. With the right steps, you can make a smooth, bakery-style cheesecake that slices like a dream and tastes even better.
This guide will walk you through every stage—no guesswork, no stress. Just you, your kitchen, and a cheesecake you’ll be proud to show off.
Ingredients Breakdown
- Cream Cheese (Full-Fat Preferred)
Go for full-fat cream cheese blocks—not the spreadable tubs. It gives the cheesecake its rich, dense texture. Light versions can lead to a thinner, less creamy result. - Granulated Sugar
Sweetens the batter and helps create a silky texture. Stick to regular white sugar for the best consistency because brown sugar adds moisture and may alter the flavor. - Eggs
These bind the batter and help it set. Add them one at a time and mix gently to avoid incorporating too much air, which can cause cracks. - Sour Cream or Heavy Cream
Sour cream adds a slight tang and smooth finish. Heavy cream makes it richer and fluffier. You can choose based on your texture preference or even mix both. - Vanilla Extract
A must-have for depth of flavor. Use pure vanilla extract if possible for a warm, aromatic base that complements the creamy filling. - Optional: Lemon Juice or Zest
Just a splash or a pinch brightens the flavor and balances out the richness without making it taste like lemon cheesecake. - Room Temperature Ingredients
Bring everything, especially cream cheese, eggs, and sour cream, to room temp before mixing. Cold ingredients don’t blend well and can cause lumps in your batter. - Use Fresh, High-Quality Products
Since cheesecake has so few ingredients, quality matters. Fresh eggs, real vanilla, and good cream cheese can make all the difference.
Equipment Checklist
- Springform Pan
This is non-negotiable. It has removable sides, making it easy to release the cheesecake without damaging the crust or top. A 9-inch pan is the standard size. - Roasting Pan or Deep Baking Dish
Used for the water bath (bain-marie), which surrounds the cheesecake with gentle heat. This helps prevent cracking and ensures even baking. - Hand Mixer or Stand Mixer
Essential for beating the cream cheese until smooth. A stand mixer makes the process easier, but a hand mixer works just as well—just take your time. - Mixing Bowls
You’ll need at least two: one large for the batter and another for the crust. Choose bowls with enough room to mix thoroughly without splashing. - Measuring Cups and Spoons
Accuracy matters in cheesecake baking. Use dry measuring cups for solids, liquid measuring cups for wet ingredients, and proper spoons for small amounts like vanilla. - Parchment Paper & Foil
Parchment can help with lining the bottom of the pan. Heavy-duty foil is key for wrapping the springform pan tightly to prevent water from seeping in during the water bath.
Preparing the Crust
A great cheesecake starts with a solid foundation, literally. The crust is more than just a base; it’s the textural contrast that sets the stage for the creamy filling.
Choose Your Crust Style
- Graham Cracker: The traditional go-to. Buttery, slightly sweet, and just crumbly enough to hold up.
- Oreo Crust: For chocolate lovers, this adds a rich, dessert-on-dessert feel. No need to scrape the filling, leave it in!
- Digestive Biscuits: Popular in the UK, they’re mildly sweet with a hearty bite, which is perfect for cheesecakes that aren’t overly sugary.
- Others: Gingersnaps, vanilla wafers, or even pretzels if you’re feeling salty-sweet. The key is using something dry and crisp.
Step 1: Make the Crumbs
Start with about 1½ cups of crushed cookies or crackers. You can pulse them in a food processor or use a zip-top bag and rolling pin.
Aim for fine, sandy crumbs—not chunky, not powdery. Think “wet beach sand.”
Step 2: Mix in Butter and Sugar
In a bowl, combine:
- 1½ cups crumbs
- ¼ cup granulated sugar (optional, skip if your cookies are already sweet)
- 5–6 tablespoons melted unsalted butter
Mix until the texture resembles damp sand. The butter acts like glue, binding everything together so it holds its shape once baked and cooled.
Step 3: Press into the Pan
Pour the crumb mixture into your greased springform pan. Use the bottom of a flat measuring cup or glass to press it down evenly.
Start with the bottom, then gently nudge some crumbs up the sides; about an inch high is perfect. Don’t pack it too tightly, or it can turn rock-solid after baking.
Step 4: Bake (If Needed)
- For baked cheesecakes: Pre-bake the crust at 350°F (175°C) for 8–10 minutes. This helps set the crust so it stays firm under the batter.
- For no-bake versions: Skip the oven and chill the crust in the fridge for at least 30 minutes to help it firm up before filling.
Let the crust cool completely before adding the batter. A warm crust plus cold filling can mess with the bake and lead to uneven textures.
Making the Cheesecake Batter
This is where the magic happens. The batter is the heart and soul of your cheesecake—smooth, creamy, and perfectly balanced between rich and light.
Get this part right, and you’re already 90% of the way to that dream-worthy dessert.
Step 1: Beat the Cream Cheese Until Smooth
Start with room-temperature cream cheese. If it’s too cold, you’ll end up with lumps that no amount of mixing can fix.
Beat the cream cheese on medium speed until it’s completely smooth and fluffy—usually about 2–3 minutes. Scrape down the sides often.
Think of this step as building the foundation for your cheesecake’s signature velvety texture.
Step 2: Add Sugar and Vanilla
Once the cream cheese looks soft and silky, add the granulated sugar and vanilla extract. Mix just until combined.
Sugar not only sweetens but also helps break down the cream cheese, making the batter even smoother.
Vanilla, on the other hand, adds that warm, familiar bakery aroma that makes your kitchen smell like heaven.
Step 3: Add Eggs One at a Time
Crack the eggs one by one, mixing on low after each addition. Stop as soon as each egg disappears into the batter.
This is not the time to overachieve because overmixing introduces air, which leads to cracks later on.
Step 4: Fold in the Sour Cream or Heavy Cream
Now it’s time for the final touch—the ingredient that determines the cheesecake’s personality.
- Sour cream gives a slight tang and a denser texture.
- Heavy cream makes it lighter and more luxurious.
Add whichever you prefer (or both) and fold gently with a spatula until smooth and uniform.
This step gives the batter that luscious creaminess that makes each bite melt in your mouth.
Step 5: Keep Those Air Bubbles Out
Overmixing or beating on high speed is a rookie mistake. Air bubbles rise to the surface during baking and can cause cracks.
To prevent that, tap the bowl gently on the counter a few times to pop any trapped air.
The goal is a silky, pourable batter that is thick enough to coat a spoon but smooth enough to flow into the pan like warm honey.
Setting Up the Water Bath (Bain-Marie)
If cheesecake had a secret weapon, it would be the water bath.
It might sound fancy (and a little intimidating), but it’s simply the most effective way to bake your cheesecake low and slow.
Why Use a Water Bath?
Here’s the deal: cheesecake is basically a custard. It wants gentle, even heat.
A water bath surrounds the pan with steam and steady warmth, keeping the edges from overcooking while the center sets. No water bath? You risk:
- Cracks on top
- Rubbery edges
- An uneven bake
So yes, it’s worth the extra step. Think of it as a spa day for your cheesecake.
How to Wrap the Springform Pan
Your springform pan is not leak-proof. Trust me, many have learned the hard way. To keep water out and your crust crisp, wrap the outside of the pan in 2–3 layers of heavy-duty foil. Here’s how:
- Place the pan on a large sheet of foil.
- Fold the foil tightly up the sides, and don’t leave any gaps.
- Repeat with another layer or two, overlapping in different directions.
Make sure the foil goes all the way up to the rim of the pan. It should look like your cheesecake is wearing a silver tutu.
How to Set Up the Bath
- Place your foil-wrapped springform pan inside a large roasting pan or deep baking dish.
- Carefully pour hot water into the outer pan, about halfway up the sides of the springform pan, and no higher.
- Use boiling water from a kettle or hot tap water. Make sure you do this after the pan is in the oven to avoid sloshing.
That’s it. The bath is set. You’ve officially given your cheesecake the best chance at a smooth, crack-free surface and creamy, even texture from edge to center.
Baking the Cheesecake
You’ve prepped the crust, nailed the batter, and set up the water bath. Now comes the moment of truth: baking.
And let’s be honest, this is where even the most confident bakers hold their breath. But with the right approach, it’s much simpler than it seems.
The Ideal Temperature
Cheesecake needs low and slow. Cranking the heat will only lead to heartbreak (and cracks).
Set your oven to 160°C / 325°F.
This gentle heat ensures the cheesecake cooks evenly without puffing up like a soufflé and collapsing later.
If your oven runs hot or has hot spots, consider using an oven thermometer. Accuracy here is everything.
Bake Time Range
Most standard 9-inch cheesecakes will need 50 to 70 minutes in the oven. But don’t rely on the clock alone because every oven has its own personality.
Start checking around the 50-minute mark. Don’t open the oven too often or too early, or you’ll lose all that precious, steamy heat.
Visual Cues: What Done Looks Like
The top should look set, but the center should still jiggle slightly—like Jell-O, not a wave pool.
Give the pan a gentle nudge (with the oven mitt, of course).
If the edges are firm and the center has a wobble about the size of a quarter, it’s ready.
Resist the urge to bake until the center is completely firm. If you wait that long, you’ve likely overbaked it.
Avoiding Overbaking
Overbaking is the fast track to a dry, cracked cheesecake. It’s better to err on the side of slightly underdone because residual heat will finish the job as it cools.
Once you’ve hit the perfect jiggle, turn off the oven. Crack the door open slightly (you can wedge a wooden spoon in there) and let the cheesecake sit inside for an hour.
This slow cool-down helps prevent sudden temperature shock, which can also cause cracking.
Then, and only then, is it time to move on to the chilling phase.
Cooling and Chilling
Cooling and chilling might sound like an afterthought, but in the cheesecake world, it’s the final and most crucial act.
Once your cheesecake is baked, leave it in the oven with the door slightly ajar for about an hour.
This gentle transition from hot to warm helps prevent sudden temperature shock, which often leads to cracks across the top.
After that, move it to the counter and let it cool completely at room temperature, and don’t even think about tossing it straight into the fridge.
Once it’s no longer warm to the touch, cover the cheesecake (still in the pan) and refrigerate it for at least 4 hours, though overnight is best.
This chilling time allows the filling to firm up fully, the flavors to develop, and the texture to transform from loose and creamy to thick and sliceable.
Rushing this step is like slicing into cake batter—you’ll get a sloppy mess instead of that smooth, dreamy finish you worked so hard for. Patience is key here.
The fridge is your best friend. Let time do its thing. Your reward? A cheesecake that holds its shape, cuts cleanly, and tastes even better the next day.
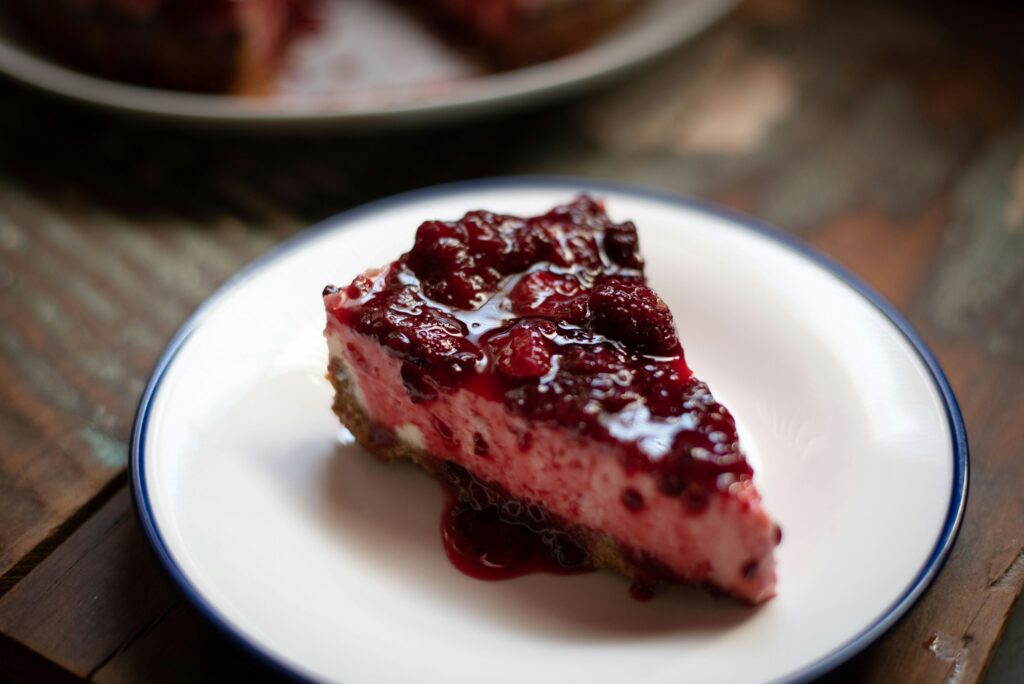
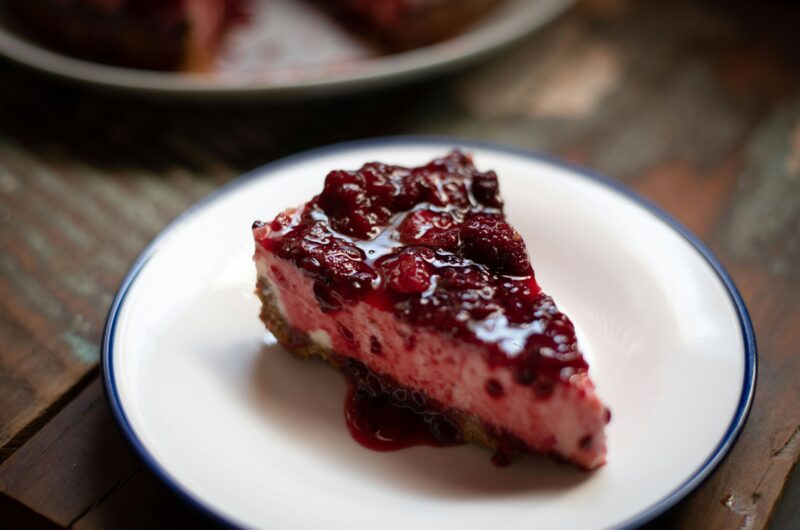
Optional Toppings and Flavor Ideas
Now that your cheesecake is cool, firm, and flawless, it’s time to dress it up because let’s be honest, toppings are the cherry on top (sometimes literally).
A fruit compote like strawberry, raspberry, or blueberry adds a sweet-tart punch and a pop of color, while fresh berries bring a bright, refreshing contrast to the rich filling.
If you’re feeling indulgent, a chocolate ganache or silky caramel drizzle can take your cheesecake from delicious to downright sinful.
For something a little more classic, try a sour cream topping—just mix sour cream with a bit of sugar and vanilla, then spread it on and let it set for a smooth, tangy finish.
Want some crunch? Sprinkle on crushed cookies, toasted nuts, or even edible flowers for a bakery-style look.
The fun part is you can mix and match, so try Oreo crumbs with ganache, or berries with a mint leaf flourish.
There’s no wrong way to top a cheesecake, as long as it makes you (and your taste buds) happy.
Serving Tips
Serving cheesecake is where presentation meets patience. To get those clean, café-worthy slices, use the hot knife method.
Dip a sharp knife into hot water, wipe it dry, make a slice, then repeat after each cut. It might sound fussy, but it makes a world of difference—no more dragging crumbs or smearing the filling.
Once sliced, cheesecake can sit out at room temperature for about 2 hours, but after that, it’s best to get it back in the fridge to keep the texture safe and the dairy happy.
For leftovers, wrap slices tightly in plastic wrap or store them in an airtight container in the fridge for up to 5 days.
If you want to save some for later (or future cravings), cheesecake freezes like a dream, so just wrap individual slices in plastic, then foil, and freeze for up to 1 month.
Thaw overnight in the fridge, and it’ll taste just as fresh as day one.
Common Mistakes to Avoid
Even the best bakers can trip up on cheesecake. It’s not a difficult dessert, but it is a little particular. Here are the most common missteps and how to dodge them.
Overmixing the Batter
This one’s sneaky. You start off trying to get the batter smooth, then before you know it, you’re whipping it like frosting. Don’t. Overmixing adds air, and air leads to puffing, cracking, and sinking.
Once the eggs go in, mix just until combined. You’re not trying to beat a record, so just blend it gently.
Skipping the Water Bath
It might seem like a hassle, but the water bath isn’t optional if you want a creamy, evenly baked cheesecake.
It keeps the temperature steady and prevents the edges from overbaking before the center sets. Without it, you’re asking for cracks, craters, and a rubbery texture.
Using Cold Ingredients
This one’s a dealbreaker. Cold cream cheese doesn’t blend well, and you’ll be chasing lumps for days. Eggs straight from the fridge also throw off the batter.
Let everything—cream cheese, eggs, sour cream—come to room temp before you begin. Your mixer (and your batter) will thank you.
Not Letting It Rest or Chill Long Enough
Cheesecake isn’t a grab-and-go dessert. It needs time to settle. Rushing the cooling or skipping the overnight chill time leads to a gooey center and a disappointing slice.
Let it cool in stages, then chill completely—minimum 4 hours, but overnight is best. The wait is part of the reward.
Final Thoughts
If you’ve never baked a cheesecake before, this is your sign to go for it. It’s easier than it looks, and way more forgiving than most people think.
Even if you hit a bump along the way, odds are it’ll still taste amazing. So grab your mixer, take your time, and trust the process.
FAQs
Can I make cheesecake without a water bath?
Yes, but expect more cracks and uneven baking. The water bath helps regulate heat and moisture, giving you that smooth, creamy finish.
If you skip it, lower your oven temp slightly and keep a close eye on the bake.
How do I fix a cracked cheesecake?
Don’t panic, it happens. You can cover cracks with fruit, whipped cream, or ganache, and no one will know.
If it’s just a surface crack, chill the cake first, then gently press the crack together with clean fingers. It won’t be perfect, but it’ll still taste great.
Can I use Greek yogurt instead of sour cream?
Absolutely. Full-fat Greek yogurt is a great substitute and adds a similar tang. Just avoid non-fat versions because they can make the texture too loose or grainy.
How long does cheesecake last in the fridge?
Cheesecake stays fresh for up to 5 days in the fridge if stored in an airtight container. Keep it covered to prevent it from drying out or picking up fridge smells.
Can I freeze cheesecake slices?
Yes! Wrap individual slices in plastic wrap, then foil, and freeze for up to 1 month. Thaw overnight in the fridge before serving. The texture stays surprisingly creamy.
Step-by-Step Guide to Baking a Perfect Cheesecake
Difficulty: Moderate12
slices25
minutes1
hour10
minutes8
hoursA rich, creamy, and smooth classic cheesecake baked to perfection with a crisp graham cracker crust and a velvety filling.
Ingredients
- For the Crust:
1½ cups graham cracker crumbs
¼ cup granulated sugar
6 tbsp unsalted butter, melted
- For the Filling:
4 (8 oz) blocks full-fat cream cheese, room temp
1 cup granulated sugar
1 tsp vanilla extract
3 large eggs, room temp
1 cup sour cream or heavy cream, room temp
Directions
- Preheat oven to 325°F (160°C). Wrap a 9-inch springform pan with 2–3 layers of heavy-duty foil.
- Make the crust: Mix crumbs, sugar, and melted butter. Press firmly into the pan and slightly up the sides. Bake for 10 minutes, then let cool.
- Make the filling: Beat cream cheese until smooth. Add sugar and vanilla; mix until combined. Add eggs one at a time, mixing on low. Fold in sour cream or heavy cream.
- Pour the batter into the cooled crust. Tap gently to release air bubbles.
- Set up the water bath: Place the springform pan in a large roasting pan. Add hot water halfway up the sides of the springform pan.
- Bake for 60–70 minutes, until edges are set and center jiggles slightly.
- Cool in the oven with the door ajar for 1 hour. Then cool to room temp, cover, and chill in the fridge for at least 4 hours or overnight.
- Serve with your favorite toppings—fruit, ganache, or whipped cream.
Notes
- Always use room-temperature ingredients for a smooth batter.
- To slice cleanly, use a hot knife and wipe between cuts.
- Cheesecake can be frozen for up to 1 month if well-wrapped.

Hi, I’m Sorenna Blythe, the baker and writer behind Mix Whisk Bake. I share simple, reliable recipes and honest kitchen moments to help home bakers bake with confidence and joy. When I’m not testing new treats, you’ll find me sipping coffee and dreaming up my next bake.


