
Craving cheesecake but not the fuss? These mini cheesecake cupcakes are your shortcut to sweet success.
They’re quick to prep, easy to customize, and perfectly portioned for parties, potlucks, or just a solo treat on the couch.
No springform pans. No water baths. No stress!
Why Mini Cheesecake Cupcakes?
Mini cheesecake cupcakes are the ultimate dessert hack.
Unlike full-size cheesecakes that demand springform pans, water baths, and a prayer or two, these bite-sized beauties are beginner-friendly and low-stress.
You just need a muffin tin and some paper liners with no fancy tools or complicated steps. Their single-serve size means no messy slicing, no uneven pieces, and no fights over the last wedge.
They’re also way easier to chill, transport, and serve, making them ideal for birthdays, holidays, potlucks, bake sales, or just an “I deserve this” Tuesday night.
Want to switch up the flavor for picky eaters? Easy, make half strawberry and half chocolate chip in the same batch. And if you’re planning ahead, they freeze like a dream.
Just pop them in a container, stack them with parchment, and you’ve got dessert on demand. Simple, neat, delicious—what’s not to love?
Ingredients You’ll Need
For the crust:
- 1 cup graham cracker crumbs – Classic base that adds crunch and a buttery flavor.
- 2 tbsp sugar – Just enough to lightly sweeten the crust.
- 3 tbsp melted butter – Helps bind the crumbs and creates that golden, toasty finish.
For the filling:
- 16 oz cream cheese, softened – The rich, creamy star of the show; softening helps it blend smoothly.
- 1/2 cup granulated sugar – Balances the tang of the cream cheese with sweetness.
- 2 large eggs – Add structure and silkiness to the cheesecake filling.
- 1 tsp vanilla extract – Boosts the flavor with warm, sweet notes.
- 1/4 cup sour cream or Greek yogurt – Adds tang, lightens the texture, and makes it ultra creamy.
Optional toppings:
- Fresh fruit – Strawberries, blueberries, or kiwi add a pop of color and freshness.
- Jam or fruit compote – Swirled on top or spooned over for a sweet, fruity finish.
- Chocolate ganache or caramel – For those who love a rich, indulgent touch.
- Crushed cookies or candy – Adds crunch and makes each one look party-ready.
Equipment Checklist
- Cupcake/muffin pan – The base for baking perfectly portioned cheesecake cupcakes.
- Paper liners – Makes removal easy and keeps the crust from sticking to the pan.
- Electric mixer (hand or stand) – Essential for a smooth, lump-free filling.
- Mixing bowls – You’ll need a couple for the crust and filling prep.
- Spatula – Ideal for scraping down the bowl and evenly filling liners.
- Measuring cups and spoons – Accuracy matters in baking, so don’t eyeball it.
Step-by-Step Instructions
1. Prep the Crust
Start with the foundation—your graham cracker crust. In a bowl, stir together the graham cracker crumbs, sugar, and melted butter until the mixture looks like damp sand.
You want every crumb coated. Line your muffin tin with paper liners and spoon about a tablespoon of crust into each one. Use the bottom of a shot glass or small spoon to press it down firmly.
This step keeps the crust from crumbling later. Bake at 325°F (160°C) for 5 minutes. This quick pre-bake sets the crust so it holds its shape and stays crisp.
2. Make the Filling
While the crusts cool, move on to the creamy center. In a large bowl, beat the softened cream cheese and sugar together until the mixture is completely smooth, with no lumps remaining.
Add the eggs one at a time, mixing on low after each to avoid overbeating (which can cause cracks). Stir in the vanilla extract and sour cream or Greek yogurt.
This combo adds flavor and gives the filling that signature silky texture. Scrape down the bowl to make sure everything’s evenly mixed.
3. Assemble and Bake
Spoon or pour the cheesecake batter into the prepared crusts, filling each liner about ¾ full. Try to be even so they all bake at the same rate.
Gently tap the pan on the counter to release any trapped air bubbles. Bake at 325°F (160°C) for 15 to 18 minutes, just until the centers are set and the tops look matte—not jiggly or shiny.
Don’t wait for browning; mini cheesecakes stay pale. If the centers still wobble like jelly, give them another minute or two.
4. Cool and Chill
When they’re done, remove the pan from the oven and let the cheesecakes cool in the pan at room temperature. This helps prevent sudden temperature changes that can cause cracks.
Once they’re completely cool, transfer them to the fridge and chill for at least 2 hours. Overnight is even better.
The chill time firms up the filling and deepens the flavor, making each bite rich and creamy.
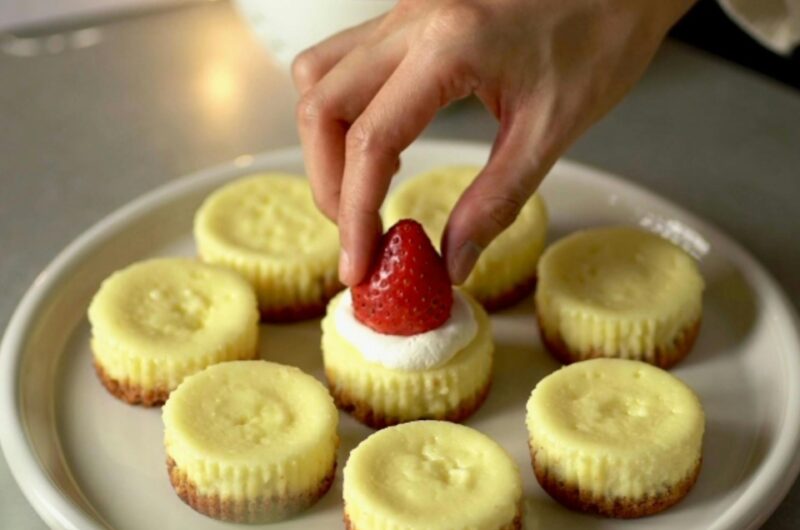
5. Top and Serve
Right before serving, dress them up with your favorite toppings. Spoon on jam, swirl in fruit compote, drizzle chocolate or caramel, or crown them with berries, crushed cookies, or candy.
This is where you can get creative and tailor each cupcake to your taste, or your guests’. Then serve cold and watch them disappear faster than you can say “cheesecake.”
Flavor Variations to Try
Mini cheesecakes are basically blank canvases waiting for your creative touch. Once you’ve nailed the classic version, it’s easy (and fun) to experiment with different flavors.
Here’s how to mix things up without making it complicated:
Chocolate Swirl
Chocolate lovers, this one’s for you. Melt ¼ cup of semi-sweet or dark chocolate and drop a teaspoon into each filled cupcake before baking. Use a toothpick or knife to gently swirl it through the batter.
It creates a marbled look and a fudgy surprise in every bite—think cheesecake meets brownie.
Lemon Zest + Curd
Want something bright and fresh? Add 1 tablespoon of finely grated lemon zest to your cheesecake filling, then swirl in a little lemon curd before baking or spoon some on top after chilling.
The tangy citrus cuts through the richness and gives each bite a sunny lift. Great for spring, brunch, or whenever your taste buds need a wake-up call.
Oreo Crust & Cookie Top
For a guaranteed crowd-pleaser (especially with kids), swap out the graham cracker crust for crushed Oreos. Just mix the same way—Oreos, melted butter, a touch of sugar.
Once baked and cooled, top each cupcake with a mini Oreo or half of a full-sized one.
Bonus: No one complains when there are cookies on top and on the bottom.
Pumpkin Spice
Perfect for fall or anytime you’re feeling cozy. Stir ½ cup canned pumpkin and 1 tsp pumpkin pie spice into the cheesecake batter. It’s like a bite-sized pumpkin pie with a creamy twist.
You can even top them with a dollop of whipped cream and a sprinkle of cinnamon to drive the autumn vibes home.
Peanut Butter & Chocolate Chip
Craving something extra indulgent? Swirl 2 tablespoons of creamy peanut butter into your batter and sprinkle mini chocolate chips on top before baking. It’s rich, nutty, sweet, and salty all in one.
Warning: these might disappear before they’ve even cooled.
Make-Ahead, Storage & Freezing Tips
Mini cheesecake cupcakes are a dream when it comes to planning ahead. You can make them up to 2 days in advance and keep them chilled until you’re ready to serve.
After they’ve fully cooled and set in the fridge, transfer them to an airtight container to lock in freshness and keep fridge odors out.
If you’re stacking them, separate the layers with parchment paper to prevent sticking or smushing.
For longer storage, skip the toppings and freeze them plain—just place the cooled cheesecakes on a baking sheet until solid, then move them into a freezer-safe container or zip-top bag.
They’ll keep beautifully for up to 2 months. When you’re ready to enjoy, thaw them overnight in the fridge and add toppings just before serving.
This way, you always have a homemade dessert ready to go, whether it’s for a party, a surprise guest, or a 10 p.m. craving that won’t quit.
Troubleshooting Tips
Cracks in the Tops?
Don’t worry, your cheesecakes are still totally edible (and delicious), but let’s avoid the Grand Canyon look next time. Cracks usually mean the filling was either overmixed or overbaked.
When blending the batter, mix just until everything is combined and smooth. Too much air in the batter causes it to puff up and collapse, which leads to those dreaded splits.
Also, keep a close eye during baking. Once the tops lose their shine and the centers no longer jiggle like jelly, pull them out. Overbaking dries them out and makes cracking more likely.
Soggy Crust?
No one wants a soggy bottom. To avoid it, make sure you press the crust down firmly and pre-bake it for a solid 5–6 minutes before adding the filling.
This step helps the butter and crumbs meld together into a crisp base. Also, always use paper liners—not just for easy removal, but because they act like little shields against unwanted moisture.
Sunken Centers?
If your cheesecakes puff up in the oven and then collapse like a deflated balloon, it usually means they cooled too quickly or were slightly underbaked.
Let them cool in the pan at room temperature before moving them to the fridge. That slow, gentle transition helps them settle evenly without sinking.
These little tweaks make a big difference, and once you’ve got them down, you’ll be baking flawless mini cheesecakes like a pro.
Final Thoughts
Mini cheesecake cupcakes aren’t just easy, but they’re endlessly customizable and seriously fun to make. One batter, endless flavor combos, and no special equipment needed.
So go ahead, try a new twist, top it your way, and make it yours!
FAQs
Can I make these dairy-free?
Yes, use plant-based cream cheese and yogurt alternatives.
Can I use a different crust?
Absolutely, try Oreos, vanilla wafers, or almond flour crusts.
Can I double the recipe?
Yes, easily! Just bake in batches.
Do I need to use a mixer?
It helps, but you can mix by hand if the ingredients are very soft.
Mini Cheesecake Cupcakes Anyone Can Make
Difficulty: Easy12
cupcakes15
minutes18
minutes2
hours45
minutesCreamy, bite-sized cheesecakes with a graham cracker crust—perfect for parties, gifts, or a quick dessert fix.
Ingredients
- Crust:
1 cup graham cracker crumbs
2 tbsp sugar
3 tbsp melted butter
- Filling:
16 oz cream cheese, softened
1/2 cup granulated sugar
2 large eggs
1 tsp vanilla extract
1/4 cup sour cream or Greek yogurt
- Optional Toppings:
Fresh fruit, jam, chocolate ganache, caramel, crushed cookies, or candy
Directions
- Preheat oven to 325°F (160°C). Line a muffin tin with 12 paper liners.
- In a bowl, mix graham cracker crumbs, sugar, and melted butter. Press about 1 tbsp into each liner. Bake for 5 minutes, then let cool.
- In a mixing bowl, beat cream cheese and sugar until smooth. Add eggs one at a time. Mix in vanilla and sour cream until just combined.
- Divide filling evenly over crusts, filling each about ¾ full.
- Bake for 15–18 minutes, until set but not browned. Cool completely in the pan, then refrigerate for at least 2 hours.
- Top with your favorite toppings just before serving.
Notes
- For best results, avoid overmixing the batter.
- Store in the fridge for up to 4 days or freeze without toppings for up to 2 months.
- Thaw in the fridge before serving.

Hi, I’m Sorenna Blythe, the baker and writer behind Mix Whisk Bake. I share simple, reliable recipes and honest kitchen moments to help home bakers bake with confidence and joy. When I’m not testing new treats, you’ll find me sipping coffee and dreaming up my next bake.


