Mini chocolate cupcakes are the kind of treat that disappear faster than you can say “save me one.”
They’re bite-sized, rich, and somehow always the first thing people reach for at parties. Perfect for birthdays, gatherings, or those moments when you just need a quick chocolate fix.
What makes this recipe stand out is simple: ultra-moist cupcakes, deep cocoa flavor, and a batter that comes together in minutes. No fuss. No drama. Just tiny chocolate dreams baked to perfection.
Why You’ll Love This Recipe
Quick to make
This batter comes together fast with no long resting or chilling. Mix dry, add wet, stir, and you’re done. Baking time is short too, so you’ll have warm minis on the table before you know it.
Perfect when guests call last minute or when a chocolate craving hits like a freight train.
Uses simple pantry ingredients
You won’t need a scavenger hunt through specialty stores. Most ingredients are things you already keep on hand: flour, cocoa, sugar, an egg or two, and a splash of milk or buttermilk.
Swap-ins are easy if you’re missing one item. This recipe is made to be friendly, not fussy.
Soft, moist, and chocolatey
These aren’t dry cupcakes hiding behind chocolate paint. The crumb is tender and stays moist bite after bite. Cocoa gives a true chocolate punch, and not just a hint. Think small cakes with big flavor.
Great for beginners
No fancy techniques or tools required. If you can whisk and measure, you can nail these. The steps are forgiving, so small mistakes won’t ruin the batch. It’s a perfect confidence-builder for new bakers.
Freezer-friendly
Made extras? Freeze them. Wrap cooled cupcakes individually or layer with parchment in a container. They thaw quickly and keep their texture.
That means grab-and-go treats for busy mornings or sudden parties.
Ingredients Overview
- Cocoa powder
Adds deep chocolate flavor and gives the cupcakes their rich color. Use unsweetened cocoa for the best balance. - All-purpose flour
Provides structure without making the cupcakes heavy. Keeps each bite tender and light. - Granulated sugar
Sweetens the batter and helps keep the cupcakes moist. It also balances the bitterness of the cocoa. - Buttermilk
Creates a soft, delicate crumb. Its acidity reacts with baking soda for a fluffier rise. - Oil or melted butter
Oil makes the cupcakes extra moist, while butter adds more flavor. Either one works, depending on your preference. - Egg
Binds the batter and helps the cupcakes rise evenly. It also adds richness and stability. - Baking soda or baking powder
Gives the cupcakes lift and keeps them soft instead of dense. - Vanilla extract
Enhances the chocolate flavor and rounds out the sweetness.
Optional Add-Ins
- Mini chocolate chips
Add little bursts of melty chocolate in every bite. - Sprinkles
Bring color and fun, especially for birthdays or themed parties. - Fillings (Nutella, ganache, caramel, etc.)
Add a surprise center and level up the cupcakes from simple to irresistible.
Equipment Needed
- Mini muffin pan
Essential for getting that perfect bite-sized shape. One pan usually makes 24 mini cupcakes. - Mini cupcake liners
Keep the cupcakes from sticking and make cleanup a breeze. They also give your minis a clean, polished look. - Mixing bowls
You’ll need one for dry ingredients and one for wet. - Whisk or spatula
A whisk helps blend everything smoothly, while a spatula is great for folding and scraping the bowl clean. - Cooling rack
Allows the cupcakes to cool evenly so they don’t steam and turn soggy. - Piping bag and tips (optional)
Perfect if you want neat, swirled frosting on top. Not required, but it definitely adds that bakery-style finish.
How to Make Mini Chocolate Cupcakes (Step-by-Step)
Step 1: Preheat oven & prep pan
Preheat the oven to 350°F (175°C). Line a mini muffin tin with mini cupcake liners.
If you don’t have liners, lightly grease each cavity. This step saves you from sticky minis and sad faces later.
Step 2: Mix dry ingredients
In a bowl, whisk together all-purpose flour, unsweetened cocoa powder, granulated sugar, a pinch of salt, and baking soda (or powder if your recipe uses it).
Sifting the cocoa and flour is optional but helps remove lumps. A few quick stirs until evenly combined is all you need.
Step 3: Combine wet ingredients
In a separate bowl, whisk the egg(s) with buttermilk, oil (or melted butter), and vanilla extract. Make sure wet ingredients are near room temperature so they blend smoothly.
Liquid fats like oil keep minis extra moist, and that’s the trick.
Step 4: Make the batter
Pour the wet mix into the dry ingredients. Stir gently until the batter is smooth and there are no streaks of flour. Don’t overmix; a few small lumps are fine.
Overworking the batter makes cupcakes tough. Keep it tender.
Step 5: Fill & bake
Use a small cookie scoop or a tablespoon to fill each liner about two-thirds full. Filling too high leads to overflow; too low makes tiny, flat tops. Aim for balance.
Tap the pan lightly on the counter to remove air pockets.
Bake at 350°F (175°C) for about 12–15 minutes, or until the tops spring back and a toothpick inserted in the center comes out with a few moist crumbs.
Ovens vary, so watch them closely after the 10-minute mark.
Step 6: Cool completely
Let the cupcakes rest in the pan for 3–5 minutes to firm up a bit. Then transfer them to a cooling rack to finish cooling. Frost warm cupcakes and you’ll end up with gooey frosting and a mess.
Cool completely for neat piping and the best texture.
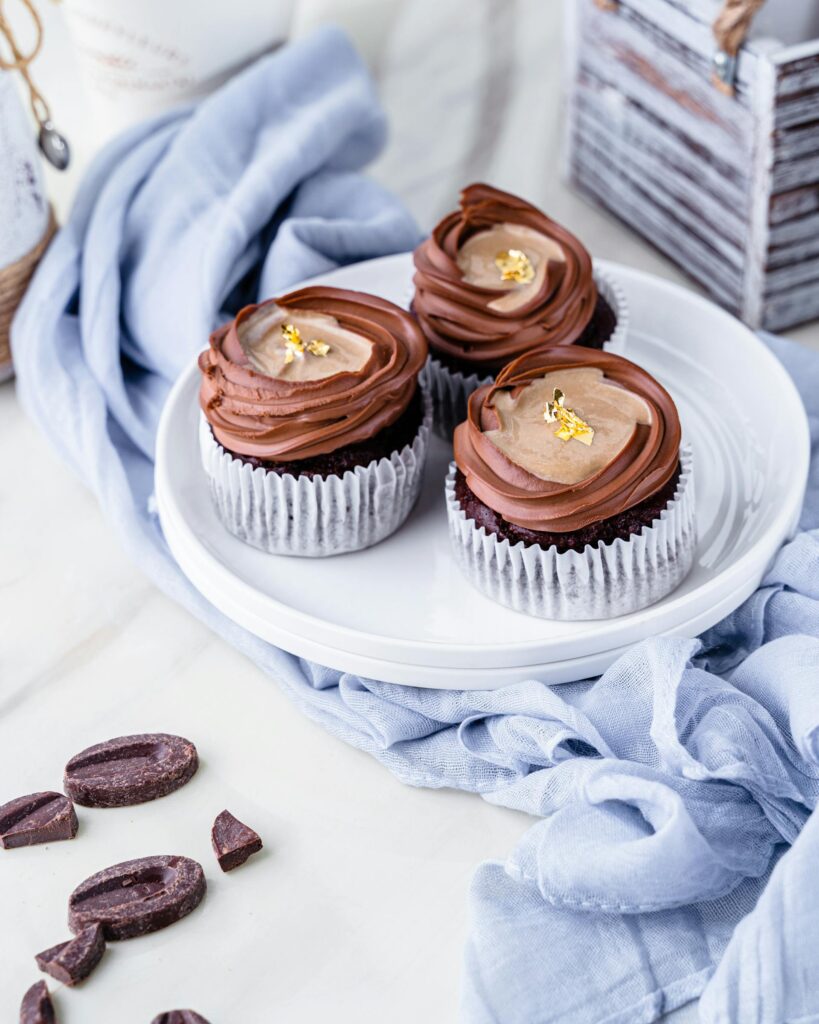
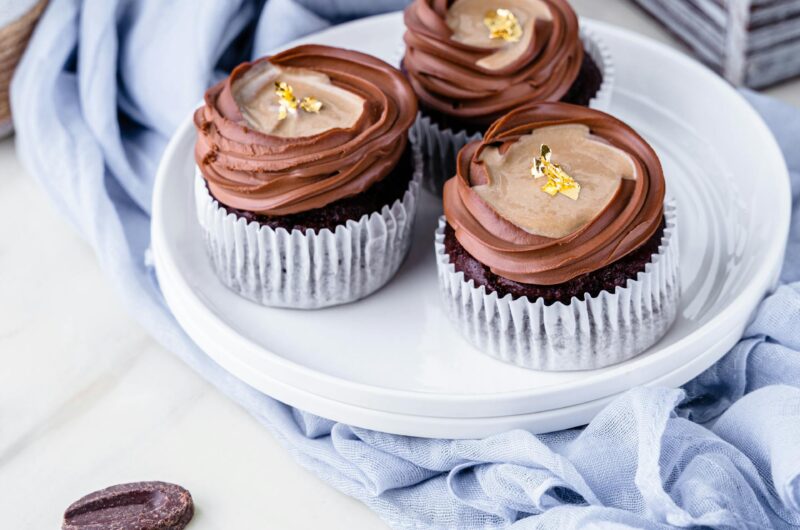
Best Frosting Options
Chocolate buttercream
Rich, creamy, and double-down on chocolate. Made with butter, cocoa, powdered sugar, and a splash of milk or cream. It holds shape well for piping pretty swirls.
Pairs perfectly with extra-chocolate cupcakes for chocoholics.
Tip: warm slightly if it’s too stiff, or chill briefly if too soft.
Vanilla buttercream
Light, sweet, and crowd-pleasing. Butter, powdered sugar, vanilla, and a little milk make a smooth, pipeable frosting. It brightens deep chocolate cupcakes and balances the richness.
Great for colorful sprinkles or themed decorations.
Tip: Use real vanilla extract for the best aroma.
Cream cheese frosting
Tangy, lush, and slightly less sweet. Cream cheese softens the sweetness and adds a pleasant tang that cuts through rich chocolate.
It’s softer than buttercream, so pipe gently or dollop on top. Perfect for birthday minis or when you want a grown-up twist. Store refrigerated and bring to room temperature before serving.
Whipped ganache
Light, glossy, and melts in your mouth. Made by pouring warm cream over chopped chocolate, then whipping once cooled. Less sweet than buttercream and very elegant on mini cupcakes.
It gives a shiny, bakery-style finish without feeling heavy. Serve soon after frosting for the best texture.
Store-bought frosting (for convenience)
No shame in saving time. Choose a high-quality brand and stir well before piping to remove air. It’s ideal for last-minute parties or when you need uniform color fast.
Add a splash of vanilla or a pinch of cocoa to boost the flavor. Keep sealed and store per package instructions.
Tips for Success
Don’t overfill the cups
Fill each liner about two-thirds full. Too much batter equals overflow and sad, misshapen tops. Too little yields tiny, flat cupcakes. Aim for that sweet spot so each mini gets a perfectly rounded cap.
Use room-temperature ingredients
Cold eggs or milk can make the batter uneven. Room-temp ingredients blend faster and trap air better. This gives a lighter crumb and steadier rise.
If you forgot to take things out, place eggs in warm water for a few minutes.
Sift cocoa powder for a smoother batter
Cocoa loves to clump. Sifting removes lumps and makes the batter silky. A smooth batter bakes into an even crumb and prettier tops. If you’re in a hurry, whisk the dry mix thoroughly to break up clumps.
Avoid overmixing to maintain tenderness
Stir until ingredients are just combined. Overmixing develops gluten and makes cupcakes tough. Think gentle folds, not a vigorous workout. A few small lumps are okay because they vanish in the oven.
Variations
Add mini chocolate chips
Stir in a handful of mini chocolate chips for extra bursts of melty goodness. They add texture, sweetness, and a little surprise in every bite.
Use mini chips so they don’t sink and overwhelm the tiny cupcakes.
Chocolate-mint mini cupcakes
Add a drop or two of peppermint extract to the batter. A little goes a long way, so start small. Top with chocolate frosting and crushed mints for a cool, refreshing twist.
Perfect for holidays or anyone who loves that “thin mint” vibe.
Filled minis (Nutella, caramel, ganache)
Spoon a small amount of filling into the center after scooping batter into the liners. Cover with a bit more batter so it stays hidden as it bakes.
Nutella gives a creamy center, caramel adds a sweet, gooey bite, and ganache keeps things rich and fancy. People love the surprise, and it’s a guaranteed crowd-pleaser.
Gluten-free version
Swap the all-purpose flour for a good 1:1 gluten-free baking blend. Choose a blend with xanthan gum for the best texture.
The cupcakes stay moist and tender, and most people won’t even notice the change. Keep an eye on baking time since gluten-free batters can brown faster.
Eggless option
Replace the egg with ¼ cup of unsweetened applesauce or plain yogurt. Both options add moisture and help the batter bind. The cupcakes still rise beautifully and taste just as rich.
It’s an easy swap for anyone avoiding eggs or baking for allergy-friendly events.
Storage Instructions
How to store at room temperature
Keep the cupcakes in an airtight container once fully cooled. They stay fresh for about 2–3 days at room temp. Avoid direct sunlight or warm spots, which can dry them out or melt the frosting.
If unfrosted, they tend to last slightly longer and stay soft.
Refrigeration tips
Refrigerate only if the frosting requires it, like cream cheese or whipped ganache. Place the cupcakes in a sealed container so they don’t absorb fridge odors.
Let them sit at room temperature for 20–30 minutes before serving. Cold cupcakes taste denser, so a little warming brings back their softness.
Freezing instructions (with or without frosting)
To freeze unfrosted cupcakes, wrap each one individually and store them in a freezer-safe bag or container.
For frosted cupcakes, freeze uncovered for 1 hour to firm the frosting, then wrap or store as usual. They keep well for up to 2 months.
Thaw at room temperature, unwrap, and let them soften before serving. They’ll taste just as fresh as the day you baked them.
Serving Ideas
Party platters
Mini cupcakes look instantly inviting when arranged on a big platter. Mix frosted varieties to add color and personality. They’re easy to grab, easy to eat, and always the first dessert to disappear.
Kids’ lunchboxes
These minis fit perfectly in lunch containers. They’re small enough for a quick treat without sugar overload. Add a fun liner or a tiny swirl of frosting to brighten a child’s day.
Holidays and celebrations
Dress them up with seasonal colors—red and green for Christmas, pastels for Easter, or orange and black for Halloween. They make great additions to dessert tables and family gatherings.
Their small size means everyone can try one without feeling stuffed.
Topped with sprinkles or themed decorations
Sprinkles instantly turn a simple cupcake into a party. Use themed toppers, edible glitter, or shaped sprinkles to match the event.
It’s an easy way to make each cupcake feel special with almost no extra effort.
Final Words
These mini chocolate cupcakes check every box—easy, quick, moist, and packed with rich chocolate flavor.
They’re the kind of treats that vanish before you even set the platter down.
Give them a try and see just how fast they disappear in your own kitchen!
FAQs
Can I use regular cupcake batter for minis?
Yes, absolutely. Most standard cupcake batters work perfectly in mini form. Just remember to reduce the baking time since minis bake much faster.
How long do mini cupcakes bake?
They usually bake in 12–15 minutes at 350°F (175°C). Start checking around the 10-minute mark. They’re done when the tops spring back or a toothpick comes out with a few moist crumbs.
Can I make them ahead of time?
Yes. Bake them a day in advance and store them in an airtight container. Frost the next day for the freshest texture. You can also freeze them if you need more time.
How do I make them extra moist?
Use oil instead of butter or a mix of both. Add buttermilk for a softer crumb. Measure flour correctly—too much can dry them out. And avoid overbaking, which is the biggest moisture killer.
Can I frost them the next day?
Definitely. Just make sure the cupcakes are stored properly overnight so they stay soft. Frost right before serving for the best look and texture.
Moist Mini Chocolate Cupcakes You Can Make in Minutes
Difficulty: Easy24
Mini Cupcakes10
minutes15
minutes25
minutesQuick, moist, and chocolatey mini cupcakes made with simple ingredients and baked to bite-sized perfection.
Ingredients
1 cup all-purpose flour
¼ cup unsweetened cocoa powder
½ cup granulated sugar
½ tsp baking soda
¼ tsp salt
1 large egg
½ cup buttermilk
¼ cup vegetable oil (or melted butter)
1 tsp vanilla extract
Optional: ½ cup mini chocolate chips
Directions
- Preheat oven to 350°F (175°C). Line a mini muffin pan with 24 mini cupcake liners.
- In a bowl, whisk flour, cocoa powder, sugar, baking soda, and salt.
- In a separate bowl, whisk egg, buttermilk, oil, and vanilla.
- Pour wet ingredients into dry and mix until smooth. Do not overmix.
- Fill each liner about ⅔ full.
- Bake for 12–15 minutes, or until a toothpick comes out with a few crumbs.
- Cool in the pan for 5 minutes, then move to a rack to cool completely before frosting.
Notes
- Use room-temperature ingredients for the best texture.
- Add mini chocolate chips for extra richness.
- Cupcakes freeze well with or without frosting.
- Don’t overbake because minis cook quickly and can dry out fast.

Hi, I’m Sorenna Blythe, the baker and writer behind Mix Whisk Bake. I share simple, reliable recipes and honest kitchen moments to help home bakers bake with confidence and joy. When I’m not testing new treats, you’ll find me sipping coffee and dreaming up my next bake.


