
Molten chocolate lava cakes feel like a fancy restaurant treat, but they’re surprisingly simple to make at home.
One slice and that warm, gooey center comes rushing out like it has somewhere important to be. It’s rich. It’s indulgent. And it hits the spot every single time.
They’re perfect for date nights, Valentine’s Day, or those moments when your chocolate cravings start yelling louder than you do. The best part? You don’t need pastry-chef skills to pull this off.
This recipe is foolproof, beginner-friendly, and guaranteed to impress!
Why You’ll Love This Recipe
Fast prep & bakes in under 15 minutes
This recipe moves at lightning speed. Mix, pour, and bake, and you’ll be at the table before your guests can say “seconds.”
It’s ideal when plans change last minute or when you need a quick win for dessert. Less time in the kitchen, more time enjoying the ooze.
Uses simple pantry ingredients
No exotic items here. Chocolate, butter, eggs, sugar, a bit of flour, and vanilla. Chances are you already have everything on hand.
That keeps the recipe low-stress and budget-friendly. Shopping lists that are two lines long are a win.
Restaurant-quality dessert made at home
The taste rivals a pricey dessert menu. Rich chocolate and warm molten center make it feel luxe.
With a few plating tricks like a scoop of ice cream, a dusting of cocoa, you’ve got a show-stopping plate.
Perfectly gooey molten center every time
This recipe focuses on timing and simple visual cues, not guesswork. You’ll learn the exact moment the edges are set, and the middle is blissfully soft.
No underbaked cake, no dry sponge, but just molten chocolate that flows like warm lava. Follow the steps and the gooey center will behave itself, every single time.
What Is a Molten Chocolate Lava Cake?
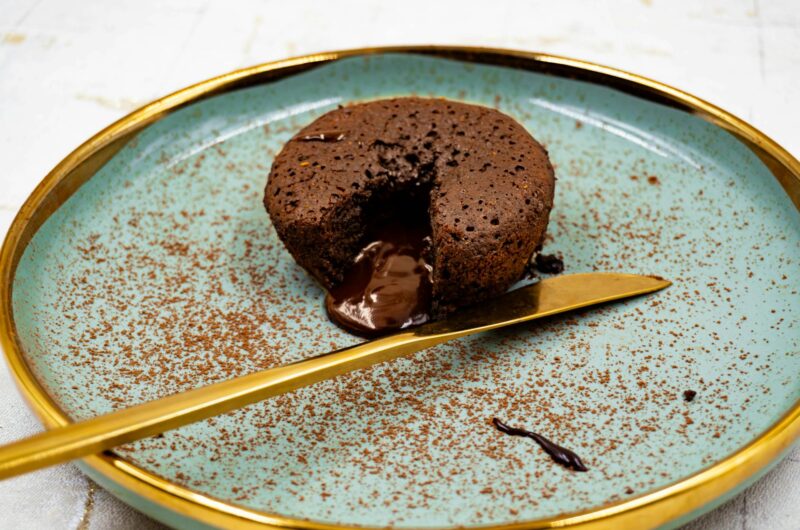
A molten chocolate lava cake is a small, lightly baked chocolate cake whose center remains hot and liquid — think of a mini chocolate volcano that spills a warm, glossy river when you cut into it.
Unlike an underbaked cake that is raw by accident, a true lava cake is purposely timed so the edges set into a tender cake while the middle stays molten; it’s controlled, not careless.
The trick is short baking and a batter that balances eggs, butter, and chocolate so the outside firms up but the core stays gooey.
When done right, the texture contrasts — slightly springy cake around a flowing, decadent center — and that contrast is what makes the dessert feel special.
This isn’t a failed attempt at baking; it’s a clever twist that uses heat and timing to create drama on the plate.
The modern fame of the dish traces back to chef Jean-Georges Vongerichten in the early 1990s, who helped popularize the idea in fine-dining kitchens and proved that simple ingredients can make a spectacular finish.
In short: it’s easy to love, easier to make than it looks, and absolutely worth the little bit of timing it demands.
Ingredients Needed
- Chocolate – Use good-quality semisweet or dark chocolate. It melts smoothly, gives the cakes their rich flavor, and is the backbone of the molten center.
- Butter – Adds moisture, richness, and that silky texture that keeps the cake soft and luxurious.
- Sugar – Sweetens the batter and helps create a tender crumb around the molten center.
- Eggs + extra yolks – Provide structure, richness, and that soft, custard-like consistency that makes the cake melt in your mouth.
- Flour – Just a small amount is needed to help the edges set without weighing the batter down.
- Salt – Enhances the chocolate flavor and keeps the sweetness balanced.
- Vanilla extract – Adds warmth and rounds out the overall flavor.
- Optional add-ins – Espresso powder for a deeper chocolate taste, liqueur for a grown-up twist, or flavored extracts (like peppermint or orange) for fun variations.
Equipment Needed
- Ramekins (6-ounce size) – These small baking dishes help the cakes hold their shape and bake evenly. The size matters because it affects how quickly the center turns molten.
- Baking sheet – Makes it easier to move the ramekins in and out of the oven and ensures even heat distribution.
- Mixing bowls – You’ll need a couple: one for melting the chocolate and butter, and another for whisking the eggs, sugar, and vanilla.
- Whisk – Helps blend the batter smoothly without overmixing. A whisk also creates that light, airy texture you want in the cake.
- Optional: Sifter – Useful if you want to remove lumps from the flour or cocoa powder when prepping ramekins.
- Optional: Pastry brush – Makes greasing the ramekins easier and ensures the cakes release cleanly when inverted.
How to Make Molten Chocolate Lava Cake (Step-by-Step)
1. Prep the ramekins with butter and cocoa
Start by generously greasing each ramekin with butter, then dusting it with cocoa powder. This little combo works like a charm and keeps the cakes from sticking.
2. Melt the butter and chocolate
Gently melt the butter and chocolate together until smooth and glossy. You can use a microwave in short bursts or a heatproof bowl over simmering water.
Either way, keep the heat low and slow. Chocolate doesn’t like drama, and rushing it can make it seize up.
3. Whisk the eggs, yolks, sugar, and vanilla
In a separate bowl, whisk these ingredients until the mixture looks pale and slightly thickened. This step adds air and helps create that soft, custardy center.
It’s also when the batter starts smelling dangerously tempting.
4. Combine the wet and dry ingredients
Pour the melted chocolate mixture into the egg mixture and whisk until smooth. Add the flour and salt, then gently stir until everything blends.
Don’t overmix because you want a silky batter, not a tough cake.
5. Pour the batter into the ramekins
Divide the batter evenly between the prepared ramekins. Fill them about three-quarters full, so they rise just right.
At this point, they already look delicious, and you’ll probably question why we even bake them.
6. Bake just until the edges are set but the centers are soft
Pop the ramekins onto a baking sheet and bake until the tops look set but still slightly shiny.
The edges should be firm, while the center stays soft and jiggly — that’s the signature lava effect. Timing is everything here, and a minute too long can turn lava into cake.
7. Cool briefly, then invert and serve
Let the cakes rest for about one minute, so they settle but don’t overcook. Run a knife around the edges, invert them onto a plate, and lift gently.
If all goes well, you’ll have a perfect little dome with a molten surprise inside. Serve immediately, because lava waits for no one.
Tips for Success
Grease the ramekins well
Don’t rush this part. A well-greased ramekin is the difference between a clean, confident release and a cake that refuses to leave home.
Butter every corner, then dust with cocoa for extra insurance. Your future self will thank you when the cakes slide out like a dream.
Don’t overbake — watch for visual cues
Lava cakes are all about timing. Bake just until the edges look set and the center still looks soft and slightly shiny.
If the middle looks fully cooked, the lava has officially left the building. Trust your eyes more than the timer because ovens can be sneaky.
Use high-quality chocolate
Since chocolate is the star of the show, using a good one makes a world of difference. Cheap chocolate works, but premium chocolate turns this dessert into a showstopper.
Bake all ramekins at the same time
For consistent results, bake them together on the same baking sheet. This ensures every cake bakes at the same speed.
Mixing batches or placing ramekins on different racks can lead to uneven textures — one might ooze beautifully while the other just shrugs.
Avoid collapsing cakes
Let the cakes rest for about a minute before flipping. Too soon, and the structure may be too soft to hold. Too long, and the center keeps cooking and loses its molten magic.
Run a knife around the edge, flip confidently, and lift straight up with no hesitation, no wobbling. This tiny pause keeps the cake standing tall and proud.
Variations
White chocolate lava cakes
Swap the dark chocolate for white chocolate to create a sweeter, creamier version with a golden, buttery center.
It’s richer, softer, and perfect for anyone who prefers sweet over intense chocolate flavor.
Peanut butter or caramel center
Add a teaspoon of peanut butter or caramel into the middle of each ramekin before baking.
It melts into the center and creates a second “lava” layer that tastes like a dessert plot twist. Chocolate + peanut butter or caramel is never a bad idea.
Mocha lava cakes
Stir in a little espresso powder to deepen the chocolate flavor and give the cake a subtle coffee kick. It’s a great option for coffee lovers or anyone wanting a more sophisticated twist.
Gluten-free option
Replace the flour with a gluten-free 1:1 baking blend. The texture stays soft and molten, and no one will ever guess it’s gluten-free. Just make sure your chocolate is certified gluten-free if needed.
Single-serving mug-lava version
When cravings hit hard and patience runs thin, mix a scaled-down batter in a microwave-safe mug.
Heat it for about 30–45 seconds until the edges set, but the center stays gooey. It’s lava cake for the “I need dessert right now” moments.
How to Serve
Serving molten chocolate lava cake is half the fun, and a few simple touches can turn it from “yum” to “wow.”
A scoop of ice cream, especially vanilla or salted caramel, melts into the warm cake like it was meant to be there.
Whipped cream adds a light, airy contrast that cuts through the richness without stealing the spotlight.
Fresh berries bring a bright, tart pop that balances the deep chocolate flavor, and they instantly make the plate look prettier.
A light dusting of powdered sugar adds a sweet, snow-like finish that feels effortless but elegant.
And if you’re into sweet-savory magic, a few salt flakes on top wake up the chocolate in the best way possible.
For a restaurant-style finish, plate the cake in the center and add your toppings with intention.
Let the ice cream sit slightly off to the side, drizzle a little chocolate or caramel around the plate, and finish with berries or a sprig of mint.
Clean edges, simple accents, and confident placement make it look like you spent hours… even though you didn’t.
Make-Ahead, Storage & Reheating
How to prepare the batter ahead of time
You can mix the batter several hours in advance and store it in the refrigerator right in the ramekins. Just cover each one with plastic wrap.
When you’re ready to bake, let them sit at room temperature for about 10–15 minutes so the batter softens slightly. This helps them bake evenly and ensures the center stays molten.
How to refrigerate or freeze unbaked cakes
If you want to prep even earlier, refrigerate the filled ramekins for up to 24 hours. For longer storage, freeze them. Simply wrap each filled ramekin tightly and freeze for up to 2 months.
When baking from frozen, add a few extra minutes to the bake time, as the edges will still set beautifully while the center stays gooey.
Reheating instructions for baked cakes
Once baked, lava cakes are best eaten immediately, but reheating is possible if you’re willing to compromise a little on the molten factor.
Warm a baked cake in the microwave for 10–15 seconds or in a low oven for 5 minutes. The center won’t be as dramatic, but you’ll still get a soft, warm, chocolatey treat that hits the spot.
Final Words
Molten chocolate lava cakes may look fancy, but they’re far easier than most people expect. Once you get the timing down, it feels like having a secret superpower in the kitchen.
Don’t stress the small stuff because even if the cake cracks or the lava flows a little too enthusiastically, it’s still warm chocolate, and warm chocolate never disappoints.
Trust the process, have fun with it, and enjoy the little moment of drama when you cut into that first cake.
FAQs
Why didn’t my lava cake ooze?
This usually means the cake was baked a little too long. Lava cake centers rely on precise timing, so even an extra minute can firm things up.
Next time, pull them when the edges look set, but the center still has a slight jiggle. Also, make sure your oven isn’t running hotter than expected. Oven thermometers help a lot.
Can I use chocolate chips instead of baking chocolate?
Yes, but with caution. Chocolate chips contain stabilizers that help them keep their shape, which can make the lava less smooth and melty.
If you do use them, choose a high-quality brand and melt them gently. Baking bars will always give a richer, silkier center.
Can I make this without ramekins?
Absolutely. You can use a muffin tin in a pinch, but just grease it very well and reduce the bake time since they cook faster.
The cakes may not unmold as neatly, but they’ll still taste incredible. Small ceramic cups or oven-safe jars work too.
How do I know when lava cakes are done?
Look for edges that are set and slightly pulling away from the ramekin while the center still looks soft, shiny, and a bit jiggly. The top shouldn’t look fully dry. Trust these visual cues more than the clock.
Can I double or halve the recipe?
Yes, this recipe scales beautifully. When doubling, just mix everything in a larger bowl and bake all the ramekins at the same time for consistent results.
When halving, keep the ratios the same and watch the bake time closely because smaller batches sometimes cook a touch faster.
Decadent Molten Chocolate Lava Cake You Can Make at Home
Difficulty: Easy4
Cakes10
minutes12
minutes22
minutesA rich, decadent molten chocolate lava cake with a perfectly gooey center. Simple ingredients, fast prep, and foolproof results.
Ingredients
4 oz semisweet or dark chocolate, chopped
½ cup unsalted butter
2 large eggs
2 large egg yolks
¼ cup granulated sugar
½ tsp vanilla extract
¼ cup all-purpose flour
Pinch of salt
Butter + cocoa powder for greasing ramekins
Directions
- Preheat oven to 425°F (220°C). Grease four 6-oz ramekins with butter and dust with cocoa.
- Melt chocolate and butter together until smooth; set aside to cool slightly.
- Whisk eggs, yolks, sugar, and vanilla until slightly thickened.
- Stir in the melted chocolate mixture. Add flour and salt; mix gently until smooth.
- Divide batter into ramekins and place on a baking sheet.
- Bake 11–13 minutes, or until edges are set and centers still look soft and slightly jiggly.
- Rest 1 minute, run a knife around the edges, invert onto plates, and serve immediately.
Notes
- Use high-quality chocolate for the best flavor and melt.
- Bake time matters — even one extra minute can reduce the molten center.
- Batter can be refrigerated in ramekins for up to 24 hours; bring to room temperature before baking.
- Serve with ice cream, whipped cream, berries, or a dusting of powdered sugar.

Hi, I’m Sorenna Blythe, the baker and writer behind Mix Whisk Bake. I share simple, reliable recipes and honest kitchen moments to help home bakers bake with confidence and joy. When I’m not testing new treats, you’ll find me sipping coffee and dreaming up my next bake.


