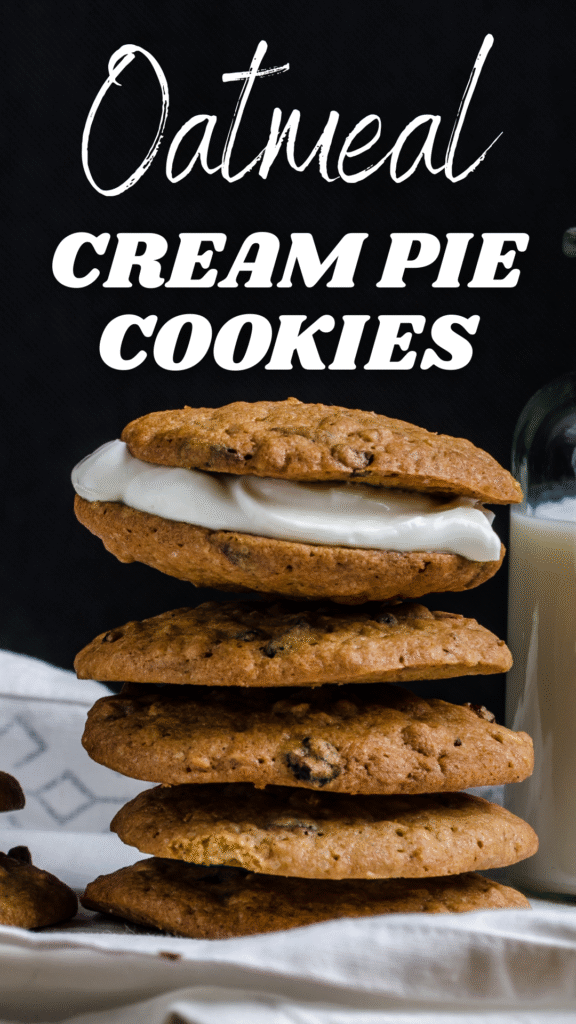
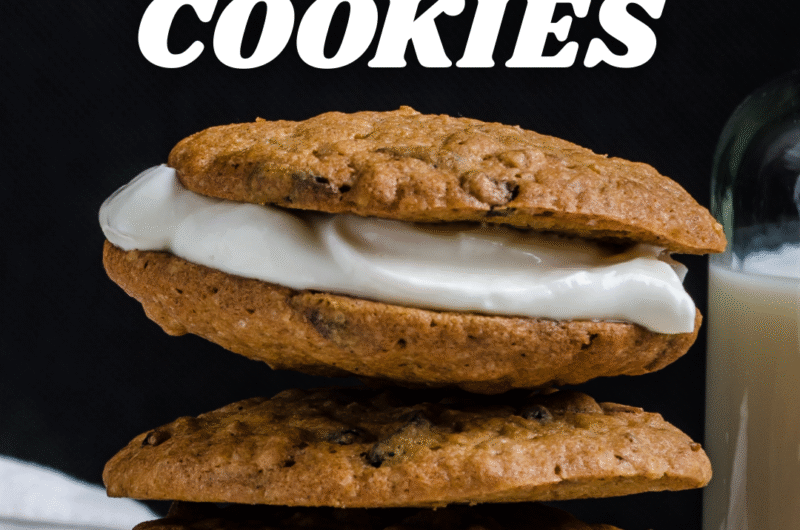
Homemade oatmeal cream pie cookies feel like opening a time capsule, but only better. Soft, chewy oatmeal cookies hug a fluffy vanilla filling that tastes like pure comfort.
One bite and you’ll swear you just upgraded the classic lunchbox treat you grew up with. It’s nostalgia, but with a delicious glow-up.
Why You’ll Love This Recipe
Soft, chewy, bakery-style texture
These cookies stay tender in the middle and just set around the edges. The oats give a gentle chew without being gummy.
A little brown sugar and butter create that rich, slightly caramelized crumb you expect from a bakery. Bake them just until the centers look set, and you’ll get the perfect balance of soft and sturdy.
Seriously, they’re the kind of cookie that forgives you if your oven isn’t cooperating.
Easy ingredients + simple steps
You don’t need a pantry full of fancy stuff. Most of the ingredients are everyday staples: oats, flour, butter, sugar, egg, and a few levers like vanilla and cinnamon.
The method is classic and low-drama — cream, mix, scoop, bake, and fill. No tempering chocolate, no tricky folds, and no special gadgets.
If you can stir and scoop, you can make these. It’s comfort baking without the drama.
Perfect for lunchboxes, bake sales, and gifting
They pack well and hold up in a lunchbox without turning into crumbs. Make them small for kids or big for a cookie-lovers’ treat.
They look cute tied with twine, and people love a homemade upgrade to store-bought nostalgia.
Bake a batch, and you’ve got instant party food, classroom-friendly snacks, or thoughtful gifts for neighbors. They travel, stack, and disappear fast — in a good way.
Customizable filling options (vanilla, marshmallow-style, etc.)
The filling is your playground. Go classic with a silky vanilla buttercream. Want true Little Debbie vibes? Fold in marshmallow creme for a pillowy, sweet center.
Prefer less sugar? Swap some powdered sugar for cream cheese to cut the sweetness and add tang.
Add a splash of maple, a pinch of espresso, or fold in mini chocolate chips. Mix and match until you find your favorite.
Ingredients Overview
For the Oatmeal Cookies
- Oats – Rolled oats add texture and chew, giving the cookies their classic, hearty feel.
- Flour – Provides structure so the cookies hold their shape while staying soft.
- Brown sugar – Adds moisture and a warm, caramel-like sweetness that keeps the cookies tender.
- Butter – Brings rich flavor and helps create that soft, bakery-style texture.
- Eggs – Bind the ingredients and keep the cookies soft and cohesive.
- Vanilla – Adds depth and rounds out the sweetness without overpowering the oats.
- Cinnamon – A small amount boosts the cozy flavor and makes the cookies smell amazing.
- Baking soda + salt – Baking soda helps the cookies rise and spread, while salt balances the sweetness.
For the Cream Filling
- Butter – Creates a smooth, creamy base for the filling.
- Powdered sugar – Sweetens and thickens the mixture into a fluffy frosting-like consistency.
- Vanilla – Adds a warm, classic flavor that pairs perfectly with the oatmeal cookies.
- Marshmallow creme (optional) – Gives the filling that nostalgic, ultra-soft Little Debbie texture.
Step-by-Step Instructions (Overview)
1. Cream butter and sugars
Start with room-temperature butter so it creams smoothly. Beat the butter and sugars until light and fluffy — about 2–3 minutes. This traps air and gives the cookies lift and tenderness.
Scrape the bowl once so nothing’s left behind. Think of this step as building the cookie’s soft backbone.
2. Add eggs + vanilla
Add the eggs one at a time and beat until each is fully incorporated. Stir in the vanilla and mix until the batter looks even.
Don’t overmix; you want everything combined, not a tough cookie. This is where flavor and structure come together.
3. Mix dry ingredients
Whisk the flour, baking soda, cinnamon, and salt in a separate bowl. Toss in the oats so they’re evenly distributed.
Whisking helps avoid pockets of leavener or spice. It’s the little things that stop surprises at the bake stage.
4. Combine
Fold the dry mix into the wet ingredients gently until just combined. Stop when you see no streaks of flour. Overworking the dough makes cookies dense.
The dough should be thick, slightly sticky, and hold its shape when scooped.
5. Scoop and bake
Scoop rounded tablespoons (or use a cookie scoop) onto a lined baking sheet, spaced about 2 inches apart. Press each slightly flat if you like a wider cookie.
Bake until edges are set and centers still look soft — usually 9–12 minutes depending on size.
They’ll finish cooking on the sheet, so pull them when they’re golden at the edges. Cool on the tray for a few minutes, then move to a rack.
6. Whip filling
Beat softened butter until smooth. Add powdered sugar in batches, scraping down the bowl as needed. Mix in vanilla and, if using, fold in marshmallow creme for that classic pillowy texture.
Adjust the thickness with a teaspoon of milk or more powdered sugar. Taste as you go, as it should be sweet, light, and spreadable.
7. Assemble cookie sandwiches
Match cookies by size. Pipe or spread a generous dollop of filling onto one cookie, then top with its twin. Press gently until the filling reaches the edges.
Chill briefly if you want a firmer sandwich. Stack them, wrap them, or eat one right away — they don’t judge!
Tips for Success
How to bake soft, non-dry oatmeal cookies
Use slightly more brown sugar than white because it holds moisture and keeps crumbs from feeling sandy.
Don’t overbake; pull the cookies when the edges are set, and the centers still look a touch underdone. Let them finish on the hot sheet for 3–5 minutes; carryover heat finishes the job.
Chill the dough for 30 minutes if your kitchen is warm, because cold dough spreads less and stays tender. If your cookies still dry out, try reducing oven time by 1–2 minutes next batch.
How to prevent spreading
Measure flour correctly — spoon it into the cup and level it off, or better yet, weigh it. Make sure your butter isn’t too soft; it should be pliable, not greasy.
Chill scooped dough for 10–15 minutes before baking to hold the shape.
Use parchment or a silicone mat; slick surfaces can cause more spread. If cookies spread flat, lower your oven temp by 10–15°F (5–8°C) next time.
Cooling tips before assembling
Cool cookies completely on a wire rack before adding filling. Warm cookies melt the filling and create a soggy sandwich.
If you’re impatient (we’ve all been there), cool in the fridge for 10 minutes to speed things up. Store cooled cookies in a single layer until assembling to avoid breakage.
Assembled sandwiches keep best after resting at room temperature for 30 minutes, so the filling sets a little.
How thick/soft the filling should be
Aim for a filling that holds its shape but still yields when you bite. Too stiff and it feels chalky; too soft and it oozes out the sides.
Start with a basic butter + powdered sugar base, then thin with a teaspoon of milk at a time until spreadable.
For a pillowy texture, fold in a little marshmallow creme. If you want a firmer sandwich for shipping, add a bit more powdered sugar or chill briefly before packing.
Variations
Chocolate chip oatmeal cream pies
Fold a handful of mini or chopped chocolate chips into the cookie dough before scooping. Use semi-sweet or dark chocolate to cut through the sweetness of the filling.
Reduce mix-ins slightly so the cookies still press flat and sandwich neatly. For extra flair, sprinkle a few chips on top of each cookie right after they come out of the oven so they melt into glossy dots.
Pair with a classic vanilla or a chocolate-hazelnut filling for double-decker satisfaction.
Pumpkin spice oatmeal cream pies
Add 1–2 teaspoons pumpkin pie spice and ¼ cup pumpkin purée to the dough for autumn vibes.
Because pumpkin adds moisture, reduce liquid elsewhere (or add a tablespoon more flour) so the dough isn’t too loose.
Bake a touch longer if the cookies feel extra damp because they should still be soft in the center. Fill with a cinnamon-cream cheese frosting to echo the pumpkin spices.
Maple cream filling
Swap part of the vanilla in the filling for 2–3 tablespoons pure maple syrup. Use slightly less milk when thinning the filling since maple adds liquid.
For a deeper flavor, brown the butter before whipping it, as it brings a toffee-like note that pairs beautifully with oats.
Maple filling pairs especially well with chopped toasted pecans folded into the cookie dough. This version feels upscale but is still as easy as pie (or, well, cookie).
Gluten-free option
Use a 1:1 gluten-free all-purpose flour blend that contains xanthan gum for structure. Choose certified gluten-free rolled oats to avoid cross-contamination.
Gluten-free dough can be a bit more delicate; chill it for 30–45 minutes before scooping. Bake until edges are set, and the centers no longer look glossy — they’ll be tender but should hold together.
Assemble gently and consider a slightly firmer filling so the sandwiches travel well.
Storage + Make-Ahead Instructions
How long they last at room temperature
Assembled oatmeal cream pies stay fresh for about 2–3 days at room temperature. Store them in an airtight container so the cookies stay soft and the filling doesn’t crust over.
If your home is warm, keep them in a cooler spot because heat can make the filling too soft. For the best texture, layer them with parchment paper so they don’t stick together.
Refrigeration guidelines
If you want them to last longer, refrigerate the sandwiches for up to 5–6 days. Chilling keeps the filling firm and helps the cookies maintain their shape.
Let them sit at room temperature for 10–15 minutes before serving so the filling softens slightly.
The fridge is especially useful if you used marshmallow creme or cream cheese in your filling, as those stay freshest when cold.
Freezing baked cookies vs. assembled cookie sandwiches
If you want the best long-term results, freeze the cookies and filling separately. Baked cookies (without filling) freeze beautifully for up to 2 months in a sealed container or freezer bag.
Thaw at room temperature, and they’ll taste freshly baked. You can freeze fully assembled sandwiches, but keep in mind the filling may firm up more than expected.
If freezing assembled cream pies, wrap each individually and freeze for up to 1 month to prevent ice crystals and breakage.
Freezing filling separately
The filling freezes well in an airtight container or freezer-safe bag for up to 2 months. Let it thaw in the fridge, then re-whip for a few seconds to bring back its fluffy texture.
If it feels too soft after thawing, add a spoonful of powdered sugar. Storing it separately gives you the most flexibility — bake cookies now, fill later, or assemble only what you need.
Serving Suggestions
These oatmeal cream pie cookies are perfect picnic and party fare because they travel well and don’t crumble into a sad mess. Serve them at room temperature so the filling is soft but not runny.
Make smaller sandwiches for kids and larger ones for adults — bite-sized treats disappear fastest.
Arrange them on a pretty tray or stack in tiers for a party table; add fresh fruit or simple cookies for color contrast.
For picnics, pack them in a shallow airtight container with parchment layers to stop sticking and keep them from squashing.
To wrap individually for gifting, cool the assembled cookies completely, then wrap each in a square of parchment or wax paper and twist the ends like a candy wrapper.
For a fancier look, slip the wrapped cookie into a clear cellophane bag, add a ribbon or twine, and tuck in a small note with the flavor and date.
If you’ll ship or store longer than a day, chill the wrapped cookies briefly so the filling firms up, and include a “best by” note, as these stay best for about 3–5 days refrigerated.
FAQs
Can I make these without marshmallow creme?
Yes! The filling is just as delicious with a simple vanilla buttercream. Marshmallow creme adds that classic “Little Debbie” fluff, but you can skip it and still get a smooth, creamy center.
If you want extra softness without the sweetness, add a teaspoon of milk or cream to loosen the buttercream slightly.
Can I use quick oats instead of rolled oats?
You can, but the texture will change. Quick oats create a softer, more uniform cookie with less chew.
Rolled oats give you those hearty, bakery-style bites. If quick oats are all you have, reduce the amount by a tablespoon or two so the cookies don’t dry out.
Can I make them smaller/larger?
Absolutely. For minis, use a teaspoon-sized scoop and reduce the bake time by a few minutes. For oversized cookies, use a large scoop and add a few minutes to the bake time.
No matter the size, pull them when the edges are set, and the centers still look soft. That’s your ticket to perfect cream pie texture.
How do I keep the cookies soft?
Don’t overbake — seriously, that’s half the battle. Store them in an airtight container with a small piece of bread or a slice of apple on the side (not touching the cookies).
The cookies absorb moisture and stay soft longer. Also, assemble only after the cookies have fully cooled, so the filling doesn’t melt into the crumb.
Can I make the filling less sweet?
Yes, and it’s easy. Add a tablespoon or two of cream cheese to cut the sweetness and add tang. You can also reduce the powdered sugar slightly, then adjust the texture with a splash of milk.
A pinch of salt works wonders, too, because it doesn’t make the filling salty, just balanced.
Homemade Oatmeal Cream Pie Cookies with Fluffy Vanilla Filling
Difficulty: Easy12
Cookies15
minutes12
minutes30
minutesSoft, chewy oatmeal cookies sandwiched with a fluffy vanilla cream filling for the perfect nostalgic treat.
Ingredients
- Oatmeal Cookies
1 cup rolled oats
1 cup all-purpose flour
½ cup brown sugar
¼ cup granulated sugar
½ cup unsalted butter, softened
1 large egg
1 tsp vanilla extract
½ tsp cinnamon
½ tsp baking soda
¼ tsp salt
- Cream Filling
½ cup unsalted butter, softened
1 ½ cups powdered sugar
1 tsp vanilla extract
2–3 tbsp marshmallow creme (optional)
Directions
- Preheat oven to 350°F (175°C) and line a baking sheet with parchment.
- Beat butter, brown sugar, and granulated sugar until creamy.
- Add the egg and vanilla; mix until smooth.
- In a separate bowl, whisk oats, flour, cinnamon, baking soda, and salt.
- Add dry ingredients to the wet mixture and stir until combined.
- Scoop tablespoon-sized portions onto the baking sheet.
- Bake 10–12 minutes or until edges are set and centers look slightly soft.
- Cool cookies completely before filling.
- For the filling, beat butter until smooth. Add powdered sugar and vanilla; whip until fluffy. Fold in marshmallow creme if using.
- Spread or pipe filling onto half the cookies and top with the remaining cookies to create sandwiches.
Notes
- For softer cookies, remove them from the oven while the centers look underbaked.
- Chill the dough for 20 minutes if your cookies spread too much.
- Filling can be made without marshmallow creme — just add a splash of milk if needed.
- Store assembled sandwiches in an airtight container for 2–3 days or refrigerate for longer freshness.

Hi, I’m Sorenna Blythe, the baker and writer behind Mix Whisk Bake. I share simple, reliable recipes and honest kitchen moments to help home bakers bake with confidence and joy. When I’m not testing new treats, you’ll find me sipping coffee and dreaming up my next bake.


