Chocolate and peanut butter are a match made in dessert heaven. One bite and you’ll wonder why you ever ate brownies any other way.
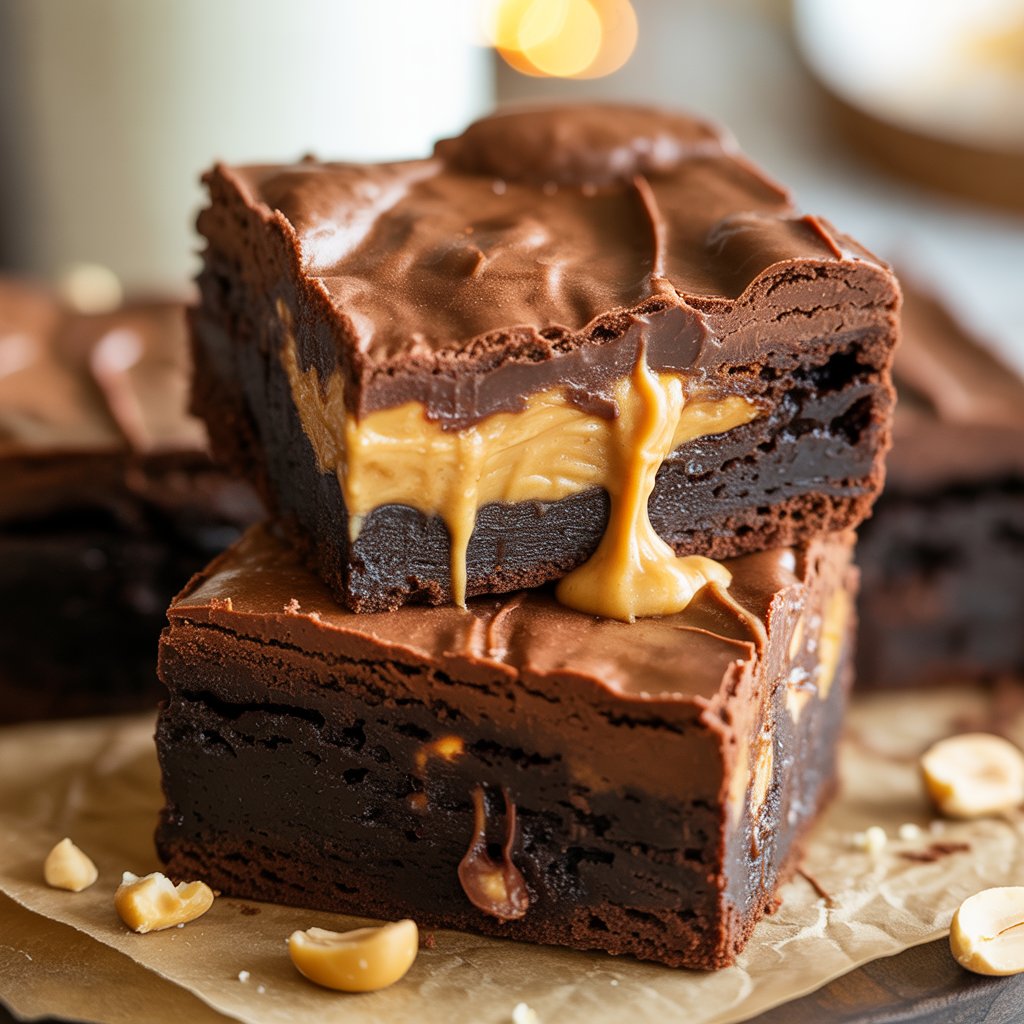
These peanut butter stuffed brownies are fudgy, gooey, and ridiculously rich. The center melts like a dream and tastes like a secret surprise you absolutely saw coming, but still cheer for every time.
Best of all, they’re easy. No fancy steps. No drama. Just a crowd-pleasing treat that disappears faster than you can say, “Save me a piece!”
Why You’ll Love These Peanut Butter Stuffed Brownies
Fudgy brownies with a creamy peanut butter filling
These brownies hit the fudgy sweet spot — dense, moist, and slightly gooey. Think chocolate that clings to the fork, not cake that crumbles away.
The peanut butter center adds a creamy contrast that makes every bite feel like a little surprise party.
It’s texture play: rich chocolate outside, silky peanut butter inside. That contrast keeps your brain (and taste buds) coming back for more.
Simple ingredients — no special equipment
You don’t need a mystery gadget hidden in the back of the cupboard. Basic pantry staples and a few fresh items are all it takes: cocoa or chocolate, butter, sugar, eggs, flour, and peanut butter.
A bowl, a whisk or a spoon, a baking pan, and a spatula are enough. No stand mixer, no tempering, no temple-level baking skills required.
If you can stir, you can make these. Seriously, my grandma could make them with one eye closed.
Perfect for parties, bake sales, or satisfying cravings
These brownies travel well and vanish fast. Cut them into squares, stack them on a plate, and watch the crowd do its thing. They’re easy to portion for bake sales and robust enough to pack in a picnic.
Bake them a day ahead — the flavors deepen — or make minis for finger-food friendly events.
They work for birthdays, potlucks, and the “I need chocolate now” emergencies.
Pro tip: sprinkle a little flaky sea salt on top and watch them disappear even faster.
Customizable (swirls, topping variations, etc.)
Want a peanut butter swirl instead of a stuffed center? Do it. Prefer a crunchy texture? Fold chopped peanuts or peanut butter cups into the batter.
Chocolate chips, caramel drizzle, toasted coconut, or a dusting of powdered sugar all play well here.
Gluten-free or dairy-free? Swap flours and use dairy-free butter and vegan chocolate. This recipe is a canvas, so paint it with whatever you (or your crowd) love.
Ingredients You’ll Need
For the Brownie Batter
- Butter – Melted for a rich, fudgy texture that keeps the brownies soft and dense.
- Granulated sugar – Sweetens the batter and helps create that classic crackly top.
- Eggs – Bind everything together and add moisture for a chewy bite.
- Vanilla extract – Boosts the chocolate flavor and adds warmth.
- Cocoa powder – Gives the brownies their deep, bold chocolate taste.
- All-purpose flour – Provides structure without making the brownies cakey.
- Salt – Balances the sweetness and sharpens the chocolate notes.
- Chocolate chips or chunks (optional) – Add pockets of melty chocolate for extra indulgence.
For the Peanut Butter Filling
- Creamy peanut butter – The star of the show; smooth, rich, and perfect for a gooey center.
- Powdered sugar – Sweetens the filling and thickens it so it holds its shape while baking.
- Vanilla extract (optional) – Adds a hint of warmth and balances the peanut flavor.
- Pinch of salt – Enhances the flavor and keeps the filling from tasting flat.
Step-by-Step Instructions
1. Prep the pan and oven
Preheat your oven to 350°F (175°C). Line an 8×8 or 9×9 inch pan with parchment, leaving an overhang on two sides.
Grease the paper or pan lightly so the brownies lift out easily. This little prep step makes slicing and cleanup a breeze.
2. Prepare the peanut butter filling
Stir creamy peanut butter with powdered sugar until the mixture is thick and scoopable. Add a splash of vanilla and a pinch of salt if you like, as they bring out the peanut flavor.
You want a filling that holds its shape when spooned; think firm frosting, not runny sauce.
If it’s too stiff, loosen with a tiny splash of milk; if it’s too loose, add more powdered sugar. Set the filling aside while you make the batter.
3. Make the brownie batter
Melt butter and stir in sugar until slightly glossy. Beat in eggs one at a time, then add vanilla. Fold in cocoa, flour, and salt until just combined, but don’t overmix.
A few streaks of flour are okay; overworking the batter makes the brownies cakey instead of fudgy. If using chocolate chips or chunks, fold them in now.
4. Layer half the brownie batter into the pan
Spoon roughly half the batter into the prepared pan and spread it into an even layer. Use a spatula dipped in warm water for a smooth top if needed.
The bottom layer should be thick enough to cradle the peanut butter without it touching the pan.
5. Add the peanut butter layer (spread or drop in dollops)
Spoon the peanut butter filling over the brownie layer. You can spread it gently into a thin, even sheet, or drop tablespoon-sized dollops for ripples of gooey center.
If you drop dollops, gently press them so they sit slightly into the batter but don’t sink to the bottom.
6. Cover with the remaining brownie batter
Drop spoonfuls of the remaining batter over the peanut butter and spread carefully to cover. Work gently — you want the peanut butter sealed in, not blended into the top layer.
A quick swirl with a knife creates a pretty marbled look if you prefer a partial swirl instead of a full seal.
7. Bake until set but still fudgy
Bake 20–30 minutes, checking at 18 minutes.
The center should look set but slightly glossy; a toothpick inserted in the brownie (avoiding the peanut butter center) should come out with a few moist crumbs, not wet batter.
Oven times vary, so trust the visual cues. Overbaking kills fudginess.
8. Cool completely before slicing for clean edges
Let the brownies cool in the pan on a wire rack until room temperature. For cleaner slices, chill the pan for 30–60 minutes, as this firms the peanut butter center and gives you neat squares.
Use the parchment overhang to lift brownies out, then slice with a sharp knife. Wipe the knife between cuts for tidy edges.
Simple. Straightforward. And worth every crumb!
Pro Tips for Perfect Stuffed Brownies
Keep the peanut butter layer from sinking or mixing
The trick is balance. If the brownie batter is too thin, the peanut butter will sink or swirl itself in without asking. You want a fairly thick, scoopable batter that can “hold” the filling.
Spread a solid base layer of brownie batter first so the peanut butter never touches the pan. When you add the filling, don’t press it down too hard. Just gently place or spread it on top.
Then, when you add the final brownie layer, spoon it over in dollops and lightly connect them, rather than dragging the spatula back and forth. Gentle moves keep your layers separate and pretty.
Best peanut butter to use (creamy vs natural)
Creamy, no-stir peanut butter is your best friend here. It’s smooth, stable, and mixes easily with powdered sugar for a thick, fudgy filling.
Natural peanut butter (the kind with oil on top) can work, but it can be trickier. It’s often runnier and can make the filling too loose, which can cause it to blend into the brownie batter or bake up greasy.
If you only have natural peanut butter, stir it really well and add a bit more powdered sugar to thicken it. In short, for the easiest win, grab classic creamy.
Extra fudgy vs more cakey brownies
If you want brownies that are extra fudgy, like almost underbaked in the best way, focus on fat and time.
Use melted butter, don’t overdo the flour, and pull them from the oven when the center still looks slightly soft. A toothpick with moist crumbs is perfect.
For a more cakey brownie, add a little extra flour and bake them a few minutes longer until the top springs back lightly.
Also, whisking the eggs a bit more introduces air and gives you a slightly lighter texture.
Slicing tips for clean, pretty squares
Clean slices are half the joy, especially if you’re serving these to guests or posting them online. Let the brownies cool completely before cutting; warm brownies will smear and drag the peanut butter layer.
For super sharp edges, chill the whole pan in the fridge for 30–60 minutes. Use a long, sharp knife and run it under warm water, then dry it before each cut. Wipe the blade between slices.
It feels a bit extra, but your brownies will look bakery-level instead of “I tried this with a butter knife and vibes.”
Variations & Add-Ins
Peanut butter cups inside
If you want your brownies to feel like a candy bar surprise, tuck a few peanut butter cups into the batter. Press them gently into the first layer before adding the peanut butter filling or the top batter.
They melt into soft, gooey pockets that make every bite feel like a jackpot. Mini cups work best because they spread out evenly, but full-size cups are a power move too.
Swirl the peanut butter instead of stuffing
If you’re craving something a little more artistic or you simply don’t want to fuss with layers, turn the filling into a swirl.
Drop spoonfuls of peanut butter mixture onto the top of the brownie batter and drag a knife through in loose figure-eights. It creates a marbled look that feels fancy with almost zero effort.
Plus, you get little ribbons of peanut butter in every bite instead of one big center.
Add chocolate chips, chopped peanuts, or sea salt on top
Think of toppings as the final flourish. Chocolate chips add extra melty bits on top, chopped peanuts add crunch, and a sprinkle of flaky sea salt turns the whole thing into a sweet-salty dream.
That hit of salt also makes the chocolate taste deeper and the peanut butter taste toastier. Use one topping or mix all three. There are no rules here.
Make it gluten-free or dairy-free with simple swaps
A gluten-free version is as easy as swapping the flour. Use a good 1:1 gluten-free baking blend and keep everything else the same.
For dairy-free brownies, use dairy-free butter and dairy-free chocolate chips if you’re adding them.
Peanut butter itself is usually dairy-free, so no changes there. The result is just as fudgy, just as rich, and still totally irresistible.
Storage Instructions
How long brownies last at room temperature
These brownies hold up well on the counter for 3–4 days. Keep them in an airtight container to prevent them from drying out. The peanut butter center stays soft, and the brownie stays fudgy.
If your kitchen runs warm, place a small piece of parchment between layers to keep them from sticking together. Just don’t leave them uncovered because air is the enemy of moisture.
How to store them in the fridge
If you like your brownies extra firm and chilled (some people swear cold brownies taste richer), store them in the fridge for up to one week.
Seal them in an airtight container so they don’t pick up fridge odors. Chilling also makes the peanut butter centers denser, which can make slicing leftovers even easier.
For serving, you can enjoy them straight from the fridge or let them sit at room temperature for a few minutes to soften slightly.
How to freeze them (whole pan or individual squares)
Brownies freeze beautifully, so they’re perfect for make-ahead treats. For a full pan, let the brownies cool completely, then wrap the entire slab tightly in plastic wrap and a layer of foil.
Freeze for up to 3 months. To thaw, move the pan to the fridge overnight or let it sit on the counter for a couple of hours.
For individual squares, wrap each piece in plastic wrap or parchment, then place them in a freezer-safe bag or container. This makes it easy to grab one whenever the craving hits.
Thaw slices at room temperature or microwave in very short bursts. They’ll taste just as fudgy and fresh as day one.
Final Words
These peanut butter stuffed brownies are the kind of treat that never sticks around for long. They’re rich, gooey, and wildly satisfying.
Give them a try and see for yourself. Snap a photo, share it, or drop a comment letting me know how they turned out. Your whisk is already halfway to the bowl, so go for it!
FAQs
Can I use natural peanut butter?
You can, but it takes a little extra care. Natural peanut butter is runnier and can separate, which may cause the filling to blend into the batter.
If you use it, stir it very well and add extra powdered sugar to thicken it. For the easiest, cleanest results, classic creamy peanut butter works best.
Can I double the peanut butter filling?
Absolutely. If you want a thicker, more dramatic peanut butter layer, double the filling ingredients. Just make sure you spread it evenly and keep a solid layer of brownie batter underneath and on top.
More filling means a slightly longer bake time, so keep an eye on the center as it sets.
How do I know when the brownies are done?
Look for a set top and slightly firm edges. The center should look glossy but not wet.
Insert a toothpick into the brownie portion, not the peanut butter, and you should see moist crumbs, not raw batter. Pull them out a little early rather than a little late if you want maximum fudginess.
How do I make them extra thick?
Use an 8×8-inch pan instead of a 9×9, and don’t over-spread the batter. A smaller pan creates taller layers and a richer bite.
You can also add a few extra tablespoons of flour for more structure or double the entire recipe if you want bakery-level height. Just be ready for a longer bake time and a whole lot more brownie joy.

Hi, I’m Sorenna Blythe, the baker and writer behind Mix Whisk Bake. I share simple, reliable recipes and honest kitchen moments to help home bakers bake with confidence and joy. When I’m not testing new treats, you’ll find me sipping coffee and dreaming up my next bake.


