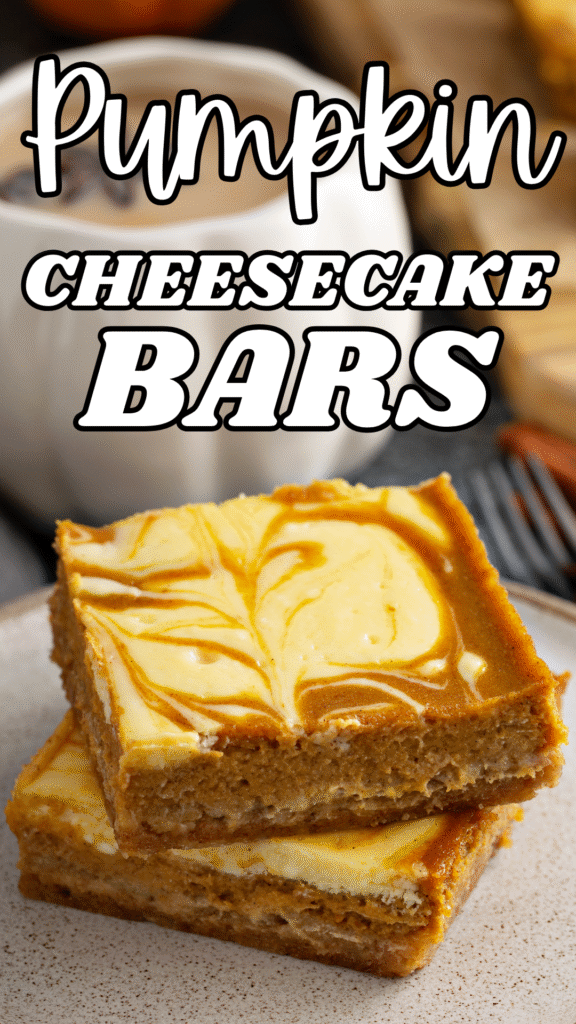
Pumpkin cheesecake bars are the kind of dessert that makes you stop mid-bite and say, “Wow… I need another one.”
They start with a buttery graham cracker crust, then get topped with a creamy cheesecake layer and a cozy, spiced pumpkin swirl that tastes like fall in every forkful.
They slice beautifully, travel well, and always disappear faster than you expect.
They’re perfect for fall gatherings, Thanksgiving dessert tables, or any moment when you want something easy that still feels bakery-worthy.
Make them ahead, chill them, and watch everyone come back for seconds!
Why You’ll Love These Pumpkin Cheesecake Bars
Perfect balance of creamy, spiced, and sweet
These bars hit all the right notes: tangy cream cheese meets warm pumpkin spice. The cheesecake layer keeps things silky and bright.
The pumpkin swirl brings cozy spices—cinnamon, nutmeg, a hint of clove—that don’t overpower.
Together, they create a flavor duet where neither part tries to steal the spotlight. Think orchestra, not a solo act.
Easier than baking a full cheesecake
You get cheesecake flavor without the fussy setup. No springform pan. No delicate water baths.
Mix, layer, bake, chill. That’s it.
Less worry means fewer kitchen mishaps and more time to sip your coffee while pretending you knew what you were doing all along.
No water bath required
A water bath is great for classic cheesecakes, but it’s one more step and one more pan to clean. These bars are forgiving. The shallower pan and thinner cheesecake layer bake evenly without steam.
You’ll still get a smooth, creamy texture minus the drama of juggling boiling water and foil-wrapping.
Portable, sliceable, and great for parties
Bars travel well. They’re easy to slice into neat squares and easy to eat standing up. No fork battles, no messy plates. Just hand one over and watch people light up.
They’re perfect for potlucks, school events, or hiding in the fridge for a midnight treat.
Make-ahead friendly
Make them a day or two in advance, and your life instantly gets easier. Chilling firms up the layers and improves flavor. The spices deepen overnight.
Tools & Equipment
- 9×13 baking pan
Provides the perfect depth for even baking and clean, sturdy bars. - Parchment paper
Makes lifting the bars out of the pan effortless and prevents sticking. - Mixing bowls
You’ll need a few to keep the crust, cheesecake, and pumpkin layers organized. - Electric mixer
Helps whip the cream cheese until smooth and lump-free, which is key for a creamy texture. - Spatula
Great for scraping bowls clean and spreading batter evenly. - Measuring cups & spoons
Ensures your ingredients stay accurate, which keeps the texture consistent. - Offset spatula (optional)
Handy for smoothing layers and creating a more polished, bakery-style finish.
Ingredients Overview
For the Graham Cracker Crust
- Graham cracker crumbs
Creates a buttery, crunchy base that holds everything together. - Granulated sugar
Adds a touch of sweetness and helps the crust firm up. - Melted butter
Binds the crumbs and gives the crust its rich, toasty flavor.
For the Cheesecake Layer
- Cream cheese
The heart of the dessert—smooth, creamy, and tangy. - Granulated sugar
Sweetens the cheesecake without overpowering it. - Large eggs
Provide structure and help the cheesecake bake evenly. - Vanilla extract
Adds warmth and depth to the overall flavor.
For the Pumpkin Layer
- Pumpkin purée
Brings moisture, color, and classic fall flavor. - Brown sugar
Adds sweetness with a hint of caramel richness. - Pumpkin pie spice
Gives that iconic blend of cinnamon, nutmeg, ginger, and cloves. - Ground cinnamon
Boosts the warm spice profile and balances the pumpkin. - All-purpose flour
Slightly thickens the pumpkin mixture so it sits beautifully on top. - Additional egg (optional)
Helps adjust the consistency if the pumpkin mixture needs extra structure.
Step-by-Step Instructions
1. Prepare the crust — mix, press into the pan, and pre-bake
Combine graham cracker crumbs, sugar, and melted butter until the mixture holds together when pinched.
Press the crumbs firmly and evenly into the bottom of a 9×13 pan because you want a compact, level base so the bars slice cleanly. Use the bottom of a measuring cup or a flat glass to tamp it down.
Pre-bake the crust at 350°F (175°C) for 8–10 minutes to set and deepen the flavor. Let it cool slightly while you make the fillings.
2. Make the cheesecake batter — beat cream cheese, sugar, eggs, and vanilla
Start with room-temperature cream cheese, so it smooths out quickly. Beat the cream cheese and sugar until silky and lump-free; scrape the bowl often.
Add eggs one at a time, mixing just until blended. Overbeating traps air and can lead to cracks. Stir in vanilla last and stop as soon as the batter is smooth. The texture should be thick but pourable.
3. Make the pumpkin layer — stir pumpkin, spices, sugar, and flour together
Whisk pumpkin purée, brown sugar, pumpkin pie spice, cinnamon, and the flour until uniform. The flour acts as a gentle stabilizer so the pumpkin layer doesn’t weep or sink into the cheesecake.
If the mix looks very loose, whisk in one beaten egg to help it hold its shape. Taste quickly and adjust spice or sweetness as needed.
4. Assemble — layer cheesecake mixture, dollop pumpkin mixture, and swirl
Pour the cheesecake batter evenly over the cooled crust and smooth it with a spatula or offset spatula. Drop spoonfuls of the pumpkin mixture across the cheesecake in an even pattern.
Use a butter knife or skewer to swirl the two layers — drag the tool in an “S” or figure-eight pattern to create pretty marbling without overmixing. Less is more here; too many swirls will muddy the layers.
5. Bake — until set but slightly jiggly
Bake at 325°F (165°C) for about 30–40 minutes, checking after 25 minutes. You’re aiming for set edges and a slightly wobbly center, as the bars will firm as they cool.
A toothpick in the center may come out with moist crumbs but not liquid. Avoid overbaking; that’s the quickest route to dry texture and cracks.
6. Cool completely — then chill several hours for clean slicing
Turn off the oven and crack the door for 10–15 minutes if you want to be extra careful about sudden temperature changes (this reduces cracking).
Move the pan to a cooling rack and cool to room temperature, about 1 hour. Then refrigerate for at least 4 hours, ideally overnight. Chilling firms the layers and makes slicing neat and tidy.
7. Slice and serve — optional whipped cream or caramel drizzle
Lift the chilled slab out using the parchment overhang and place it on a cutting board. Use a sharp knife and wipe it clean between cuts for tidy squares.
For restaurant-style slices, warm the knife under hot water, dry it, then slice.
Serve chilled or at cool room temperature with a dollop of whipped cream, a drizzle of caramel, or a sprinkle of cinnamon. These extras are welcome, but the bars taste great all on their own.
Recipe Tips & Tricks
How to prevent cracks
Cracks usually come from too much air in the batter or sudden temperature changes. Mix the cheesecake batter just until smooth; no need to whip it like frosting.
Scrape the bowl often to avoid lumps, but don’t overbeat. Bake at a lower temperature and pull the bars out when the center still has a gentle wobble. Letting the bars cool slowly helps too.
How to get clean cuts
A sharp knife is your best friend here. Run the knife under hot water, wipe it dry, slice once, then clean the blade before the next cut.
It sounds fussy, but it makes every slice look like it came from a bakery. Cold bars also cut cleaner than warm ones, so don’t skip the chill time.
Best way to swirl pumpkin and cheesecake layers
The secret is not overthinking it. Add the pumpkin mixture in small dollops over the cheesecake layer, then drag a knife or skewer through the batter in smooth, gentle motions.
Figure-eights work well. Avoid stirring or swirling too much because you want defined marbling, not pumpkin soup.
Make-ahead storage tips
Pumpkin cheesecake bars love fridge time. Make them a day ahead, chill overnight, and they’ll be even better the next day as the spices develop. Store tightly covered for up to 4 days.
For longer storage, freeze in an airtight container for up to 2 months. Thaw in the fridge, not on the counter, to keep the texture creamy.
Ingredient substitutions
- Gingersnap crust: Swap graham crumbs for crushed gingersnaps for extra spice and a subtle crunch.
- Light cream cheese: Works in a pinch, but expect slightly softer bars. Full-fat gives the creamiest texture.
- Fresh pumpkin purée: Totally fine. Just make sure it’s thick and not watery—strain with a paper towel if needed.
- Spice adjustments: Add more cinnamon, reduce cloves, or use your own blend. Your taste buds make the rules.
Variations
Gingersnap crust version
Swap graham cracker crumbs for crushed gingersnap cookies in a 1:1 ratio. The crust will be spicier and sturdier, so press it firmly and prebake the same 8–10 minutes.
Gingersnaps pair beautifully with pumpkin spices and add a warm, molasses-like bite. Use slightly less added cinnamon in the pumpkin layer if your gingersnaps are strongly spiced.
Serve with a dollop of whipped cream and a sprinkle of crystallized ginger for extra flair.
Chocolate swirl pumpkin cheesecake bars
Fold ½ cup melted semi-sweet chocolate into a small portion of the cheesecake batter, or drizzle melted chocolate over the pumpkin dollops.
Swirl with a skewer for dramatic dark ribbons against the orange pumpkin. Chocolate tones down sweetness and adds depth, which is great for chocoholics.
Bake and chill exactly as the base recipe; chocolate won’t change timing. Top with shaved chocolate or a light dusting of cocoa before serving.
Maple pumpkin cheesecake bars
Replace the brown sugar in the pumpkin layer with the same amount of pure maple syrup (about ½ cup) and reduce other liquids slightly.
Add 1–2 teaspoons of real maple extract for a stronger maple profile if desired. Maple brings a soft, woodsy sweetness that feels cozy without overpowering the cream cheese.
Consider swapping part of the granulated sugar in the cheesecake layer for 2–3 tablespoons of maple syrup to tie the flavors together. Garnish with toasted pecans for a classic fall finish.
Gluten-free crust option
Use gluten-free graham crackers or almond flour as a 1:1 replacement for graham crumbs. If using almond flour, add 1–2 tablespoons extra melted butter to help bind the crust.
Press and prebake as usual, and watch closely since alternative crusts can brown faster. This keeps the bars friendly for gluten-sensitive guests without sacrificing texture.
Label the platter clearly so everyone knows they’re GF.
How to Store & Freeze
Store these bars in the fridge once they’re fully chilled and cover the pan tightly with plastic wrap or transfer slices to an airtight container so they don’t pick up fridge odors.
Keep them at refrigerator temperature (around 4°C / 40°F), and they’ll stay fresh for up to 4 days.
If you want longer storage, freeze them: cut into squares, place pieces in a single layer on a baking sheet to flash-freeze for an hour, then stack with parchment between layers in an airtight container or freezer bag to prevent sticking.
Frozen bars keep well for up to 2 months; label the container with the date so you don’t play freezer roulette later.
To thaw, move the container to the fridge and let it defrost slowly overnight because this preserves the creamy texture.
If you’re in a hurry, let slices sit at room temperature for 20–30 minutes before serving, but don’t thaw on the counter for hours.
Avoid repeated refreezing; it ruins texture faster than you can say “one more piece.”
When serving after chilling or freezing, a quick dusting of cinnamon, a spoonful of whipped cream, or a warm caramel drizzle brings the bars back to life.
Serving Suggestions
A little garnish goes a long way with pumpkin cheesecake bars, and each option adds its own kind of magic.
A swirl of whipped cream softens the spices and gives every bite a light, airy finish.
A caramel drizzle brings warm sweetness and makes the bars feel instantly more decadent, especially if you warm the caramel just enough to melt into the swirls.
For extra texture, sprinkle crushed pecans on top; they add a buttery crunch that plays perfectly with the creamy layers.
A simple dusting of cinnamon works too, giving a pop of color and boosting the warm fall flavors without overpowering anything.
And if you want to serve these bars at their best, pair them with coffee or tea, or set them out proudly on your Thanksgiving dessert table—they fit right in with all the seasonal favorites and tend to disappear before the pie does.
FAQs
Can I use fresh pumpkin instead of canned?
Yes, absolutely. Just make sure the fresh pumpkin purée is thick and not watery. If it looks loose, strain it with paper towels to remove excess moisture.
Thick pumpkin gives the bars a better swirl and a creamier finish.
Why did my bars turn out too soft?
They may have needed more chill time. Cheesecake firms up as it cools, so let the bars chill at least 4 hours or overnight. Too much moisture in the pumpkin layer or underbaking can also cause softness.
Check for set edges and a slightly jiggly center before removing them from the oven.
Can I halve the recipe?
Yes, this recipe halves beautifully. Use an 8×8 pan and bake for a slightly shorter time. Keep an eye on the center starting around the 20–25 minute mark.
Can these be made gluten-free?
Definitely. Swap the graham cracker crumbs for gluten-free graham crackers or use almond flour with a little extra butter.
Both options create a sturdy, delicious crust without changing the overall texture of the bars.
Do I have to use a water bath?
Nope! One of the perks of cheesecake bars is that they bake evenly without the fuss of a water bath. The thinner cheesecake layer also reduces the risk of cracking and overbaking.
How do I avoid over-baking cheesecake?
Watch for set edges and a center that still has a gentle wobble. Cheesecake continues to firm up as it cools, so pulling it from the oven early prevents dryness.
Bake at a lower temperature and avoid opening the oven door too often because it can drop the heat and cause uneven baking.
Creamy Pumpkin Cheesecake Bars (Easy Fall Dessert Recipe)
Difficulty: Easy16
Bars20
minutes40
minutes4
hours30
minutesCreamy pumpkin cheesecake bars with a spiced swirl and a buttery graham crust—simple to make and perfect for fall or Thanksgiving.
Ingredients
- Graham Cracker Crust:
2 cups graham cracker crumbs
2 tbsp granulated sugar
½ cup melted butter
- Cheesecake Layer:
16 oz cream cheese, softened
½ cup granulated sugar
2 large eggs
1 tsp vanilla extract
- Pumpkin Layer:
1 cup pumpkin purée
½ cup brown sugar
1 tsp pumpkin pie spice
½ tsp ground cinnamon
1 tbsp all-purpose flour
1 egg (optional, for a thicker consistency)
Directions
- Preheat oven to 350°F (175°C). Line a 9×13 pan with parchment.
- Mix graham crumbs, sugar, and melted butter. Press into the pan and bake 8–10 minutes. Cool slightly.
- Beat cream cheese and sugar until smooth. Add eggs one at a time, then mix in vanilla.
- In a separate bowl, combine pumpkin purée, brown sugar, spices, flour, and optional egg.
- Pour cheesecake batter over the crust. Add spoonfuls of the pumpkin mixture on top. Swirl gently with a knife.
- Reduce oven to 325°F (165°C). Bake 30–40 minutes, until edges are set and center is slightly jiggly.
- Cool completely, then chill at least 4 hours before slicing.
Notes
- For clean slices, wipe the knife between each cut.
- Add the optional egg if your pumpkin mixture seems thin.
- Substitute gingersnaps for a spicier crust.
- Store in the fridge up to 4 days or freeze up to 2 months.

Hi, I’m Sorenna Blythe, the baker and writer behind Mix Whisk Bake. I share simple, reliable recipes and honest kitchen moments to help home bakers bake with confidence and joy. When I’m not testing new treats, you’ll find me sipping coffee and dreaming up my next bake.


