
Red velvet cake isn’t just beautiful — it’s unforgettable. That deep red color, soft crumb, and creamy white frosting make it a true classic for birthdays, holidays, and everything in between.
Unlike regular chocolate cake, red velvet has a lighter cocoa flavor with a gentle tang from buttermilk and vinegar. It’s rich, but not heavy. Sweet, but perfectly balanced.
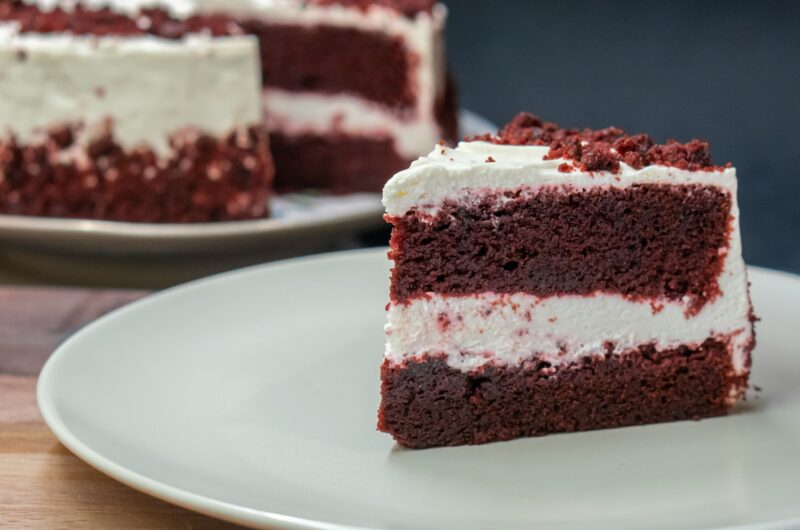
This recipe gives you an ultra-moist, tender cake layered with smooth, tangy cream cheese frosting.
Follow the simple steps, and you’ll have a bakery-style red velvet cake that looks impressive and tastes even better.
What Is Red Velvet Cake?
Red velvet cake has been around since the early 1900s, with roots in American baking, and it became especially popular during the Great Depression when simple ingredients were used creatively to produce a soft, “velvety” crumb.
The name comes from that texture—fine, tender, and smooth—not just the color.
Flavor-wise, it is not a strong chocolate cake; it contains a small amount of cocoa powder, which gives a gentle chocolate note rather than a deep, rich cocoa taste.
What truly sets it apart is the slight tang from buttermilk and vinegar, which react with the baking soda to create a soft rise while adding a subtle brightness that balances the sweetness.
This combination makes the cake taste richer and more complex without being heavy. Its vibrant red color originally came from a natural reaction between cocoa powder and acidic ingredients, but today most bakers use red food coloring to achieve that bold, signature look.
The contrast between the deep red cake and the creamy white frosting is part of what makes it so iconic, instantly recognizable, and perfect for special occasions.
Why You’ll Love This Recipe
Soft and Fluffy Crumb
This recipe creates a cake that is incredibly soft with a fine, tender crumb.
The combination of buttermilk, a small amount of cocoa powder, and the right balance of fat keeps the texture light while still feeling rich.
Each slice holds together beautifully without being dense or dry. If you follow the mixing steps carefully and avoid overmixing, you’ll get that smooth, velvety texture red velvet is known for.
Rich but Not Overly Chocolatey
Red velvet should never taste like a heavy chocolate cake. In this recipe, the cocoa adds depth and a gentle warmth, not overpowering sweetness.
The slight tang from the buttermilk and vinegar balances the sugar and enhances the flavor, making each bite taste layered and smooth.
It feels indulgent, yet light enough to enjoy a full slice without it feeling too rich.
Easy, Beginner-Friendly Method
You don’t need advanced baking skills to make this cake successfully. The steps are clear, simple, and designed to guide you from start to finish with confidence.
Basic pantry ingredients and standard baking tools are all you need. As long as you measure properly and mix in the right order, the process feels manageable and rewarding.
Perfect for Birthdays, Holidays, and Special Occasions
Red velvet cake always stands out on a dessert table. The bold red layers paired with creamy white frosting create a striking contrast that feels festive and elegant at the same time.
It’s impressive enough for celebrations, yet simple enough to make at home without stress.
Whether you’re baking for family, friends, or a special event, this cake delivers both in presentation and flavor.
Ingredients You’ll Need
Dry Ingredients
- 2½ cups (315g) all-purpose flour
- 2 tablespoons (15g) unsweetened cocoa powder
- 1 teaspoon baking soda
- ½ teaspoon salt
Wet Ingredients
- ½ cup (115g) unsalted butter, softened
- 1½ cups (300g) granulated sugar
- 2 large eggs, room temperature
- 1 cup (240ml) buttermilk, room temperature
- ½ cup (120ml) vegetable oil
- 2 teaspoons vanilla extract
- 1 teaspoon white vinegar
- 1–2 tablespoons red food coloring (adjust for desired color intensity)
Cream Cheese Frosting
- 16 oz (450g) full-fat cream cheese, softened
- ½ cup (115g) unsalted butter, softened
- 4 cups (480g) powdered sugar, sifted
- 2 teaspoons vanilla extract
Ingredient Tips & Substitutions
Can I Use Natural vs Dutch Cocoa?
For this recipe, natural unsweetened cocoa powder works best. It is slightly acidic, which reacts properly with the baking soda and vinegar to help the cake rise and develop its soft texture.
Dutch-processed cocoa is less acidic because it has been treated to neutralize its natural acidity.
If you use Dutch cocoa, the cake may not rise the same way, and the flavor can taste smoother but less bright.
If Dutch cocoa is all you have, the cake will still bake, but the texture may be slightly denser, and the color may not be as vibrant.
Buttermilk Substitutes
Buttermilk adds moisture and a gentle tang that defines red velvet cake.
If you don’t have buttermilk, you can easily make a substitute by adding 1 tablespoon of white vinegar or lemon juice to 1 cup of milk. Let it sit for 5–10 minutes before using.
The milk will slightly curdle, which is exactly what you want. Plain yogurt or sour cream thinned with a little milk can also work.
Keep the texture pourable and smooth, so it blends easily into the batter.
Gel vs Liquid Food Coloring
Both gel and liquid food coloring can be used, but they behave differently. Liquid coloring is easier to find and blends smoothly, though you may need more of it to achieve a deep red shade.
Gel coloring is more concentrated, so you use less and get a stronger color without thinning the batter. If you want a bold, bakery-style red, gel coloring is usually the better choice.
Always mix it in fully to avoid streaks.
Making It Without Food Coloring
You can skip the food coloring completely if you prefer. The cake will turn a light brown with a slight reddish tint from the cocoa and acidic ingredients.
The flavor and texture will stay the same. If you still want a natural red tone, you can experiment with beet powder, though the shade will be softer and more muted.
The color may change, but the cake will still be moist, tender, and delicious.
Step-by-Step Instructions
1. Prep the Pans and Preheat Oven
Start by preheating your oven to 350°F (175°C) so it’s fully heated before the batter goes in. Grease two 8-inch round cake pans, then line the bottoms with parchment paper for easy removal.
Lightly grease the parchment as well. This small step prevents sticking and helps your layers release cleanly after baking.
2. Mix Dry Ingredients
In a medium bowl, whisk together the flour, cocoa powder, baking soda, and salt. Whisking evenly distributes the leavening and removes lumps from the cocoa.
This ensures the cake rises properly and has a smooth texture throughout.
3. Cream Butter and Sugar
In a large mixing bowl, beat the softened butter and granulated sugar together until light and fluffy. This usually takes about 2–3 minutes.
Creaming adds air to the batter, which helps create a soft crumb. Don’t rush this step, as it directly affects the cake’s texture.
4. Add Eggs and Wet Ingredients
Add the eggs one at a time, mixing well after each addition. This keeps the batter smooth and prevents curdling.
Next, mix in the vegetable oil and vanilla extract until fully combined. The oil adds moisture, while the vanilla enhances the overall flavor.
5. Alternate Dry Ingredients with Buttermilk
Add the dry ingredients in three additions, alternating with the buttermilk in two additions. Start and end with the dry mixture.
Mix on low speed and stop as soon as everything is combined. Overmixing can make the cake dense, so keep it gentle.
6. Add Food Coloring & Vinegar
Stir in the red food coloring until the batter is evenly tinted. Then mix in the white vinegar.
The vinegar reacts with the baking soda, giving the cake a better rise and contributing to its soft texture. Mix just until incorporated.
7. Bake
Divide the batter evenly between the prepared pans and smooth the tops. Bake for 28–32 minutes, or until a toothpick inserted into the center comes out clean or with a few moist crumbs.
Avoid opening the oven door too early, as this can cause the cake to sink.
8. Cool Completely
Let the cakes cool in their pans for about 10–15 minutes. Then carefully turn them out onto a wire rack and remove the parchment paper.
Allow the layers to cool completely before frosting. A warm cake will melt the frosting and make decorating difficult.
9. Make Cream Cheese Frosting
In a large bowl, beat the softened cream cheese and butter together until smooth and creamy. Gradually add the powdered sugar, mixing on low speed to avoid a sugar cloud.
Once incorporated, add the vanilla extract and beat until light and fluffy. The frosting should be thick but spreadable.
10. Frost and Decorate
Place one cake layer on a serving plate and spread an even layer of frosting on top. Add the second layer and frost the top and sides of the cake.
Use a spatula to smooth it out or create soft swirls for texture. Chill the cake for 20–30 minutes before slicing for clean, neat pieces.
Baking Tips for Success
Don’t Overmix
Once you begin combining the dry ingredients with the wet ingredients, mix gently and only until everything is incorporated.
Overmixing develops too much gluten in the flour, which can make the cake dense and slightly tough instead of soft and tender.
Use low speed on your mixer or fold by hand near the end. Stop as soon as you no longer see streaks of flour. A smooth batter is good, but a heavily beaten batter is not.
Measure Flour Correctly
Too much flour is one of the most common reasons cakes turn out dry. Instead of scooping flour directly with the measuring cup, spoon it into the cup and level it off with a knife.
This keeps the measurement accurate and prevents packing. If you have a kitchen scale, weighing the flour is even better for consistency. Small measuring differences can noticeably change the texture.
Use Room Temperature Ingredients
Room temperature butter, eggs, buttermilk, and cream cheese blend more smoothly and evenly. Cold ingredients can cause the batter to look curdled or uneven, which affects how the cake bakes.
Set your ingredients out about 30–60 minutes before starting. When everything mixes easily, the batter traps air better and creates a softer crumb.
How to Know When It’s Done
Start checking the cake a few minutes before the minimum baking time. Insert a toothpick into the center; it should come out clean or with a few moist crumbs, but no wet batter.
The top should spring back lightly when pressed with your finger. The edges will also begin to pull slightly away from the sides of the pan.
Removing the cake at the right moment keeps it moist and prevents overbaking.
Variations
Red Velvet Cupcakes
To turn this recipe into cupcakes, line a muffin pan with paper liners and fill each about two-thirds full. This gives the batter room to rise without spilling over.
Bake at 350°F (175°C) for 18–22 minutes, checking with a toothpick for doneness. Cupcakes are perfect for parties because they’re easy to serve and require no slicing.
Pipe or spread cream cheese frosting on top, and keep the swirl simple for a clean finish.
Red Velvet Sheet Cake
For a more casual option, bake the batter in a 9×13-inch pan. Spread it evenly so it bakes uniformly. The baking time will be slightly longer, usually around 30–35 minutes.
A sheet cake is ideal when you need more servings with less effort. Frost it directly in the pan and smooth the top with a spatula for a simple, neat presentation.
Red Velvet Layer Cake
If you want a taller and more dramatic cake, divide the batter between three 8-inch pans instead of two. This creates thinner layers that stack beautifully.
Trim the tops if needed to level them before frosting. Adding extra layers gives you more frosting in each slice and a striking look when cut.
Chill the cake briefly after stacking to help it stay stable while you frost the outside.
Red Velvet Cake with White Chocolate Frosting
For a sweeter twist, replace the cream cheese frosting with white chocolate frosting. Melt good-quality white chocolate, let it cool slightly, then beat it into a butter-based frosting until smooth.
The white chocolate adds a creamy sweetness that pairs well with the mild cocoa flavor. This version feels a bit more indulgent while still keeping the cake soft and balanced.
Storage & Make-Ahead Tips
If you plan to serve the cake within a day, you can store it at room temperature in an airtight container, as long as the room is cool and not too warm; this keeps the cake soft without drying it out.
Because the frosting contains cream cheese, refrigeration is the safest option for longer storage, especially in warmer climates, so place the cake in a covered container and refrigerate for up to 4–5 days, then let slices sit at room temperature for about 30 minutes before serving so the texture softens again.
If you want to prepare in advance, you can bake the cake layers ahead of time and freeze them unfrosted.
Wrap each cooled layer tightly in plastic wrap, then in foil, and freeze for up to 2 months for best quality.
When ready to use, thaw the layers in the refrigerator overnight while still wrapped to prevent condensation from making them soggy.
Properly stored, the cake stays moist and flavorful, and planning ahead makes assembling and serving much easier when you need it.
Final Thoughts
Red velvet cake may look impressive, but once you follow the steps, you’ll see how manageable and rewarding it truly is, so don’t hesitate to give it a try even if you’re not an experienced baker.
Take your time, measure carefully, and trust the process—the result is a soft, moist cake with a smooth, tangy frosting that feels special with every slice.
If you make this recipe, I’d love to hear how it turned out for you, so leave a comment and a rating to help others feel confident trying it too. Your feedback also helps improve and refine future recipes.
Serve this cake with a warm cup of coffee for a cozy dessert, a glass of cold milk for a classic pairing, or as the centerpiece for birthdays, holidays, and family gatherings.
However you choose to enjoy it, this cake is meant to be shared and remembered.
FAQs
Is red velvet just chocolate cake?
No. It contains a small amount of cocoa, but it has a lighter chocolate flavor and a slight tang that regular chocolate cake does not have.
Why do you add vinegar?
Vinegar reacts with baking soda to help the cake rise and creates a softer, more tender texture.
Can I make this without buttermilk?
Yes. Add 1 tablespoon of vinegar or lemon juice to 1 cup of milk and let it sit for 5–10 minutes before using.
Can I make it ahead of time?
Yes. You can bake the layers in advance and refrigerate for up to 2 days or freeze for up to 2 months.
Why is my cake dry?
It’s usually caused by overbaking, too much flour, or overmixing the batter. Measure carefully and check for doneness early.
Red Velvet Cake Recipe (Moist, Soft & Bakery-Style)
Difficulty: Easy12
Slices20
minutes30
minutes50
minutesA soft, moist red velvet cake with a light cocoa flavor and smooth, tangy cream cheese frosting. Perfect for celebrations or weekend baking.
Ingredients
- Cake:
2½ cups (315g) all-purpose flour
2 tablespoons cocoa powder
1 teaspoon baking soda
½ teaspoon salt
½ cup (115g) unsalted butter, softened
1½ cups (300g) granulated sugar
2 large eggs
½ cup (120ml) vegetable oil
1 cup (240ml) buttermilk
2 teaspoons vanilla extract
1 teaspoon white vinegar
1–2 tablespoons red food coloring
- Frosting:
16 oz (450g) cream cheese, softened
½ cup (115g) unsalted butter, softened
4 cups (480g) powdered sugar
2 teaspoons vanilla extract
Directions
- Preheat oven to 350°F (175°C). Grease and line two 8-inch cake pans.
- Whisk flour, cocoa powder, baking soda, and salt in a bowl.
- Beat butter and sugar until light and fluffy. Add eggs one at a time.
- Mix in oil and vanilla.
- Alternate adding dry ingredients and buttermilk. Mix gently.
- Stir in food coloring and vinegar until combined.
- Divide batter between pans and bake 28–32 minutes.
- Cool completely before frosting.
- Beat frosting ingredients until smooth and creamy.
- Frost the cake and chill briefly before slicing.
Notes
- Use room temperature ingredients for the best texture.
- Do not overmix the batter.
- Store refrigerated for up to 5 days.

Hi, I’m Sorenna Blythe, the baker and writer behind Mix Whisk Bake. I share simple, reliable recipes and honest kitchen moments to help home bakers bake with confidence and joy. When I’m not testing new treats, you’ll find me sipping coffee and dreaming up my next bake.


