
There’s something magical about biting into a brownie that’s soft in the center, with just the right amount of chew.
It’s the kind that sticks to your fingers a little and makes you pause mid-bite because, wow, it’s that good.
But let’s be honest: not all brownies hit the mark. Some come out dry, cakey, or worse… bland. If you’ve been chasing that perfect fudgy-chewy middle ground, you’re in the right place.
This post will walk you through exactly how to make soft and chewy brownies every single time—no guesswork, no disappointment.
Stick around for easy tips, a foolproof recipe, and what to avoid so your brownies stay bakery-level, not bake-sale flop.
What Makes Brownies Soft and Chewy Instead of Cakey?
Cakey brownies are light, fluffy, and almost resemble chocolate cake squares, which is great if that’s what you’re after.
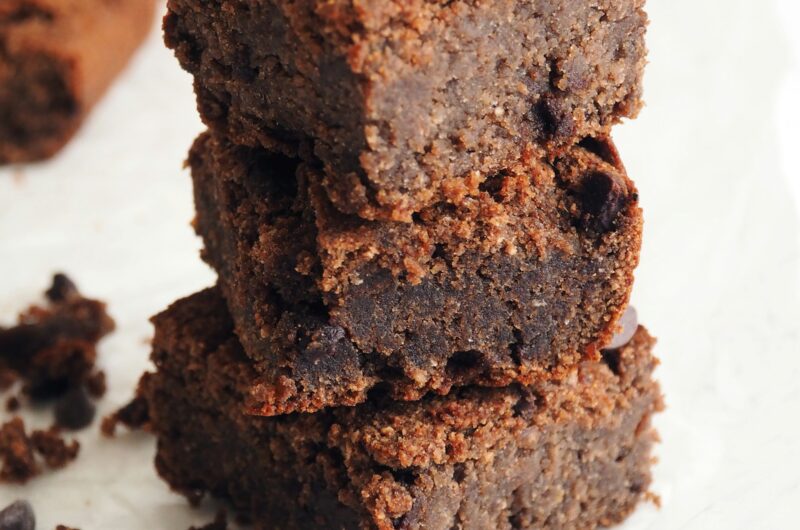
But chewy brownies? They’re dense, rich, moist, and slightly gooey in the middle with crisp edges. The secret lies in how you balance fat, sugar, and flour.
Chewy brownies start with a higher fat-to-flour ratio, meaning more butter (or oil) compared to the amount of flour. Fat brings moisture and richness, which helps avoid that dreaded dry bite.
You also want to use less flour overall because too much and your brownies stiffen up like a chocolate brick.
Skip the baking powder entirely—it creates lift, which is perfect for cakes but a no-go for chewy, dense brownies.
Sugar choice matters too: brown sugar adds more moisture than white, thanks to its molasses content, and also gives a deeper flavor. Using more brown sugar gives you that soft, bendy bite.
And finally, underbaking slightly is key. Pull them from the oven when the edges are set but the center still looks a little underdone. They’ll finish cooking as they cool, locking in that perfect chew.
Nail this formula, and you’ll never settle for cakey again, unless you’re baking an actual cake.
Key Ingredients That Guarantee the Perfect Chew
To get that dreamy, chewy texture every time, it’s not just how you bake, but it’s what you bake with. Here’s a breakdown of the key players and why they matter:
- Butter vs. Oil
Butter gives brownies a richer flavor and firmer edges, while oil brings more moisture and chew. For the best of both worlds, many bakers use a mix. Want super chewy? Lean toward oil. - Brown Sugar
Brown sugar holds more moisture than white sugar, thanks to the molasses in it. That extra moisture is what makes brownies softer, denser, and chewier. - Cocoa Powder
It adds bold chocolate flavor without extra fat or liquid. Natural cocoa also helps keep the texture tight and chewy, unlike melted chocolate, which can lead to a softer, more fudge-like crumb. - Eggs
Eggs bind everything together and help build structure. More eggs = richer texture. Beating them well adds a bit of height while keeping the center gooey. - Flour
Less is more. Using just enough flour keeps brownies from getting cakey. All-purpose flour works well—just don’t overdo it, and always spoon and level it instead of scooping. - Optional: Cornstarch or Espresso Powder
A spoonful of cornstarch can make brownies softer and silkier by tenderizing the crumb. A dash of espresso powder won’t make them taste like coffee, but it will boost the chocolate flavor big time.
Equipment Checklist
Before you dive into brownie bliss, make sure you have these kitchen essentials ready:
- Mixing bowls
At least two—one for wet ingredients, one for dry. Bigger is better for less mess. - Whisk or electric hand mixer
A whisk works fine for blending, but a hand mixer makes it faster (and gives your arm a break). - 8×8 or 9×9 inch baking pan
The go-to size for classic brownies. An 8×8 gives thicker brownies; a 9×9 makes them slightly thinner. - Parchment paper
Makes for easy lifting and cleaner cuts—plus, no sticky corners. - Oven thermometer (optional but helpful)
Ovens lie. This little gadget helps you bake at the right temperature so you don’t overcook your brownies.
Step-by-Step Instructions for Chewy Brownie Success
Follow these steps closely, and your brownies will come out soft, rich, and irresistible every single time.
1. Melt the Butter and Mix with the Sugars
Start by melting your butter until it’s smooth and warm, not bubbling hot. Stir in both brown and white sugar while it’s still warm so they start to dissolve slightly.
This creates that signature shiny, crinkly top everyone loves. Think of this step as the foundation of flavor because it’s where the magic begins.
2. Beat in the Eggs Thoroughly
Add your eggs one at a time and whisk them in like you mean it. This is where structure starts to form. Mixing them well helps give your brownies that delicate balance between fudgy and chewy.
If you rush this part, your texture can end up uneven. So take a minute, it’s worth it.
3. Add Cocoa, Flour, and Salt (But Don’t Overmix)
Sift in your dry ingredients and gently fold them together until just combined. The key here is restraint. Overmixing whips in too much air, which can make your brownies cakey instead of chewy.
Stop stirring as soon as there are no visible streaks of flour—your batter should be thick, dark, and glossy.
4. Pour into a Lined Pan
Line your baking pan with parchment paper, letting it hang over the sides for easy removal. Pour the batter in and spread it evenly with a spatula.
Those overhanging edges will make lifting the brownies out later a breeze and save you from the tragic crumble of trying to scoop them out.
5. Bake Just Until the Edges Are Set
Pop the pan into a preheated oven and bake until the edges are firm but the center still looks slightly soft and underdone. That’s your cue.
Remember, brownies keep baking from residual heat even after they’re out of the oven. Overbake, and you lose the chew. Underbake slightly, and you strike gold.
6. Cool Completely Before Slicing
This is the hardest part, waiting. But let your brownies cool completely in the pan before cutting. This helps them set, intensifies the flavor, and ensures those clean, picture-perfect squares.
Warm brownies might smell heavenly, but patience here pays off with chewy perfection in every bite.
Storage Tips for Keeping Brownies Soft
To keep your brownies soft, chewy, and just as dreamy on day three as they were fresh out of the oven, proper storage is key.
First things first, let them cool completely before you even think about storing them. Warm brownies trap steam, which leads to soggy tops and weird textures.
Once cooled, store them in an airtight container to lock in moisture and keep air out.
At room temperature, they’ll stay delicious for 3 to 4 days—just stack them with parchment between layers if needed to avoid sticking.
Here’s a neat trick: add a slice of bread to the container. Sounds strange, but it works.
The brownies will draw moisture from the bread, staying soft while the bread slowly dries out—sacrifice the slice, save the batch. If you want to keep them longer, freezing is totally fair game.
Just wrap each brownie tightly in plastic wrap, then add a layer of foil or toss them in a freezer-safe bag. They’ll keep for up to 3 months.
When the craving hits, let them thaw at room temp or give them a quick zap in the microwave for that fresh-baked feel. Easy, right? Soft brownies all week with no sorcery required!
Optional Add-Ins and Variations
Brownies are already a crowd-pleaser, but if you want to take things up a notch (or five), add-ins and flavor twists are the way to go. Let’s start with the obvious: chocolate chips or chunks.
Stirring in a handful right before baking gives you melty pockets of chocolate throughout—think lava bursts in every bite. Want to get fancy? Try a mix of dark, milk, and white chocolate chips for contrast.
If you’re into rich, gooey swirls, spoon in a few dollops of peanut butter, Nutella, or caramel right on top of the batter before baking.
Then gently swirl it with a butter knife for a marbled effect that looks impressive but takes zero effort.
For those who like a little crunch, chopped walnuts or pecans add texture and a toasty bite that plays well with all that softness.
Just don’t go overboard, though, because about ½ cup is plenty.
Feeling adventurous? A few drops of peppermint extract can turn your brownies into holiday gold, while espresso powder deepens the chocolate flavor without making it taste like coffee.
It’s subtle but powerful. With just one or two of these tweaks, your brownies go from classic to unforgettable. Mix, match, and make them your own.
Common Mistakes to Avoid
Even the best brownie recipes can fall flat if a few key mistakes sneak in, but don’t worry, they’re easy to dodge once you know what to watch for. First, overbaking is the ultimate brownie buzzkill.
They might look a little underdone in the center when the timer goes off, but that’s exactly when you want to pull them out.
They keep baking from the residual heat as they cool, and that’s what gives you that soft, chewy middle.
Next up: using too much flour. It’s one of the fastest ways to turn dreamy brownies into dry blocks.
Always spoon your flour into the measuring cup and level it off with a knife, and don’t scoop straight from the bag, or you’ll pack in way more than you need.
Another sneaky culprit? Not mixing the sugar and butter well enough. That step’s not just about blending, but it helps create that shiny, crackly top and ensures the texture stays moist.
So don’t rush it. And finally, the hardest part: cutting before they’re fully cooled. It’s tempting, sure, but slicing too early turns even perfect brownies into a messy, gooey pile.
Let them cool completely in the pan, then lift and cut for clean, chewy squares that hold their shape and taste just right. Avoid these pitfalls, and you’re golden.
Final Thoughts
If you’ve been chasing the perfect chewy brownie, now you’ve got the blueprint. Stick with the base recipe first, then go wild with your own twists—add-ins, swirls, or secret ingredients.
Just remember, it all comes down to balance: the right fat, just enough moisture, and knowing exactly when to pull them from the oven.
Give it a go, share your batch, we want to see those gooey, glorious squares!
FAQs
Can I use oil instead of butter?
Yes, for an even chewier texture, but you’ll miss that rich flavor from butter.
How do I know when brownies are done?
Edges should be set, center slightly jiggly—test with a toothpick that comes out with moist crumbs, not wet batter.
Can I double the recipe?
Yes, just bake in a 9×13” pan and add ~5–10 minutes to the bake time.
Why did my brownies turn cakey?
Too much flour or overmixing, or using baking powder.
How to Make Soft and Chewy Brownies Every Time
Difficulty: Easy12
squares10
minutes25
minutes40
minutesThese soft and chewy brownies are rich, fudgy, and packed with chocolate flavor. Perfect for beginners and serious brownie lovers alike.
Ingredients
½ cup (115g) unsalted butter, melted
¾ cup (150g) brown sugar
¼ cup (50g) granulated sugar
2 large eggs
1 tsp vanilla extract
½ cup (45g) unsweetened cocoa powder
½ cup (60g) all-purpose flour
¼ tsp salt
½ cup chocolate chips or chunks (optional)
Directions
- Preheat oven to 175°C (350°F). Line an 8×8-inch pan with parchment paper.
- In a mixing bowl, whisk melted butter with both sugars until smooth.
- Add eggs and vanilla; beat well for about 1 minute until glossy.
- Sift in cocoa powder, flour, and salt. Stir gently until just combined.
- Fold in chocolate chips if using.
- Pour batter into prepared pan and smooth the top.
- Bake for 25–28 minutes, until edges are set but the center is still soft.
- Let cool completely in the pan before slicing.
Notes
- For extra chew, use oil instead of butter or a mix of both.
- Add a swirl of peanut butter or caramel on top before baking for a fun twist.
- Store in an airtight container with a slice of bread to keep them soft for days.
- Can be frozen for up to 3 months—wrap tightly for best results.

Hi, I’m Sorenna Blythe, the baker and writer behind Mix Whisk Bake. I share simple, reliable recipes and honest kitchen moments to help home bakers bake with confidence and joy. When I’m not testing new treats, you’ll find me sipping coffee and dreaming up my next bake.


