This page may contain affiliate links. As an Amazon Associate, I earn from qualifying purchases. If you choose to make a purchase after clicking a link, I may receive a commission at no additional cost to you. My goal is to provide helpful and valuable content, and any commissions help me maintain this site and continue creating high-quality content for my readers. Thank you for your support!
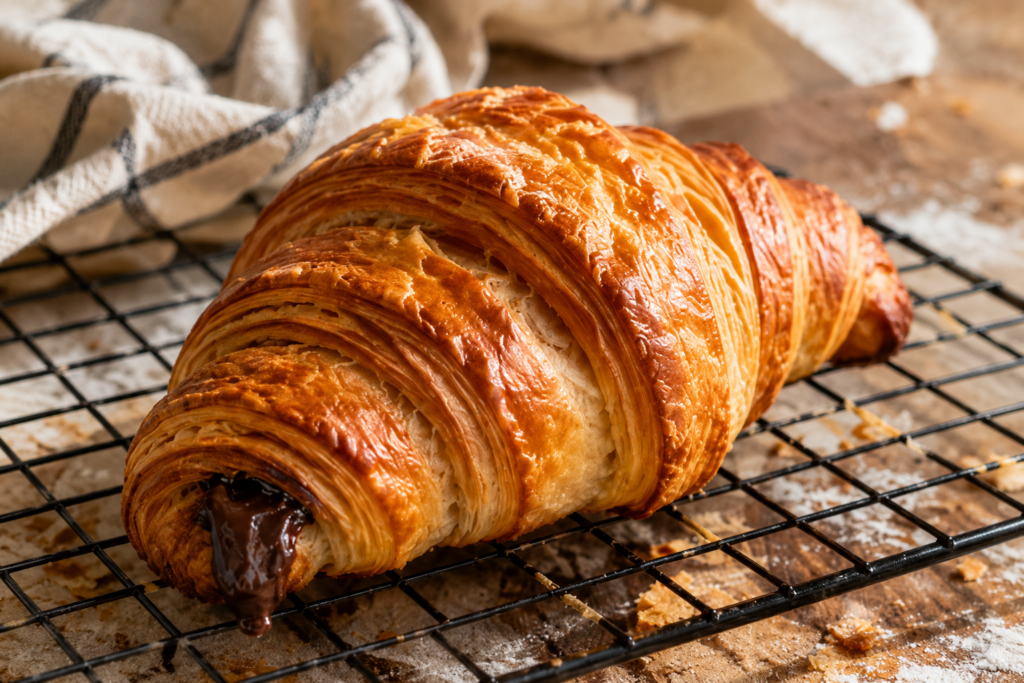
There’s nothing quite like biting into a warm chocolate croissant with crisp, flaky layers and rich melted chocolate in the center.
While they may look like something only a bakery can make, you can create the same delicious results at home with a little patience and the right steps.
Bakery-style chocolate croissants stand out because of their light, buttery layers.
These delicate layers are made by folding butter into the dough several times, a simple technique called lamination.
It may sound challenging at first, but don’t worry because I’ll guide you through each step so you can bake with confidence.
In this guide, you’ll learn how to make the dough, laminate it for beautiful flaky layers, shape the croissants, and bake them until perfectly golden.
Along the way, you’ll also find helpful tips to avoid common mistakes, making it easier to enjoy fresh, bakery-quality chocolate croissants right from your own oven.

What Are Chocolate Croissants (Pain au Chocolat)?
A Brief History of Pain au Chocolat
Pain au chocolat is a classic French pastry made from the same buttery, laminated dough used for traditional croissants.
The name pain au chocolat simply means “chocolate bread,” although the pastry is much lighter and flakier than regular bread.
Its signature texture comes from a process called lamination, where butter is folded into the dough several times to create dozens of thin layers.
As the pastry bakes, those layers puff up and become crisp on the outside while staying light and tender inside.
Pain au chocolat has been enjoyed in French bakeries for generations and is a popular choice for breakfast, brunch, or an afternoon treat with coffee.
Although chocolate croissants and croissants are often thought to be the same, there is one noticeable difference.
A traditional croissant is shaped into a crescent and is usually served plain, though some versions include fillings.
Pain au chocolat is shaped into a rectangle and wrapped around pieces of chocolate before baking.
Because the chocolate is rolled inside the dough, every bite combines buttery, flaky pastry with a rich chocolate center.
Why You’ll Love This Recipe
This recipe is designed to help you make bakery-style chocolate croissants at home without feeling intimidated.
Each step is explained clearly, making it suitable for both beginners and experienced bakers.
The laminated dough creates crisp, flaky layers with a rich buttery flavor that’s difficult to match with store-bought pastries.
Inside, the chocolate melts into a smooth, decadent filling that perfectly complements the light pastry.
Making chocolate croissants at home is also more affordable than buying them from a bakery, especially if you’re baking for family or preparing a larger batch.
You’ll have complete control over the ingredients, the type of chocolate you use, and the size of each pastry.
Another great advantage is that these croissants freeze beautifully.
You can prepare them ahead of time and bake or reheat them whenever you want a fresh, warm pastry without starting from scratch.
What Makes Bakery Style Chocolate Croissants So Good?
Hundreds of Thin Buttery Layers
The first thing you’ll notice about a bakery-style chocolate croissant is its beautiful flaky texture.
Every crisp layer is created by folding butter into the dough several times, which builds dozens of thin sheets of dough separated by butter.
As the croissants bake, the butter releases steam that gently pushes the layers apart.
This creates the light, airy texture that makes each bite crisp on the outside and soft inside.
When you pull a freshly baked croissant apart, you should see delicate honeycomb-like layers instead of a dense interior.
Those flaky layers are what turn a simple pastry into something that feels truly special.
High-Quality Butter Makes All the Difference
Because butter is one of the main ingredients, its quality has a big impact on the finished croissants.
European-style butter is a popular choice because it contains slightly more butterfat and less water than standard butter.
The higher butterfat helps create richer flavor and more defined flaky layers during baking.
If European-style butter isn’t available, use the best unsalted butter you can find.
Keeping the butter cold throughout the process is just as important as choosing the right kind.
Cold butter stays in thin layers inside the dough, while warm butter can soften too quickly and reduce the flaky texture.
Proper Dough Lamination
Lamination is the technique that gives chocolate croissants their famous texture.
It simply means rolling the dough around a layer of butter, then folding and chilling it several times.
Each fold creates more layers without making the process overly complicated.
The resting time between folds allows the butter to firm up and the dough to relax, making it much easier to roll without tearing.
Don’t worry if your first fold isn’t perfect.
Small imperfections are completely normal, and your croissants will still bake up beautifully as long as you keep the dough cold and work gently.
Slow Overnight Proofing
After the croissants are shaped, they need time to proof before baking.
Proofing is the final rise that allows the yeast to create a light, airy pastry.
A slow proof develops better flavor while giving the layers room to expand naturally.
The croissants should look noticeably larger and slightly puffy before they go into the oven.
It’s worth being patient during this step because under-proofed croissants often bake up heavy instead of light and flaky.
Golden Egg Wash Finish
Just before baking, the croissants are brushed with a simple egg wash made from beaten egg and a splash of milk or cream.
This thin coating gives the pastries their deep golden color and glossy finish.
It also helps highlight the flaky layers as they bake.
For the best results, brush the egg wash on gently so you don’t press down on the delicate dough.
Once baked, you’ll have beautifully browned chocolate croissants that look just as impressive as the ones displayed in your favorite bakery.
Ingredients You’ll Need
For the Dough
Gather all of your ingredients before you begin to make the process smoother and more enjoyable.
Using a kitchen scale is highly recommended because it gives the most accurate and consistent results.
- 250 g (2 cups) bread flour
- 250 g (2 cups) all-purpose flour
- 50 g (¼ cup) granulated sugar
- 10 g (2 teaspoons) fine salt
- 10 g (1 tablespoon) instant yeast
- 250 ml (1 cup) whole milk, cold
- 125 ml (½ cup) cold water
- 50 g (3½ tablespoons) unsalted butter, softened
For the Butter Block
The butter block is what creates the signature flaky layers found in bakery-style croissants.
Choose a good-quality European-style butter with at least 82% butterfat if possible.
The higher butterfat and lower water content help create cleaner layers, richer flavor, and a crisp, delicate texture after baking.
- 280 g (10 ounces) cold European-style unsalted butter
For the Filling
Traditional pain au chocolat is filled with dark chocolate batons because they melt evenly and stay neatly inside the pastry.
If you can’t find chocolate batons, chopped chocolate bars work just as well.
Chocolate chips can also be used, although they tend to hold their shape more during baking.
- 24 dark chocolate batons (2 per croissant)
- OR 170–200 g (6–7 ounces) dark chocolate bar, cut into sticks
- OR 170 g (1 cup) dark or semi-sweet chocolate chips
Egg Wash
An egg wash gives the croissants their beautiful golden color and glossy bakery-style finish.
Brush it on gently just before baking for the best results.
- 1 large egg
- 1 tablespoon whole milk or heavy cream
Recommended Equipment
You don’t need a professional bakery setup to make delicious chocolate croissants at home.
Having the right tools simply makes the process easier, more accurate, and more enjoyable.
- Rolling pin: Used to roll the dough evenly during each stage of lamination and shaping.
- Bench scraper: Helps lift, divide, and move the dough without stretching or tearing it.
- Kitchen scale: The best way to measure ingredients accurately for consistent results every time.
- Pastry brush: Used to apply the egg wash evenly, giving the croissants a beautiful golden, glossy finish.
- Large baking sheets: Provide enough space for the croissants to expand while baking without touching each other.
- Parchment paper: Prevents sticking and makes cleanup quick and easy.
- Ruler: Helps measure the dough and cut evenly sized rectangles for uniform croissants.
- Pizza cutter or sharp knife: Makes clean, straight cuts through the dough without squashing the delicate layers.
- Cooling rack: Allows air to circulate around the croissants after baking, helping them stay crisp instead of becoming soggy on the bottom.
Choosing the Best Chocolate
Chocolate Batons vs Chocolate Bars
The chocolate you choose has a big impact on the flavor and texture of your finished croissants.
Chocolate batons are the traditional choice for pain au chocolat because they are made specifically for baking.
Their long, narrow shape makes them easy to roll inside the dough and helps keep the filling evenly distributed from one end of the pastry to the other.
They also melt beautifully without making the croissants difficult to shape.
If you can’t find chocolate batons, don’t worry.
A good-quality chocolate bar is an excellent substitute and is much easier to find in most grocery stores.
Simply cut the bar into long sticks that fit comfortably inside each rectangle of dough.
Try to keep the pieces similar in size so every croissant has the same amount of chocolate.
Best Chocolate Percentage
For a classic bakery-style flavor, choose dark chocolate that contains between 55% and 70% cocoa.
This range provides a rich chocolate taste without being overly bitter.
Chocolate with around 60% cocoa is a great middle ground if you’re baking for family or guests with different tastes.
If you prefer a sweeter pastry, semi-sweet chocolate is another good option.
Milk chocolate can also be used, but keep in mind that it melts more quickly and creates a much sweeter filling.
Can You Use Chocolate Chips?
Yes, chocolate chips can be used if that’s what you have on hand.
They won’t melt quite the same way as chocolate batons or chopped chocolate because they’re designed to hold their shape during baking.
Even so, they’ll still add plenty of chocolate flavor to your croissants.
For the best results, place the chocolate chips close together before rolling the dough so the filling stays evenly spread throughout the pastry.
If you’re aiming for the most authentic bakery-style experience, chocolate batons or chopped chocolate bars are the better choice.
If convenience is your priority, chocolate chips are a perfectly acceptable alternative and will still produce delicious homemade chocolate croissants.
How to Make Bakery Style Chocolate Croissants
Step 1: Make the Dough
In a large mixing bowl or the bowl of a stand mixer, combine the bread flour, all-purpose flour, sugar, salt, and instant yeast.
Add the cold milk, cold water, and softened butter.
Mix until a rough dough forms, then knead for about 8–10 minutes until the dough becomes smooth and elastic.
Shape the dough into a rectangle, wrap it tightly in plastic wrap, and place it in the refrigerator.
Step 2: Chill Overnight
Let the dough chill for at least 8 hours, or overnight.
This resting time allows the gluten to relax, making the dough easier to roll while also developing a deeper flavor.
Cold dough is much easier to work with, so avoid skipping this step.
Step 3: Prepare the Butter Block
Place the cold European-style butter between two sheets of parchment paper.
Use a rolling pin to gently pound and roll it into a rectangle about 7 x 8 inches (18 x 20 cm).
The butter should be firm but flexible enough to bend without cracking.
Return it to the refrigerator if it becomes too soft while shaping.
Step 4: Enclose the Butter
Roll the chilled dough into a rectangle that’s about twice the size of the butter block.
Place the butter in the center of the dough.
Fold the dough over the butter like an envelope, making sure all of the butter is completely covered.
Pinch the seams closed to keep the butter from escaping during rolling.
Step 5: First Fold
Turn the dough so the sealed edge faces you.
Roll it into a long rectangle about 24 inches (60 cm) long.
Brush away any excess flour.
Fold the top third toward the center, then fold the bottom third over it, just like folding a business letter.
This is called a single fold.
Wrap the dough and refrigerate it for 30 minutes.
Step 6: Chill
Keeping the dough cold is one of the biggest secrets to flaky croissants.
During this resting time, the butter firms up again and the dough relaxes, making the next fold much easier.
If your kitchen is warm or the butter starts feeling soft, chill the dough a little longer before continuing.
Step 7: Second Fold
Place the chilled dough on a lightly floured surface.
Roll it into another long rectangle, keeping the edges as straight as possible.
Repeat the same single-fold technique.
Work gently and avoid pressing too hard so the layers stay even.
Step 8: Chill Again
Wrap the dough tightly and refrigerate it for another 30 minutes.
This extra resting time helps maintain distinct layers and prevents the butter from melting into the dough.
Patience here leads to much flakier croissants later.
Step 9: Final Fold
Roll the dough into a long rectangle one last time.
Complete one final single fold.
After folding, wrap the dough well and refrigerate it for at least 1 hour, or overnight if it better fits your schedule.
Step 10: Roll Out the Dough
Place the chilled dough on a lightly floured work surface.
Roll it into a large rectangle about ¼ inch (6 mm) thick.
Try to keep the thickness as even as possible for consistent baking.
Trim the edges with a sharp knife or pizza cutter to expose clean layers.
Step 11: Cut Rectangles
Using a ruler and pizza cutter, cut the dough into 12 rectangles, each measuring about 4 x 6 inches (10 x 15 cm).
Keeping the rectangles the same size helps every croissant bake evenly.
Step 12: Add Chocolate
Place 2 chocolate batons near one short edge of each rectangle.
If you’re using a chocolate bar, arrange two similar-sized chocolate sticks instead.
Avoid overfilling the croissants, as too much chocolate can leak out during baking.
Step 13: Roll the Croissants
Fold the edge of the dough over the chocolate and roll tightly toward the opposite end.
Place each croissant seam-side down on a parchment-lined baking sheet.
Leave enough space between them so they have room to rise.
Step 14: Final Proof
Cover the croissants loosely with plastic wrap or a clean kitchen towel.
Let them proof at room temperature for 2 to 3 hours, or until they look noticeably larger and slightly puffy.
They should feel light and gently wobble when the baking sheet is moved.
Avoid proofing them in a hot place, as warm temperatures can cause the butter to melt.
Step 15: Egg Wash
Whisk together the egg and milk or cream until smooth.
Using a pastry brush, lightly coat the tops of the croissants with the egg wash.
Apply it gently so you don’t flatten the delicate layers that have formed during proofing.
Step 16: Bake Until Deep Golden
Preheat your oven to 400°F (200°C).
Bake the croissants for 18–22 minutes, or until they are puffed, deeply golden brown, and crisp.
If they begin browning too quickly, rotate the baking sheet halfway through baking for even color.
Your kitchen will smell amazing when they’re ready.
Step 17: Cool Before Serving
Transfer the baked croissants to a cooling rack.
Let them cool for 10–15 minutes before serving.
This short cooling time allows the layers to set and prevents the melted chocolate from being too hot.
Enjoy them while they’re still warm for the best flaky texture and gooey chocolate center.
Common Lamination Mistakes (And How to Avoid Them)
Butter Breaking Into Pieces
If the butter cracks or breaks apart while you’re rolling the dough, it’s usually too cold.
Let the dough sit at room temperature for 5 to 10 minutes before rolling again so the butter has time to soften slightly.
The butter should feel firm but flexible.
Rolling gently with steady pressure also helps keep the butter in one even layer instead of breaking it into chunks.
Don’t worry if you notice a few small cracks.
As you continue folding and rolling, they often smooth out without affecting the finished croissants.
Butter Melting Into the Dough
Soft, melted butter is one of the biggest reasons croissants lose their flaky layers.
If the butter melts into the dough before baking, it can’t create the pockets of steam needed for a light texture.
If the dough starts feeling warm, sticky, or difficult to handle, place it back in the refrigerator for 20 to 30 minutes before continuing.
Working in a cool kitchen and handling the dough quickly can make a big difference.
It’s always better to chill the dough for a little longer than to rush the process.
Dough Shrinking
If the dough keeps springing back while you roll it, the gluten is still too tight.
Simply cover the dough and let it rest in the refrigerator for 15 to 20 minutes.
This short break allows the dough to relax, making it much easier to roll into an even rectangle.
Avoid forcing the dough to stretch, as this can damage the layers you’ve worked so hard to create.
Layers Disappearing
If your baked croissants look more like bread than flaky pastry, the layers may have blended together during preparation.
This often happens when the butter becomes too warm or the dough is rolled too aggressively.
Keep the dough cold between folds and use gentle, even pressure with the rolling pin.
Dust away excess flour before folding so the layers stick together properly without becoming dry.
Even if the layers aren’t perfect the first time, you’ll improve with every batch you bake.
Chocolate Leaking Out
It’s completely normal for a small amount of chocolate to escape during baking.
However, large leaks usually happen when the croissants are overfilled or not rolled tightly enough.
Stick to the recommended amount of chocolate and roll the dough snugly around the filling without squeezing it.
Always place the croissants seam-side down on the baking sheet to help keep them closed as they bake.
Even if a little chocolate melts onto the parchment paper, don’t let it discourage you.
Those croissants will still taste wonderfully buttery, flaky, and delicious.
Pro Tips for Bakery-Quality Results
- Keep everything cold: Chilled dough and butter help create distinct flaky layers and prevent the butter from melting into the dough.
- Use a kitchen scale: Weighing your ingredients gives more accurate measurements and consistent results.
- Don’t rush resting times: Chilling the dough between folds allows the gluten to relax and the butter to firm up for easier rolling.
- Use European butter: Butter with at least 82% butterfat creates richer flavor and more defined layers.
- Roll evenly: Keep the dough at an even thickness so every croissant bakes and rises uniformly.
- Proof patiently: Let the shaped croissants become light and puffy before baking for the best texture and rise.
- Bake until deeply golden: A rich golden-brown color ensures crisp, flaky layers and a fully baked interior.
| Problem | Cause | Solution |
|---|---|---|
| Dense croissants | Under-proofed | Allow more proofing time |
| Butter leaks | Butter too warm | Chill dough between folds |
| Few layers | Overworked dough | Handle gently and rest frequently |
| Burnt bottoms | Oven too hot | Use double baking sheets |
| Chocolate spills | Overfilled | Use less chocolate |
Easy Flavor Variations
Once you’ve mastered the classic chocolate croissant, it’s fun to experiment with different flavors.
Most of these variations only require a few extra ingredients, making them an easy way to create something new without changing the dough recipe.
Double Chocolate Croissants
For an extra chocolatey treat, spread a thin layer of chocolate hazelnut spread or chocolate ganache over the dough before adding the chocolate batons.
You can also sprinkle a small handful of mini chocolate chips inside for even more rich chocolate flavor.
After baking, dust the croissants with cocoa powder or drizzle them with melted dark chocolate for a bakery-style finish.
Almond Chocolate Croissants
Almond and chocolate are a classic combination that never goes out of style.
Spread a thin layer of almond cream, also called frangipane, onto the dough before adding the chocolate.
Top the baked croissants with sliced almonds and a light dusting of powdered sugar for a beautiful finishing touch.
The result is a pastry that’s rich, nutty, and perfect for a special breakfast or brunch.
Hazelnut Chocolate Croissants
If you love chocolate and hazelnuts together, this variation is sure to become a favorite.
Spread a thin layer of chocolate hazelnut spread inside each croissant before rolling it up.
For extra crunch, sprinkle in a few finely chopped toasted hazelnuts.
The toasted nuts add texture while enhancing the deep chocolate flavor.
Orange Chocolate Croissants
Orange and dark chocolate create a fresh, balanced flavor that’s both bright and rich.
Before rolling the dough, sprinkle a little finely grated orange zest over the chocolate.
The citrus aroma becomes more noticeable as the croissants bake, adding a refreshing twist without overpowering the chocolate.
This variation is especially nice during the holiday season but tastes wonderful any time of year.
Espresso Chocolate Croissants
Coffee naturally enhances the flavor of chocolate, making this variation ideal for coffee lovers.
Lightly dust the chocolate with a small pinch of instant espresso powder before rolling the croissants.
The espresso doesn’t make the pastry taste like coffee.
Instead, it deepens the chocolate flavor and adds a subtle richness that pairs beautifully with the buttery layers.
Salted Caramel Chocolate Croissants
For a sweet and salty treat, drizzle a small amount of thick caramel sauce over the chocolate before rolling the dough.
Use just enough to add flavor without making the filling too runny.
After baking, sprinkle a small pinch of flaky sea salt over the warm croissants.
The combination of buttery pastry, rich chocolate, smooth caramel, and a touch of salt creates a bakery-style pastry that’s hard to resist.
Can You Make Them Ahead?
One of the best things about homemade chocolate croissants is that they can be prepared in advance.
Making them ahead saves time and lets you enjoy fresh pastries without starting from scratch every time.
Refrigerate Overnight
After shaping the croissants, arrange them on a parchment-lined baking sheet and cover them loosely with plastic wrap.
Place them in the refrigerator overnight for a slow, cold proof.
The next morning, let the croissants sit at room temperature for 45 to 90 minutes, or until they look puffy and slightly expanded.
Brush them with the egg wash just before baking.
This method is perfect if you want freshly baked chocolate croissants for breakfast without doing all the work in the morning.
Freeze Before Proofing
If you’d like to prepare a batch well in advance, freezing the shaped croissants before they proof is a great option.
Place the shaped croissants on a baking sheet and freeze them until firm.
Once frozen, transfer them to a freezer-safe bag or airtight container.
They can be stored in the freezer for up to 2 months.
When you’re ready to bake, place the frozen croissants on a lined baking sheet and let them thaw and proof at room temperature for 4 to 6 hours, or until they become light and puffy.
Apply the egg wash just before baking as directed.
Freeze After Baking
Fully baked chocolate croissants also freeze very well.
Allow them to cool completely before placing them in a freezer-safe bag or airtight container.
They’ll keep their best quality for up to 2 months.
To enjoy them again, warm the frozen croissants in a 350°F (175°C) oven for 8 to 10 minutes, or until heated through and crisp on the outside.
Storage Tips
Freshly baked chocolate croissants are at their very best the day they’re made.
If you have leftovers, storing them properly will help preserve their flavor and flaky texture for as long as possible.
Room Temperature
Once the croissants have cooled completely, place them in an airtight container or a paper bag.
Store them at room temperature for up to 2 days.
Avoid sealing warm croissants, as trapped steam can soften the crisp layers.
If possible, keep them in a cool, dry place away from direct sunlight.
Refrigerator
Although you can refrigerate chocolate croissants, it’s usually not the best option.
The cool temperature causes the pastry to become firm and lose some of its light, flaky texture.
If you do need to refrigerate them, store them in an airtight container for up to 5 days.
Reheating them before serving will help restore some of their crispness.
Freezer
Chocolate croissants freeze very well, making them a convenient treat to have on hand.
Wrap each croissant individually in plastic wrap or aluminum foil, then place them in a freezer-safe bag or airtight container.
They’ll keep their best quality for up to 2 months.
For the freshest flavor, label the container with the freezing date so you know when to enjoy them.
Best Way to Reheat
The oven is the best way to bring chocolate croissants back to life.
Preheat your oven to 350°F (175°C) and warm the croissants for 5 to 8 minutes if they’re at room temperature, or 8 to 10 minutes if they’re frozen.
This helps crisp the outside while gently warming the chocolate inside.
Avoid using the microwave whenever possible.
While it’s quick, it can make the pastry soft and chewy instead of light and flaky.
What to Serve with Chocolate Croissants
- Coffee: A freshly brewed cup of coffee balances the sweetness of the chocolate and buttery pastry.
- Espresso: A bold shot of espresso provides a rich, concentrated flavor that pairs perfectly with flaky croissants.
- Café au lait: Equal parts coffee and steamed milk create a smooth, creamy drink that’s a classic French pairing.
- Cappuccino: The light, foamy milk softens the richness of the croissant while complementing the chocolate filling.
- Hot chocolate: A warm mug of hot chocolate makes for an extra indulgent breakfast or cozy afternoon treat.
- Fresh berries: Strawberries, raspberries, or blueberries add a fresh, slightly tart contrast to the rich pastry.
- Fruit preserves: Raspberry, apricot, or orange preserves add a bright burst of fruity sweetness when served alongside or lightly spread on the croissant.
Bakery Style Chocolate Croissants vs Store-Bought
While store-bought chocolate croissants are convenient, homemade versions offer better flavor, texture, and freshness.
Here’s a quick comparison to help you see the difference:
| Homemade Bakery-Style | Store-Bought |
|---|---|
| Made with real butter for a rich, authentic flavor | Often made with shortening blends or lower-quality fats |
| Baked fresh for the best taste and aroma | Usually pre-packaged for a longer shelf life |
| Light, crisp, and flaky with delicate layers | Softer texture with fewer defined layers |
| Filled with premium chocolate you choose | Often contains less chocolate or lower-quality filling |
| No unnecessary preservatives or additives | May include preservatives and other additives to extend freshness |
Making chocolate croissants at home takes more time, but the reward is a pastry that’s fresher, flakier, and customized to your taste.
You also have complete control over the ingredients, allowing you to choose high-quality butter and your favorite chocolate for bakery-quality results.
Expert Baking Tips for First-Time Success
- Read the recipe before starting: Knowing the full process ahead of time helps you stay organized and avoid surprises.
- Work in a cool kitchen whenever possible: Cooler temperatures keep the butter firm, making it easier to create flaky layers.
- Chill the dough anytime it becomes difficult to handle: A short rest in the refrigerator firms the butter and makes rolling much easier.
- Measure ingredients by weight: Using a kitchen scale provides the most accurate measurements and consistent baking results.
- Don’t skip the overnight rest: The extra chilling time develops better flavor and improves the dough’s texture.
- Bake until the croissants are a rich golden brown: A deep golden color ensures crisp, flaky layers and a fully baked interior.
Final Thoughts
Making bakery-style chocolate croissants at home takes a little time, but the flaky layers, buttery pastry, and rich chocolate filling make every step worthwhile.
If your first batch isn’t perfect, don’t be discouraged.
Each time you practice the lamination process, you’ll gain more confidence, and your croissants will keep getting better.
Once you’ve mastered the classic recipe, have fun trying different chocolates and flavor combinations to make each batch your own.
Happy baking!
FAQs
Why didn’t my croissants puff up?
Croissants usually don’t puff up if they were under-proofed, the butter melted into the dough, or the yeast wasn’t active. Make sure the dough has enough time to rise before baking.
Can I use puff pastry instead?
Yes, you can use store-bought puff pastry for a quicker version. The texture will still be flaky, but it won’t have the same rich flavor and airy layers as traditional laminated croissant dough.
What’s the best butter for croissants?
European-style unsalted butter with at least 82% butterfat is the best choice because it creates richer flavor and flakier layers.
Can I make these without a stand mixer?
Yes. You can mix and knead the dough by hand. It takes a little more effort, but the results are just as delicious.
Can I use milk chocolate?
Absolutely. Milk chocolate creates a sweeter filling, while dark chocolate offers the classic bakery-style flavor.
How many folds should laminated dough have?
This recipe uses three single folds, which creates plenty of buttery layers without making the process too complicated.
Why is my butter leaking?
Butter usually leaks if it becomes too warm, the dough tears during rolling, or the croissants are under-proofed. Keeping the dough cold helps prevent this.
Can I freeze unbaked croissants?
Yes. Freeze the shaped croissants before proofing for up to 2 months, then thaw and proof them before baking.
How long do homemade chocolate croissants stay fresh?
They taste best on the day they’re baked but will stay fresh at room temperature for up to 2 days when stored in an airtight container.
Can I make mini chocolate croissants?
Yes. Simply cut smaller rectangles of dough, use smaller pieces of chocolate, and reduce the baking time by a few minutes.
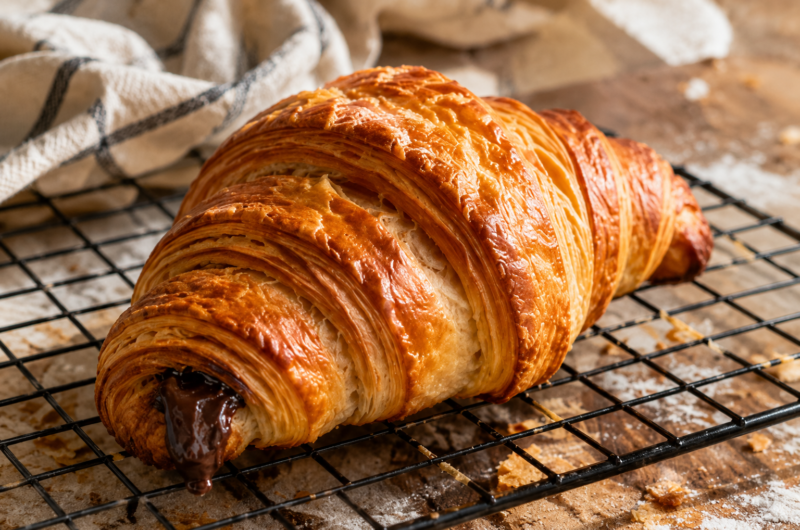
Bakery Style Chocolate Croissants (Flaky, Buttery & Delicious)
Difficulty: Medium12
Croissants1
hour20
minutes12
hoursMake flaky, buttery bakery-style chocolate croissants at home with rich dark chocolate wrapped in delicate laminated pastry.
Ingredients
250 g bread flour
250 g all-purpose flour
50 g granulated sugar
10 g salt
10 g instant yeast
250 ml whole milk
125 ml cold water
50 g unsalted butter (for the dough)
280 g European-style unsalted butter (for the butter block)
24 dark chocolate batons (or 170–200 g dark chocolate, cut into sticks)
1 large egg
1 tablespoon milk or heavy cream
Directions
- Prepare and knead the dough until smooth, then refrigerate overnight.
- Make the butter block, laminate the dough with three folds, chilling between each fold.
- Roll out the dough, cut into rectangles, and add the chocolate.
- Roll into croissants and let them proof until light and puffy.
- Brush with egg wash and bake at 400°F (200°C) for 18–22 minutes, or until deep golden brown.
- Cool for 10–15 minutes before serving.
Notes
- Keep the dough and butter cold throughout the lamination process for the flakiest layers.
- European-style butter with at least 82% butterfat gives the best results.
- Chocolate croissants are best enjoyed warm and can be frozen for up to 2 months.


Hi, I’m Sorenna Blythe, the baker and writer behind Mix Whisk Bake. I share simple, reliable recipes and honest kitchen moments to help home bakers bake with confidence and joy. When I’m not testing new treats, you’ll find me sipping coffee and dreaming up my next bake.