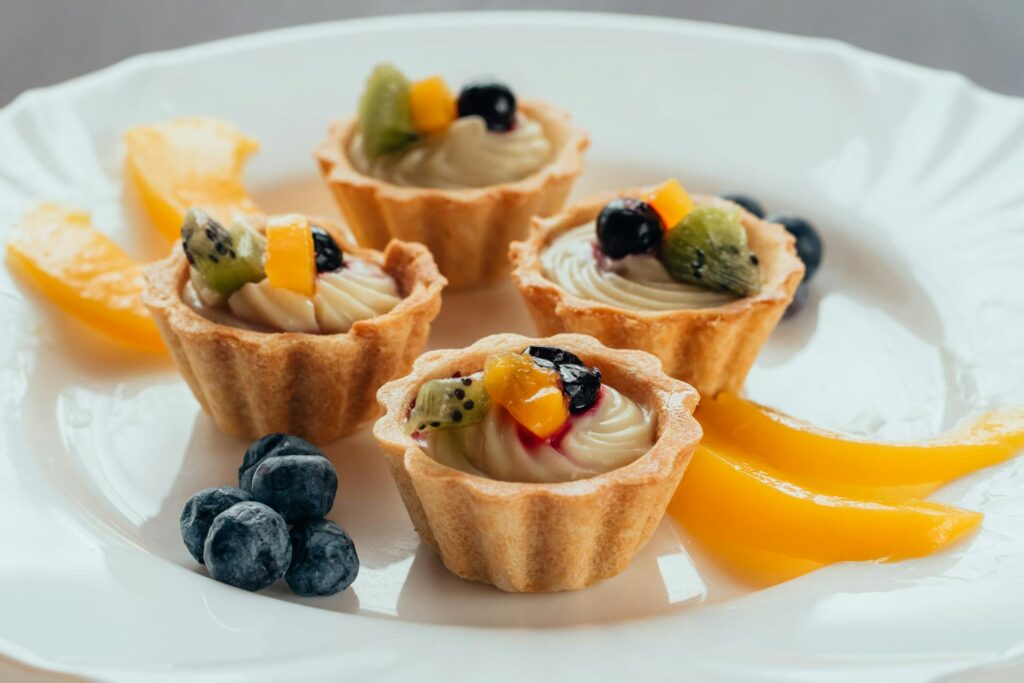
Mini fruit tarts are one of those desserts that look fancy but are surprisingly simple to make. Each one is a perfect little bite—crisp, creamy, and topped with fresh, colorful fruit.
They’re ideal for just about any occasion. Serve them at parties, bring them out for tea, or make a batch when you want something special without too much fuss.
You’ll notice the magic is in the layers. A buttery, crisp shell holds a smooth, lightly sweet cream, all finished with juicy fruit on top. Every bite has a bit of everything.
In this recipe, I’ll walk you through each step so you can make them with confidence.
Why You’ll Love This Recipe
Easy to Make Ahead
These mini fruit tarts are great when you want to plan ahead. You can bake the tart shells a day or two in advance and store them in an airtight container.
The pastry cream can also be made ahead and kept chilled.
When you’re ready to serve, all that’s left is assembling. This saves time and keeps things stress-free, especially if you’re preparing for guests.
Customizable with Different Fruits
You can use almost any fruit you like here. Berries, kiwi, mango, and peaches—each one brings a different flavor and color.
This means you can adjust the tarts based on what’s in season or what you already have at home.
If one fruit isn’t available, simply swap it out. You’ll still get a beautiful and delicious result.
Bakery-Style Results at Home
These tarts may look like something from a pastry shop, but they’re completely doable in your own kitchen.
You’ll notice that simple techniques, like chilling the dough and cooking the cream gently, make a big difference. With a little care, you’ll get that smooth filling and crisp shell every time.
Perfect Portion Sizes
Mini tarts are easy to serve and even easier to enjoy. Each one is just the right size for a single portion, so there’s no slicing or guessing.
They’re also great for sharing. You can make a batch and let everyone pick their favorite topping.
Visually Stunning Dessert
These tarts naturally look beautiful. The mix of bright fruit and glossy glaze makes them stand out without extra effort.
You don’t need advanced decorating skills. Just arrange the fruit neatly, and you’ll have a dessert that looks as good as it tastes.
Ingredients Needed
Tart Shell (Shortcrust Pastry)
- 1 ¼ cups (160g) all-purpose flour
- ½ cup (115g) unsalted butter, cold and cubed
- ¼ cup (50g) granulated sugar
- 1 large egg yolk
- 1 teaspoon vanilla extract
- ¼ teaspoon salt
Pastry Cream Filling
- 2 cups (480ml) whole milk
- 4 large egg yolks
- ½ cup (100g) granulated sugar
- ¼ cup (30g) cornstarch
- 2 tablespoons (30g) unsalted butter
- 1 teaspoon vanilla extract
Toppings
- 1–2 cups fresh fruit (strawberries, kiwi, blueberries, mango, or a mix)
- 2 tablespoons apricot jam or jelly (for glaze, optional)
Equipment Needed
- Mini tart pans or muffin tin
These shape your tarts. If you don’t have tart pans, a muffin tin works just fine, but just press the dough in evenly. - Rolling pin
Used to roll out the dough to an even thickness. If you don’t have one, a clean bottle can work in a pinch. - Mixing bowls
You’ll need a few bowls for the dough and the pastry cream. It helps to stay organized as you go. - Saucepan
This is where you’ll cook the pastry cream. Use a medium-sized one so you have enough space to whisk comfortably. - Whisk
Important for getting a smooth, lump-free cream. Keep it moving while cooking to prevent sticking. - Piping bag (optional)
Makes filling the tart shells neat and easy. If you don’t have one, you can simply use a spoon.
Step-by-Step Instructions
1. Make the Tart Dough
Start by combining your dry ingredients in a bowl. Mix the flour, sugar, and salt until evenly blended. This helps ensure the dough has a balanced flavor.
Next, add the cold butter. Use your fingers or a pastry cutter to work it into the flour until the mixture looks like coarse crumbs.
You’ll notice small bits of butter, and that’s exactly what you want for a tender, flaky crust.
Add the egg yolk and vanilla extract. Mix gently until the dough starts to come together. If it feels a little dry, you can add a teaspoon of cold water, but don’t overdo it.
Bring the dough together into a ball, flatten it slightly, and wrap it. Let it chill in the fridge for at least 30 minutes.
This step makes the dough easier to handle and helps prevent shrinking during baking.
2. Shape and Bake Tart Shells
Once chilled, roll out the dough on a lightly floured surface. Aim for an even thickness so the shells bake evenly.
Cut out circles and gently press them into your tart pans or muffin tin. Take your time here, press the dough into the corners without stretching it.
Use a fork to dock the base. This simply means poking small holes to stop the dough from puffing up while baking.
For best results, blind bake the shells. You can line them with baking paper and add baking weights or dry beans. Bake until lightly golden and set.
Let the shells cool completely before filling. If they’re still warm, the filling can melt and make them soggy.
3. Prepare the Pastry Cream
Start by heating the milk in a saucepan over medium heat. You don’t need it to boil, just warm enough that you see steam.
In a separate bowl, whisk together the egg yolks, sugar, and cornstarch until smooth. This step is important for a lump-free cream.
Now, slowly pour some of the warm milk into the egg mixture while whisking. This is called tempering, and it prevents the eggs from scrambling.
Pour everything back into the saucepan and cook gently, whisking constantly. You’ll notice it thickening into a smooth custard.
Once it reaches a pudding-like consistency, remove it from the heat.
Stir in the butter and vanilla until fully combined. Transfer to a bowl, cover the surface with plastic wrap (touching the cream), and chill until set.
4. Assemble the Tarts
Once everything is cool, it’s time to put your tarts together. Spoon or pipe the pastry cream into each tart shell, filling them evenly.
Arrange your fresh fruit on top. You can keep it simple or create patterns. It’s up to you.
For a glossy finish, gently brush the fruit with a light layer of warmed apricot jam or jelly. This adds a nice shine and helps the fruit stay fresh longer.
Now they’re ready to serve. You’ll notice how each layer comes together in every bite—crisp, creamy, and fresh!
Best Fruits for Mini Tarts
Berries (Strawberries, Blueberries, Raspberries)
Berries are one of the easiest and most popular choices. They’re naturally sweet, slightly tart, and hold their shape well on top of the cream.
Strawberries can be sliced or halved for a clean look. Blueberries are great for quick decorating since you can place them whole. Raspberries add a soft texture and a bit of tang.
If you’re not sure where to start, a mix of berries is always a safe and beautiful option.
Tropical Fruits (Mango, Kiwi, Pineapple)
Tropical fruits bring bright color and a fresh, juicy flavor. Mango is soft and sweet, making it easy to slice and arrange. Kiwi adds a slight tang and a nice pop of green.
Pineapple works well too, but make sure it’s cut into small, bite-sized pieces so it sits neatly on the tart.
You’ll notice these fruits make the tarts look extra vibrant. They’re perfect if you want something a little different from classic berry toppings.
Stone Fruits (Peaches, Plums)
Stone fruits add a soft, juicy bite and a deeper sweetness. Peaches are especially nice when ripe. They slice easily and pair well with the creamy filling.
Plums can add a slight tartness, which helps balance the sweetness of the pastry cream. Just slice them thin so they’re easy to eat.
If the fruit is very juicy, gently pat it dry before using. This helps keep your tart shells crisp.
Tips for Choosing Ripe, Fresh Fruit
Go for fruit that is firm but slightly soft to the touch. It should smell fresh and lightly sweet, not sour or overly strong.
Avoid fruit that looks bruised, dull, or overly wet. These can affect both the taste and the final look of your tarts.
Before using, wash and dry the fruit well. You’ll notice that dry fruit sits better on the cream and keeps everything looking neat.
Tips for Perfect Mini Fruit Tarts
Keep Dough Cold for a Flaky Crust
Cold dough is key to a crisp, tender tart shell. When the butter stays cold, it creates small pockets in the dough as it bakes, giving you that light, flaky texture.
If the dough starts to feel soft or sticky while working, don’t worry, just pop it back in the fridge for a few minutes. It’s much easier to handle when chilled.
Don’t Overfill with Cream
It’s tempting to add lots of filling, but a little control goes a long way. Fill each tart just below the top of the shell so the fruit can sit neatly without sliding off.
You’ll notice that a balanced layer of cream makes each bite better. It keeps the tart from feeling too heavy and helps the flavors stay fresh.
Dry Fruit Before Placing on Tarts
Moisture is the enemy of a crisp tart shell. After washing your fruit, gently pat it dry with a paper towel.
This small step helps prevent the cream from becoming watery and keeps the base from going soggy. It also helps the fruit stay in place when you arrange it.
Chill Before Serving for Best Texture
Once assembled, let the tarts chill in the fridge for about 30–60 minutes. This helps the cream set slightly and makes the tarts easier to handle.
You’ll notice the flavors come together more after chilling. The texture also improves, giving you a clean bite instead of a soft, messy one.
Use a Glaze for a Professional Finish
A light glaze gives your tarts a beautiful shine. Warm a little apricot jam or jelly and gently brush it over the fruit.
This not only makes the tarts look polished, but it also helps keep the fruit fresh for longer.
Variations & Flavor Ideas
Chocolate Pastry Cream
If you enjoy a richer flavor, chocolate pastry cream is a great option. Simply add melted dark or milk chocolate to your warm pastry cream and stir until smooth.
You’ll notice the texture stays just as creamy, but the flavor becomes deeper and more indulgent. This pairs especially well with berries like strawberries or raspberries.
Lemon Curd Filling
For something lighter and more refreshing, try lemon curd instead of pastry cream. It has a bright, tangy flavor that balances the sweetness of the tart shell.
This option works beautifully with berries or even kiwi. If you like a mix of flavors, you can also do a thin layer of pastry cream topped with lemon curd.
Nut-Based Crust (Almond or Hazelnut)
You can switch up the crust by adding ground nuts like almonds or hazelnuts to the dough. Replace a small portion of the flour with finely ground nuts for a slightly nutty flavor.
This adds extra depth and a softer texture to the crust. It’s a simple change, but you’ll notice it gives the tarts a more unique taste.
Dairy-Free or Vegan Alternatives
You can easily adjust this recipe to suit dairy-free or vegan diets. Use plant-based butter for the crust and swap the milk in the filling with options like almond or coconut milk.
For the filling, a simple custard made with plant-based milk and cornstarch works well. You can also use coconut cream for a richer texture.
Storage & Make-Ahead Tips
You can store assembled mini fruit tarts in the fridge for up to 2 days, but keep in mind they are at their best on the first day when the shells are still crisp, and the fruit looks fresh.
If you’re planning ahead, it’s a good idea to store the tart shells and pastry cream separately. This helps prevent the shells from becoming soft.
Keep the baked shells in an airtight container at room temperature, and store the pastry cream in the fridge with plastic wrap pressed directly onto the surface to stop a skin from forming.
When you’re ready to serve, simply fill and decorate, which only takes a few minutes. You’ll notice that assembling them fresh makes a big difference in both texture and appearance.
Common Mistakes to Avoid
- Soggy tart shells
This usually happens when moisture seeps into the crust. Make sure your tart shells are fully baked and cooled before adding the filling. Also, always dry your fruit well to prevent extra moisture. - Runny pastry cream
If the cream isn’t thick enough, it likely needs more cooking time. Keep whisking over gentle heat until it reaches a pudding-like consistency. It will also thicken more as it cools. - Overbaking the crust
Baking too long can make the shells too hard or overly dark. Keep an eye on them and remove them once they turn lightly golden. They will continue to firm up as they cool. - Using overly juicy fruit
Fruits with too much moisture can make the tarts messy and soften the filling. Choose ripe but firm fruit, and always pat it dry before placing it on your tarts.
Final Thoughts
Mini fruit tarts may look fancy, but you’ll notice they’re quite simple once you break them down step by step. With a crisp shell, smooth cream, and fresh fruit, they always feel a little special.
Feel free to mix and match flavors based on what you love or have on hand. Don’t worry about making them perfect because each batch gets better with practice.
Give this recipe a try and make it your own. If you do, share your results and enjoy the process along the way!
FAQs
Yes, you can. It saves time and still gives you a great result, but just make sure they’re crisp before filling.
Yes. Prepare the shells and cream in advance, then assemble closer to serving for the best texture.
Let the shells cool completely, avoid overfilling, and always use dry fruit. Assembling just before serving also helps.
It’s not recommended once assembled. You can freeze the baked shells, but add the filling and fruit fresh.
You can use whipped cream, cream cheese filling, or lemon curd for a different flavor.

Irresistible Mini Fruit Tarts – Buttery, Creamy & Bursting with Flavor
Difficulty: Easy10
Mini Tarts30
minutes25
minutes55
minutesButtery mini tart shells filled with smooth pastry cream and topped with fresh fruit for a simple yet elegant dessert.
Ingredients
- Tart Shell
1 ¼ cups (160g) all-purpose flour
½ cup (115g) unsalted butter, cold
¼ cup (50g) sugar
1 egg yolk
1 tsp vanilla extract
¼ tsp salt
- Pastry Cream
2 cups (480ml) milk
4 egg yolks
½ cup (100g) sugar
¼ cup (30g) cornstarch
2 tbsp (30g) butter
1 tsp vanilla extract
- Toppings
1–2 cups fresh fruit (berries, kiwi, mango, etc.)
2 tbsp apricot jam (optional, for glaze)
Directions
- Make the dough: Mix flour, sugar, and salt. Cut in cold butter until crumbly. Add egg yolk and vanilla, then bring into a dough. Chill for 30 minutes.
- Bake shells: Roll out dough, press into mini tart pans, and prick the base. Bake at 180°C (350°F) for 15–20 minutes until lightly golden. Cool completely.
- Make pastry cream: Heat milk. Whisk egg yolks, sugar, and cornstarch. Slowly add warm milk, then cook until thick. Stir in butter and vanilla. Chill.
- Assemble: Fill tart shells with cream, top with fresh fruit, and brush with glaze if using.
Notes
- Keep the dough cold for the best texture
- Let shells cool before filling
- Pat the fruit dry to avoid soggy tarts
- Best served fresh or within 1–2 days

Hi, I’m Sorenna Blythe, the baker and writer behind Mix Whisk Bake. I share simple, reliable recipes and honest kitchen moments to help home bakers bake with confidence and joy. When I’m not testing new treats, you’ll find me sipping coffee and dreaming up my next bake.