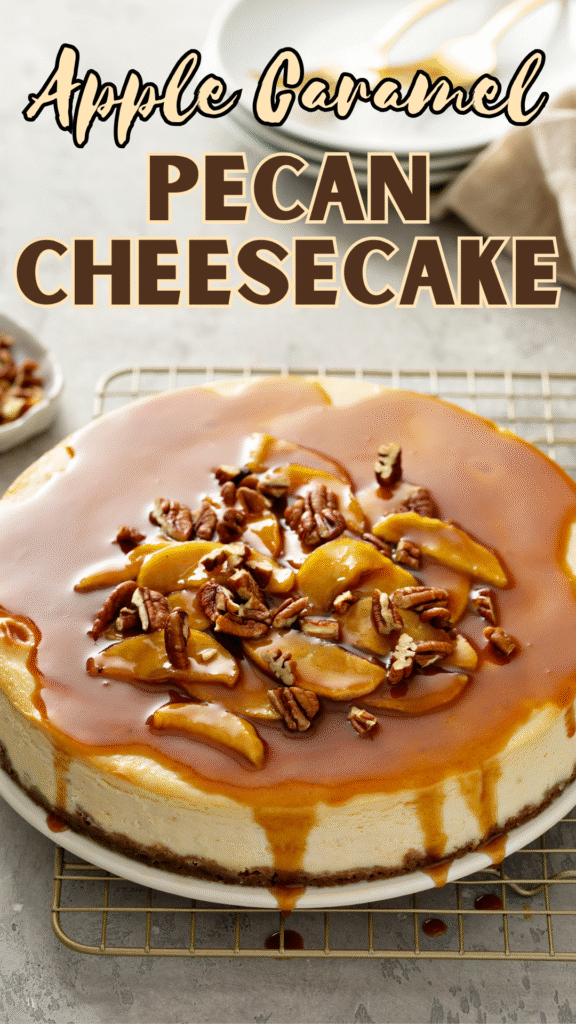
This apple caramel pecan cheesecake is everything you want in one dessert. It’s creamy, cozy, and packed with flavor.
You get smooth cheesecake, soft spiced apples, crunchy pecans, and a rich caramel drizzle in every bite.
It’s the kind of treat that feels right at home on a holiday table or a quiet fall evening.
The warm apple spices and buttery crunch make it extra comforting, while the creamy filling keeps it indulgent without being overwhelming.
Why You’ll Love This Recipe
Perfect Balance of Textures
This cheesecake gives you more than just a creamy bite. You’ll notice the smooth, rich filling pairs perfectly with the soft, spiced apples and the crunch of toasted pecans.
Each layer adds something different. The crust is firm and buttery, the filling is silky, and the topping brings a light crunch.
It keeps every bite interesting, so it never feels too heavy or one-note.
Great for Special Occasions and Gatherings
This is the kind of dessert people remember. It looks beautiful on the table and feels just right for holidays, birthdays, or family dinners.
You don’t need to decorate it much. The caramel drizzle and pecans do the work for you. Just slice and serve, and you’ll have something that feels thoughtful without extra effort.
Make-Ahead Friendly
One of the best things about cheesecake is that you can make it ahead of time. In fact, it tastes even better after chilling because the flavors settle and the texture firms up.
You can bake it the day before and keep it in the fridge until you’re ready to serve. This takes the pressure off, especially if you’re preparing for guests. You’ll be glad it’s already done.
Impressive Yet Achievable
It may look like a bakery-style dessert, but don’t let that intimidate you. If you follow the steps and take your time, you’ll notice it’s very manageable.
Don’t worry if it’s your first cheesecake. Simple tips like using room temperature ingredients and not rushing the process make a big difference.
With a little patience, you’ll end up with a dessert that looks impressive and tastes even better.
Ingredients Needed
Let’s gather everything before you start. Having ingredients measured and ready makes the process much smoother.
For the Crust
- 200g (about 2 cups) graham cracker crumbs or crushed digestive biscuits
- 100g (7 tablespoons) unsalted butter, melted
- 2 tablespoons granulated sugar
- ½ teaspoon ground cinnamon (optional, but adds warmth)
For the Cheesecake Filling
- 680g (24 oz) cream cheese, softened (about 3 blocks)
- 1 cup (200g) granulated sugar
- 3 large eggs, room temperature
- 1 teaspoon vanilla extract
- 1 cup (240ml) sour cream or heavy cream
- ½ teaspoon ground cinnamon (optional)
- ¼ teaspoon ground nutmeg (optional)
For the Apple Layer
- 3 medium apples, peeled, cored, and sliced (Granny Smith or Honeycrisp work well)
- ¼ cup (50g) brown sugar
- 2 tablespoons unsalted butter
- 1 teaspoon ground cinnamon
- 1 teaspoon lemon juice
For the Caramel Pecan Topping
- ¾ cup (180ml) caramel sauce (store-bought or homemade)
- ¾ cup (90g) pecans, roughly chopped and lightly toasted
- 2–3 tablespoons heavy cream (optional, to thin the caramel if needed)
Kitchen Tools You’ll Need
Before you start, it helps to have your tools ready and within reach. This keeps the process smooth and stress-free.
Essential Tools
- Springform pan (20–23 cm / 8–9 inch)
This is key for cheesecakes. The removable sides make it easy to release without damaging the cake. - Mixing bowls (medium and large)
You’ll need a few bowls to keep ingredients separate and organized as you go. - Electric mixer (hand or stand mixer)
Helps create a smooth, lump-free filling. If you don’t have one, you can mix by hand. Just take your time and beat well. - Saucepan
Used for cooking the apple layer and warming the caramel if needed. - Baking tray or roasting pan (for water bath)
The cheesecake sits in this tray with hot water. This gentle heat helps it bake evenly and reduces the chance of cracks.
Helpful Extras (Optional)
- Measuring cups and spoons for accuracy
- Rubber spatula to scrape every bit of batter
- Aluminum foil to wrap the pan and prevent water from leaking in
Step-by-Step Instructions
Take it one step at a time. You’ll notice each stage is simple on its own, and together they build a beautiful cheesecake.
Step 1: Prepare the Crust
Start by crushing your graham crackers or biscuits into fine crumbs. You can use a food processor or place them in a bag and crush with a rolling pin.
Mix the crumbs with melted butter and sugar until the texture feels like wet sand. If you’re adding cinnamon, stir it in here.
Press the mixture firmly into the bottom of your springform pan. Use the back of a spoon or a flat glass to even it out. Bake at 180°C (350°F) for about 8–10 minutes, then set aside to cool.
Step 2: Make the Apple Filling
In a saucepan over medium heat, melt the butter and add the sliced apples, brown sugar, and cinnamon. Stir gently as the apples soften.
Cook for about 8–10 minutes until the apples are tender but not mushy. Add a splash of lemon juice to balance the sweetness.
Remove from heat and let the mixture cool completely. This step is important because hot apples can affect the cheesecake batter.
Step 3: Prepare the Cheesecake Batter
In a large bowl, beat the cream cheese until smooth and creamy. Take your time here. You want no lumps.
Add the sugar and mix until fully combined. Then add the eggs one at a time, mixing on low speed. This helps keep the batter smooth without adding too much air.
Stir in the vanilla and sour cream (or heavy cream). If using spices, add them now. You’ll notice the batter becomes silky and easy to pour.
Step 4: Assemble the Cheesecake
Pour the cheesecake batter over the cooled crust and smooth the top.
Add the apple filling. You can layer it evenly or gently swirl it into the batter with a knife for a marbled look. Just a few swirls will do.
Step 5: Bake the Cheesecake
Wrap the bottom of your pan with foil, then place it in a larger baking tray. Pour hot water into the tray to create a water bath. This helps the cheesecake bake evenly and reduces cracks.
Bake at 160°C (320°F) for about 55–70 minutes. The edges should be set, and the center should still have a slight jiggle when you gently shake the pan.
Step 6: Cool and Chill
Turn off the oven and let the cheesecake cool inside with the door slightly open for about 1 hour. This slow cooling helps prevent cracks.
Then remove it and let it come to room temperature. Once cooled, cover and refrigerate for at least 4 hours, or overnight for best results.
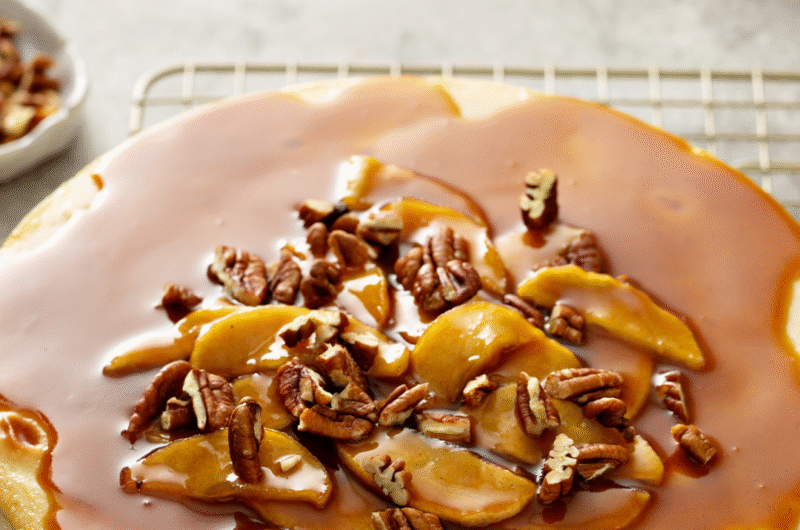
Step 7: Add Toppings
Before serving, drizzle caramel sauce over the top. If it’s too thick, warm it slightly or stir in a little cream to loosen it.
Sprinkle the toasted pecans evenly over the caramel. Slice, serve, and enjoy the layers you’ve just created.
Tips for the Perfect Cheesecake
Keep these tips in mind as you bake, and you’ll notice a smoother texture and a more even finish.
Use Room Temperature Ingredients
Let your cream cheese, eggs, and sour cream sit out for a bit before you start. This helps everything blend together easily.
Cold ingredients tend to stay lumpy, even after mixing. When everything is at room temperature, your batter turns smooth and creamy with less effort.
If you forget, don’t worry, just let them sit for 20–30 minutes before using.
Don’t Overmix the Batter
Once your ingredients are combined, mix just until smooth. You don’t need to keep beating the batter.
Overmixing adds too much air, which can cause the cheesecake to puff up in the oven and then sink or crack as it cools.
Keep the mixer on low speed, especially after adding the eggs. You’ll still get a creamy result without the extra air.
Avoid Opening the Oven Door Too Often
It’s tempting to check on your cheesecake, but try to resist. Each time you open the oven, heat escapes, and the temperature drops.
This can affect how evenly the cheesecake bakes. Instead, wait until you’re close to the end of the baking time before checking. A slight jiggle in the center is exactly what you’re looking for.
Water Bath Tips to Prevent Cracks
A water bath might sound tricky, but it’s simple and worth it. The steam keeps the oven environment moist, which helps the cheesecake bake gently and evenly.
Wrap your springform pan tightly with foil to keep water out. Place it in a larger pan, then pour in hot water until it reaches about halfway up the sides.
Don’t worry if it’s not perfect. Even a shallow water bath helps. This extra step gives you a smoother top and reduces the chance of cracks, making your cheesecake look just as good as it tastes.
Variations & Substitutions
Use Different Nuts (Walnuts, Almonds)
If you don’t have pecans, you can swap them out without any trouble. Walnuts are the closest in texture and give a slightly deeper, more earthy flavor.
Almonds work well too, especially if you like a lighter crunch. Just chop them roughly and toast them for a few minutes to bring out their flavor. You’ll notice this step makes a big difference.
Swap Apples for Pears
Pears are a great alternative if you want something softer and slightly sweeter. They cook down nicely and pair well with the caramel and spices.
Choose firm pears so they hold their shape while cooking. If they release extra juice, just let it cook off in the pan. You want the mixture thick, not watery.
Add Streusel Topping
For an extra layer of texture, you can add a simple streusel on top. This gives the cheesecake a bakery-style finish with a light crunch.
Mix flour, brown sugar, butter, and a pinch of cinnamon until crumbly.
Sprinkle it over the cheesecake before baking or add it during the last part of baking so it stays crisp. Don’t worry if it looks rustic, as that’s part of the charm.
Gluten-Free Crust Option
You can easily make this recipe gluten-free by changing the crust. Use gluten-free biscuits or graham crackers in the same quantity.
The method stays exactly the same. Press, bake, and cool as usual. You’ll still get a firm, buttery base that holds everything together.
How to Store and Freeze
Once your cheesecake has fully chilled, store it in the fridge, covered tightly with plastic wrap or in an airtight container to keep it fresh and prevent it from absorbing other smells; it will stay at its best for up to 4–5 days.
If you plan to keep it longer, freezing is a great option.
You can freeze the whole cheesecake or individual slices. Just wrap them well in plastic wrap, then add a layer of foil to protect against freezer burn.
For easier serving later, slicing before freezing works really well. When you’re ready to enjoy it again, transfer the cheesecake to the fridge and let it thaw slowly overnight.
You’ll notice the texture stays smooth and creamy this way. Try not to thaw it at room temperature, as that can make it too soft and affect the structure.
Serving Suggestions
When you’re ready to serve, take the cheesecake out of the fridge and let it sit for about 10–15 minutes.
You’ll notice it softens slightly, making each slice smoother and easier to cut while still holding its shape.
If you prefer a firmer texture, you can serve it straight from the fridge. Both ways work well, so go with what you enjoy.
For an extra touch, add a dollop of whipped cream or a scoop of vanilla ice cream on the side; the light, creamy contrast pairs beautifully with the rich cheesecake.
Just before serving, drizzle a little extra caramel sauce over each slice to bring everything together and enhance the flavor.
Common Mistakes to Avoid
- Overbaking the cheesecake
It’s easy to leave it in the oven too long. You’re looking for a slight jiggle in the center when you gently shake the pan. If it looks fully firm, it’s likely overbaked and may turn dry or crack as it cools. - Skipping the cooling process
Letting the cheesecake cool slowly is just as important as baking it. If you rush this step, the sudden temperature change can cause cracks. Let it rest in the oven first, then cool at room temperature before chilling. - Using cold ingredients
Cold cream cheese and eggs don’t mix smoothly. This can leave lumps in your batter. Let them come to room temperature so everything blends easily and gives you a creamy texture. - Not preparing the pan properly
If the pan isn’t lined, greased, or wrapped well for the water bath, you may run into issues. Water can leak in, or the cheesecake can stick to the sides. Take a minute to prep the pan properly, as it makes removing and serving much easier.
Final Thoughts
This apple caramel pecan cheesecake brings together creamy, spiced, crunchy, and sweet in one beautiful dessert.
It’s simple to follow, and you’ll notice each step builds something worth sharing. Give it a try and make it your own.
FAQs
Yes, it works perfectly and saves time. Just choose a good-quality one for the best flavor.
Granny Smith and Honeycrisp are great choices. They hold their shape and balance the sweetness with a slight tartness.
Use room temperature ingredients, don’t overmix, and bake with a water bath. Letting the cheesecake cool slowly also helps a lot.
Yes, and it’s actually better that way. Make it a day in advance so it has time to chill and set properly.
It’s highly recommended. It helps the cheesecake bake evenly and keeps the texture smooth, but you can skip it if needed. Just expect a slightly higher chance of cracks.
Best Apple Caramel Pecan Cheesecake (Rich, Creamy & Easy!)
Difficulty: Intermediate10
Slices25
minutes1
hour6
hoursA creamy cheesecake layered with spiced apples, topped with crunchy pecans and rich caramel—perfect for fall and special occasions.
Ingredients
- For the Crust
200g graham crackers, crushed
100g unsalted butter, melted
2 tablespoons sugar
- For the Cheesecake Filling
680g cream cheese, softened
1 cup (200g) sugar
3 large eggs
1 teaspoon vanilla extract
1 cup (240ml) sour cream
- For the Apple Layer
3 apples, peeled and sliced
¼ cup (50g) brown sugar
2 tablespoons butter
1 teaspoon cinnamon
- For the Topping
¾ cup (180ml) caramel sauce
¾ cup (90g) pecans, toasted
Directions
- Preheat oven to 180°C (350°F). Mix crust ingredients, press into pan, and bake for 10 minutes.
- Cook apples with butter, sugar, and cinnamon until soft. Let cool.
- Beat cream cheese until smooth. Add sugar, eggs, vanilla, and sour cream. Mix until creamy.
- Pour batter over crust. Add apples and lightly swirl.
- Bake at 160°C (320°F) in a water bath for 55–70 minutes until slightly jiggly in the center.
- Cool it (slowly) in the oven, then chill for at least 4 hours or overnight.
- Top with caramel and pecans before serving.
Notes
- Use room temperature ingredients for a smooth batter
- Don’t overmix to avoid cracks
- Chill overnight for the best texture and flavor
- Warm caramel slightly for easy drizzling

Hi, I’m Sorenna Blythe, the baker and writer behind Mix Whisk Bake. I share simple, reliable recipes and honest kitchen moments to help home bakers bake with confidence and joy. When I’m not testing new treats, you’ll find me sipping coffee and dreaming up my next bake.


