
If you love simple summer desserts, this Blueberry Peach Galette is one you’ll want to make again and again.
A galette is a rustic free-form pastry that delivers all the goodness of a fruit pie without the extra work.
Sweet, juicy peaches and fresh blueberries are a perfect match.
As they bake, their flavors blend into a bright, fruity filling that tastes like summer in every bite.
What makes this dessert so special is its relaxed, homemade look.
There’s no need for perfect edges or fancy techniques. Just roll out the dough, add the fruit, and fold the crust around the filling.
Even if you’ve never made a pie before, you can make this galette with confidence and enjoy a beautiful, bakery-worthy dessert straight from your own kitchen.
Why You’ll Love This Blueberry Peach Galette
- Easy, beginner-friendly recipe – Simple steps and basic ingredients make this a great dessert for new bakers.
- Less fuss than traditional pie – No pie dish or complicated crust work is needed, saving both time and effort.
- Juicy seasonal fruit filling – Fresh peaches and blueberries create a sweet, flavorful filling packed with summer goodness.
- Beautiful rustic presentation – The folded crust gives this galette a charming homemade look that always impresses.
- Perfect for summer gatherings, picnics, and family desserts – It’s easy to share and makes a wonderful treat for any warm-weather occasion.

What Is a Galette?
A galette is a rustic French pastry made by placing a filling in the center of a flat round of dough and folding the edges over it before baking, creating a simple yet beautiful dessert that celebrates both the crust and the filling.
Unlike a traditional pie, which is usually baked in a pie dish and often has a top crust or decorative lattice, a galette is free-form, meaning it is shaped directly on a baking sheet without the need for special equipment or precise techniques.
A tart is typically baked in a shallow tart pan with straight sides and has a more structured appearance, while the crust is often carefully pressed into the pan to create clean, polished edges.
A crostata is the Italian version of a galette and is very similar in style and preparation, with the main differences coming from regional traditions, ingredients, and flavor combinations rather than the baking method itself.
One of the reasons galettes are so popular with home bakers is that they are wonderfully forgiving, allowing you to focus on enjoying the baking process instead of worrying about making everything look perfect.
The folded edges are meant to look rustic and natural, so small cracks, uneven folds, and handmade details only add to the charm rather than taking away from the final result.
Galettes are also incredibly versatile because they can be filled with a wide variety of fruits, making them a great way to use whatever is fresh, ripe, and in season.
For beginners, a galette is often the perfect introduction to fruit pastries since it delivers the same comforting flavors as a homemade pie while requiring far less time, effort, and experience.
If you’ve ever felt intimidated by pie-making, a galette is a wonderful place to start because it offers all the satisfaction of a classic fruit dessert in a much simpler and more approachable form.
Ingredients You’ll Need
For the Crust
- 1 ¼ cups (156g) all-purpose flour – Provides the structure for a tender, flaky crust.
- ¼ teaspoon salt – Enhances the flavor of the dough.
- ½ cup (113g) cold unsalted butter, cubed – Creates flaky layers and rich flavor.
- 3–4 tablespoons ice water – Helps bring the dough together without warming the butter.
For the Blueberry Peach Filling
- 2 medium peaches, sliced (about 2 cups) – Adds natural sweetness and juicy texture.
- 1 cup (150g) fresh blueberries – Provides bursts of sweet-tart flavor throughout the filling.
- ⅓ cup (67g) granulated sugar – Sweetens the fruit while helping create a syrupy filling.
- 1 tablespoon cornstarch – Thickens the fruit juices during baking.
- 1 tablespoon fresh lemon juice – Brightens the flavors and balances the sweetness.
- 1 teaspoon vanilla extract – Adds warmth and depth to the filling.
- ¼ teaspoon ground cinnamon (optional) – Brings a subtle hint of spice that pairs beautifully with the fruit.
For Finishing
- 1 large egg, beaten with 1 tablespoon water – Used as an egg wash to help the crust bake up golden and shiny.
- 1 tablespoon coarse sugar – Sprinkled over the crust for extra sweetness and a delicate crunch.
Ingredient Notes and Substitutions
Fresh vs. Frozen Blueberries
Fresh blueberries are a wonderful choice for this galette because they hold their shape well during baking and provide little bursts of juicy flavor in every bite.
When blueberries are in season, they often offer the best flavor, sweetness, and texture for the filling.
Frozen blueberries work well too, making this recipe easy to enjoy year-round.
There is no need to thaw frozen blueberries before using them, as thawing can release excess moisture that may make the filling too watery.
If using frozen berries, consider adding an extra teaspoon of cornstarch to help thicken the juices as the galette bakes.
How to Choose Ripe Peaches
Look for peaches that have a sweet fragrance and give slightly when gently pressed near the stem.
A ripe peach should feel soft but not mushy.
Avoid peaches with large bruises, wrinkled skin, or overly soft spots, as these can affect the texture of the filling.
If your peaches are still firm, leave them at room temperature for a day or two until they soften naturally.
Slightly firm peaches are often ideal for baking because they hold their shape better while still becoming tender in the oven.
Alternative Sweeteners
Granulated sugar provides reliable sweetness and helps create a beautifully balanced fruit filling.
If you prefer a more natural option, you can substitute honey or maple syrup for part of the sugar.
Keep in mind that liquid sweeteners add extra moisture, so the filling may be slightly softer after baking.
Coconut sugar can also be used as a one-to-one replacement and adds a subtle caramel-like flavor that pairs nicely with peaches.
No matter which sweetener you choose, taste your fruit first and adjust the sweetness as needed since some peaches and blueberries are naturally sweeter than others.
Store-Bought Pie Crust Option
If you’re short on time, a store-bought refrigerated pie crust is a convenient alternative to homemade dough.
Using a ready-made crust can significantly reduce prep time while still producing a delicious dessert.
Allow the crust to soften slightly according to the package directions before unrolling it to prevent cracking.
Even with a store-bought crust, you’ll still get the rustic look and homemade feel that makes a galette so appealing.
This shortcut is especially helpful for beginner bakers who want a simple and stress-free baking experience.
Gluten-Free Crust Alternatives
A gluten-free galette can be just as flaky and flavorful when made with the right crust.
Many grocery stores now carry ready-made gluten-free pie crusts that work well for fruit galettes.
If making your own dough, use a quality gluten-free all-purpose flour blend that contains a binding ingredient such as xanthan gum.
Because gluten-free dough can be more delicate, chilling it well before rolling can make it easier to handle.
A few small cracks are completely normal, and they can easily be pressed back together with your fingers before baking.
Kitchen Tools You’ll Need
- Mixing bowls – Used for preparing both the galette dough and fruit filling.
- Rolling pin – Helps roll the dough into an even circle for easy shaping.
- Baking sheet – Provides a sturdy surface for baking the galette until golden brown.
- Parchment paper – Prevents sticking and makes cleanup much easier.
- Pastry brush – Used to apply the egg wash for a beautifully golden crust.
- Sharp knife – Makes slicing peaches and serving the finished galette quick and easy.
How to Make Blueberry Peach Galette
Step 1: Prepare the Galette Dough
In a large mixing bowl, whisk together the all-purpose flour and salt until evenly combined.
Add the cold, cubed butter to the flour mixture and use a pastry cutter, fork, or your fingertips to work the butter into the flour until the mixture resembles coarse crumbs with a few pea-sized pieces of butter remaining.
Keeping small pieces of butter in the dough is what helps create a flaky crust, so don’t worry about making everything perfectly smooth.
Add the ice water one tablespoon at a time, gently mixing after each addition until the dough begins to come together.
The dough should hold together when pressed between your fingers, but should not feel sticky or wet.
Gather the dough into a ball and gently flatten it into a disc shape.
Wrap the dough tightly in plastic wrap or place it in an airtight container.
Chill the dough in the refrigerator for at least 30 minutes to allow the butter to firm up and the gluten to relax, making the dough easier to roll out later.
Step 2: Make the Fruit Filling
While the dough chills, prepare the fruit filling.
Wash and dry the peaches and blueberries thoroughly.
Slice the peaches into thin, even wedges so they bake evenly and become tender without turning mushy.
Place the sliced peaches and blueberries in a large bowl.
Add the granulated sugar, cornstarch, lemon juice, vanilla extract, and cinnamon if using.
Gently toss everything together until the fruit is evenly coated.
The cornstarch helps thicken the juices during baking, which keeps the filling from becoming overly runny.
Set the filling aside while you prepare the dough.
Step 3: Roll Out the Dough
Lightly flour your work surface and remove the chilled dough from the refrigerator.
Roll the dough into a rough circle about 12 inches wide and approximately ⅛ inch thick.
Don’t worry if the edges aren’t perfectly round, as a galette is meant to have a rustic appearance.
Carefully transfer the rolled dough onto a parchment-lined baking sheet.
If the dough becomes too soft while working with it, place it in the refrigerator for a few minutes before continuing.
Step 4: Assemble the Galette
Spoon the blueberry peach filling into the center of the dough.
Spread the fruit into an even layer, leaving about 2 inches of dough uncovered around the outer edge.
This border will be folded over the filling to create the classic galette shape.
Gently fold the edges of the dough up and over portions of the fruit, overlapping the folds as you work your way around the galette.
The center of the filling should remain visible.
Small imperfections and uneven folds are part of the charm, so there is no need to make it look perfect.
Step 5: Add Finishing Touches
In a small bowl, whisk together the egg and water to create an egg wash.
Use a pastry brush to lightly coat the exposed crust with the egg wash.
This simple step helps the crust bake into a beautiful golden brown color with a slight shine.
Sprinkle the coarse sugar over the crust for extra texture and a touch of sweetness.
For an even flakier crust, you can chill the assembled galette for 10 to 15 minutes before baking.
Step 6: Bake
Place the galette in a preheated 400°F (200°C) oven.
Bake for 35 to 40 minutes, or until the crust is golden brown and the fruit filling is bubbling around the edges.
The bubbling juices are a good sign that the filling has thickened and the fruit is fully cooked.
Remove the galette from the oven and place it on a wire rack.
Allow it to cool for at least 15 to 20 minutes before slicing.
Giving the galette time to cool helps the filling set properly and makes serving much easier.
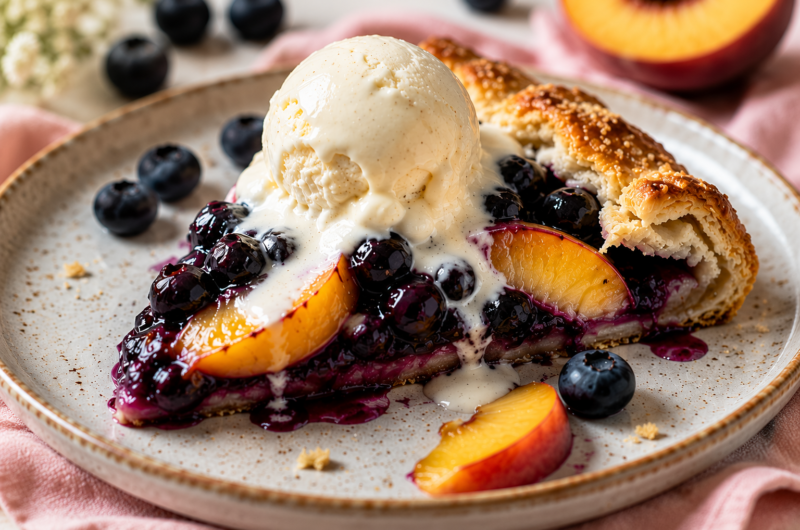
Serve warm on its own or with a scoop of vanilla ice cream for an extra-special treat.
Tips for the Best Blueberry Peach Galette
Keep Ingredients Cold for a Flaky Crust
One of the easiest ways to create a flaky, tender crust is to keep your butter and water as cold as possible throughout the dough-making process.
Cold butter stays in small pieces within the dough, and as it melts in the oven, it creates tiny pockets that give the crust its light, flaky texture.
If your kitchen is warm, don’t hesitate to place the dough back in the refrigerator for a few minutes if it starts feeling soft while you work.
Working with chilled ingredients may seem like a small detail, but it can make a noticeable difference in the final result.
Avoid Overfilling
It can be tempting to pile on extra fruit, especially when the filling looks so colorful and delicious.
However, too much filling can release excess juice during baking, making it harder for the crust to cook properly.
Overfilling can also cause the galette to leak or lose its shape as it bakes.
For the best balance, spread the filling in an even layer and leave enough room around the edges for folding.
A well-balanced galette allows both the fruit and crust to shine.
Use Ripe but Firm Peaches
Peaches that are ripe but still slightly firm are ideal for baking.
They offer plenty of sweetness and flavor while holding their shape during baking.
Very soft peaches can break down quickly and create a filling that is overly soft or watery.
When selecting peaches, look for fruit with a sweet aroma and a gentle give when lightly pressed.
Using peaches at the right stage of ripeness helps create a filling with great texture and beautiful slices in every serving.
Chill the Assembled Galette Before Baking
After assembling the galette, placing it in the refrigerator for 10 to 15 minutes can help improve the finished crust.
This short chilling time allows the butter in the dough to firm up again before it enters the hot oven.
A colder crust is more likely to bake up flaky and golden rather than spreading too much during baking.
This extra step takes very little effort but often produces a more polished and bakery-style result.
Prevent a Soggy Bottom Crust
Fruit naturally releases juice as it bakes, which is part of what makes a galette so delicious.
The cornstarch in the filling helps thicken those juices and keeps them from soaking into the crust too much.
Be sure to avoid adding extra liquid to the filling unless necessary.
Baking the galette on a fully preheated oven rack also helps the bottom crust cook evenly and develop a crisp texture.
If your fruit seems especially juicy, you can sprinkle a small amount of flour or a tablespoon of almond flour onto the center of the dough before adding the filling to help absorb excess moisture.
Delicious Variations
Peach Berry Galette
If you enjoy experimenting with seasonal fruit, this variation is an easy way to give the galette a fresh new flavor while keeping the same simple preparation.
Replace the blueberries with an equal amount of raspberries for a brighter, slightly tangy filling that pairs beautifully with sweet peaches.
Blackberries are another excellent option and add a deeper berry flavor with a rich, juicy texture.
You can even use a combination of raspberries and blackberries to create a colorful filling with a balance of sweet and tart flavors.
No other changes to the recipe are needed, making this one of the easiest variations to try.
Peach Almond Galette
Almond and peach are a classic pairing that brings a subtle bakery-style flavor to this rustic dessert.
Add ¼ teaspoon of almond extract to the filling along with the vanilla extract to enhance the natural sweetness of the peaches.
Sprinkle a handful of sliced almonds over the fruit before folding the dough around the filling.
As the galette bakes, the almonds become lightly toasted and add a pleasant crunch to each bite.
This variation is especially delicious served slightly warm with a scoop of vanilla ice cream.
Honey Peach Galette
For a naturally sweet twist, replace part of the granulated sugar with honey.
Honey adds gentle floral notes that complement the flavor of ripe peaches without overpowering them.
A good starting point is replacing half of the sugar with two tablespoons of honey.
Because honey adds extra moisture, the filling may be slightly softer, but the result is still wonderfully flavorful.
This version highlights the fruit and creates a warm, comforting dessert that feels perfect for late summer.
Mixed Fruit Galette
A galette is one of the best desserts for using a variety of fresh fruits that need to be enjoyed before they become overripe.
Try adding sliced nectarines, plums, or pitted cherries alongside the peaches and blueberries.
Each fruit brings its own flavor and texture, creating a filling that is layered, colorful, and full of seasonal character.
Nectarines offer a flavor similar to peaches, while plums contribute a pleasant tartness, and cherries add bursts of sweetness.
This variation is a great choice when visiting a farmers market or when you simply want to make the most of the fresh fruit you have on hand.
What to Serve with Blueberry Peach Galette
- Vanilla ice cream – The creamy, cold texture pairs perfectly with the warm fruit filling and flaky crust.
- Fresh whipped cream – Adds a light, airy topping that complements the sweetness of the peaches and blueberries.
- Greek yogurt – Provides a creamy, slightly tangy contrast that balances the rich flavors of the galette.
- Caramel drizzle – Brings extra sweetness and a buttery flavor that enhances the baked fruit.
- Hot coffee or tea – A warm beverage makes this dessert feel even more comforting and enjoyable.
Storage and Make-Ahead Tips
How to Store Leftovers
If you have leftover galette, proper storage will help maintain its flavor and texture for the next few days.
Allow the galette to cool completely before storing it, as trapping heat can create excess moisture that softens the crust.
Once cooled, place the galette in an airtight container or cover it tightly with plastic wrap or aluminum foil.
Store it in the refrigerator for up to 4 days.
While the crust may soften slightly over time, the filling will continue to taste delicious.
For the best texture, reheat individual slices in a 350°F (175°C) oven for a few minutes before serving.
This helps restore some of the crust’s crispness while gently warming the fruit filling.
Best Container Options
An airtight food storage container is one of the easiest ways to keep the galette fresh and protected from absorbing refrigerator odors.
If the galette is too large for a container, place it on a plate or baking sheet and cover it tightly with plastic wrap or foil.
Containers with secure-fitting lids help preserve both the flavor and texture of the dessert.
If storing individual slices, separate them with small pieces of parchment paper to prevent sticking.
Can You Freeze a Galette?
A blueberry peach galette freezes surprisingly well, making it a great dessert to prepare ahead for future cravings or special occasions.
Whether you freeze it before or after baking, proper wrapping helps maintain quality and prevent freezer burn.
Freezing Before Baking
To freeze an unbaked galette, assemble it completely on a parchment-lined baking sheet.
Place the baking sheet in the freezer until the galette is firm.
Once frozen, wrap the galette tightly in plastic wrap, followed by a layer of aluminum foil.
Store it in the freezer for up to 3 months.
When ready to bake, place the frozen galette directly into the oven without thawing.
You may need to add a few extra minutes to the baking time to account for the frozen dough.
Freezing After Baking
If you have already baked the galette, allow it to cool completely before freezing.
Wrap the entire galette or individual slices tightly in plastic wrap and then in foil.
Store in a freezer-safe container or freezer bag for added protection.
Frozen baked galette can be stored for up to 3 months.
To serve, thaw overnight in the refrigerator and warm in the oven until heated through.
This method helps preserve the flavor while improving the texture of the crust.
Make-Ahead Instructions
Preparing parts of the recipe ahead of time can make baking day easier and more enjoyable.
A little planning allows you to spend less time in the kitchen and more time enjoying the finished dessert.
Prepare Dough in Advance
The galette dough can be made up to 3 days ahead and stored in the refrigerator.
Keep it tightly wrapped so it does not dry out.
You can also freeze the dough for up to 3 months if you’d like to prepare even further in advance.
Allow frozen dough to thaw overnight in the refrigerator before rolling it out.
Having dough ready to go can make assembling the galette feel quick and effortless.
Assemble Ahead and Refrigerate
The fully assembled galette can be prepared several hours before baking.
Once assembled, place it on a baking sheet, cover loosely, and refrigerate until needed.
Keeping the galette chilled helps the butter stay cold, which supports a flaky crust during baking.
For the best results, bake the galette within 24 hours of assembling it.
This simple make-ahead option is especially helpful when preparing dessert for guests, family gatherings, or holiday meals.
Final Thoughts
This Blueberry Peach Galette is proof that a beautiful homemade dessert doesn’t have to be complicated.
With its flaky crust and juicy fruit filling, it’s an easy recipe that delivers wonderful flavor in every bite.
If peaches are in season, this is the perfect time to give this galette a try.
The fresh fruit truly shines and creates a dessert that feels both simple and special.
Don’t be afraid to make it your own by experimenting with different berries and seasonal fruits.
Once you see how easy a galette is to make, you’ll have endless ways to enjoy it throughout the year.
FAQs
Can I Use Frozen Fruit?
Yes, frozen fruit works well in this recipe. Use it straight from the freezer and consider adding an extra teaspoon of cornstarch to help absorb excess moisture.
Do I Need to Peel the Peaches?
No, peeling is optional. The peach skins soften during baking, but you can remove them if you prefer a smoother filling.
Why Is My Galette Leaking Juice?
This usually happens when the filling contains too much moisture or the galette is overfilled.
Using the recommended amount of cornstarch and leaving a proper border around the edges can help prevent leaks.
Can I Make This Recipe Vegan?
Yes. Use a plant-based butter for the crust and replace the egg wash with a little non-dairy milk or maple syrup before baking.
How Do I Keep the Crust Crispy?
Keep the dough cold, avoid overfilling the galette, and bake until the crust is deeply golden.
Allowing the galette to cool on a wire rack also helps prevent the bottom crust from becoming soft.
Blueberry Peach Galette: The Perfect Rustic Summer Dessert
Difficulty: Easy8
Slices20
minutes40
minutes1
hourA rustic blueberry peach galette with a flaky homemade crust and a sweet, juicy fruit filling that’s perfect for summer baking.
Ingredients
- For the Crust:
1¼ cups all-purpose flour
¼ teaspoon salt
½ cup cold unsalted butter, cubed
3–4 tablespoons ice water
- For the Filling:
2 medium peaches, sliced
1 cup fresh blueberries
⅓ cup granulated sugar
1 tablespoon cornstarch
1 tablespoon lemon juice
1 teaspoon vanilla extract
¼ teaspoon ground cinnamon (optional)
- For Finishing:
1 egg, beaten with 1 tablespoon of water
1 tablespoon coarse sugar
Directions
- Mix the flour and salt in a bowl, then cut in the cold butter until crumbly. Add ice water until the dough comes together. Shape into a disc and chill for 30 minutes.
- In a separate bowl, combine the peaches, blueberries, sugar, cornstarch, lemon juice, vanilla, and cinnamon.
- Roll the dough into a 12-inch circle and place it on a parchment-lined baking sheet.
- Spoon the filling into the center, leaving a 2-inch border around the edges.
- Fold the edges of the dough over the fruit, pleating as needed.
- Brush the crust with egg wash and sprinkle with coarse sugar.
- Bake at 400°F (200°C) for 35–40 minutes, or until the crust is golden and the filling is bubbling.
- Cool for 15–20 minutes before slicing and serving.
Notes
- Keep the butter and water cold for the flakiest crust.
- Frozen blueberries can be used without thawing.
- For extra flavor, serve warm with vanilla ice cream or whipped cream.
- Store leftovers in the refrigerator for up to 4 days.


Hi, I’m Sorenna Blythe, the baker and writer behind Mix Whisk Bake. I share simple, reliable recipes and honest kitchen moments to help home bakers bake with confidence and joy. When I’m not testing new treats, you’ll find me sipping coffee and dreaming up my next bake.


