
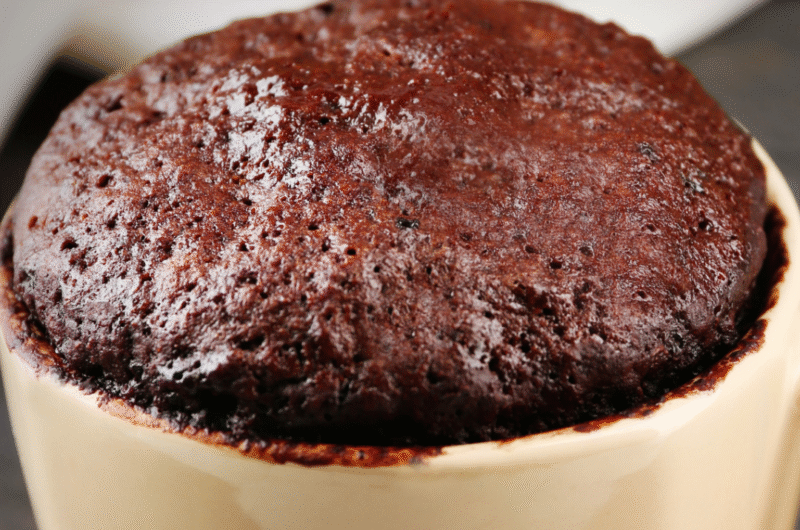
Craving something sweet, but don’t want the hassle of baking a full cake? This chocolate mug cake is your answer.
It’s a soft, rich cake made right in a mug using simple ingredients you likely already have.
You’ll love how quick and easy it is. Just mix, microwave, and enjoy. No oven, no mess, and no leftovers to worry about.
It’s perfect for those late-night chocolate cravings or when you want a quick treat without the wait. Let’s make something warm, gooey, and delicious in minutes.
Why You’ll Love This Chocolate Mug Cake
Ready in Under 5 Minutes
This recipe is all about speed without sacrificing flavor. From start to finish, you’re looking at just a few minutes.
Mix everything in one mug, pop it in the microwave, and it’s done before you know it.
You don’t need to plan ahead or wait for anything to preheat. It’s perfect when you want something sweet right now.
Uses Simple Pantry Ingredients
You’ll only need basic ingredients you likely already have, like flour, cocoa powder, sugar, milk, and a little oil. Nothing fancy, nothing hard to find.
If you bake even occasionally, you’re probably already set.
And if you’re missing something, don’t worry, this recipe is flexible enough to handle small swaps.
No Oven Required
No oven? No problem. This mug cake is made entirely in the microwave, which makes it quick and stress-free.
You’ll also avoid extra dishes and cleanup. One mug, one spoon, and you’re good to go. It’s a simple way to enjoy homemade cake without the usual effort.
Easy to Customize (Chips, Nuts, Fillings)
Once you’ve got the base recipe down, you can make it your own. Stir in chocolate chips for extra richness, or add a spoonful of peanut butter for a creamy center.
You can even drop in a square of chocolate before cooking for a gooey middle. Try nuts for crunch or a splash of vanilla for extra flavor.
Have fun with it. This is one of those recipes where small changes can make it feel brand new every time.
Ingredients Overview
Let’s keep this simple and practical. These amounts are perfect for one soft, rich mug cake.
Basic Ingredients
- 4 tablespoons all-purpose flour
- 2 tablespoons unsweetened cocoa powder
- 3 tablespoons sugar
- 3 tablespoons milk
- 2 tablespoons vegetable oil (or melted butter)
- ¼ teaspoon baking powder
- Pinch of salt (optional, but helps balance the flavor)
Optional Add-Ins
- 1–2 tablespoons chocolate chips (for extra richness)
- 1 tablespoon peanut butter (swirl it in or drop it in the center)
- ¼ teaspoon vanilla extract (adds a warm, sweet flavor)
- 1 small square of chocolate (for a gooey middle)
- 1 tablespoon chopped nuts (for a bit of crunch)
Ingredient Substitutions
- Dairy-free:
- Use almond, soy, or oat milk in the same amount (3 tablespoons)
- Gluten-free:
- Swap the flour with a 1:1 gluten-free flour blend (4 tablespoons)
- Low-sugar:
- Use 2 tablespoons of sugar or a sugar substitute equivalent
- Oil alternatives:
- Replace oil with melted butter or coconut oil (same amount)
Equipment Needed
You don’t need much to make this mug cake. Just a few simple tools, and you’re ready to go.
- Microwave-safe mug (at least 250–300 ml / 1 cup size)
Choose a slightly larger mug to prevent overflow while it cooks. You’ll notice the cake rises as it heats, so a bit of extra space helps avoid spills. - Spoon or small whisk
Use this to mix everything right in the mug. A spoon works perfectly fine, but just make sure you stir well so there are no dry pockets of flour or cocoa. - Microwave
This is where the magic happens. Most mug cakes cook in about 60–90 seconds, depending on your microwave’s power.
Step-by-Step Instructions
Let’s walk through this together. It’s simple, quick, and you’ll have a warm chocolate cake in minutes.
1. Mix Dry Ingredients
Start by adding the flour, cocoa powder, sugar, baking powder, and a pinch of salt directly into your mug.
Use your spoon to mix everything well. You want the cocoa and flour evenly combined so you don’t end up with dry spots later.
Take a few extra seconds here because it makes a difference.
2. Add Wet Ingredients
Pour in the milk and oil (or melted butter). If you’re using vanilla extract, add it now too.
Make sure you’re measuring roughly, but don’t stress about being perfect. This recipe is forgiving and works well with small variations.
3. Stir Until Smooth
Mix everything together until you have a smooth batter. Scrape the bottom and sides of the mug as you stir so nothing gets left behind.
You’re looking for a thick, lump-free mixture. Don’t worry if it’s not perfectly silky. Just make sure there are no dry pockets.
4. Add Optional Toppings or Fillings
Now’s the fun part. Stir in chocolate chips, or drop a spoonful of peanut butter into the center.
If you want a gooey middle, press a small piece of chocolate into the batter. You’ll notice it melts as it cooks, creating a soft, rich center.
5. Microwave Cooking Time Guide
Place the mug in the microwave and cook on high for 60 to 90 seconds.
Start with 60 seconds, then check. If it still looks wet on top, continue in 10–15 second bursts. Every microwave is different, so this step may take a little adjusting the first time.
6. Check Doneness and Cool Slightly
The cake should look set on top but still soft in the center. It will continue to cook slightly as it sits.
Let it cool for 1–2 minutes before eating. It will be very hot right out of the microwave.
Grab a spoon and enjoy it straight from the mug. You’ve just made a quick, homemade chocolate cake with almost no effort.
Tips for the Perfect Mug Cake
A few small tweaks can take your mug cake from good to really satisfying.
Don’t Overmix the Batter
Once you add the wet ingredients, mix just until everything comes together.
Overmixing can make the cake dense instead of soft. You’re aiming for a smooth batter, but it doesn’t need to be perfect. If you don’t see dry flour, you’re good to go.
Use the Right Mug Size to Avoid Overflow
Choose a mug that holds at least 250–300 ml (about 1 cup). This gives the cake room to rise as it cooks.
If the mug is too small, the batter may spill over in the microwave. You’ll notice the cake puff up quickly, so a little extra space makes things easier and cleaner.
Adjust Microwave Time Based on Wattage
Microwaves don’t all cook the same. Some are stronger, some are slower.
Start with 60 seconds, then add time in short bursts if needed. You’ll quickly learn what works best for your microwave after a try or two.
Avoid Overcooking (Prevents Dryness)
It’s better to slightly undercook than overcook. The cake should look set on top but still soft inside.
If you cook it too long, it can turn dry and rubbery. Don’t worry if the center looks a little soft because it will firm up as it cools.
Flavor Variations
Once you’ve made the basic version, it’s easy to switch things up. These simple ideas let you create a new flavor every time without changing the whole recipe.
Double Chocolate Mug Cake
If you love rich chocolate flavor, this one’s for you.
Add 1–2 tablespoons of chocolate chips to the batter before microwaving. You’ll notice they melt into the cake, making it extra soft and gooey.
For even more chocolate, sprinkle a few chips on top right after cooking.
Nutella-Filled Version
This version gives you a soft, melted center.
Add your batter to the mug, then drop 1 tablespoon of Nutella into the middle. Gently push it down so it’s slightly covered.
As it cooks, the Nutella warms up and creates a smooth, creamy filling inside the cake.
Peanut Butter Swirl
Chocolate and peanut butter work beautifully together.
Add 1 tablespoon of peanut butter on top of the batter, then lightly swirl it in with a spoon. Don’t mix it fully. You want ribbons of peanut butter throughout.
You’ll get little pockets of creamy flavor in every bite.
Mocha (Coffee + Chocolate)
This one adds a subtle coffee boost that deepens the chocolate taste.
Mix ½ teaspoon of instant coffee or espresso powder into the dry ingredients. It won’t taste strongly like coffee, but you’ll notice a richer chocolate flavor.
It’s a great option if you enjoy a slightly bolder dessert.
Vegan Chocolate Mug Cake
You can easily make this recipe dairy-free and vegan.
Use plant-based milk (like almond or oat) and replace butter with vegetable or coconut oil. Double-check that your chocolate chips are dairy-free if you’re adding them.
The texture stays soft and moist, so you’re not missing out on anything.
Common Mistakes to Avoid
- Overcooking the cake
Cooking too long makes the cake dry and rubbery, so stop when the top is set, but the center is still slightly soft. - Using too much flour
Adding too much flour makes the cake dense, so keep measurements level and avoid packing it in. - Not mixing properly
Poor mixing can leave dry pockets, so stir until the batter is smooth and fully combined. - Choosing a mug that’s too small
A small mug can cause overflow, so use one that holds at least 250–300 ml to give the cake room to rise.
Serving Suggestions
Now that your mug cake is ready, let’s make it even better with a few simple toppings.
Serve with Ice Cream or Whipped Cream
A warm mug cake pairs perfectly with something cold and creamy.
Add a scoop of vanilla ice cream on top and let it melt slightly into the cake.
If you prefer something lighter, a spoonful of whipped cream works just as well and adds a soft, airy finish.
Add Chocolate Syrup or Caramel Drizzle
A quick drizzle can take your mug cake to the next level.
Pour a little chocolate syrup or caramel over the top just before serving. You’ll notice it seeps into the cake, adding extra sweetness and richness in every bite.
Dust with Powdered Sugar
If you want something simple, a light dusting of powdered sugar does the job.
It adds a touch of sweetness without overpowering the chocolate flavor. This is a great option when you want to keep things quick and not too heavy.
Top with Fresh Berries
Fresh berries add a nice contrast to the rich chocolate.
Try strawberries, raspberries, or blueberries on top. Their slight tartness balances the sweetness and makes the dessert feel a bit lighter.
Storage & Reheating
This chocolate mug cake is best enjoyed fresh, right after it’s made, when it’s warm, soft, and slightly gooey in the center. You’ll notice the texture is at its best during those first few minutes.
If you do have leftovers, don’t worry, you can cover the mug with plastic wrap or transfer the cake to an airtight container and store it at room temperature for up to a day, though it may firm up slightly over time.
When you’re ready to enjoy it again, reheat it in the microwave for about 10–15 seconds to bring back some softness and warmth; just be careful not to overheat, as this can dry it out.
If it feels a bit dry, you can add a small splash of milk or top it with something creamy like whipped cream to help bring it back to life.
Final Thoughts
This chocolate mug cake is quick, simple, and perfect when you want something sweet without the wait.
It’s easy to make, uses basic ingredients, and delivers a soft, rich cake in minutes.
Feel free to play around with flavors and toppings to make it your own!
FAQs
Yes, this recipe is naturally egg-free and still turns out soft and moist.
It’s usually overcooked or overmixed; reduce cooking time and mix just until combined.
Yes, bake at 180°C (350°F) for about 10–15 minutes in an oven-safe ramekin.
Use a mug that holds at least 250–300 ml (about 1 cup) to prevent overflow.
Yes, reduce the sugar, use whole wheat or gluten-free flour, and swap in plant-based milk if needed.
The Best Chocolate Mug Cake (Ready in Just 5 Minutes!)
Difficulty: Easy1
serving2
minutes1
minute3
minutesA quick, rich chocolate cake made in a mug in just minutes—perfect for a single sweet treat.
Ingredients
4 tbsp all-purpose flour
2 tbsp cocoa powder
3 tbsp sugar
3 tbsp milk
2 tbsp vegetable oil (or melted butter)
¼ tsp baking powder
Pinch of salt (optional)
Optional: 1–2 tbsp chocolate chips or 1 tbsp peanut butter
Directions
- Add all dry ingredients to a microwave-safe mug and mix well.
- Stir in milk and oil until smooth.
- Add any optional mix-ins or fillings.
- Microwave on high for 60–90 seconds.
- Let cool for 1–2 minutes, then enjoy.
Notes
- Do not overcook, or the cake may turn dry.
- Use a large mug to prevent overflow.
- Adjust cooking time based on your microwave.
- Best enjoyed fresh and warm.

Hi, I’m Sorenna Blythe, the baker and writer behind Mix Whisk Bake. I share simple, reliable recipes and honest kitchen moments to help home bakers bake with confidence and joy. When I’m not testing new treats, you’ll find me sipping coffee and dreaming up my next bake.


