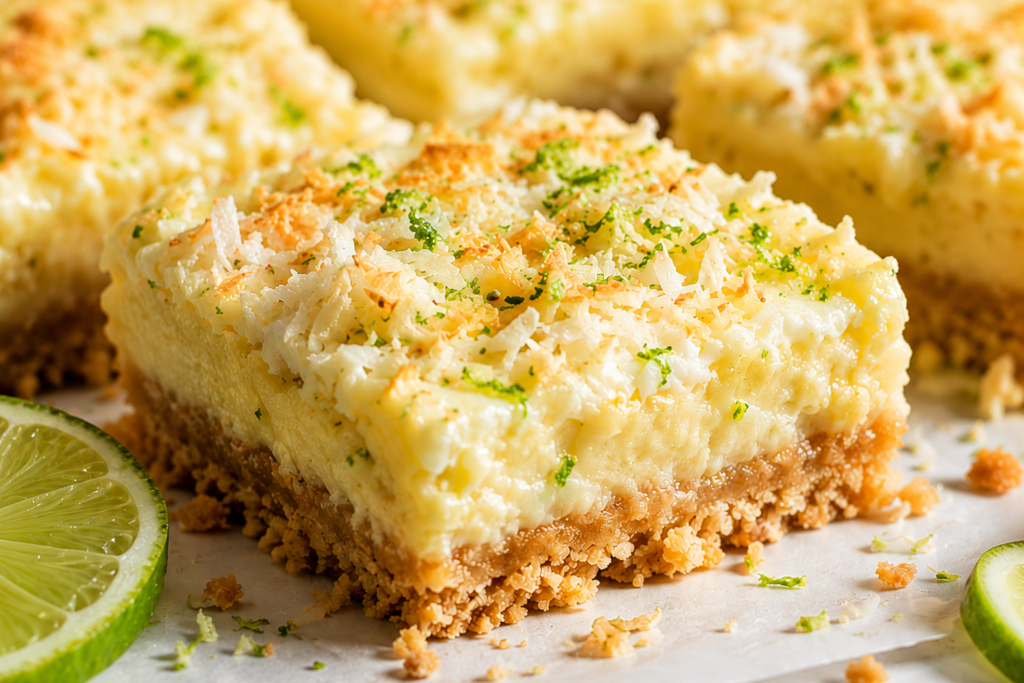
If you’re looking for a dessert that tastes bright, fresh, and a little tropical, these Key Lime Coconut Bars are a wonderful choice.
The tangy key lime filling pairs perfectly with sweet coconut, creating a flavor combination that’s both refreshing and satisfying.
With a creamy filling and a buttery coconut crust, these bars are easy to love and even easier to share.
They’re perfect for spring and summer gatherings, potlucks, picnics, or anytime you want a simple dessert that feels special.
Best of all, they’re straightforward to make, so even beginner bakers can enjoy great results.
Why You’ll Love This Recipe
- Bright and zesty key lime flavor – Fresh key lime adds a vibrant citrus taste that makes every bite refreshing.
- Sweet coconut complements the citrus perfectly – Coconut adds a subtle sweetness that balances the tangy lime beautifully.
- Easy-to-make dessert bars – Simple ingredients and straightforward steps make this recipe beginner-friendly.
- Great make-ahead treat – These bars chill well, making them perfect for preparing in advance.
- Perfect balance of tart and sweet – The creamy filling delivers just the right mix of citrusy tang and sweetness.
What Are Key Lime Coconut Bars?
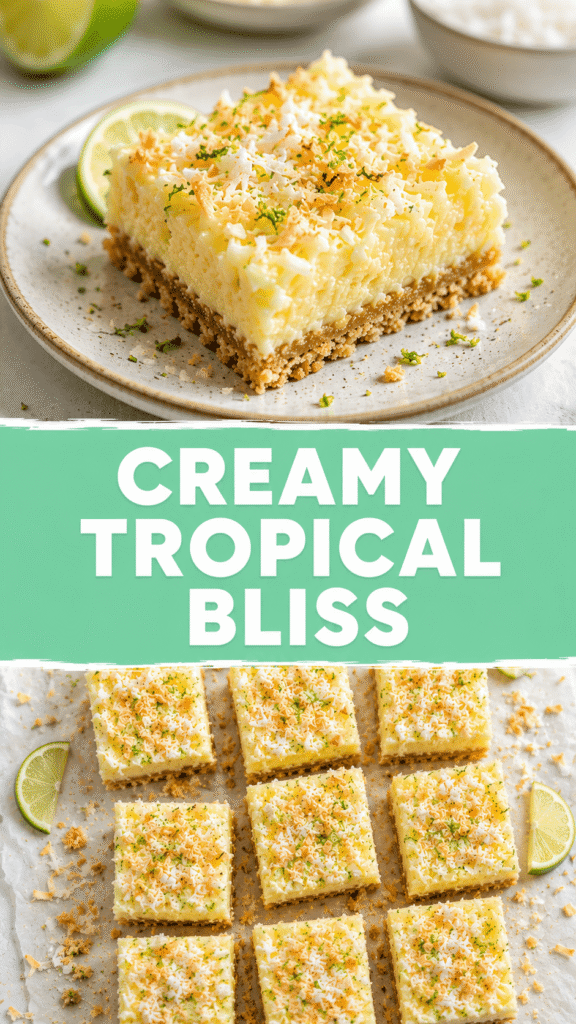
Key Lime Coconut Bars are a tropical-inspired dessert made with a buttery crust and a smooth, creamy filling that combines the bright flavor of key limes with the natural sweetness of coconut.
The inspiration for this recipe comes from classic key lime pie, a beloved dessert known for its refreshing citrus flavor and rich, creamy texture.
By transforming those flavors into easy-to-serve bars, you get all the deliciousness of a traditional key lime dessert in a convenient form that’s perfect for sharing at parties, picnics, and family gatherings.
One of the ingredients that makes these bars special is key lime juice, which has a slightly different flavor than regular lime juice.
Key limes are smaller than standard limes and have a more intense aroma with a unique balance of sweetness and tartness.
Their flavor is bright and vibrant without being overly sharp, which helps create a filling that tastes fresh and balanced.
If you can only find regular limes, you can still make this recipe successfully, but key limes provide the classic flavor that gives these bars their signature taste.
Coconut adds another layer of flavor that pairs naturally with citrus.
Its subtle sweetness softens the tanginess of the lime and creates a dessert that feels light, refreshing, and satisfying all at once.
The coconut also adds a gentle texture that makes each bite more interesting without overpowering the creamy filling.
Together, the key lime and coconut create a combination that feels like a taste of the tropics, making these bars especially popular during warm-weather months.
The result is a dessert that is bright, creamy, sweet, and tart in perfect harmony, with every ingredient working together to create a refreshing treat that keeps you coming back for another bite.
Ingredients You’ll Need
For the Crust
- 1½ cups graham cracker crumbs
- ½ cup sweetened shredded coconut
- 2 tablespoons granulated sugar
- 6 tablespoons unsalted butter, melted
For the Key Lime Filling
- 1 (14-ounce) can sweetened condensed milk
- 4 large egg yolks
- ½ cup key lime juice (freshly squeezed if possible)
- 1 tablespoon key lime zest
- ½ cup sweetened shredded coconut
Optional Garnishes
- Whipped cream, for serving
- Thin lime slices, for decorating
- ¼ cup toasted coconut flakes
- Extra key lime zest, for sprinkling on top
Equipment Needed
- 8×8-inch baking pan – The perfect size for creating thick, evenly baked bars.
- Mixing bowls – You’ll need separate bowls for the crust and filling.
- Whisk – Helps create a smooth, creamy filling without lumps.
- Measuring cups and spoons – Ensures accurate ingredient measurements for the best results.
- Microplane or zester – Makes it easy to remove the flavorful zest from the key limes.
- Parchment paper – Prevents sticking and allows you to lift the bars out of the pan for easy slicing.
How to Make Key Lime Coconut Bars
Step 1: Prepare the Pan
Preheat your oven to 350°F (175°C), so it has plenty of time to reach the correct temperature while you prepare the crust.
Line an 8×8-inch baking pan with parchment paper, leaving a little overhang on two sides to create handles for easy removal later.
Taking a minute to line the pan properly helps prevent sticking and makes slicing the finished bars much easier.
Step 2: Make the Coconut Crust
In a medium mixing bowl, combine the graham cracker crumbs, shredded coconut, granulated sugar, and melted butter.
Stir until all of the crumbs are evenly coated and the mixture resembles wet sand.
Pour the mixture into the prepared baking pan and spread it into an even layer.
Use the bottom of a measuring cup or glass to firmly press the crust into the pan, paying special attention to the corners.
A well-packed crust helps create clean slices and prevents crumbling after baking.
Bake the crust for 8 to 10 minutes, or until it is lightly golden and fragrant.
Remove the pan from the oven and allow the crust to cool slightly while you prepare the filling.
Step 3: Prepare the Key Lime Filling
In a large mixing bowl, whisk together the sweetened condensed milk and egg yolks until the mixture is smooth and fully combined.
Add the key lime juice and key lime zest, then continue whisking until everything is evenly incorporated.
The filling will naturally begin to thicken slightly as the citrus juice reacts with the condensed milk.
Gently fold in the shredded coconut until it is evenly distributed throughout the mixture.
Take care not to overmix, as a gentle fold helps maintain the filling’s smooth texture.
Step 4: Bake the Bars
Pour the key lime filling over the slightly cooled crust and spread it evenly with a spatula.
Place the pan back into the oven and bake for 15 to 18 minutes.
The bars are ready when the edges look set, and the center has only a slight wobble when gently shaken.
Avoid overbaking, as the filling will continue to firm up while it cools.
Remove the pan from the oven and place it on a wire rack.
Step 5: Cool and Chill
Allow the bars to cool completely at room temperature before moving them to the refrigerator.
Cooling first helps prevent excess condensation from forming on the surface of the bars.
Once cooled, refrigerate the bars for at least 2 hours, or until the filling is fully set and firm.
This chilling time is important because it gives the bars their smooth texture and makes them easier to slice neatly.
Step 6: Slice and Serve
When the bars are fully chilled, use the parchment paper handles to carefully lift them out of the pan.
Place them on a cutting board and use a sharp knife to cut them into squares or rectangles.
For the cleanest cuts, wipe the knife clean between slices.
Garnish with whipped cream, lime slices, toasted coconut flakes, extra lime zest, or your favorite combination of toppings.
Serve chilled and enjoy the bright citrus flavor, creamy filling, and sweet coconut in every bite.
Tips for the Best Key Lime Coconut Bars
Use Fresh Key Lime Juice Whenever Possible
Fresh key lime juice gives these bars their signature bright and vibrant flavor.
Bottled juice can work in a pinch, but it often lacks the fresh citrus aroma that makes homemade desserts taste special.
If fresh key limes are available, take the extra few minutes to squeeze them yourself for the best results.
Don’t forget to zest the limes before juicing them, as the zest contains flavorful oils that add even more citrus character to the filling.
Don’t Overbake the Filling
The filling should look mostly set when it comes out of the oven, but the center can still have a slight jiggle.
Overbaking can cause the filling to become firmer than intended and reduce its creamy texture.
Keep a close eye on the bars during the final few minutes of baking.
Remember that the filling will continue to set as it cools and chills in the refrigerator.
Chill Thoroughly Before Slicing
Patience makes a big difference when it comes to clean, beautiful bars.
Allowing the bars to chill completely helps the filling firm up and develop its smooth texture.
Trying to slice them too soon can lead to messy edges and a softer center.
For the neatest cuts, refrigerate the bars for at least two hours, though longer chilling often produces even better results.
Toast Coconut for Extra Flavor
Toasted coconut adds a deeper, nuttier flavor that pairs wonderfully with the bright key lime filling.
A quick toast in the oven or a dry skillet can transform ordinary coconut into a flavorful garnish.
Watch it carefully while toasting because coconut can brown quickly.
Even a small sprinkle on top adds extra texture and makes the finished bars look more inviting.
Use Parchment Paper for Easy Removal
Lining the baking pan with parchment paper is a simple step that saves time later.
Leaving a little parchment hanging over the sides creates handles that allow you to lift the entire dessert out of the pan.
This makes slicing easier and helps keep the bars looking neat and professional.
It also reduces the chance of the crust sticking to the pan, making cleanup much simpler once you’re finished baking.
Variations to Try
Toasted Coconut Version
If you love coconut, this variation is an easy way to add even more flavor to the bars.
Lightly toast the shredded coconut before mixing it into the crust to give it a richer, nuttier taste.
The toasting process brings out the natural sweetness of the coconut and adds extra depth to every bite.
For even more texture and flavor, sprinkle toasted coconut flakes over the chilled bars just before serving.
This simple change creates a dessert with a more pronounced tropical character while keeping the recipe just as easy to make.
Extra Citrus Bars
For a brighter citrus flavor, try adding a little lemon zest or regular lime zest to the filling.
The additional zest enhances the fresh, tangy notes without overpowering the classic key lime flavor.
A combination of key lime and lemon creates a slightly more complex citrus profile that many people enjoy.
This variation is especially helpful if you prefer desserts with a stronger citrus presence.
Start with a small amount of extra zest and adjust to your taste.
Coconut Cream Bars
For an even creamier dessert, add a layer of whipped coconut cream after the bars have completely chilled.
The light and fluffy coconut cream complements the smooth filling and adds an elegant finishing touch.
You can spread it across the entire batch or add a dollop to each individual serving.
For the best texture, chill the coconut cream before whipping it.
A sprinkle of lime zest on top makes the bars look beautiful while reinforcing their fresh citrus flavor.
Gluten-Free Option
Making these bars gluten-free is simple and requires only one easy substitution.
Replace the regular graham cracker crumbs with your favorite gluten-free graham crackers or gluten-free cookie crumbs.
The crust will still be buttery, flavorful, and sturdy enough to support the creamy filling.
Always check ingredient labels carefully if you are baking for someone with gluten sensitivities or dietary restrictions.
With this adjustment, everyone can enjoy the same refreshing combination of key lime and coconut without sacrificing flavor or texture.
Storage Instructions
Refrigerator
Once the bars have fully cooled and chilled, store them in an airtight container in the refrigerator.
Keeping them covered helps prevent them from drying out and protects them from absorbing odors from other foods.
If you’re stacking multiple layers of bars, place a sheet of parchment paper between the layers to keep them from sticking together.
The bars will stay fresh and delicious for up to 5 days when properly stored.
Many people find that the flavor becomes even better after a few hours in the refrigerator, as the lime and coconut have more time to blend together.
For the best texture, serve the bars chilled straight from the refrigerator.
Freezer
These bars freeze very well, making them a great make-ahead dessert for busy weeks or special occasions.
To freeze them, first allow the bars to chill completely and cut them into individual portions.
Wrap each bar tightly in plastic wrap, then place them in a freezer-safe container or zip-top freezer bag.
Wrapping the bars individually helps protect them from freezer burn and makes it easy to thaw only the amount you need.
The bars can be frozen for up to 3 months while maintaining their flavor and texture.
When you’re ready to enjoy them, transfer the bars to the refrigerator and allow them to thaw overnight.
For a quicker option, let a bar sit at room temperature for about 20 to 30 minutes before serving.
Adding fresh garnishes such as whipped cream, toasted coconut, or lime zest after thawing will help the bars look and taste their best.
Serving Suggestions
- Serve chilled on warm days – The cool, creamy texture makes these bars especially refreshing during spring and summer.
- Pair with iced coffee or tropical tea – A cold beverage complements the bright citrus flavor and sweet coconut perfectly.
- Include on dessert platters – Their vibrant flavor and neat presentation make them a standout addition to any dessert spread.
- Serve at summer gatherings and holidays – These easy-to-share bars are ideal for picnics, potlucks, barbecues, and festive celebrations.
Common Mistakes to Avoid
- Using bottled lime juice only – Bottled juice can lack the fresh, vibrant flavor that makes these bars truly shine, so fresh key lime juice is the best choice whenever possible.
- Overbaking the filling – Baking the bars for too long can make the filling less creamy, so remove them from the oven when the center is just set with a slight jiggle.
- Skipping the chilling time – Chilling allows the filling to fully firm up and develop the smooth texture that makes these bars easy to slice and serve.
- Cutting before fully set – Slicing the bars too soon can lead to messy edges and a soft center, so wait until they are thoroughly chilled before cutting.
Final Thoughts
These Key Lime Coconut Bars are a simple dessert that delivers big flavor with every bite.
The combination of tangy key lime, sweet coconut, creamy filling, and buttery crust creates a refreshing treat that’s perfect for warm days and special occasions alike.
Give it a try, and enjoy a little taste of the tropics right from your own kitchen.
FAQs
Can I use regular limes instead of key limes?
Yes, regular limes can be used if key limes aren’t available, though the flavor will be slightly less sweet and aromatic.
Can I make these bars ahead of time?
Absolutely. These bars are a great make-ahead dessert and can be prepared a day in advance and stored in the refrigerator.
Can I freeze key lime coconut bars?
Yes, wrap the bars individually and freeze them for up to 3 months. Thaw in the refrigerator before serving.
Do I need sweetened or unsweetened coconut?
Sweetened shredded coconut is recommended for the best flavor and texture, but unsweetened coconut can also be used if preferred.
How do I know when the bars are done baking?
The edges should be set, and the center should have a slight jiggle when gently shaken. The filling will continue to firm up as it cools.
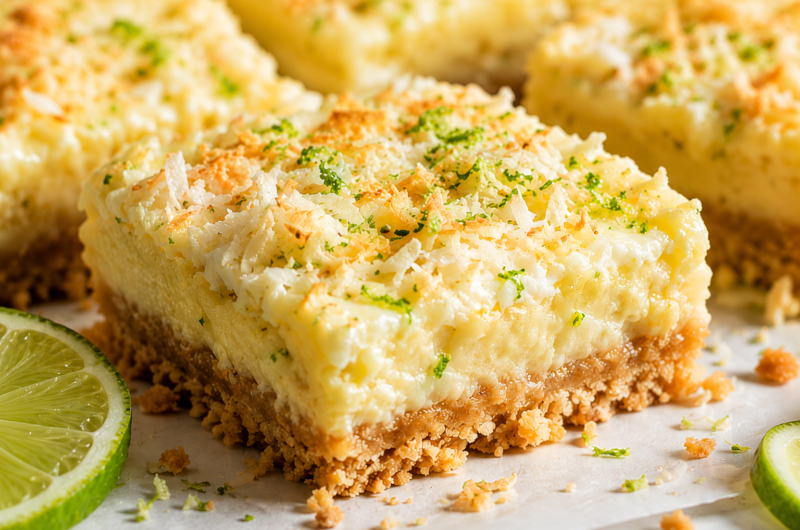
Buttery, Creamy, and Zesty: The Best Key Lime Coconut Bars
Difficulty: Easy9
Bars15
minutes25
minutes40
minutesThese Key Lime Coconut Bars feature a buttery graham cracker crust topped with a creamy key lime and coconut filling for a bright, refreshing tropical dessert.
Ingredients
- For the Crust
1½ cups graham cracker crumbs
½ cup sweetened shredded coconut
2 tablespoons granulated sugar
6 tablespoons unsalted butter, melted
- For the Filling
1 (14-ounce) can sweetened condensed milk
4 large egg yolks
½ cup key lime juice
1 tablespoon key lime zest
½ cup sweetened shredded coconut
Directions
- Preheat the oven to 350°F (175°C) and line an 8×8-inch baking pan with parchment paper.
- Mix the graham cracker crumbs, coconut, sugar, and melted butter. Press firmly into the prepared pan and bake for 8–10 minutes.
- Whisk together the condensed milk and egg yolks. Stir in the key lime juice, zest, and coconut.
- Pour the filling over the crust and spread evenly.
- Bake for 15–18 minutes, or until the center is just set.
- Cool completely, then refrigerate for at least 2 hours.
- Slice into bars and serve chilled.
Notes
- Fresh key lime juice provides the best flavor.
- Chill thoroughly before slicing for clean edges.
- Garnish with toasted coconut, lime zest, or whipped cream if desired.
- Store leftovers in the refrigerator for up to 5 days.

Hi, I’m Sorenna Blythe, the baker and writer behind Mix Whisk Bake. I share simple, reliable recipes and honest kitchen moments to help home bakers bake with confidence and joy. When I’m not testing new treats, you’ll find me sipping coffee and dreaming up my next bake.