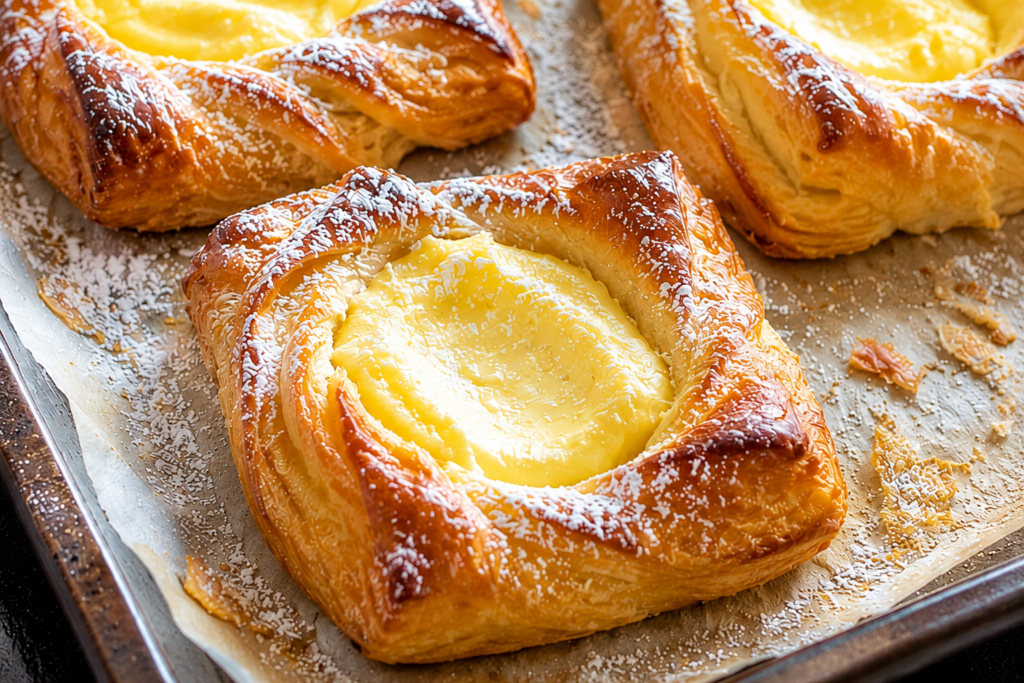
Few pastries are as hard to resist as a warm bakery-style cheese Danish.
With its crisp, buttery layers and smooth, sweet cream cheese filling, it’s the kind of treat that feels special any time of day.
The good news is that you don’t need to visit a bakery to enjoy one.
This easy recipe uses simple ingredients and straightforward steps to help you create flaky, golden pastries right in your own kitchen.
Even if it’s your first time working with puff pastry, you’ll be surprised by how simple the process is.
In this guide, you’ll learn exactly how to make a bakery-style cheese Danish, along with helpful tips for getting perfectly flaky pastry, a creamy filling, and beautiful results every time.
Why You’ll Love This Bakery Style Cheese Danish
- Crispy, flaky, buttery pastry: Every bite is light, golden, and packed with delicious buttery layers.
- Rich and creamy cheesecake filling: The smooth cream cheese center is lightly sweet and perfectly balanced.
- Easy shortcut using puff pastry: Store-bought puff pastry saves time without sacrificing great flavor or texture.
- Perfect for breakfast, brunch, or dessert: Enjoy these pastries with your morning coffee or as a sweet treat after dinner.
- Freezer-friendly: Make a batch ahead of time and freeze extras for a quick homemade pastry whenever you want one.
- Ready in under an hour: From start to finish, you can have fresh, bakery-style cheese danishes on the table in less than 60 minutes.

What Is a Cheese Danish?
Despite its name, the Danish pastry has roots in both Austrian and Danish baking traditions.
Austrian bakers introduced laminated dough techniques to Denmark in the 1800s, and Danish bakers refined them into the flaky pastries we know today.
A cheese Danish is made with buttery layers of pastry that puff up beautifully in the oven.
The center is filled with a sweet, creamy cream cheese mixture that adds richness to every bite.
People often compare Danish pastries to croissants because both use laminated dough.
The difference is that croissants are usually plain, while Danish pastries are sweeter and often filled with cream cheese, fruit, custard, or jam.
Cream cheese is the most popular filling for a reason. Its smooth texture and slight tanginess balance the sweetness of the pastry without making it taste too rich.
It also pairs well with fresh fruit, fruit preserves, and a light drizzle of icing.
Making a cheese Danish at home gives you more control over the finished pastry.
You can adjust the sweetness, add your favorite toppings, and enjoy it fresh from the oven while it’s still warm and flaky.
Bakery cheese danishes are known for their golden color and crisp, buttery layers.
The good news is that you can achieve very similar results at home with quality puff pastry and a few simple ingredients.
If you’re new to baking, this recipe is a great place to start.
The steps are simple, the ingredients are easy to find, and you’ll be rewarded with a pastry that looks and tastes like it came from your favorite bakery.
Ingredients You’ll Need
For the Pastry
- 2 sheets puff pastry, thawed – Forms the light, flaky layers that make these danishes irresistible.
- 1 large egg, beaten – Brushed over the pastry to create a shiny, golden-brown finish.
For the Cream Cheese Filling
- 8 ounces (225 g) full-fat cream cheese, softened – Creates a rich, smooth, and creamy filling.
- ⅓ cup (67 g) granulated sugar – Sweetens the filling without overpowering the cream cheese.
- 1 large egg yolk – Adds richness and helps the filling set while baking.
- 1 teaspoon vanilla extract – Brings warm, sweet flavor to the filling.
- 1 teaspoon finely grated lemon zest (optional) – Adds a fresh, bright flavor that complements the cream cheese.
- ⅛ teaspoon salt – Balances the sweetness and enhances the overall flavor.
Optional Toppings
- ½ cup fresh berries (such as blueberries, raspberries, or sliced strawberries) – Adds fresh color and natural sweetness.
- ¼ cup raspberry jam – Spoon a small amount over the filling for a fruity twist.
- ¼ cup apricot preserves – Brush over the baked pastries for a glossy bakery-style finish.
- 2 tablespoons sliced almonds – Sprinkle on before baking for extra crunch.
- 2 tablespoons powdered sugar – Dust over the cooled danishes before serving for a classic finishing touch.
Kitchen Equipment
- Baking sheet – Provides a sturdy surface for baking the danishes until golden and flaky.
- Parchment paper – Prevents sticking and makes cleanup quick and easy.
- Mixing bowl – Used to prepare the smooth cream cheese filling.
- Electric mixer or whisk – Helps blend the filling until creamy and lump-free.
- Pastry brush – Applies the egg wash for a beautiful golden finish.
- Sharp knife or pizza cutter – Makes it easy to cut the puff pastry into even squares.
- Cooling rack – Allows the danishes to cool evenly while keeping the pastry crisp.
How to Make Bakery Style Cheese Danish
Step 1: Prepare the Puff Pastry
Preheat your oven to 400°F (200°C) and line a baking sheet with parchment paper so it’s ready when your pastries are assembled.
Remove the puff pastry from the refrigerator and let it thaw according to the package directions until it is flexible enough to unfold without cracking.
Keep the pastry cool while you work, as cold dough creates the flakiest layers and is much easier to handle.
Lightly dust your work surface with flour if needed, then unfold each sheet and cut it into 4 equal squares, giving you 8 pastries in total.
Transfer the pastry squares to the prepared baking sheet, leaving a little space between each one so they have room to puff as they bake.
Step 2: Make the Cream Cheese Filling
In a mixing bowl, combine the softened cream cheese, granulated sugar, egg yolk, vanilla extract, lemon zest if using, and salt.
Beat everything together until the mixture is completely smooth and creamy with no visible lumps.
Mix only until the ingredients are combined, as overmixing can make the filling softer than needed.
Give the filling a quick taste before using it, then add a little more sugar if you prefer a sweeter pastry or a little extra lemon zest for a brighter flavor.
Step 3: Shape the Danish
Using a small knife, lightly score a border about ½ inch from the edge of each pastry square, being careful not to cut all the way through the dough.
If you prefer a traditional bakery look, gently fold each corner slightly toward the center or pinch the corners to create a decorative shape.
Spoon about 2 tablespoons of the cream cheese filling into the center of each pastry.
Keep the filling inside the scored border so the pastry edges can rise beautifully while baking.
If you’re adding berries, jam, or sliced almonds, place them on top of the filling before the pastries go into the oven.
Step 4: Add the Egg Wash
Beat the egg until smooth, then use a pastry brush to lightly coat only the exposed pastry around the filling.
Avoid brushing the egg wash over the cream cheese mixture, as it can affect the finished appearance.
The egg wash helps the pastry bake into a rich golden brown with a beautiful glossy finish that looks just like a bakery pastry.
Step 5: Bake
Bake the cheese danishes in the preheated 400°F (200°C) oven for 18 to 22 minutes.
Check them near the end of the baking time, as ovens can vary slightly.
The pastries are ready when the layers have puffed up, the edges are deep golden brown, and the filling is set with only a slight wobble in the center.
If the pastry still looks pale, bake for another minute or two until it develops a rich golden color.
Step 6: Cool Before Serving
Allow the cheese danishes to cool on the baking sheet for about 5 minutes, then transfer them to a cooling rack.
Cooling gives the filling time to set, making the pastries easier to handle and improving their texture.
Once they have cooled slightly, dust them with powdered sugar if you’d like a classic bakery-style finish.
Serve them warm or at room temperature, and enjoy every flaky, creamy bite.
Pro Tips for Bakery-Quality Cheese Danish
Keep Everything Cold
Cold puff pastry is one of the biggest secrets to creating light, flaky layers that puff beautifully in the oven.
If the pastry starts to feel soft or sticky while you’re shaping it, place it in the refrigerator for 10 to 15 minutes before continuing.
Working with chilled pastry also makes it easier to cut clean shapes and helps the danishes hold their form as they bake.
Don’t Overfill
It can be tempting to add extra cream cheese filling, but using too much often causes it to spill over the edges during baking.
About 2 tablespoons of filling per pastry is enough to create a rich center while leaving room for the pastry to rise.
Keeping the filling inside the scored border helps the danishes bake evenly and gives them a neat, bakery-style appearance.
Use Full-Fat Cream Cheese
Full-fat cream cheese creates the smoothest filling and gives each bite a rich, creamy texture.
Lower-fat versions contain more moisture, which can make the filling softer and less stable as it bakes.
For the best results, let the cream cheese soften at room temperature before mixing so it blends into a silky, lump-free filling.
Chill Before Baking
Once the danishes are assembled, place the baking sheet in the refrigerator for 10 to 15 minutes before baking.
This short chilling time helps the butter in the pastry stay cold, which creates taller, flakier layers in the oven.
It’s a simple step, but it can make a noticeable difference in both the texture and appearance of the finished pastries.
Bake Until Deep Golden Brown
Don’t remove the danishes from the oven as soon as they begin to brown.
A deep golden color means the pastry has fully baked, giving it a crisp outside and light, airy layers inside.
Well-baked pastry also develops a richer buttery flavor and stays crisp longer after it cools.
If the filling is set and the pastry is a beautiful golden brown, your cheese danishes are ready to enjoy.
Common Mistakes to Avoid
- Using warm puff pastry: Soft pastry won’t puff as well and can lose its flaky texture during baking.
- Overmixing the filling: Mixing too much can make the cream cheese filling overly soft and less stable.
- Skipping the egg wash: The pastry will bake without it, but it won’t develop the rich golden color and glossy finish.
- Underbaking the pastry: Pale pastry may be doughy inside instead of crisp, light, and flaky.
- Adding too much filling: Overfilling can cause the cream cheese mixture to spill over the edges as the pastries bake.
| Problem | Cause | Solution |
|---|---|---|
| Pastry didn’t puff | Dough too warm | Keep pastry cold |
| Filling cracked | Overbaked | Bake until just set |
| Bottom soggy | Underbaked | Bake longer on lower rack |
| Filling spilled | Overfilled pastry | Use less filling |
| Pastry shrank | Overhandled dough | Handle gently |
Easy Flavor Variations
- Cherry Cheese Danish: Top the cream cheese filling with a spoonful of cherry pie filling for a classic bakery favorite.
- Blueberry Cheese Danish: Add fresh or frozen blueberries for a sweet, juicy burst of flavor.
- Raspberry Cheese Danish: Spoon raspberry jam or fresh raspberries over the filling for a delicious balance of sweet and tart.
- Strawberry Cream Cheese Danish: Layer sliced fresh strawberries or strawberry preserves on top of the cream cheese filling.
- Lemon Cheese Danish: Mix a little extra lemon zest into the filling and finish with a simple lemon glaze.
- Apple Cinnamon Cheese Danish: Add small diced apples tossed with cinnamon and brown sugar for a cozy fall-inspired treat.
- Chocolate Chip Cheese Danish: Sprinkle mini chocolate chips over the cream cheese filling for a rich, dessert-style twist.
Make-Ahead Instructions
If you’d like to save time, you can fully assemble the cheese danishes the night before, including the cream cheese filling and any fruit toppings, then place them on a parchment-lined baking sheet.
Cover the baking sheet tightly with plastic wrap or transfer the pastries to an airtight container to keep the puff pastry from drying out in the refrigerator.
Refrigerate the assembled danishes for up to 24 hours, which makes them a great option for holiday mornings, brunches, or busy weekdays.
When you’re ready to bake, remove the pastries from the refrigerator while the oven preheats to 400°F (200°C) so they lose just a little of their chill without becoming warm.
Brush the pastry with the egg wash just before baking instead of the night before, as this helps create the best golden color and glossy finish.
Bake the danishes according to the recipe, adding an extra 1 to 3 minutes if they’re still very cold from the refrigerator.
Serving them warm from the oven gives you the freshest flavor, the flakiest pastry, and a creamy filling that’s every bit as delicious as one from your favorite bakery.
How to Store Cheese Danish
Freshly baked cheese danishes are best enjoyed the day they are made, but storing them properly will help keep them tasting delicious for several days.
If you plan to eat them within a few hours, let the pastries cool completely and store them in an airtight container at room temperature for up to 8 hours.
Because the filling contains cream cheese, any leftovers should be refrigerated rather than left on the counter overnight.
Place the cooled danishes in a single layer in an airtight container, or separate stacked layers with parchment paper to prevent them from sticking together.
Store them in the refrigerator for up to 4 days, where they’ll stay fresh while the filling remains safe to eat.
For longer storage, freeze the completely cooled pastries on a baking sheet until firm, then transfer them to a freezer-safe bag or airtight container.
Freezing them individually first helps prevent the pastries from sticking together, making it easy to remove only as many as you need.
Cheese danishes can be frozen for up to 2 months without losing much of their flavor or texture.
When you’re ready to enjoy one, thaw it overnight in the refrigerator or let it sit at room temperature for about 30 to 60 minutes before reheating.
A few minutes in the oven or air fryer will help restore the crisp, flaky pastry, making the danish taste much closer to freshly baked.
How to Reheat Cheese Danish
Oven Method
The oven is the best way to reheat a cheese Danish because it helps bring back the crisp, flaky pastry while warming the creamy filling.
Preheat your oven to 325°F (165°C) and place the danish on a baking sheet lined with parchment paper or foil.
Warm the pastry for 8 to 10 minutes, or until it is heated through and the outside feels crisp again.
Let it cool for a minute or two before serving, as the filling will be very hot straight from the oven.
Air Fryer Method
An air fryer is a quick option when you’re reheating one or two pastries.
Preheat the air fryer to 320°F (160°C) if your model recommends preheating.
Place the cheese Danish in the basket, leaving a little space around it so the hot air can circulate evenly.
Heat for 3 to 5 minutes, checking after the third minute to make sure the pastry doesn’t become too dark.
Remove it carefully and let it rest for a minute before enjoying.
Microwave Method
The microwave is the fastest option when you’re short on time, although the pastry won’t be as flaky as it is with the oven or air fryer.
Place the cheese Danish on a microwave-safe plate and heat it for 15 to 20 seconds.
If it isn’t warm enough, continue heating in 5-second intervals until the filling is just warmed through.
Avoid microwaving for too long, as the pastry can become soft and chewy instead of light and crisp.
If you have a few extra minutes, choose the oven or air fryer for the closest-to-fresh bakery texture.
What to Serve with Cheese Danish
- Fresh fruit: Berries, grapes, or sliced melon add a fresh, juicy contrast to the rich pastry.
- Coffee: A hot cup of coffee pairs perfectly with the buttery pastry and creamy filling.
- Tea: Black tea, green tea, or herbal tea makes a light and comforting accompaniment.
- Hot chocolate: Creamy hot chocolate turns a cheese Danish into an extra cozy treat.
- Fresh orange juice: Its bright, citrusy flavor balances the richness of the pastry.
- Yogurt parfait: Layers of yogurt, granola, and fresh fruit create a satisfying and well-rounded breakfast.
Bakery Secrets for Extra Flaky Danish
- Don’t stretch the pastry: Handle the dough gently to help the layers rise evenly as they bake.
- Score lightly instead of cutting through: A shallow score creates a raised border without separating the pastry.
- Chill between steps: Keeping the pastry cold helps the butter stay firm for flakier, taller layers.
- Rotate the baking tray halfway through baking: Turning the tray promotes even browning on all sides.
- Use quality butter puff pastry: An all-butter puff pastry delivers the richest flavor and the flakiest texture.
Recipe Variations for Holidays
- Christmas Cheese Danish: Top with cranberry sauce or raspberry preserves and finish with a drizzle of vanilla icing for a festive holiday treat.
- Easter Brunch Danish: Decorate with pastel-colored sprinkles and fresh berries for a bright, spring-inspired pastry that’s perfect for brunch.
- Valentine’s Heart-Shaped Danish: Cut the puff pastry into heart shapes and add strawberry jam for a sweet dessert that’s perfect for sharing.
- Fall Pumpkin Cream Cheese Danish: Mix a few tablespoons of pumpkin purée and a pinch of pumpkin pie spice into the cream cheese filling for a cozy autumn twist.
Final Thoughts
Making a bakery-style cheese Danish at home is easier than it looks, and the fresh, flaky results are well worth the effort.
With buttery pastry, a creamy filling, and simple ingredients, you can enjoy a bakery-quality treat whenever the craving strikes.
Don’t be afraid to try different fruit toppings, jams, or seasonal flavors to make the recipe your own. Every batch is a chance to discover a new favorite.
FAQs
Can I use homemade Danish dough?
Yes. Homemade Danish dough works beautifully and creates an even richer, more traditional pastry than store-bought puff pastry.
Can I use low-fat cream cheese?
You can, but full-fat cream cheese gives the filling a smoother texture and richer flavor.
Why did my filling leak out?
This usually happens if the pastries are overfilled or the filling is spread too close to the edges.
Can I freeze unbaked cheese danishes?
Yes. Freeze the assembled pastries on a baking sheet, then transfer them to a freezer-safe container for up to 2 months. Bake from frozen, adding a few extra minutes to the baking time.
How long do cheese danishes stay fresh?
They’re best enjoyed the day they’re baked, but will keep in the refrigerator for up to 4 days when stored in an airtight container.
Can I make them without eggs?
Yes. You can leave the egg out of the filling, although it may be slightly softer, and brush the pastry with milk or heavy cream instead of egg wash.
What’s the difference between puff pastry and Danish dough?
Puff pastry is made with layers of butter and dough, while Danish dough also contains yeast, giving it a softer, lighter, and slightly bread-like texture.
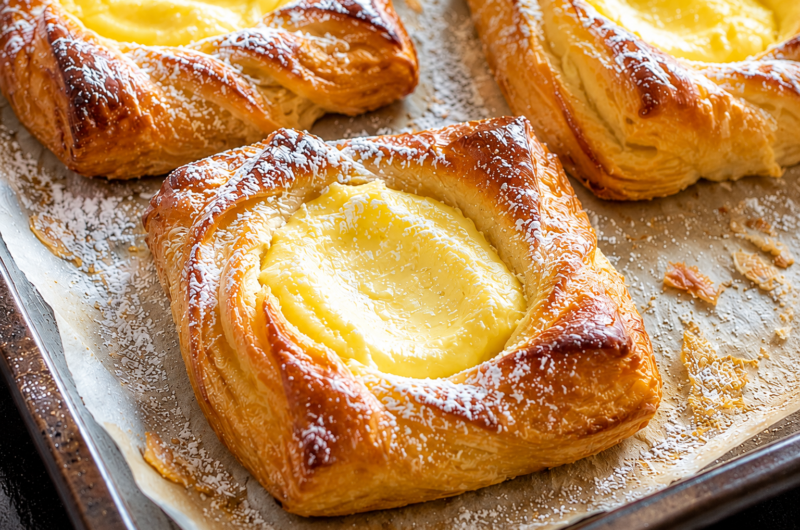
Easy Bakery Style Cheese Danish Recipe with Flaky Puff Pastry
Difficulty: Easy8
Danishes20
minutes20
minutes40
minutesThese bakery-style cheese danishes are made with flaky puff pastry and a rich, creamy cream cheese filling for an easy homemade pastry that’s perfect for breakfast, brunch, or dessert.
Ingredients
2 sheets puff pastry, thawed
8 oz (225 g) full-fat cream cheese, softened
⅓ cup granulated sugar
1 egg yolk
1 teaspoon vanilla extract
1 teaspoon lemon zest (optional)
⅛ teaspoon salt
1 large egg, beaten (for egg wash)
Powdered sugar, for dusting (optional)
Directions
- Preheat the oven to 400°F (200°C) and line a baking sheet with parchment paper.
- Mix the cream cheese, sugar, egg yolk, vanilla, lemon zest, and salt until smooth.
- Cut each puff pastry sheet into four squares and place them on the prepared baking sheet.
- Lightly score a border around each square and spoon about 2 tablespoons of filling into the center.
- Brush the pastry edges with the beaten egg.
- Bake for 18–22 minutes, or until the pastry is puffed and deep golden brown.
- Cool for 5 minutes, dust with powdered sugar if desired, and serve warm or at room temperature.
Notes
- Keep the puff pastry cold for the flakiest layers.
- Avoid overfilling to prevent the filling from spilling during baking.
- Store leftovers in the refrigerator for up to 4 days or freeze for up to 2 months.


Hi, I’m Sorenna Blythe, the baker and writer behind Mix Whisk Bake. I share simple, reliable recipes and honest kitchen moments to help home bakers bake with confidence and joy. When I’m not testing new treats, you’ll find me sipping coffee and dreaming up my next bake.


