Need a party dessert that looks impressive but takes almost no effort? No-bake dessert cups are your answer.
These little treats are layered with creamy fillings, crunchy bases, and sweet toppings—all made without turning on the oven.
They come together quickly, are easy to carry, and keep serving simple with perfectly portioned cups.
Whether you’re hosting a birthday, planning a holiday spread, or just bringing something to share, these dessert cups fit right in.
You can make them ahead, mix and match flavors, and still have time to enjoy the party.
Why You’ll Love No-Bake Dessert Cups
Quick and Easy to Prepare
No-bake dessert cups come together fast, even if you’re short on time.
Most recipes only need simple mixing and layering. No complicated steps or special skills.
You can prepare the base, whip up a creamy filling, and assemble everything in minutes.
If you can stir and spoon, you can make these.
That’s what makes them perfect for beginners or last-minute plans.
No Baking Required (Great for Hot Weather)
You don’t need to turn on the oven, which is a big win on warm days.
Your kitchen stays cool, and you avoid the extra heat and waiting time that baking usually brings.
This also means fewer chances of something going wrong.
No worrying about overbaking or checking timers.
Customizable Flavors and Layers
These dessert cups are easy to adapt based on what you like or what you have at home.
You can switch cookies, change fillings, or add your favorite toppings without affecting the overall method.
Try chocolate with peanut butter, vanilla with fresh fruit, or even mix in caramel or nuts.
Start simple, then get creative as you go. There’s no single “right” way to build your layers.
Perfect Individual Servings (Less Mess)
Each dessert is served in its own cup, so there’s no cutting or scooping needed.
Guests can grab one and enjoy it right away.
This keeps things neat and stress-free, especially at parties.
It also helps with portion control, and the clear cups show off those beautiful layers, which is always a nice bonus.
Make-Ahead Friendly
You can prepare these dessert cups hours or even a day in advance.
Just keep them chilled in the fridge until you’re ready to serve.
This gives you more time to focus on other parts of your event.
A small tip: add fresh toppings like fruit or whipped cream just before serving so everything stays fresh and looks its best.
Essential Ingredients for No-Bake Dessert Cups
Base Layers (Crunchy or Soft Foundation)
These create the bottom layer and add texture.
- 1 ½ cups crushed cookies (like Oreos or digestive biscuits)
- 1 cup graham cracker crumbs
- 4 tablespoons (60g) melted butter (to help bind crumbs)
- 1 cup small brownie cubes (optional for a soft, rich base)
Tip: If using cookies with cream filling, you can skip adding butter.
Creamy Fillings (Smooth and Rich Layers)
This is the heart of your dessert—light, fluffy, and flavorful.
- 1 cup heavy whipping cream (whipped to soft peaks)
- 1 cup (225g) cream cheese, softened
- ½ cup (60g) powdered sugar
- 1 cup prepared pudding (chocolate, vanilla, or any flavor you like)
Tip: For extra stability, fold whipped cream into the cream cheese mixture instead of mixing it all at once.
Sweeteners and Flavorings (Boost the Taste)
These add depth and bring everything together.
- 1 teaspoon vanilla extract
- ½ cup melted chocolate or chocolate spread
- 1–2 tablespoons honey or caramel sauce (optional for extra sweetness)
- 1 cup fresh or canned fruit (strawberries, blueberries, mango, etc.)
Tip: Taste your filling before layering and adjust the sweetness if needed.
Toppings (Finishing Touches)
These make your dessert look and taste even better.
- ½ cup whipped cream (for topping)
- ¼ cup chocolate chips or shavings
- 2–3 tablespoons caramel or chocolate drizzle
- ¼ cup chopped nuts (like almonds or peanuts)
- Extra fruit slices for garnish
Tip: Add toppings just before serving to keep them fresh and appealing.
Tools You’ll Need
Just a few basic tools will help you work smoothly and keep your dessert cups looking neat.
- 1–2 medium mixing bowls
- 1 electric hand mixer or 1 sturdy whisk
- 6–8 small cups (150–200 ml each)
- 1–2 piping bags (or zip-top bags with a corner cut)
- 1 spoon for layering
- 1 spatula for mixing and scraping
Tip: Set everything out before you start. It makes the process quicker and keeps things stress-free.
How to Make No-Bake Dessert Cups (Basic Method)
Once you understand the basic steps, you can make almost any flavor of dessert cups with confidence.
Take it one layer at a time, and don’t rush. This process is simple, and a little care goes a long way.
1. Prepare the Base Layer
Start by getting your base ready. If you’re using cookies or biscuits, crush them into fine crumbs.
You can do this with a rolling pin or by pulsing them in a blender.
Mix the crumbs with melted butter if needed, just until they feel like damp sand.
This helps the base hold together. If you’re using soft brownie pieces, you can skip the butter.
Spoon a small amount into each cup and gently press it down with the back of a spoon.
Keep the layer even, but don’t pack it too tightly.
2. Mix the Creamy Filling
In a mixing bowl, beat your cream cheese until smooth and soft. This step helps avoid lumps later.
Add sugar and vanilla, then mix again until everything is well combined.
In a separate bowl, whip your cream until it forms soft peaks.
That just means it holds its shape but still looks light and fluffy.
Fold the whipped cream into the cream cheese mixture slowly.
Use a spatula and gentle motions to keep the mixture airy.
This is what gives your dessert that light, creamy texture.
3. Layer Ingredients in Cups
Now comes the fun part, which is building your layers.
Start with the base, then add a layer of your creamy filling.
Continue layering based on your recipe.
You might add fruit, chocolate, or more crumbs in between.
Try to keep each layer even so the cups look neat from the outside.
If you want cleaner layers, use a piping bag.
If not, just spoon carefully and take your time. It doesn’t have to be perfect to taste amazing.
4. Add Toppings
Finish each cup with a simple topping.
This could be whipped cream, fruit, chocolate chips, or a drizzle of sauce.
Keep it balanced.
A small amount on top is usually enough to add flavor without overpowering the dessert.
If you’re serving later, it’s best to add delicate toppings like fresh fruit just before serving so they stay fresh.
5. Chill Before Serving
Place the finished cups in the fridge for at least 2–4 hours.
This helps the layers set and the flavors come together.
If you can, let them chill overnight.
The texture improves, and the dessert tastes even better.
When you’re ready to serve, take them out, add any final toppings, and enjoy.
You’ve just made a party-ready dessert with ease.
5 Easy No-Bake Dessert Cup Recipes
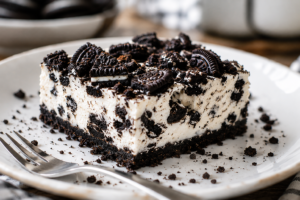
1. No-Bake Oreo Cheesecake Cups
Creamy, slightly tangy cheesecake layered with crunchy Oreo crumbs.
This one is always a crowd favorite and very beginner-friendly.
Key Ingredients
- 2 cups crushed Oreo cookies
- 4 tbsp (60g) melted butter (optional if Oreos have filling)
- 1 cup (225g) cream cheese, softened
- ½ cup (60g) powdered sugar
- 1 tsp vanilla extract
- 1 cup heavy whipping cream
- ½ cup extra crushed Oreos (for layering)
Quick Steps
- Mix crushed Oreos with melted butter and press into cups.
- Beat cream cheese, sugar, and vanilla until smooth.
- Whip cream separately, then fold it into the mixture.
- Layer cheesecake filling over the base, then add extra Oreo crumbs.
- Repeat layers, finish with crumbs or whipped cream.
- Chill for at least 3 hours before serving.
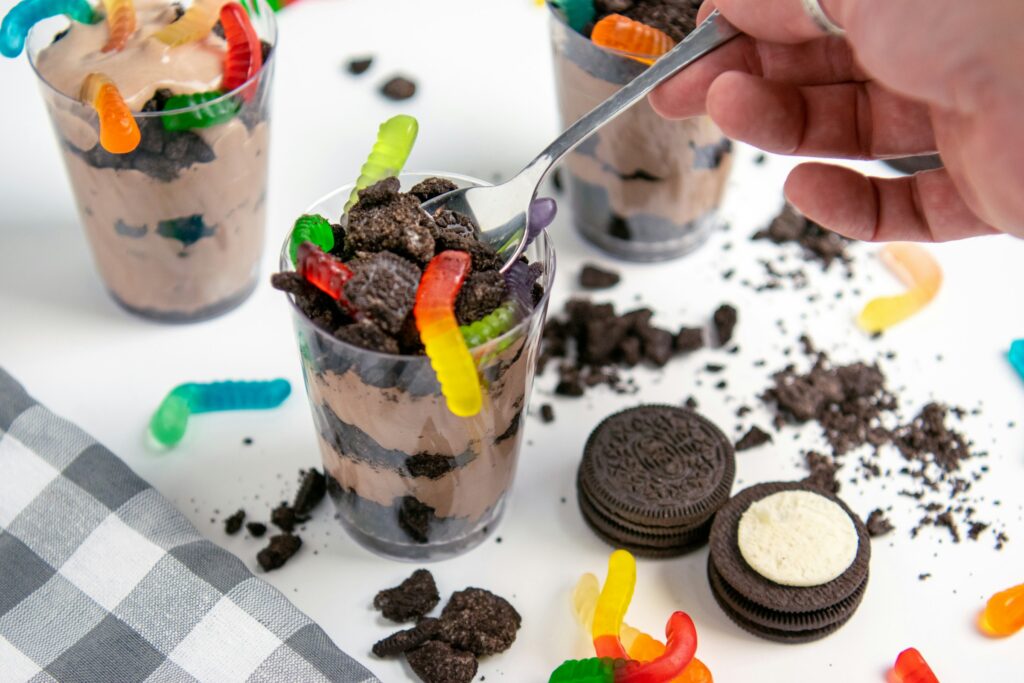
2. Chocolate Mousse Dessert Cups
Light, airy chocolate mousse with a rich flavor.
Smooth layers that feel fancy but are simple to make.
Key Ingredients
- 1 cup chocolate cookie crumbs
- 2 tbsp (30g) melted butter
- 1 cup heavy whipping cream
- 1 cup melted chocolate (semi-sweet or milk)
- 2 tbsp sugar (optional, depending on chocolate)
- ½ tsp vanilla extract
Quick Steps
- Combine cookie crumbs and butter, then press into cups.
- Whip cream to soft peaks.
- Gently fold melted (cooled) chocolate into the whipped cream.
- Add vanilla and mix lightly until smooth.
- Spoon or pipe mousse over the base.
- Chill for 2–3 hours until set.
3. Strawberry Shortcake Cups
Fresh, fruity, and light.
Layers of soft cake, whipped cream, and juicy strawberries make this a refreshing option.
Key Ingredients
- 2 cups cubed vanilla cake or sponge cake
- 1 ½ cups fresh strawberries, chopped
- 2 tbsp sugar (to sweeten strawberries)
- 1 cup heavy whipping cream
- 3 tbsp powdered sugar
- 1 tsp vanilla extract
Quick Steps
- Toss strawberries with sugar and let sit for 10–15 minutes.
- Whip cream with powdered sugar and vanilla until fluffy.
- Add cake cubes to the bottom of each cup.
- Layer strawberries, then whipped cream.
- Repeat layers once more.
- Chill for 1–2 hours before serving.
4. Peanut Butter Chocolate Cups
Rich and indulgent with a perfect balance of sweet chocolate and creamy peanut butter.
Key Ingredients
- 1 cup chocolate cookie crumbs
- 3 tbsp (45g) melted butter
- ½ cup (125g) creamy peanut butter
- ½ cup (120g) cream cheese, softened
- ½ cup powdered sugar
- 1 cup whipped cream (or whipped topping)
- ½ cup melted chocolate (for drizzle)
Quick Steps
- Mix cookie crumbs with butter and press into cups.
- Beat peanut butter, cream cheese, and sugar until smooth.
- Fold in whipped cream gently.
- Layer peanut butter filling over the base.
- Add a drizzle of melted chocolate between layers.
- Chill for 2–3 hours before serving.
5. Lemon Cream Dessert Cups
Bright, creamy, and slightly tangy.
A great choice when you want something light and refreshing.
Key Ingredients
- 1 cup graham cracker crumbs
- 3 tbsp (45g) melted butter
- 1 cup (225g) cream cheese, softened
- ½ cup powdered sugar
- 2 tbsp fresh lemon juice
- 1 tsp lemon zest
- 1 cup whipped cream
Quick Steps
- Combine graham crumbs with butter and press into cups.
- Beat cream cheese and sugar until smooth.
- Add lemon juice and zest, then mix well.
- Fold in whipped cream until light and creamy.
- Spoon the mixture over the base and smooth the top.
- Chill for at least 2–3 hours before serving.
Tip: Once you’ve tried one or two of these, you’ll see how easy it is to mix and match flavors. Trust your taste and have fun with it.
Tips for Perfect Dessert Cups
A few small details can take your dessert cups from good to really impressive.
These tips will help you get clean layers, great texture, and a result you’ll feel proud to serve.
Chill Long Enough for Layers to Set
Chilling isn’t just a final step because it’s what helps everything come together.
The filling firms up, the base holds its shape, and the flavors blend nicely.
Give your dessert cups at least 2–4 hours in the fridge.
If you have the time, overnight is even better.
You’ll notice a smoother texture and cleaner layers when you serve.
If you’re in a rush, place them in the coldest part of your fridge.
Just avoid the freezer unless the recipe calls for it, as freezing can change the texture.
Use Clear Cups for Presentation
Clear cups make a big difference.
They show off each layer, and that instantly makes your dessert look more appealing.
Try to keep your layers neat and even so they’re visible from the outside.
If a little smudge happens, don’t worry, just wipe the inside gently with a clean spoon or tissue.
This simple step turns a basic dessert into something that looks party-ready without extra effort.
Don’t Overfill Layers
It’s tempting to add more of everything, but too much can make the cups messy and hard to eat.
Stick to thin, even layers so each bite has a good balance.
Leave a little space at the top for toppings.
This keeps everything contained and gives your dessert a clean finish.
If you’re unsure, start with smaller amounts.
You can always add more, but it’s hard to fix an overfilled cup.
Balance Textures (Crunchy + Creamy)
The best dessert cups have a mix of textures.
A crunchy base paired with a smooth, creamy filling makes each bite more interesting.
Add something soft like fruit or cake, then layer with cream, and finish with a bit of crunch if you like.
This balance keeps the dessert from feeling too heavy or too plain.
Think of each layer as part of the whole.
When they work together, the result is simple but really satisfying.
Variations and Custom Ideas
Once you’re comfortable with the basic method, you can easily adjust these dessert cups to suit different needs and flavors.
Small swaps can make a big difference, and you don’t have to change the whole recipe to make it work for you.
Gluten-Free Options
Making these dessert cups gluten-free is simple. Just swap out the base for gluten-free cookies or biscuits.
Look for gluten-free graham crackers or chocolate cookies at the store.
You can crush and use them the same way as regular ones.
If you prefer a softer base, use gluten-free cake pieces instead.
Always double-check labels, especially for packaged ingredients.
Once that’s covered, the rest of the recipe stays the same.
Vegan/Dairy-Free Swaps
You can still get a creamy, rich result without dairy. It just takes a few easy substitutions.
Use dairy-free cream cheese and plant-based whipping cream (like coconut or soy-based).
These whip up nicely and hold their shape well when chilled.
For the base, choose cookies that don’t contain butter or milk.
Many store-bought options are already dairy-free.
Keep your layers gentle when mixing so the texture stays light.
Low-Sugar Alternatives
If you want a lighter option, you can reduce or replace the sugar without losing flavor.
Use unsweetened whipped cream and adjust sweetness with a small amount of honey, maple syrup, or a sugar substitute.
Choose dark chocolate instead of milk chocolate for a less sweet finish.
Fresh fruit also helps.
It adds natural sweetness and balances the richness of the cream layers.
Seasonal Flavors (Pumpkin, Peppermint, Mango)
Changing flavors with the season keeps things fun and fresh.
You can use the same method and simply adjust your ingredients.
For a cozy option, mix pumpkin puree with cream cheese, a little sugar, and a pinch of cinnamon.
It creates a warm, spiced filling that’s perfect for cooler months.
For something festive, add a drop of peppermint extract to your chocolate filling and top with crushed candy pieces.
If you want a bright, tropical twist, blend mango into your cream or layer fresh mango pieces between fillings.
It adds a natural sweetness and a pop of color.
Tip: Start with one small change at a time. Once you see how flexible these recipes are, you’ll feel more confident creating your own combinations.
Storage and Make-Ahead Tips
No-bake dessert cups are great for planning ahead, and storing them properly keeps them fresh and tasty.
Once assembled, you can keep them in the fridge for up to 2–3 days, covered well so they don’t dry out or absorb other fridge smells.
The texture is usually best within the first 24 hours, when the layers are set but still light and fresh.
For storage, use cups with lids if you have them, or cover each cup tightly with plastic wrap.
Placing them in an airtight container adds extra protection and makes stacking easier if you’re short on space.
If you’re preparing in advance, it’s a good idea to hold off on adding fresh toppings like fruit or whipped cream until just before serving so everything looks and tastes its best.
Freezing is possible for some versions, especially ones without fresh fruit, but the texture can change slightly once thawed—cream layers may become softer or a bit watery.
If you do freeze them, wrap them tightly and thaw in the fridge overnight rather than at room temperature.
Serving Suggestions
When it’s time to serve, a little presentation goes a long way and makes your dessert cups feel extra special without extra work.
Arrange them on a tray or tiered stand to create height and make them easy for guests to grab, and group similar flavors together so people can choose quickly.
If you’re hosting a larger event, placing small labels in front of each flavor helps guests know what they’re picking, especially if there are dietary options.
For garnishing, keep it simple and fresh.
Add a swirl of whipped cream, a few fruit slices, or a light drizzle of chocolate or caramel just before serving so everything looks clean and vibrant.
A small sprinkle of crushed cookies or nuts on top can also add texture and tie the layers together.
For portion sizes, stick to small cups (about 150–200 ml) so guests can enjoy one or try a few different flavors without feeling too full.
This also helps reduce waste and keeps serving smooth. If you’re unsure how many to make, plan for at least one per person, or two if dessert is the main highlight.
Final Thoughts
No-bake dessert cups are simple, quick, and perfect for any party.
They look great, taste even better, and make serving easy for everyone.
Start with a flavor you love, then try new combinations as you go.
Mix, layer, and have fun with it because you really can’t go wrong.
FAQs
Yes, most can be made 1–2 days in advance and stored in the fridge.
Typically 2–4 hours, depending on the recipe.
Absolutely, ready-made pudding or whipped topping saves time.
Small, clear plastic or glass cups work best for presentation.
Some can be frozen, but the texture may change slightly after thawing.

Hi, I’m Sorenna Blythe, the baker and writer behind Mix Whisk Bake. I share simple, reliable recipes and honest kitchen moments to help home bakers bake with confidence and joy. When I’m not testing new treats, you’ll find me sipping coffee and dreaming up my next bake.