Oreo desserts are hard to resist. That perfect mix of crunchy cookies and creamy filling makes every bite feel like a treat.
The best part? You don’t need an oven to enjoy them.
No-bake desserts are quick, simple, and perfect for busy days or warm kitchens.
If you can mix, layer, and chill, you’re already halfway there.
In this post, you’ll find 10 easy no-bake Oreo desserts you can make with confidence.
Each one is simple, delicious, and perfect for sharing, or keeping all to yourself!
Why You’ll Love No-Bake Oreo Desserts
- No oven needed (perfect for hot days) – You can skip the heat and still make something rich and satisfying, which is especially helpful when your kitchen feels too warm.
- Minimal ingredients – Most recipes use a handful of simple items, so you won’t need a long shopping list.
- Beginner-friendly – These desserts are easy to follow, with simple steps like mixing, layering, and chilling—no special skills required.
- Great for parties and make-ahead treats – You can prepare them in advance, giving you more time to relax while still serving something everyone will love.
Tips for Making the Perfect No-Bake Oreo Desserts
Crushing Oreos (food processor vs. manual)
Getting the right crumb texture makes a big difference.
If you have a food processor, it’s the quickest option and gives you fine, even crumbs, which is perfect for smooth crusts and layers.
No food processor? No problem. Place the Oreos in a sealed bag and crush them with a rolling pin.
It takes a little more effort, but it works well.
Try to press out large chunks so everything sets evenly. If you’re making a base, aim for fine crumbs.
For toppings, leaving a few bigger pieces adds a nice crunch.
Choosing the Right Cream (whipping cream vs. whipped topping)
Both options work, but they give slightly different results.
Fresh whipping cream (also called heavy cream) creates a richer taste and a softer, more natural texture.
You’ll need to whip it until it holds its shape, which just means it forms soft peaks when lifted.
Whipped topping is more stable and already prepared, so it’s great if you want something quick and foolproof.
It also holds its shape longer, which can be helpful for layered desserts.
If you’re new to no-bake recipes, this is a safe and easy choice.
Setting Time Tips for Best Texture
Patience here really pays off.
Most no-bake Oreo desserts need at least 2–4 hours in the fridge to firm up.
This helps the layers hold together and gives you clean slices instead of a soft mess.
If you have the time, letting it chill overnight gives the best results.
The flavors blend better, and the texture becomes smoother and more stable.
If you’re in a hurry, placing it in the freezer for a shorter time can help speed things up, but just don’t forget to move it back to the fridge before serving.
Storage and Shelf Life
No-bake desserts should always be kept in the fridge.
Cover them well with plastic wrap or store them in an airtight container to keep them fresh and prevent them from drying out.
Most Oreo desserts stay good for about 3–4 days.
If you want to keep them longer, many can be frozen.
Just wrap them tightly and thaw in the fridge before serving.
This way, you always have a sweet treat ready when you need it.
10 Best No-Bake Oreo Desserts
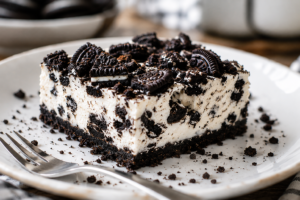
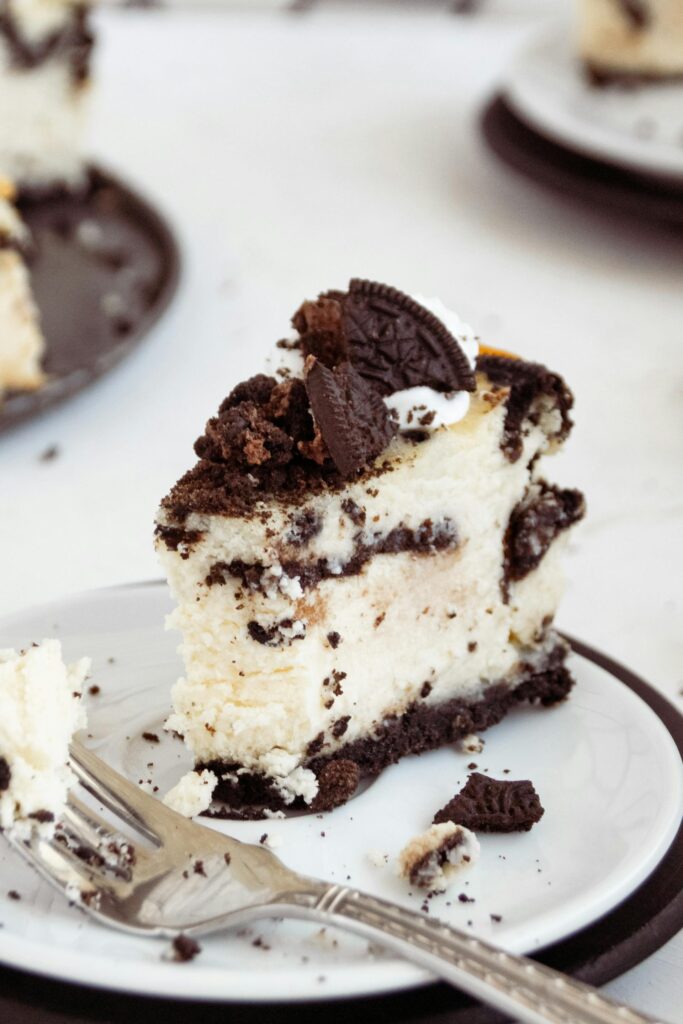
1. No-Bake Oreo Cheesecake
This is the kind of dessert that feels special but is surprisingly simple to make.
It’s smooth, creamy, and packed with Oreo flavor in every bite.
Perfect when you want something impressive without the stress.
It looks like a bakery dessert, but the steps are easy and forgiving. Great for beginners.
Ingredients:
- 24 Oreo cookies (crushed)
- 5 tbsp melted butter
- 2 cups cream cheese (softened)
- 1 cup powdered sugar
- 1 tsp vanilla extract
- 1 ½ cups whipping cream (cold)
- 8–10 Oreo cookies (chopped)
Instructions:
- Mix crushed Oreos with melted butter and press into a pan to form the crust. Chill for 15 minutes.
- Beat cream cheese, powdered sugar, and vanilla until smooth.
- In a separate bowl, whip the cream until soft peaks form.
- Gently fold the whipped cream into the cream cheese mixture.
- Stir in chopped Oreos.
- Spread over the crust and smooth the top.
- Chill for at least 4 hours or overnight before serving.
2. Oreo Icebox Cake
This dessert is all about layering and letting time do the work.
The cookies soften in the fridge and turn into a soft, cake-like texture.
No baking, no complicated steps. Just layer, chill, and enjoy.
Ingredients:
- 36 Oreo cookies
- 2 cups whipping cream
- ¼ cup powdered sugar
- 1 tsp vanilla extract
Instructions:
- Whip cream, powdered sugar, and vanilla until soft peaks form.
- Spread a thin layer of cream on the bottom of a dish.
- Add a layer of Oreos.
- Spread whipped cream over the cookies.
- Repeat layers until everything is used, ending with cream.
- Cover and chill overnight (or at least 6 hours).
- Slice and serve once soft and cake-like.
3. No-Bake Oreo Truffles
These little bites are rich, chocolatey, and perfect when you want something small but satisfying. They’re also great for sharing.
Easy to make ahead and simple to decorate.
Ingredients:
- 36 Oreo cookies
- 8 oz (225g) cream cheese (softened)
- 200g chocolate (melted, for coating)
Instructions:
- Crush Oreos into fine crumbs.
- Mix with cream cheese until fully combined.
- Roll into small balls and place on a tray.
- Chill for 30 minutes to firm up.
- Dip each ball into melted chocolate and coat evenly.
- Place back on the tray and let it set in the fridge for 15–20 minutes.
- Serve chilled or at room temperature.
4. Oreo Dirt Cups
These are fun, simple, and always a hit with kids.
The layers are creamy, chocolatey, and full of crunch.
They look playful and taste like a cookies-and-cream dream.
Ingredients:
- 20 Oreo cookies (crushed)
- 2 cups chocolate pudding (prepared)
- 1 ½ cups whipped topping
- Optional: gummy worms or toppings
Instructions:
- Spoon a layer of crushed Oreos into cups.
- Add a layer of chocolate pudding.
- Add a layer of whipped topping.
- Repeat the layers until the cup is filled.
- Finish with Oreo crumbs on top.
- Add gummy worms if you like for a fun touch.
- Chill for 1–2 hours before serving.
5. No-Bake Oreo Bars
These bars are rich, firm, and easy to slice.
They’re perfect when you want something you can grab and serve quickly.
Dense, chocolatey, and great for making ahead.
Ingredients:
- 24 Oreo cookies (crushed)
- 5 tbsp melted butter
- 1 cup chocolate chips
- 1 cup condensed milk
- ½ cup chopped Oreos (for topping)
Instructions:
- Mix crushed Oreos with melted butter and press into a lined pan.
- In a saucepan, gently heat chocolate chips and condensed milk until smooth.
- Pour the mixture over the crust and spread evenly.
- Sprinkle chopped Oreos on top.
- Chill for 2–3 hours until firm.
- Slice into bars and serve.
6. Oreo Mousse
Light, creamy, and full of cookies-and-cream flavor, this mousse feels fancy but comes together with very simple steps.
It’s a great option when you want something soft and spoonable.
It’s quick to make and has a smooth, airy texture that melts in your mouth.
Ingredients:
- 20 Oreo cookies (crushed)
- 1 ½ cups whipping cream (cold)
- ½ cup powdered sugar
- 1 tsp vanilla extract
- 1 cup cream cheese (softened)
Instructions:
- Beat cream cheese, powdered sugar, and vanilla until smooth.
- In a separate bowl, whip the cream until soft peaks form.
- Gently fold the whipped cream into the cream cheese mixture.
- Stir in crushed Oreos.
- Spoon into serving cups or bowls.
- Chill for at least 2 hours before serving.
7. Oreo Milkshake Dessert Cups
This one sits right between a drink and a dessert.
It’s thick, creamy, and perfect when you want something quick and indulgent.
You get the flavor of a milkshake with the texture of a chilled dessert.
Ingredients:
- 16 Oreo cookies
- 2 cups vanilla ice cream
- 1 cup milk
- 1 cup whipped cream
- Extra crushed Oreos for topping
Instructions:
- Blend Oreos, ice cream, and milk until thick and smooth.
- Spoon or pour into dessert cups.
- Top with whipped cream.
- Sprinkle crushed Oreos on top.
- Chill for 30–60 minutes if you want a firmer texture, or serve immediately.
8. Oreo Chocolate Lasagna
This is a layered dessert that looks impressive but is very easy to build.
Each layer adds a new texture, making every bite interesting.
Creamy, chocolatey layers with a soft Oreo base, which is great for sharing.
Ingredients:
- 36 Oreo cookies (crushed)
- 6 tbsp melted butter
- 1 cup cream cheese (softened)
- 1 cup powdered sugar
- 2 cups whipped topping
- 2 cups chocolate pudding (prepared)
- ½ cup mini chocolate chips
Instructions:
- Mix crushed Oreos with melted butter and press into a dish. Chill for 15 minutes.
- Beat cream cheese and powdered sugar until smooth, then fold in 1 cup whipped topping.
- Spread this mixture over the crust.
- Add a layer of chocolate pudding.
- Spread the remaining whipped topping over the pudding.
- Sprinkle chocolate chips on top.
- Chill for at least 4 hours before slicing.
9. No-Bake Oreo Pie
This is a classic, simple dessert that always delivers.
It has a crisp crust and a soft, creamy filling.
It’s easy to prepare and works well for any occasion.
Ingredients:
- 24 Oreo cookies (crushed)
- 5 tbsp melted butter
- 1 ½ cups cream cheese (softened)
- ¾ cup powdered sugar
- 1 tsp vanilla extract
- 1 ½ cups whipped cream
- 8 Oreo cookies (chopped)
Instructions:
- Combine crushed Oreos with melted butter and press into a pie dish. Chill for 15 minutes.
- Beat cream cheese, powdered sugar, and vanilla until smooth.
- Fold in whipped cream gently.
- Stir in chopped Oreos.
- Spread filling into the crust and smooth the top.
- Chill for at least 4 hours or until set.
- Slice and serve cold.
10. Oreo Fudge (No-Bake)
This fudge is rich, dense, and full of chocolate flavor.
It’s perfect when you want something small but very satisfying.
It’s simple to make and sets into neat, bite-sized squares.
Ingredients:
- 2 cups chocolate chips
- 1 can (395g) condensed milk
- 1 tsp vanilla extract
- 15 Oreo cookies (chopped)
Instructions:
- In a saucepan, gently melt chocolate chips and condensed milk, stirring until smooth.
- Remove from heat and stir in vanilla.
- Fold in chopped Oreos.
- Pour into a lined pan and spread evenly.
- Chill for 2–3 hours until firm.
- Cut into small squares and serve.
How to Store No-Bake Oreo Desserts
Keeping your no-bake Oreo desserts fresh is simple once you know what to watch for.
Always store them in the fridge, as the creamy layers need to stay cold to hold their shape and taste their best; most desserts will keep well for about 3–4 days when properly covered.
Use plastic wrap or an airtight container to prevent them from drying out or picking up fridge odors—this small step makes a big difference in flavor.
If you want to make desserts ahead or save leftovers longer, freezing is a great option.
Wrap the dessert tightly (or store slices in sealed containers), then freeze for up to 1–2 months.
When you’re ready to enjoy, let it thaw slowly in the fridge so the texture stays smooth and creamy.
For best results, choose sturdy containers with tight-fitting lids, especially for layered desserts, so they keep their shape and don’t get squished.
A little care in storage means your desserts stay just as delicious as the day you made them.
Variations & Customization Ideas
Use Flavored Oreos (Mint, Golden, Peanut Butter)
Switching up the type of Oreos you use is one of the easiest ways to change the flavor without changing the recipe.
Mint Oreos add a cool, refreshing twist that works especially well in cheesecakes and mousse.
Golden Oreos give you a lighter, vanilla-style base that pairs nicely with fruit or caramel layers.
Peanut butter Oreos bring a richer, slightly salty flavor that makes desserts feel more indulgent.
You can follow the same steps as the original recipe. Just swap the cookies, and you’re good to go.
If you’re unsure, start with half regular and half flavored Oreos to test what you like best.
Add Toppings (Chocolate Drizzle, Caramel, Nuts)
Toppings are where you can have a little fun and make each dessert feel your own.
A simple chocolate drizzle adds extra richness and makes the dessert look more finished.
Caramel brings a soft sweetness that balances the cookie flavor beautifully.
If you like a bit of crunch, chopped nuts like almonds or peanuts add texture and contrast.
You don’t need much; just a small handful or light drizzle can make a big difference.
Add toppings right before serving to keep them fresh and looking their best.
Make It Healthier (Low-Sugar or Dairy-Free Swaps)
If you want a lighter version, a few simple swaps can help without losing the overall flavor.
You can use reduced-fat cream cheese or light whipped topping to cut down on richness while still keeping a creamy texture.
For dairy-free options, try coconut cream or plant-based whipped toppings. They whip up nicely and hold their shape well.
You can also choose lower-sugar cookies or reduce added sugar in the filling if needed.
The key is to keep the balance right, so the dessert still feels like a treat while fitting your needs a little better.
Final Thoughts
No-bake Oreo desserts are simple, flexible, and always satisfying.
You don’t need special skills, but just a few ingredients, a little time, and you’re set.
Start with one recipe that feels easy, then try another once you see how well it turns out.
FAQs
Yes, most need chilling to set properly.
Yes, they work just as well in most recipes.
Typically, 2–6 hours depending on the recipe.
Yes, many freeze well for longer storage.
Mascarpone or whipped topping are good alternatives.

Hi, I’m Sorenna Blythe, the baker and writer behind Mix Whisk Bake. I share simple, reliable recipes and honest kitchen moments to help home bakers bake with confidence and joy. When I’m not testing new treats, you’ll find me sipping coffee and dreaming up my next bake.