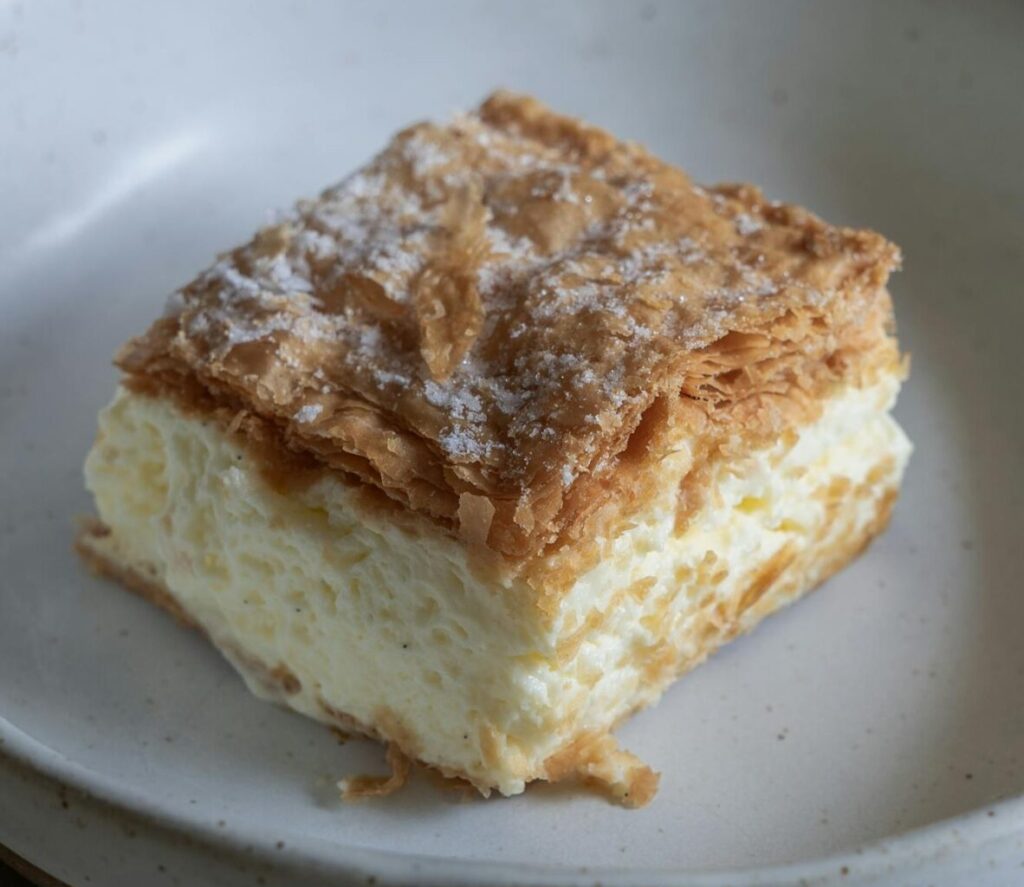
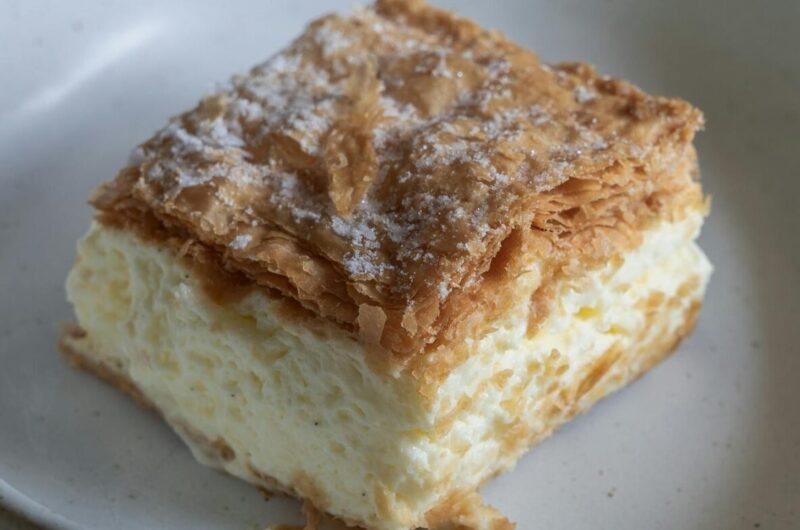
A vanilla slice is a classic layered dessert with creamy custard sandwiched between soft biscuits and topped with a sweet glaze.
It’s simple, comforting, and always a crowd-pleaser.
This no-bake version makes things even easier.
No oven, no stress—just a few basic steps and you’ll have a smooth, rich slice that sets beautifully in the fridge.
If you’re new to making desserts, this is a great place to start.
It’s perfect for warm days, last-minute treats, or when you need something easy for guests.
Make it ahead, let it chill, and enjoy every creamy bite.
Why You’ll Love This Recipe
No Baking Required
There’s no oven involved here, which keeps things simple and stress-free.
You won’t need to worry about temperatures or timing. Just mix, layer, and chill.
It’s a great option for warm days when you don’t want to heat up the kitchen.
Simple, Affordable Ingredients
Everything in this recipe is easy to find and budget-friendly.
You’re likely to have most of the ingredients already in your kitchen.
Basic items like milk, sugar, and biscuits come together to create something that feels much more special than it sounds.
Creamy, Smooth Custard Filling
The custard is the heart of this dessert, and it’s worth it.
It turns out rich, silky, and full of vanilla flavor.
Stir it gently and give it a little patience while it thickens.
You’ll be rewarded with a smooth filling that slices beautifully once chilled.
Perfect Make-Ahead Dessert
This is one of those desserts that actually gets better as it sits.
Making it ahead gives the layers time to set properly, which means cleaner slices and better texture.
It’s ideal when you want to prep something in advance and have it ready to go.
Customizable Flavors
Once you’ve got the base recipe down, you can easily make it your own.
Add a touch of citrus, switch up the topping, or layer in something extra for a twist.
It’s flexible without being complicated, so you can keep it classic or get a little creative when you feel like it.
Ingredients Needed
For the Base Layer
- 2 cups (about 200–250g) biscuits (graham crackers, tennis biscuits, or Marie biscuits)
- ½ cup (115g) melted butter (optional) – use if you prefer a firmer, slightly crunchy base
Tip: If you want a softer, classic slice, you can skip the butter and just layer the biscuits.
For the Vanilla Custard Filling
- 3 cups (750ml) milk
- ½ cup (100g) granulated sugar
- ⅓ cup (40g) cornstarch
- 1 tablespoon vanilla extract
- 2 tablespoons (30g) butter
- 2 egg yolks (optional) – adds extra richness and a deeper custard flavor
Tip: If using egg yolks, whisk them well before adding to avoid any lumps.
For the Top Layer
- 1 cup (120g) powdered sugar
- 2–3 tablespoons milk or water (to make a smooth icing)
Optional Passionfruit Topping (for a fresh twist):
- 1 cup (120g) powdered sugar
- 2–3 tablespoons passionfruit pulp
Tip: Adjust the liquid slowly when making the icing. You’re aiming for a thick but spreadable consistency.
Kitchen Tools You’ll Need
You don’t need anything fancy here. Just a few basic tools to keep things smooth and stress-free.
- Mixing bowls
You’ll use these to combine ingredients and prep different parts of the recipe. Having at least two helps keep things organized. - Saucepan
This is where your custard comes together. Use a medium-sized one so you have enough space to stir without spilling. - Whisk
A whisk helps keep the custard smooth and lump-free. Keep it moving gently while cooking to get that creamy texture. - Spatula
Great for scraping down the sides and spreading the custard evenly. It helps you get every bit of that filling into your dish. - Square baking dish (about 20×20 cm / 8×8 inch)
This gives your slice its shape. A square dish makes it easier to layer neatly and cut clean portions later. - Measuring cups & spoons
These keep your quantities accurate, which is key for a custard that sets properly. Try to level off your measurements for the best results.
Tip: Before you start, line your baking dish with parchment paper. It makes lifting and slicing much easier later on.
Step-by-Step Instructions
Step 1: Prepare the Base
Start by lining your baking dish with parchment paper.
This makes lifting the slice out later much easier and keeps the layers neat.
Arrange your biscuits in a single layer across the bottom.
Try to fit them closely together so there are no big gaps.
If needed, gently break a few biscuits to fill in the edges.
If you’re using melted butter, mix it with crushed biscuits and press the mixture firmly into the base.
This creates a slightly firmer, more structured layer.
Otherwise, simply keep the biscuits whole for a softer, classic texture.
Step 2: Make the Custard Filling
Pour the milk into a saucepan and add the sugar.
Heat it over medium heat, stirring gently until the sugar dissolves and the milk is warm—not boiling.
In a separate bowl, mix the cornstarch with a little cold milk to form a smooth slurry.
This step helps prevent lumps later, so take a moment to stir it well.
Slowly add the slurry into the warm milk while whisking. Keep stirring as it cooks.
You’ll notice it start to thicken—this is exactly what you want.
Stay patient and keep the whisk moving so it turns out smooth.
Once thick and creamy, remove it from the heat.
Stir in the vanilla extract and butter until fully melted and combined. The custard should look glossy and feel rich.
Step 3: Assemble the Layers
Pour the warm custard over your prepared base.
Use a spatula to spread it out evenly, making sure it reaches all the corners.
Work gently here so you don’t shift the biscuits underneath.
A smooth top will give you cleaner layers later.
Place another layer of biscuits on top of the custard.
Press them down lightly so they sit flat without sinking too deep.
Step 4: Add the Topping
Mix your powdered sugar with a small amount of liquid until you get a thick, spreadable icing.
It should glide easily but not be runny.
Spread the icing over the top biscuit layer. Take your time to smooth it out evenly for a clean finish.
If you’re using passionfruit, spoon it over and gently spread.
Step 5: Chill and Set
Place the dish in the fridge and let it chill for at least 4–6 hours.
Overnight is even better if you have the time.
This step is important.
It allows the custard to fully set and the layers to hold together when sliced.
Once firm, lift it out using the parchment paper, slice into squares, and serve.
You’ll see those neat layers, and that’s when you know it’s ready.
Tips for the Perfect Vanilla Slice
Use Full-Fat Milk for Creaminess
Full-fat milk gives your custard a richer taste and a smoother texture.
It helps the filling set nicely without feeling too firm or rubbery.
If you can, stick with it for the best result. You’ll notice the difference in every bite.
Stir Constantly to Avoid Lumps
When cooking the custard, steady stirring is key.
It keeps the mixture smooth and prevents it from catching at the bottom of the pan.
Use a whisk and keep it moving, especially as the custard starts to thicken.
If you pause too long, small lumps can form.
Don’t rush this step because gentle, consistent stirring will give you that silky finish you’re after.
Chill Long Enough for Clean Slices
It might be tempting to cut into it early, but giving your slice enough time to chill makes all the difference.
The custard needs time to fully set so the layers hold together.
Aim for at least 4–6 hours in the fridge, or overnight if you can.
The longer it rests, the cleaner your slices will be.
You’ll get those neat layers without the filling spilling out.
Use Parchment Paper for Easy Removal
Lining your dish with parchment paper is a small step that makes a big difference.
It allows you to lift the whole slice out in one piece once it’s set.
This makes cutting easier and keeps the edges looking tidy.
If you leave a bit of extra paper hanging over the sides, you’ll have something to grip when lifting it out.
Variations & Substitutions
Eggless Custard Version
You can easily skip the eggs and still get a smooth, creamy custard.
The cornstarch does the main thickening, so the texture will still set well.
Just follow the same steps and leave out the egg yolks.
If you want a slightly richer feel, add an extra tablespoon of butter at the end.
It keeps the custard soft and flavorful without adding complexity.
Dairy-Free Alternative (Plant-Based Milk)
This recipe adapts well to dairy-free options.
Use a plant-based milk like almond, soy, or oat.
Oat milk gives a naturally creamy result, while almond milk keeps it lighter.
Make sure to choose an unsweetened version so you can control the sweetness.
The method stays the same, and the custard will still thicken nicely with cornstarch.
Chocolate Vanilla Slice
For a chocolate twist, add melted chocolate to the custard once it’s cooked.
About 100g of dark or milk chocolate works well.
Stir it in while the custard is still hot so it melts smoothly.
You’ll get a rich, chocolatey layer that pairs beautifully with the biscuits.
You can also dust the top with cocoa powder for an extra touch.
Passionfruit Topping Variation
If you want something fresh and slightly tangy, passionfruit is a great choice.
It balances the sweetness of the custard and adds a bright flavor.
Mix passionfruit pulp with powdered sugar to make a simple glaze.
Spread it over the top layer just like regular icing.
The seeds add a little texture, which makes each bite more interesting.
Biscuit Alternatives
You’re not limited to one type of biscuit here.
Use what you have or what you enjoy most.
- Graham crackers, tennis biscuits, or Marie biscuits all work well
- Digestive biscuits give a slightly richer, buttery base
- Even plain tea biscuits can be used for a lighter texture
Choose something that softens slightly when chilled but still holds its shape.
That balance helps create clean layers without the base turning soggy.
How to Store No-Bake Vanilla Slice
Once your vanilla slice has fully set, store it in the fridge to keep it fresh and firm, where it will stay at its best for up to 3–4 days.
Place it in an airtight container or cover the dish tightly with plastic wrap or foil to prevent it from drying out or absorbing any fridge odors.
This step helps maintain that smooth custard texture and keeps the top layer looking neat.
If you’ve already sliced it, you can store the pieces in a single layer or gently stack them with parchment paper in between to avoid sticking.
Freezing is not recommended for this dessert, as the custard can become watery or grainy once thawed, which affects both the texture and overall taste.
For the best experience, keep it chilled and enjoy it within a few days while it’s still creamy and fresh.
Serving Suggestions
Serve your vanilla slice well chilled so the custard stays firm and the layers hold together neatly when cut, giving you clean, satisfying slices every time.
It’s best taken straight from the fridge, especially on warm days, as the cool, creamy texture really stands out.
This dessert pairs beautifully with a simple cup of tea or coffee, which helps balance the sweetness and makes it feel like a complete treat rather than just something sugary.
If you want to dress it up a little, add a light garnish just before serving.
Fresh fruit like berries or sliced kiwi brings a bit of brightness, while a small dollop of whipped cream adds extra softness without overpowering the slice.
Keep it simple and let the custard shine, because that’s the heart of the dessert.
Common Mistakes to Avoid
- Undercooking custard (too runny) – If the custard isn’t cooked long enough, it won’t set properly, so keep stirring until it’s thick and holds its shape.
- Skipping chill time – Cutting too soon will cause the layers to slide, so give it enough time in the fridge to fully firm up.
- Uneven layering – Gaps or uneven spreading can make the slice fall apart, so take a moment to level each layer neatly.
- Overly thick icing – Icing that’s too thick won’t spread smoothly, so add liquid slowly until it’s easy to spread but still holds its shape.
Final Thoughts
This no-bake vanilla slice is simple to make, easy to adapt, and always satisfying.
With just a few basic steps, you get a creamy dessert that looks and tastes impressive.
Give it a try and make it your own. If you add a twist or have a tip that worked well, share it—I’d love to hear how yours turned out!
FAQs
Yes, use a cornstarch-based custard and simply skip the egg yolks.
At least 4–6 hours, but overnight gives the best results.
No, freezing isn’t recommended as it can affect the custard’s texture.
Tennis biscuits, graham crackers, or Marie biscuits are all great options.
It likely needs more cooking time or the cornstarch wasn’t fully activated.
No-Bake Vanilla Slice Recipe (Easy, Creamy & No Oven Needed)
Difficulty: Easy12
Slices15
minutes10
minutes8
hoursA simple no-bake dessert with layers of biscuits and smooth vanilla custard, chilled until perfectly set.
Ingredients
2 cups (200–250g) biscuits (tennis, graham, or Marie)
½ cup (115g) melted butter (optional)
3 cups (750ml) milk
½ cup (100g) sugar
⅓ cup (40g) cornstarch
1 tbsp vanilla extract
2 tbsp (30g) butter
2 egg yolks (optional)
1 cup (120g) powdered sugar
2–3 tbsp milk or water (for icing)
Directions
- Line a square dish and arrange biscuits as the base (mix with butter if using).
- Heat milk and sugar until warm.
- Mix cornstarch with a little milk, then whisk it into the saucepan.
- Cook, stirring constantly, until thick and smooth.
- Remove from heat and stir in vanilla and butter.
- Pour custard over the base and spread evenly.
- Add a top layer of biscuits.
- Mix the icing and spread it over the top.
- Chill for 4–6 hours or overnight until set.
Notes
- Stir the custard continuously to keep it smooth.
- Chill fully before slicing for clean layers.
- Store in the fridge and enjoy within 3–4 days.

Hi, I’m Sorenna Blythe, the baker and writer behind Mix Whisk Bake. I share simple, reliable recipes and honest kitchen moments to help home bakers bake with confidence and joy. When I’m not testing new treats, you’ll find me sipping coffee and dreaming up my next bake.