There’s something special about an old fashioned sour cream donut.
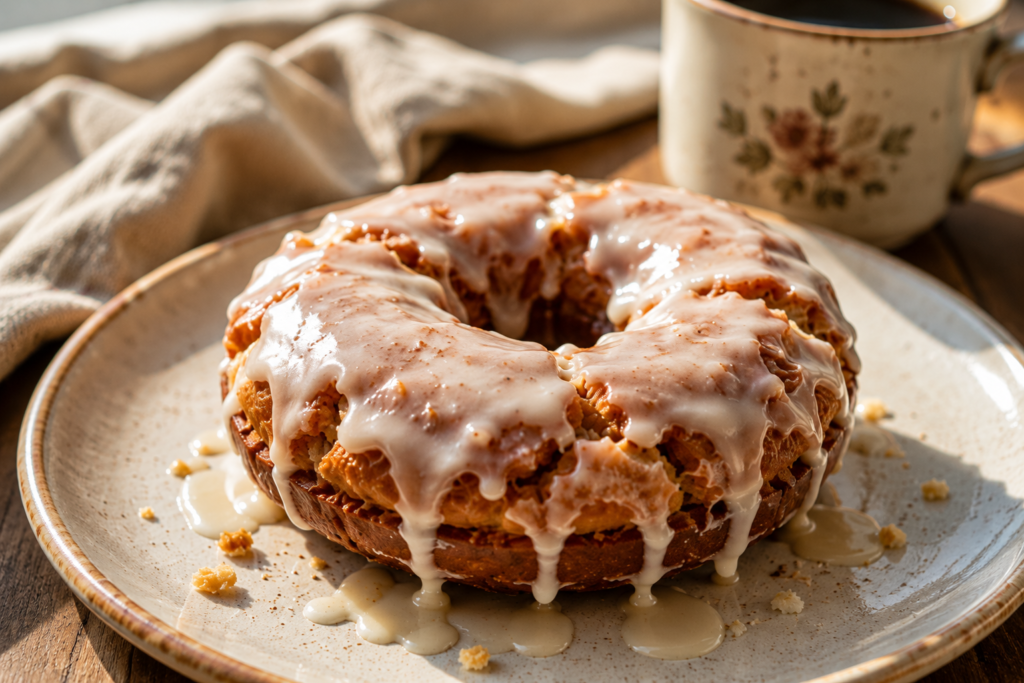
From its signature cracked edges to its crisp golden outside and soft, cake-like center, every bite is rich, comforting, and full of nostalgic flavor.
Finished with a simple vanilla glaze, these homemade donuts taste just like the ones you’d find at your favorite bakery.
The best part? They’re easier to make than you might think.
This beginner-friendly recipe walks you through each step with simple instructions, plus helpful tips for frying, glazing, and storing your donuts so they turn out delicious every time.
Why You’ll Love This Old Fashioned Sour Cream Donuts Recipe
- Soft and moist interior: Sour cream keeps every donut tender with a rich, cake-like texture.
- Crispy golden exterior: Frying creates a lightly crisp shell that perfectly complements the soft center.
- Classic cracked tops: Those signature craggy edges give these donuts their old fashioned bakery look.
- Simple pantry ingredients: Everything you need is easy to find and likely already in your kitchen.
- Sweet vanilla glaze: A smooth, classic glaze adds just the right amount of sweetness to every bite.
- Perfect any time of day: Enjoy these donuts for breakfast, brunch, dessert, or an afternoon snack.
- Freezer friendly: Make a batch ahead of time and freeze extras for a quick homemade treat later.
- Ready in under an hour: With straightforward steps, you can have fresh, warm donuts on the table in no time.

What Are Old Fashioned Sour Cream Donuts?
Old fashioned sour cream donuts are a classic type of cake donut that has been enjoyed for generations, becoming a bakery staple thanks to their rich flavor, crisp edges, and soft, tender center.
Unlike yeast donuts, which rely on yeast to rise and create a light, airy texture, cake donuts are made with baking powder, giving them a denser, more delicate crumb that feels similar to a slice of moist cake.
Sour cream is one of the key ingredients because its richness and natural acidity help keep the dough soft and moist while also creating a tender bite that stays delicious even after the donuts have cooled.
One of the easiest ways to recognize an old fashioned donut is by its beautiful cracked surface, which forms naturally as the dough expands in the hot oil, creating crisp ridges that hold even more of the sweet glaze.
These crisp, craggy edges are more than just part of the donut’s signature look—they add extra texture and provide plenty of little pockets for the glaze to cling to, making every bite sweet, crunchy, and satisfying.
Old fashioned sour cream donuts are loved by bakeries because they have a wonderful balance of textures, with a lightly crisp outside, a soft cake-like interior, and a flavor that’s rich without being overly sweet.
They’re also incredibly versatile, tasting just as good with a simple vanilla glaze as they do coated in cinnamon sugar or finished with maple or chocolate icing, making them a favorite for every season.
Ingredients You’ll Need
For the Donuts
- 2¼ cups (280g) all-purpose flour: Provides the structure for soft, cake-like donuts.
- 2 teaspoons baking powder: Helps the donuts rise and creates a light, tender crumb.
- ½ teaspoon salt: Balances the sweetness and enhances the overall flavor.
- ½ teaspoon ground nutmeg (optional): Adds the classic warm, old fashioned donut flavor found in many bakery recipes.
- ¾ cup (150g) granulated sugar: Sweetens the dough while contributing to a tender texture.
- 2 tablespoons (28g) unsalted butter, softened: Adds richness and helps create a soft crumb.
- 2 large egg yolks: Give the donuts a rich flavor and beautiful golden color.
- ½ cup (120g) full-fat sour cream: Keeps the donuts moist, tender, and slightly tangy.
- 1 teaspoon vanilla extract: Adds a warm, classic flavor that complements the glaze.
- 2–3 quarts vegetable oil, canola oil, or peanut oil: You’ll need enough oil to fill your pot to a depth of about 2–3 inches for even frying.
The best frying oils have a high smoke point and a mild flavor so they don’t overpower the donuts.
Vegetable oil is an affordable, all-purpose choice that produces consistently crisp donuts.
Canola oil has a clean, neutral taste and fries evenly, making it another excellent option.
Peanut oil is popular in bakeries because it stays stable at high temperatures and creates an exceptionally crisp exterior, though it should be avoided if anyone has a peanut allergy.
For the Vanilla Glaze
- 2 cups (240g) powdered sugar: Creates a smooth, sweet glaze.
- 3–4 tablespoons milk: Adjust the amount to reach your desired glaze consistency.
- 1 teaspoon vanilla extract: Adds classic vanilla flavor.
- Pinch of salt: Balances the sweetness and brings out the vanilla flavor.
Best Sour Cream to Use
Full-Fat Sour Cream
Full-fat sour cream is the best choice for this recipe because its higher fat content creates a rich, moist dough that fries into soft, tender donuts with a delicate crumb.
It also adds a subtle tang that balances the sweetness of the glaze and gives old fashioned donuts their signature flavor.
If you can, let the sour cream sit at room temperature for about 20 to 30 minutes before mixing, as it blends more smoothly with the other ingredients.
Reduced-Fat Sour Cream
Reduced-fat sour cream can be used if that’s what you have on hand, and your donuts will still turn out delicious.
The texture may be slightly less rich and a little less tender because it contains less fat, but the difference is fairly small for most home bakers.
Avoid fat-free sour cream, as it often contains extra stabilizers that can affect both the flavor and texture of the finished donuts.
Greek Yogurt Substitute
Plain full-fat Greek yogurt is an excellent substitute when you don’t have sour cream available.
It has a similar thickness and tangy flavor, making it a reliable replacement in equal amounts.
Choose plain Greek yogurt rather than flavored varieties, and avoid versions with added sugar since they can change the taste of the dough.
Why Full-Fat Gives the Best Texture
The fat in full-fat sour cream coats the flour as the dough comes together, helping create a softer, more tender crumb instead of a dry or tough one.
Its natural acidity also works with the baking powder to give the donuts a light lift while keeping the inside moist and cake-like.
When paired with the crisp exterior that develops during frying, the result is the classic bakery-style texture that makes old fashioned sour cream donuts so memorable.
Kitchen Equipment
- Mixing bowls: Use separate bowls for the wet and dry ingredients before combining them.
- Measuring cups and spoons: Measure ingredients accurately for consistent results every time.
- Whisk: Helps evenly mix the dry ingredients and creates a smooth batter.
- Rolling pin: Rolls the chilled dough to an even thickness for uniform donuts.
- Donut cutter: Cuts perfectly shaped donuts and donut holes with clean edges.
- Kitchen thermometer: Monitors the oil temperature and keeps it at 350°F (175°C) for even frying.
- Heavy-bottomed pot or Dutch oven: Holds heat well and helps maintain a steady frying temperature.
- Cooling rack: Allows excess oil to drain while keeping the donuts crisp.
- Slotted spoon or spider strainer: Safely lifts the donuts from the hot oil without excess oil coming with them.
How to Make Old Fashioned Sour Cream Donuts
Step 1: Mix the Dry Ingredients
In a medium mixing bowl, whisk together the all-purpose flour, baking powder, salt, and optional ground nutmeg until everything is evenly combined.
Whisking helps distribute the baking powder throughout the flour so every donut rises evenly and has a consistent texture.
Take a few extra seconds to break up any small lumps in the flour, as this will make it easier to combine with the wet ingredients later.
Step 2: Cream Butter and Sugar
In a large mixing bowl, beat the softened butter and granulated sugar together until the mixture looks lighter in color and feels smooth.
Creaming adds tiny air pockets to the butter, which helps create a softer, more tender donut.
You don’t need to beat it for several minutes—just until the butter and sugar are fully blended and slightly fluffy.
Step 3: Add Egg Yolks, Vanilla, and Sour Cream
Mix the egg yolks into the butter mixture one at a time, then stir in the vanilla extract and sour cream until smooth.
Room-temperature ingredients blend together much more easily than cold ones, helping you create a smooth dough without overmixing.
If your sour cream has just come out of the refrigerator, let it sit on the counter for about 20 to 30 minutes before you begin.
Step 4: Combine Wet and Dry Ingredients
Gradually add the dry ingredients to the wet mixture, stirring just until no dry streaks of flour remain.
Avoid overmixing the dough, as too much stirring develops the flour and can make the finished donuts dense instead of soft and tender.
The dough will be soft and slightly sticky, which is exactly what you want before chilling.
Step 5: Chill the Dough
Cover the bowl tightly and refrigerate the dough for at least one hour, or until it feels firm enough to handle comfortably.
Chilling makes the dough much easier to roll and cut while helping the donuts keep their shape during frying.
Cold dough also encourages the beautiful cracked edges that make old fashioned donuts so recognizable.
Step 6: Roll and Cut Donuts
Lightly flour your work surface and gently roll the chilled dough to about ½ inch thick for tall, bakery-style donuts.
Use a floured donut cutter to press straight down into the dough instead of twisting, as twisting can seal the edges and affect how the donuts rise.
Place the cut donuts on a parchment-lined baking sheet while you finish cutting the rest.
Gather the leftover dough scraps, gently press them back together, and roll them only once more to avoid making the dough tough.
Any remaining scraps can be fried as delicious donut holes or bite-sized treats.
Step 7: Heat the Oil
Pour about 2 to 3 inches of frying oil into a heavy-bottomed pot or Dutch oven and heat it to 350°F (175°C).
Use a kitchen thermometer to monitor the temperature throughout the frying process because even small changes can affect the texture of the donuts.
If the oil gets too hot, the outside may brown before the center is fully cooked.
If the oil cools too much, the donuts will absorb extra oil and become greasy instead of crisp.
Allow the oil to return to 350°F between batches for the most consistent results.
Step 8: Fry Until Golden
Carefully lower two or three donuts into the hot oil, leaving enough space for them to cook evenly.
Fry each side for about 1½ to 2 minutes, turning the donuts once they become deep golden brown.
As they cook, you’ll notice the classic cracks begin to form around the surface, creating the signature old fashioned look.
Avoid overcrowding the pot because too many donuts at once can quickly lower the oil temperature and lead to uneven cooking.
Transfer the cooked donuts to a wire rack so any excess oil can drain away while they cool slightly.
Step 9: Prepare the Glaze
While the donuts cool for a few minutes, whisk together the powdered sugar, milk, vanilla extract, and a pinch of salt until completely smooth.
If the glaze feels too thick, add a small splash of milk, one teaspoon at a time, until it reaches a pourable consistency.
If it becomes too thin, simply whisk in a little more powdered sugar until it coats the back of a spoon.
Step 10: Glaze the Donuts
For the best finish, dip the donuts into the glaze while they are still slightly warm, as this helps the glaze spread evenly and cling to every crack.
A single coating creates a light, classic glaze, while a second dip after the first layer has set gives the donuts a thicker, sweeter finish.
Place the glazed donuts back on the cooling rack and let them rest for about 10 to 15 minutes so the glaze can dry before serving or storing.
Tips for Bakery-Style Donuts
- Chill the dough thoroughly: Cold dough is easier to handle and helps create the signature cracked tops during frying.
- Don’t overwork the dough: Mix just until combined to keep the donuts soft, light, and tender.
- Keep the oil at 350°F (175°C): A steady oil temperature ensures evenly cooked donuts with a crisp exterior and fluffy center.
- Fry only a few at a time: Leaving space between the donuts helps maintain the oil temperature and promotes even browning.
- Use fresh baking powder: Fresh leavening gives the donuts the best rise and prevents them from becoming dense.
- Glaze while slightly warm: Warm donuts allow the glaze to spread smoothly and cling to every crack and ridge.
- Drain properly: Place freshly fried donuts on a wire rack so excess oil drips away while the outside stays crisp.
Common Mistakes to Avoid
Dough Is Too Sticky
A soft, slightly sticky dough is completely normal for old fashioned sour cream donuts, so don’t be tempted to add lots of extra flour right away.
If the dough feels too sticky to handle, chill it for a little longer instead of mixing in more flour, as cold dough is much easier to roll and cut.
Lightly flour your work surface, rolling pin, and donut cutter to prevent sticking without drying out the dough.
Adding too much flour can make the donuts heavier and less tender, so use only the amount needed to keep the dough manageable.
Dense Donuts
One of the most common reasons for dense donuts is overmixing the dough after the wet and dry ingredients are combined.
Mix only until the flour disappears, as continued stirring develops the flour and creates a tougher texture.
Measuring the flour correctly also makes a big difference, so spoon it into your measuring cup and level it off rather than scooping directly from the bag.
Using fresh ingredients and avoiding unnecessary mixing will help your donuts stay soft, light, and cake-like.
Greasy Donuts
Greasy donuts are usually the result of oil that isn’t hot enough.
When the oil drops below 350°F (175°C), the dough absorbs more oil before the outside has a chance to crisp up.
Always check the temperature with a kitchen thermometer and allow the oil to return to the proper temperature between batches.
Frying only a few donuts at a time also helps keep the oil temperature steady and produces crisp, evenly cooked donuts.
Burnt Outside, Raw Inside
If the outside of your donuts turns dark too quickly while the center stays undercooked, the oil is likely too hot.
Oil that’s much hotter than 350°F (175°C) browns the outside before the heat has enough time to cook the inside.
Lower the heat slightly and give the oil a few minutes to stabilize before adding the next batch.
Keeping a close eye on the thermometer throughout frying is one of the easiest ways to avoid this problem.
Flat Donuts
Flat donuts are often caused by baking powder that has lost its strength over time.
Even if it looks fine, expired baking powder won’t provide enough lift for the dough to rise properly.
For the best results, use fresh baking powder and whisk it well with the dry ingredients so it is evenly distributed.
Flavor Variations
Cinnamon Sugar
For a classic twist, skip the vanilla glaze and roll the warm donuts in a mixture of granulated sugar and ground cinnamon as soon as they come out of the fryer.
The warmth helps the cinnamon sugar stick evenly, creating a sweet, slightly crunchy coating that pairs perfectly with the soft cake-like center.
Maple Glaze
Turn the vanilla glaze into a rich maple glaze by replacing part of the milk with pure maple syrup.
The maple adds a deep, cozy sweetness that tastes especially delicious during the cooler months.
For even more flavor, add a tiny splash of maple extract if you have it, but pure maple syrup alone creates a wonderful glaze.
Chocolate Glaze
Chocolate lovers can whisk a few tablespoons of unsweetened cocoa powder into the powdered sugar before adding the milk and vanilla.
The result is a smooth, rich glaze that balances the lightly tangy flavor of the sour cream donuts.
Finish with chocolate sprinkles or chopped nuts while the glaze is still wet if you’d like an extra-special treat.
Lemon Glaze
For a bright and refreshing finish, replace some of the milk in the glaze with fresh lemon juice and stir in a little finely grated lemon zest.
The fresh citrus flavor cuts through the sweetness and gives the donuts a light, vibrant taste.
This variation is especially nice during spring and summer when you’re craving something a little lighter.
Pumpkin Spice
Give these donuts a cozy fall makeover by adding a teaspoon of pumpkin pie spice to the dough along with the dry ingredients.
You can also stir a pinch of pumpkin pie spice into the glaze for an extra layer of warm flavor.
Serve these donuts with a hot cup of coffee or apple cider for a comforting autumn treat.
Vanilla Bean
For an extra bakery-style touch, replace the vanilla extract in the glaze with vanilla bean paste.
The tiny flecks of real vanilla bean make the glaze look beautiful while adding a richer, more fragrant vanilla flavor.
Can You Bake Instead of Fry?
Yes, you can bake old fashioned sour cream donuts if you prefer to skip frying, and they’ll still be soft, flavorful, and enjoyable.
Baked donuts have a different texture than fried ones because they won’t develop the crisp golden crust or the signature cracked edges that make traditional old fashioned donuts so recognizable.
Instead, baking produces a lighter, cake-like donut with a soft exterior that’s perfect if you’re looking for an easier, less hands-on option.
To bake them, preheat your oven to 350°F (175°C) and place the cut donuts on a parchment-lined baking sheet, leaving a little space between each one.
Bake for about 10 to 12 minutes, or until the donuts are lightly golden and a toothpick inserted into the center comes out clean.
Be careful not to overbake them, as even a few extra minutes can dry out the soft crumb that makes these donuts so delicious.
Allow the baked donuts to cool for just a few minutes before dipping them into the vanilla glaze, as a slightly warm donut helps the glaze spread evenly and set beautifully.
If you’re expecting the exact texture of a bakery-style fried donut, baking won’t produce the same crisp exterior, but it does create a tender, homemade treat that’s every bit as satisfying in its own way.
Air Fryer Instructions
If you’d like a quicker alternative to deep frying, you can cook these sour cream donuts in an air fryer, although the texture will be a little different from the traditional version.
Preheat your air fryer to 350°F (175°C) so the donuts begin cooking as soon as they go into the basket.
Lightly grease the air fryer basket or line it with perforated parchment paper to help prevent the donuts from sticking.
Place the cut donuts in a single layer with a little space between each one, as proper airflow is what helps them cook evenly.
Air fry the donuts for 6 to 8 minutes, flipping them halfway through cooking so both sides brown evenly.
The exact cooking time may vary slightly depending on your air fryer, so start checking the donuts around the 6-minute mark.
The donuts are ready when they are lightly golden and spring back gently when touched.
For the best flavor and color, lightly brush the tops with melted butter before dipping them into the vanilla glaze or coating them in cinnamon sugar.
Keep in mind that air-fried donuts won’t have the crisp exterior or the signature cracked edges that develop during deep frying, since they aren’t surrounded by hot oil.
Instead, you can expect a soft, tender, cake-like donut with a lightly golden outside that’s still delicious and perfect for anyone looking for a lighter homemade option.
Allow the donuts to cool for just a few minutes before glazing so the coating sticks well without becoming too thin or running off the surface.
Make Ahead Tips
Preparing the dough ahead of time is a great way to break the recipe into smaller steps and makes it easy to enjoy fresh homemade donuts whenever you’re ready.
Once the dough is mixed, cover the bowl tightly with plastic wrap or transfer it to an airtight container before placing it in the refrigerator.
The dough can be refrigerated for up to 24 hours, and the extra chilling time often makes it even easier to roll, cut, and handle.
If you’re planning for a special breakfast or brunch, making the dough the night before is one of the easiest ways to save time the next morning.
When you’re ready to bake, simply remove the chilled dough from the refrigerator, lightly flour your work surface, and roll and cut the donuts as directed.
If the dough feels very firm after an overnight chill, let it rest at room temperature for about 10 to 15 minutes so it becomes slightly easier to roll without becoming too soft.
For the freshest flavor and best texture, it’s recommended to fry the donuts shortly after cutting them rather than storing the cut shapes for long periods.
Freshly fried donuts have the crisp exterior and soft, cake-like center that make old fashioned sour cream donuts so irresistible.
If you need to pause before frying, place the cut donuts on a parchment-lined baking sheet, cover them loosely, and refrigerate them for up to 2 hours.
When it’s time to fry, there’s no need to bring the donuts fully to room temperature, as slightly chilled dough holds its shape well and develops those classic cracked edges during cooking.
Glaze the donuts soon after frying while they’re still slightly warm, and you’ll be rewarded with a smooth, shiny finish that tastes just like it came from your favorite bakery.
Storage Instructions
Room Temperature
Old fashioned sour cream donuts taste their very best on the day they’re made, but they can be stored at room temperature for up to 2 days.
Allow the glaze to set completely before storing so the donuts don’t stick together or become messy.
Place the donuts in an airtight container and separate layers with parchment or wax paper to help protect the glaze.
Keep the container in a cool, dry place away from direct sunlight or heat, which can soften the glaze and affect the texture.
Refrigerator
If you’d like to keep the donuts fresh a little longer, store them in the refrigerator for up to 5 days.
Use an airtight container to prevent the donuts from drying out or absorbing odors from other foods in the refrigerator.
Before serving, let the donuts sit at room temperature for about 15 to 20 minutes, or warm them gently for a few seconds in the microwave to soften the crumb.
Freezer
These donuts freeze well, making them a great make-ahead treat for busy mornings or unexpected guests.
For the best results, freeze the donuts in a single layer until firm, then transfer them to a freezer-safe container or freezer bag.
Place a sheet of parchment paper between layers to keep the glaze from sticking and to make it easy to remove only the donuts you need.
Store the donuts in the freezer for up to 3 months for the best flavor and texture.
Thaw frozen donuts overnight in the refrigerator or let them sit at room temperature for about 1 hour before enjoying.
Best Containers
A sturdy airtight container is the best choice because it helps keep the donuts soft while protecting the delicate glaze.
If you’re freezing the donuts, use a freezer-safe container with a tight-fitting lid or a heavy-duty freezer bag with as much air removed as possible.
How to Reheat Donuts
Microwave
The microwave is the quickest way to bring leftover donuts back to life when you’re short on time.
Place a donut on a microwave-safe plate and heat it for 8 to 12 seconds if it’s at room temperature, or 15 to 20 seconds if it has been refrigerated.
Warm the donut just until it’s soft, as overheating can make the glaze melt too much and the cake-like texture become dry or rubbery.
This method is perfect when you want a warm, tender donut in just a few seconds.
Oven
The oven is the best choice when reheating several donuts at once because it warms them evenly without making them soggy.
Preheat your oven to 300°F (150°C) and place the donuts on a baking sheet lined with parchment paper.
Heat them for 5 to 8 minutes, checking them near the end so they don’t dry out.
Let the donuts cool for a minute or two before serving, as the glaze will be warm and slightly soft right out of the oven.
Air Fryer
An air fryer is an excellent option if you want to restore a little of the crispness to the outside of the donuts.
Preheat the air fryer to 300°F (150°C) and arrange the donuts in a single layer so the hot air can circulate evenly.
Warm them for 2 to 3 minutes, checking after the first couple of minutes to prevent overcooking.
What to Serve with Sour Cream Donuts
- Fresh coffee: A hot cup of coffee perfectly balances the sweetness of the donuts.
- Cold brew: Smooth, refreshing cold brew pairs wonderfully with the rich vanilla glaze.
- Latte: Creamy steamed milk and espresso create a comforting match for the tender cake-like texture.
- Cappuccino: The light, frothy milk complements the crisp exterior and soft center of the donuts.
- Hot chocolate: A warm mug of rich hot chocolate makes these donuts an extra cozy treat.
- Fresh fruit: Berries, sliced oranges, or grapes add a bright, refreshing contrast to the rich donuts.
- Scrambled eggs: Fluffy eggs help turn the donuts into a satisfying breakfast or brunch spread.
- Breakfast casserole: A savory breakfast casserole pairs well with the sweet donuts for a balanced meal.
Expert Tips
- Weigh the flour for accuracy: Using a kitchen scale gives consistent results and helps prevent dense, dry donuts.
- Chill the dough before cutting: Cold dough is easier to handle and creates cleaner cuts with better-shaped donuts.
- Use a thermometer for consistent frying: Keep the oil at 350°F (175°C) for evenly cooked donuts with a crisp outside and a tender center.
- Let the glaze set completely before stacking: Allow the glaze to dry so the donuts don’t stick together or lose their smooth finish.
- Fry the donut holes first: They cook quickly and are a great way to test the oil temperature before frying the full-sized donuts.
- Avoid adding too much extra flour when rolling: Use only a light dusting to keep the dough tender and prevent the donuts from becoming heavy.
Final Thoughts
Making old fashioned sour cream donuts at home is easier than you might think, and the reward is a batch of warm, bakery-style treats with crisp edges, a soft cake-like center, and a delicious vanilla glaze.
Once you’ve mastered the basic recipe, have fun trying different glazes, toppings, and flavors to make them your own.
FAQs
Why are old fashioned donuts cracked?
The signature cracks form naturally as the cold dough expands quickly in the hot oil, creating the classic old fashioned look and extra-crispy edges.
What does sour cream do in donuts?
Sour cream adds moisture, richness, and a slight tang while helping create a soft, tender, cake-like texture.
Can I use Greek yogurt instead?
Yes. Plain full-fat Greek yogurt can be used as a 1:1 substitute for sour cream with very similar results.
Do I need a donut cutter?
No. You can use a large round cookie cutter or drinking glass for the donut and a small round cutter or bottle cap for the center hole.
Why did my donuts absorb so much oil?
The oil was likely too cool. Keep the frying temperature at 350°F (175°C) to prevent greasy donuts.
Can I freeze homemade donuts?
Yes. Freeze the cooled donuts in an airtight container for up to 3 months, then thaw and enjoy when ready.
Can I make these without nutmeg?
Absolutely. The donuts will still taste delicious, although nutmeg adds the classic old fashioned bakery flavor.
Why are my donuts dry?
Dry donuts are usually caused by adding too much flour, overmixing the dough, or frying or baking them for too long.
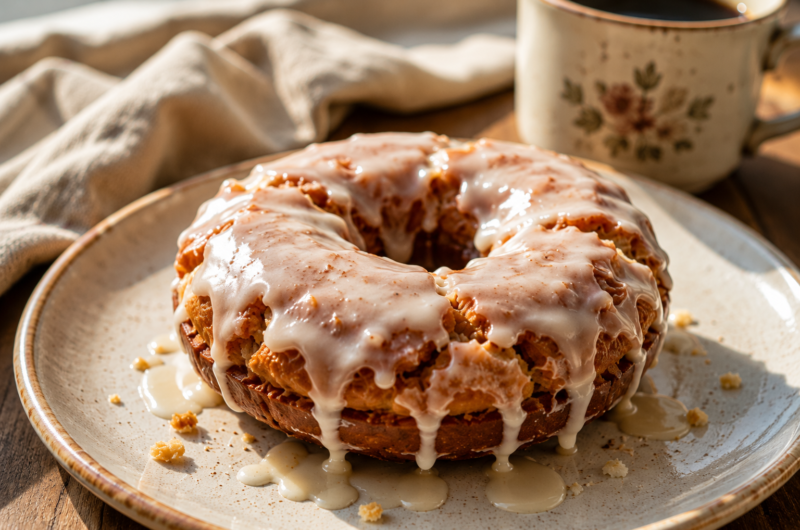
Old Fashioned Sour Cream Donuts: Perfectly Crispy and Tender
Difficulty: Easy12
Donuts20
minutes15
minutes35
minutesThese old fashioned sour cream donuts are crispy on the outside, soft and cake-like on the inside, and finished with a sweet vanilla glaze for a classic bakery-style treat.
Ingredients
- For the Donuts:
2¼ cups all-purpose flour
2 tsp baking powder
½ tsp salt
½ tsp ground nutmeg (optional)
¾ cup granulated sugar
2 tbsp unsalted butter, softened
2 large egg yolks
½ cup full-fat sour cream
1 tsp vanilla extract
Vegetable oil, for frying
- For the Glaze:
2 cups powdered sugar
3–4 tbsp milk
1 tsp vanilla extract
Pinch of salt
Directions
- Whisk together the flour, baking powder, salt, and nutmeg.
- Cream the butter and sugar, then mix in the egg yolks, sour cream, and vanilla.
- Stir the dry ingredients into the wet ingredients until just combined, then chill the dough for 1 hour.
- Roll the dough to ½-inch thick, cut out the donuts, and heat the oil to 350°F (175°C).
- Fry the donuts for 1½–2 minutes per side until golden brown, then drain on a wire rack.
- Whisk together the glaze ingredients until smooth, dip the slightly warm donuts into the glaze, and let them set before serving.
Notes
- Chill the dough well for easier handling and classic cracked edges.
- Keep the oil at 350°F (175°C) for evenly cooked, non-greasy donuts.
- Store leftovers in an airtight container for up to 2 days or freeze for up to 3 months.

Hi, I’m Sorenna Blythe, the baker and writer behind Mix Whisk Bake. I share simple, reliable recipes and honest kitchen moments to help home bakers bake with confidence and joy. When I’m not testing new treats, you’ll find me sipping coffee and dreaming up my next bake.