There’s something special about the combination of sweet peaches and rich almonds.
The juicy fruit brings fresh summer flavor, while the almond filling adds a buttery, nutty depth that makes every bite feel a little extra special.
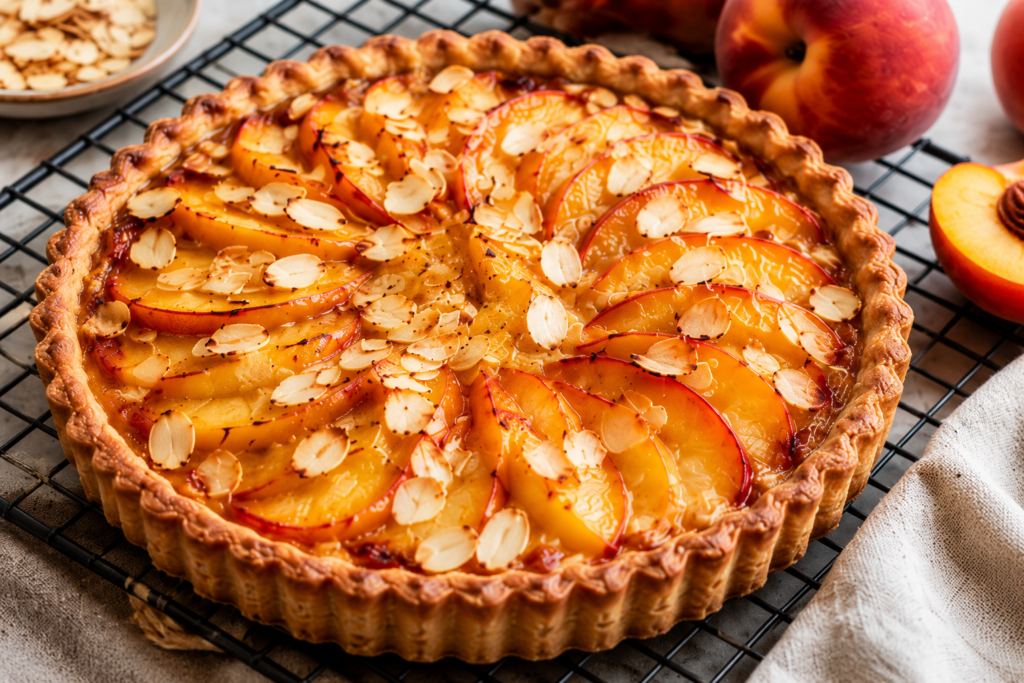
This Peach Almond Tart looks impressive enough for a celebration, yet it’s surprisingly simple to make at home.
In this recipe, I’ll walk you through each step, from making the crisp tart crust to creating the creamy almond filling and arranging the peaches on top.
Don’t worry if you’re new to baking because this recipe is easy to follow and well worth the effort.
Why You’ll Love This Peach Almond Tart
- Buttery, flaky tart crust – Creates the perfect crisp and tender base for the filling and fruit.
- Sweet, juicy peaches in every bite – Fresh peaches add natural sweetness and bright summer flavor.
- Rich almond cream (frangipane) filling – A soft, nutty layer that pairs beautifully with the peaches.
- Beautiful bakery-style presentation – The arranged peach slices make this tart look elegant and impressive.
- Easier to make than it looks – Simple steps and basic ingredients help you create a stunning dessert with confidence.
What Is a Peach Almond Tart?
A peach almond tart is a classic fruit dessert made with a crisp pastry crust, a creamy almond filling, and layers of fresh peaches baked until tender and golden.
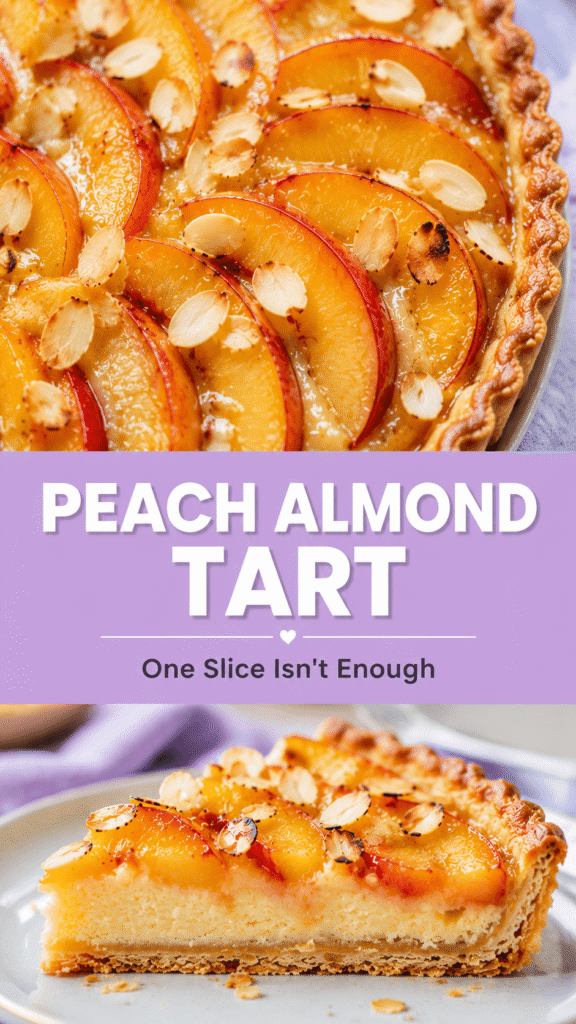
Unlike many fruit desserts that focus mainly on the fruit, this tart balances several textures and flavors, giving you a buttery crust, a soft almond center, and juicy peaches in every slice.
At its heart, a traditional fruit tart is a pastry shell filled with ingredients that complement seasonal fruit, creating a dessert that highlights the fruit while adding richness and structure.
One of the key elements that makes this tart special is the frangipane, which is a sweet almond cream made from butter, sugar, eggs, and almond flour.
As the tart bakes, the frangipane becomes soft, lightly golden, and wonderfully fragrant, adding a rich nutty flavor that pairs naturally with sweet peaches.
Peaches and almonds have long been considered a perfect match because the fruit’s bright sweetness balances the deep, buttery flavor of the almonds without either one overpowering the other.
This tart is different from a pie because pies typically have a deeper crust and often contain a larger amount of fruit filling, while a tart is shallower and places more focus on presentation and balanced layers.
It also differs from a galette, which has a more rustic appearance with the dough folded over the fruit instead of being shaped inside a tart pan.
Compared to a cobbler, which is topped with biscuit-like dough and baked in a dish, a peach almond tart has a firmer pastry crust and a more refined texture.
The result is a dessert that feels elegant enough for special occasions yet simple enough to enjoy as a weekend baking project when peaches are in season.
Even if you’ve never made a tart before, don’t let the beautiful finished look intimidate you, because each component is straightforward and comes together easily when you follow the recipe step by step.
Ingredients You’ll Need
For the Tart Crust
- 1 ¼ cups (155g) all-purpose flour
- ½ cup (113g) unsalted butter, cold and cubed
- 2 tablespoons (25g) granulated sugar
- ¼ teaspoon salt
- 1 large egg yolk
- 2–3 tablespoons cold water
For the Almond Filling (Frangipane)
- ½ cup (113g) unsalted butter, softened
- ½ cup (100g) granulated sugar
- 2 large eggs
- 1 cup (96g) almond flour
- 1 teaspoon vanilla extract
- ¼ teaspoon almond extract
For the Peach Topping
- 3 medium fresh ripe peaches, thinly sliced
- 1 tablespoon lemon juice
- ¼ teaspoon ground cinnamon (optional)
Optional Garnishes
- 2 tablespoons sliced almonds
- 2 tablespoons apricot jam, warmed for glazing
- 1 tablespoon powdered sugar, for dusting
- Fresh mint leaves, for serving
Equipment Needed
- 9-inch tart pan with removable bottom – Makes it easy to remove the tart and create clean, professional-looking slices.
- Mixing bowls – Needed for preparing the tart dough, almond filling, and peach topping.
- Electric mixer – Helps cream the butter and sugar together for a smooth, fluffy frangipane filling.
- Rolling pin – Used to roll the dough into an even circle that fits the tart pan.
- Pastry brush – Perfect for applying the apricot glaze after baking.
- Cooling rack – Allows the tart to cool evenly and helps prevent the crust from becoming soggy.
How to Make Peach Almond Tart
Step 1: Prepare the Tart Dough
In a large mixing bowl, combine the all-purpose flour, granulated sugar, and salt until evenly mixed.
Add the cold, cubed butter and work it into the flour mixture using your fingertips or a pastry cutter until the mixture resembles coarse crumbs with small pieces of butter still visible.
Mix in the egg yolk, then add the cold water one tablespoon at a time until the dough begins to come together.
Try not to overwork the dough, as this helps keep the finished crust tender and flaky.
Gently shape the dough into a flat disc and wrap it tightly in plastic wrap.
Place it in the refrigerator for at least 30 minutes so the butter can firm up, and the dough becomes easier to roll.
Step 2: Blind Bake the Crust
Preheat your oven to 375°F (190°C) while the dough chills.
Lightly flour your work surface and roll the chilled dough into a circle large enough to fit your 9-inch tart pan.
Carefully transfer the dough to the pan and gently press it into the bottom and sides without stretching it.
Trim any excess dough from the edges for a neat finish.
Place the prepared tart shell back into the refrigerator for 15 to 20 minutes to help prevent shrinking during baking.
Line the chilled crust with parchment paper and fill it with pie weights or dried beans.
Bake for 15 minutes, then carefully remove the parchment and weights.
Return the crust to the oven and bake for another 8 to 10 minutes, or until it looks lightly golden and dry to the touch.
Set the crust aside to cool slightly while you prepare the filling.
Step 3: Make the Frangipane Filling
In a mixing bowl, beat the softened butter and granulated sugar together until light and creamy.
Add the eggs one at a time, mixing well after each addition to create a smooth filling.
Stir in the vanilla extract and almond extract for extra flavor.
Add the almond flour and gently fold it into the mixture until everything is fully combined.
The finished frangipane should be smooth, thick, and easy to spread.
Step 4: Assemble the Tart
Spread the frangipane filling evenly across the bottom of the cooled tart crust.
Use the back of a spoon or a small spatula to smooth the surface.
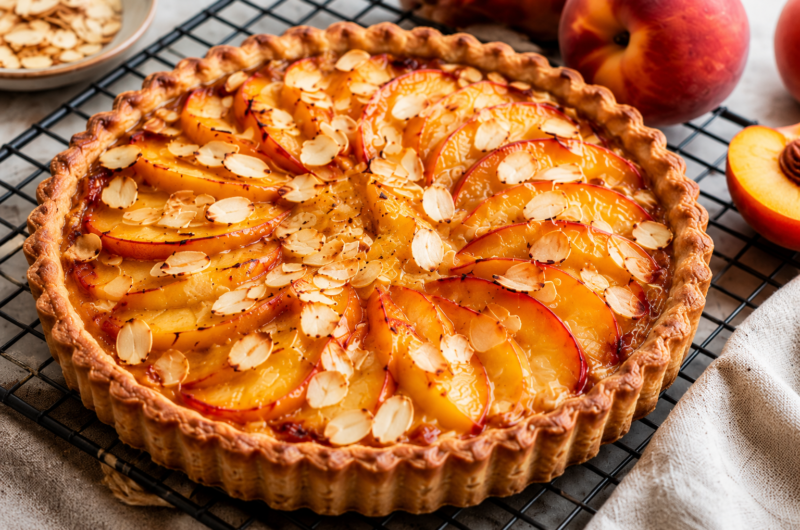
Arrange the peach slices on top in overlapping circles or any decorative pattern you like.
There is no need to make it perfect, as the tart will look beautiful once baked.
If desired, sprinkle sliced almonds over the peaches for added texture and crunch.
Step 5: Bake
Place the assembled tart into the preheated oven and bake for 35 to 40 minutes.
The tart is ready when the almond filling is set, the top is lightly golden, and the peaches are tender.
If the edges begin browning too quickly, loosely cover them with foil during the final minutes of baking.
Remove the tart from the oven and place it on a cooling rack.
Allow it to cool completely before serving so the filling can fully set, and the slices hold their shape.
Step 6: Finish and Serve
Warm the apricot jam until smooth and brush a thin layer over the peaches for a beautiful glossy finish.
Lightly dust the tart with powdered sugar if desired.
Remove the tart from the pan and transfer it to a serving plate.
Slice into wedges and serve as is or with a dollop of whipped cream or a scoop of vanilla ice cream.
Enjoy every bite of the buttery crust, creamy almond filling, and sweet peaches that make this tart such a memorable dessert.
Tips for the Best Peach Almond Tart
Use Ripe but Firm Peaches
Choose peaches that are fragrant and slightly soft when gently squeezed, but still firm enough to hold their shape during baking.
Overripe peaches can release too much juice in the oven, which may make the filling overly wet and affect the texture of the tart.
If your peaches are very juicy, pat the slices dry with a paper towel before arranging them on the filling.
Fresh, in-season peaches will always give the best flavor, color, and overall result.
Chill the Crust to Prevent Shrinking
Chilling the dough before rolling and again before baking is one of the easiest ways to achieve a neat, professional-looking tart.
Cold butter creates steam as it bakes, helping form flaky layers in the crust.
A well-chilled crust is also less likely to shrink or slide down the sides of the tart pan in the oven.
Even if you’re short on time, try not to skip this step because it makes a noticeable difference in the finished tart.
Avoid Overfilling with Fruit
It can be tempting to pile on extra peaches, but too much fruit can weigh down the tart and create excess moisture.
Arrange the slices in a single overlapping layer so the almond filling can bake evenly underneath.
A balanced amount of fruit allows each component of the tart to shine without overwhelming the crust or filling.
Remember that a beautifully arranged tart often looks more elegant than one packed with too many toppings.
Let the Tart Cool Completely Before Slicing
Allowing the tart to cool fully helps the frangipane set properly and makes cleaner slices.
Cutting into the tart while it is still warm can cause the filling to be soft and less stable.
The cooling time also gives the flavors a chance to settle and blend together.
If possible, wait at least one hour before slicing for the best texture and presentation.
Use Almond Extract Sparingly for Balanced Flavor
Almond extract adds a wonderful bakery-style flavor, but a small amount goes a long way.
Using too much can overpower the delicate sweetness of the peaches and make the tart taste overly strong.
A modest amount enhances the almond filling without taking attention away from the fruit.
When in doubt, stick to the recipe measurement and let the natural flavors of the peaches and almonds work together.
Recipe Variations
Rustic Peach Almond Galette
If you love simple, relaxed baking, try turning this recipe into a rustic galette.
Instead of pressing the dough into a tart pan, roll it into a large circle on a baking sheet lined with parchment paper.
Spread the frangipane in the center, leaving a border around the edges.
Arrange the peach slices over the filling and gently fold the edges of the dough over part of the fruit.
The free-form shape creates a beautiful homemade look while delivering the same delicious flavors.
This version is especially helpful for beginners because it removes the need to shape the dough perfectly in a tart pan.
Peach Berry Almond Tart
Adding berries is an easy way to bring extra color and flavor to the tart.
Scatter a handful of fresh raspberries or blueberries between the peach slices before baking.
The berries add a pleasant burst of sweetness and a touch of tartness that complements the almond filling.
Blueberries create a mellow flavor that blends smoothly with the peaches.
Raspberries provide a brighter contrast and add beautiful pops of color throughout the tart.
You can even use a combination of both if you want a more vibrant fruit filling.
Nectarine Almond Tart
Nectarines make an excellent substitute when peaches are unavailable or out of season.
Because nectarines have a similar texture and sweetness, they work almost exactly the same in the recipe.
One advantage is that nectarines have smooth skin, so there is no need to peel them if you prefer to leave the skin on.
The finished tart has the same buttery crust and rich almond flavor with a slightly different fruit character.
Many bakers enjoy using a mixture of peaches and nectarines for added variety.
Gluten-Free Version
A gluten-free tart can be just as delicious as the original version when made with the right crust.
Replace the traditional tart dough with your favorite gluten-free tart crust recipe or a high-quality store-bought option.
Look for a gluten-free flour blend that is designed for baking to achieve the best texture.
Be sure to chill the gluten-free dough well before rolling, as it can be more delicate than traditional pastry dough.
The almond filling and peach topping are naturally gluten-free, making this variation simple to adapt.
Honey Almond Tart
For a deeper, more natural sweetness, replace part of the granulated sugar in the frangipane with honey.
Honey adds a subtle floral flavor that pairs beautifully with both peaches and almonds.
Because honey contains moisture, replacing only a portion of the sugar usually provides the best texture.
A mild honey allows the fruit flavor to remain the star of the dessert.
This variation creates a slightly softer filling and gives the tart a warm, homemade character that feels perfect for summer baking.
What to Serve With Peach Almond Tart
- Vanilla ice cream – Adds a creamy, cool contrast to the warm, nutty flavors of the tart.
- Fresh whipped cream – Provides a light and airy topping that complements the peaches without overpowering them.
- Mascarpone cream – Offers a rich, silky texture with a subtle tang that pairs beautifully with the almond filling.
- Hot coffee – Balances the sweetness of the tart and makes it perfect for brunch or an afternoon treat.
- Iced tea – A refreshing option that pairs especially well with the tart’s fresh summer fruit flavors.
- Dessert wine – Enhances the sweetness of the peaches and creates an elegant finish for special occasions.
Storage Instructions
Refrigerating
Once the tart has cooled completely, cover it tightly with plastic wrap or transfer it to an airtight container.
Storing the tart after it has fully cooled helps prevent excess moisture from building up and softening the crust.
Keep the tart refrigerated for up to 4 days to maintain its best flavor and texture.
For the freshest taste, enjoy the tart within the first two days when the crust is still at its crispest.
If you plan to serve refrigerated slices, letting them sit at room temperature for 15 to 20 minutes before serving can help bring out the flavors of the peaches and almond filling.
Freezing
If you would like to save some for later, freezing individual slices is the easiest and most convenient option.
Place the slices on a baking sheet and freeze them until firm before wrapping each piece tightly in plastic wrap.
Transfer the wrapped slices to a freezer-safe container or storage bag to help protect them from freezer burn.
Properly stored slices can be frozen for up to 2 months.
When you’re ready to enjoy a slice, thaw it overnight in the refrigerator for the best results.
Reheating
A brief warm-up in the oven can help restore some of the tart’s freshly baked texture.
Place the thawed or refrigerated tart on a baking sheet and warm it in a 300°F (150°C) oven for about 8 to 10 minutes.
This gentle reheating helps crisp the crust while warming the filling without drying it out.
Avoid using high heat, as it can cause the peaches to become overly soft and the crust to brown too quickly.
Once warmed, serve the tart on its own or with a scoop of vanilla ice cream or a dollop of whipped cream for an extra-special treat.
Troubleshooting Common Issues
Tart Crust Shrinking
If your tart crust shrinks during baking, the most common cause is dough that was not chilled long enough before going into the oven.
Chilling allows the butter to firm up and gives the gluten in the dough time to relax, which helps the crust hold its shape.
Avoid stretching the dough when pressing it into the tart pan, as stretched dough naturally pulls back while baking.
For the best results, chill the dough after mixing and again after fitting it into the pan.
Taking a few extra minutes for this step can make a noticeable difference in the appearance of your finished tart.
Soggy Bottom Crust
A soggy crust usually happens when the pastry does not have enough time to partially bake before the filling is added.
Blind baking is the key to creating a crisp, sturdy base that can support the almond filling and juicy peaches.
Make sure the crust looks lightly golden and feels dry before removing it from the oven.
Using parchment paper and pie weights helps the crust bake evenly and prevents it from puffing up.
Allowing the blind-baked crust to cool slightly before adding the filling can also help maintain a better texture.
Filling Not Setting
If the almond filling remains too soft after baking, it likely needs a few more minutes in the oven.
The center of the tart should look set and no longer jiggle noticeably when the pan is gently moved.
Keep in mind that the filling will continue to firm up as the tart cools.
Avoid increasing the oven temperature to speed up the process, as this can cause uneven baking.
When in doubt, bake a little longer rather than removing the tart too early.
Peaches Releasing Too Much Juice
Peaches naturally contain a lot of moisture, but very ripe fruit can release enough juice to affect the texture of the tart.
Choose peaches that are ripe and flavorful while still feeling firm to the touch.
Overripe peaches tend to break down more quickly during baking and release excess liquid.
If your peaches seem especially juicy, gently pat the slices dry with paper towels before arranging them on the tart.
Using the right fruit helps the filling bake properly and keeps the crust crisp and delicious.
Remember that even experienced bakers run into small challenges from time to time.
Most tart issues are easy to fix with a few simple adjustments, and each batch helps build confidence for the next one.
Final Thoughts
This Peach Almond Tart combines a buttery, flaky crust, a rich almond filling, and sweet, juicy peaches to create a dessert that feels both comforting and elegant.
It’s a wonderful recipe to make during peach season when fresh fruit is at its best and most flavorful.
Don’t let its beautiful appearance fool you because this tart is surprisingly approachable and can be made successfully by bakers of all skill levels.
Take your time, enjoy the process, and savor every slice of this delicious homemade treat.
FAQs
Can I use canned peaches?
Yes, you can use canned peaches if fresh peaches are unavailable.
Be sure to drain them thoroughly and pat them dry to remove excess moisture before adding them to the tart.
Do I need to peel the peaches?
No, peeling the peaches is completely optional.
The skins soften during baking and add a touch of color to the finished tart.
Can I make the tart ahead of time?
Yes, this tart can be prepared up to one day in advance.
Store it covered in the refrigerator until you’re ready to serve.
What is frangipane?
Frangipane is a sweet almond cream made from butter, sugar, eggs, and almond flour.
It is commonly used in French pastries and adds a rich, nutty flavor to baked desserts.
Can I use store-bought crust?
Absolutely.
A store-bought crust is a great time-saving option and still produces a delicious tart.
Peach Almond Tart Recipe: Buttery, Nutty, and Perfect for Summer
Difficulty: Easy8
Slices30
minutes45
minutes1
hour15
minutesA buttery tart filled with rich almond cream and topped with sweet, juicy peaches for an elegant yet simple dessert perfect for summer.
Ingredients
- For the Crust:
1¼ cups (155g) all-purpose flour
½ cup (113g) unsalted butter, cold and cubed
2 tbsp granulated sugar
¼ tsp salt
1 egg yolk
2–3 tbsp cold water
- For the Filling:
½ cup (113g) unsalted butter, softened
½ cup (100g) granulated sugar
2 eggs
1 cup (96g) almond flour
1 tsp vanilla extract
¼ tsp almond extract
- For the Topping:
3 medium peaches, thinly sliced
1 tbsp lemon juice
2 tbsp sliced almonds
Directions
- Prepare the tart dough, press into a 9-inch tart pan, and chill for 30 minutes.
- Blind bake the crust at 375°F (190°C) until lightly golden, about 20–25 minutes.
- Beat the butter and sugar until creamy, then mix in the eggs, extracts, and almond flour to make the frangipane.
- Spread the filling into the cooled crust and arrange the peach slices on top.
- Sprinkle with sliced almonds and bake for 35–40 minutes, or until the filling is set and golden.
- Cool completely before slicing and serving.
Notes
- Use ripe but firm peaches for the best texture.
- Chill the dough well to prevent the crust from shrinking.
- Let the tart cool completely before slicing for clean, neat pieces.
- Brush with warm apricot jam after baking for a beautiful glossy finish.


Hi, I’m Sorenna Blythe, the baker and writer behind Mix Whisk Bake. I share simple, reliable recipes and honest kitchen moments to help home bakers bake with confidence and joy. When I’m not testing new treats, you’ll find me sipping coffee and dreaming up my next bake.


