
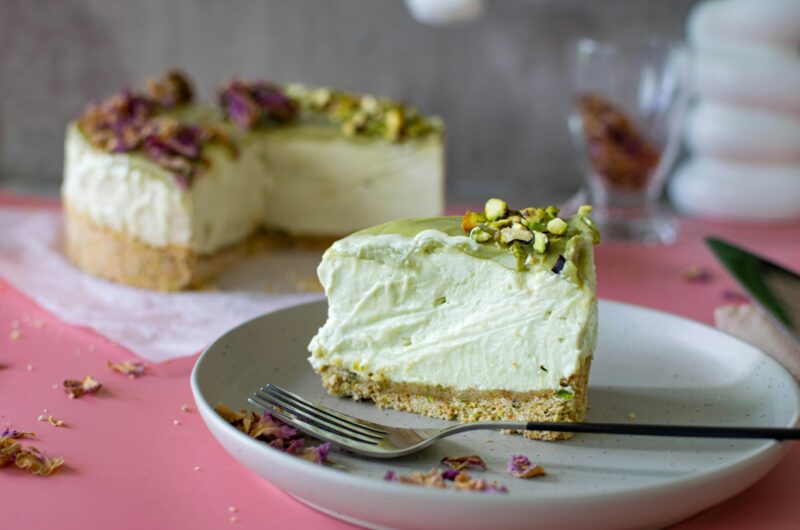
If you love creamy desserts with a little twist, this pistachio cheesecake is going to win you over. It’s rich, smooth, and has that gentle nutty flavor that makes each bite feel a bit special.
Pistachio desserts are having a moment right now, and for good reason. They bring a unique taste that’s not too sweet, but still feels indulgent.
This recipe keeps things simple while giving you real pistachio flavor and a silky texture you’ll notice right away.
Don’t worry if you’re new to baking cheesecakes because I’ll guide you through each step so you can make it with confidence.
Why You’ll Love This Recipe
Creamy and Velvety Texture
This cheesecake is all about texture. It’s smooth, rich, and melts in your mouth with every bite.
You’ll notice how soft and creamy the filling turns out when you follow the steps carefully.
Using room temperature ingredients really helps here because it keeps everything silky instead of lumpy.
Don’t worry, I’ll remind you of that when we get to the method.
Perfect Balance of Sweetness and Nuttiness
Pistachios have a naturally mild, slightly buttery flavor, and that’s what makes this dessert so special.
The sweetness isn’t overpowering.
Instead, it works with the pistachios, not against them. You get a gentle nutty taste in every bite, which keeps the cheesecake feeling light rather than too rich.
Great for Special Occasions or Everyday Indulgence
This is one of those desserts that feels fancy but doesn’t require complicated skills. It’s perfect for celebrations, holidays, or when you want to impress guests.
At the same time, it’s simple enough to make just because you’re craving something homemade and comforting.
Can Be Made Ahead of Time
Cheesecake actually gets better after a few hours in the fridge. That means you can make it the day before and not feel rushed.
You’ll have one less thing to worry about, and the texture will be even more set and creamy when you serve it.
Beginner-Friendly with Clear Steps
If you’ve never made a cheesecake before, this is a great place to start. We’ll take it step by step, and nothing will feel overwhelming.
Just follow along, take your time, and don’t stress about perfection because you’ll still end up with a beautiful, delicious result.
What Does Pistachio Cheesecake Taste Like?
Pistachio cheesecake has a gentle, balanced flavor that feels rich without being heavy.
It’s mildly sweet, with a soft buttery base from the cream cheese and a light nutty taste from the pistachios that comes through in every bite.
You’ll notice it isn’t as tangy as a classic cheesecake because pistachios smooth out that sharpness and add a warm, slightly roasted flavor instead.
Compared to a traditional vanilla cheesecake, this one feels a bit more refined and less sugary, which makes it easy to enjoy more than one slice.
If you’re using real pistachios or pistachio paste, the flavor will be natural, subtle, and slightly earthy.
On the other hand, pistachio flavoring or pudding mix gives a stronger, sweeter taste and a brighter green color.
Neither is wrong; it just depends on what you prefer. If you want a more authentic, bakery-style result, real pistachios are the way to go.
Ingredients You’ll Need
For the Crust
- 200 g (about 2 cups) graham crackers or digestive biscuits, finely crushed
- 100 g (7 tablespoons) unsalted butter, melted
- 2 tablespoons sugar (optional, for a slightly sweeter base)
For the Pistachio Filling
- 500 g (2 cups) cream cheese, softened to room temperature
- 150 g (¾ cup) granulated sugar
- 3 large eggs, room temperature
- 120 ml (½ cup) sour cream or heavy cream
- 120 g (½ cup) pistachio paste or very finely ground pistachios
- 1 teaspoon vanilla extract
- ½ teaspoon almond extract (optional, enhances the nutty flavor)
Optional Toppings
- 1 cup whipped cream (for serving)
- ¼ cup crushed pistachios (for garnish)
- 50 g white chocolate, melted (for drizzling)
Tools & Equipment
- Springform pan (20–23 cm / 8–9 inch)
This makes it easy to remove the cheesecake without damaging the sides. Don’t worry if it feels a bit loose because that’s normal. Just wrap the outside with foil if you’re using a water bath. - Mixing bowls (at least 2)
You’ll need one for the crust and another for the filling. A larger bowl helps keep things neat when mixing. - Electric mixer or hand whisk
An electric mixer makes the process faster and smoother, but a hand whisk works just fine if you mix patiently. Just make sure the batter is smooth with no lumps. - Food processor (for pistachios)
This helps turn pistachios into a fine paste or powder. If you don’t have one, you can chop them very finely, but aim for a smooth texture. - Oven
A standard oven works perfectly. You’ll bake the cheesecake slowly so it stays creamy and doesn’t crack. - Baking tray (for water bath)
This holds hot water while baking, which helps the cheesecake cook gently and evenly. It’s a simple step that makes a big difference in texture.
How to Make Pistachio Cheesecake (Step-by-Step)
Step 1: Prepare the Crust
Start by crushing your biscuits into fine crumbs. You can use a food processor for a quick result, or place them in a bag and crush with a rolling pin.
You’re looking for a sand-like texture with no large pieces.
Pour in the melted butter and mix until all the crumbs are evenly coated.
The mixture should hold together when you press it between your fingers. If it feels too dry, add a little more melted butter.
Press the mixture firmly into the bottom of your springform pan. Use the back of a spoon or a flat glass to smooth and compact it.
This step helps the crust hold together when slicing. Place it in the fridge to chill while you prepare the filling.
Step 2: Make the Pistachio Filling
In a large bowl, beat the cream cheese until completely smooth. Take your time here, as this step sets the base for a creamy cheesecake. If you see lumps, keep mixing until they disappear.
Add the sugar and mix until well combined. You’ll notice the texture becomes softer and slightly glossy.
Now add the eggs, one at a time. Mix gently after each addition until just combined. Don’t rush this step, and avoid overmixing, as too much air can cause cracks later.
Stir in the pistachio paste, cream, vanilla extract, and almond extract if using. Mix until everything is smooth and evenly blended. The batter should look creamy and slightly thick.
Step 3: Assemble
Take your chilled crust out of the fridge and pour the filling over it. You’ll see how easily it spreads.
Gently smooth the top with a spatula. This helps the cheesecake bake evenly and gives you a clean, neat finish.
Step 4: Bake
Place your springform pan into a larger baking tray. Pour hot water into the tray until it reaches about halfway up the sides of the pan.
This is called a water bath, and it helps the cheesecake bake slowly and evenly.
Carefully transfer everything to the oven. Bake until the edges are set, but the center still has a slight wobble when you gently shake the pan.
Don’t worry if it looks a little soft in the middle because it will firm up as it cools.
Step 5: Cool & Chill
Once baked, turn off the oven and let the cheesecake sit inside with the door slightly open for about an hour. This slow cooling helps prevent cracks.
Remove it from the oven and let it cool completely at room temperature. Then transfer it to the fridge and chill for at least 4 hours, or overnight if you can wait.
You’ll notice the texture becomes firmer and creamier after chilling, making it much easier to slice and serve.
Tips for the Perfect Cheesecake
Use Room Temperature Ingredients
Let’s start with one of the simplest but most important steps. Make sure your cream cheese, eggs, and cream are at room temperature before you begin.
This helps everything blend smoothly without lumps. If the ingredients are too cold, the batter can turn uneven, and you’ll end up mixing longer than needed.
A quick tip: take them out of the fridge about 30–45 minutes before you start.
Don’t Overmix (Prevents Cracks)
Once your ingredients are combined, try not to overmix the batter. Mixing too much adds extra air, and that air expands in the oven, which can cause cracks on the surface.
You’ll notice the batter should look smooth and creamy, not fluffy. Mix just until everything is combined, especially after adding the eggs.
Water Bath Tips (Wrap Pan, Avoid Leaks)
A water bath helps the cheesecake bake gently and evenly, but it only works well if your pan is properly sealed.
Wrap the outside of your springform pan with a couple of layers of foil to keep water from seeping in. Make sure the foil goes up the sides, not just the bottom.
Place the pan in a larger tray, then add hot water around it. This extra step keeps the texture soft and prevents overbaking.
Slow Cooling to Prevent Sinking or Cracking
Cooling the cheesecake slowly makes a big difference. When it finishes baking, don’t rush it out of the oven. Let it sit inside with the door slightly open so the temperature drops gradually.
Sudden changes can cause the cheesecake to sink or crack. After that, let it cool fully at room temperature before chilling in the fridge.
It may take a bit of patience, but you’ll notice the texture turns out much smoother and more stable.
Variations & Substitutions
No-Bake Pistachio Cheesecake Version
If you’d rather skip the oven, you can turn this into a no-bake dessert. Instead of eggs, use whipped cream to help the filling set.
You’ll mix the cream cheese, sugar, and pistachio paste as usual, then gently fold in whipped cream until smooth and airy. Pour it over the crust and chill for several hours until firm.
You’ll notice the texture is lighter and mousse-like, but still creamy and full of flavor.
Gluten-Free Crust Option
Making this cheesecake gluten-free is simple. Just swap the regular biscuits for gluten-free cookies or crackers. Everything else stays the same.
Press the crust firmly so it holds together well, since gluten-free crumbs can be a bit more delicate.
Using Pistachio Pudding Mix vs Real Pistachios
You can use pistachio pudding mix if that’s what you have on hand. It gives a brighter green color and a stronger, sweeter pistachio flavor.
If you prefer a more natural taste, stick with real pistachios or pistachio paste.
The flavor will be softer, slightly earthy, and less sweet. Both options work, so it really comes down to what you enjoy and what’s available in your kitchen.
Mini Pistachio Cheesecakes
If you’d like smaller portions, you can make mini cheesecakes using a muffin tin. Line each cup with a paper liner, press in the crust, and fill with the batter.
They bake faster, so keep an eye on them. You’ll notice they’re done when the centers are just set.
These are great for serving at parties or when you want easy, individual portions without slicing.
How to Store Pistachio Cheesecake
Once your cheesecake has fully set, storing it properly will keep it fresh and creamy for days.
You can cover it tightly with plastic wrap or place it in an airtight container and keep it in the fridge for up to 4–5 days.
You’ll notice the flavor actually deepens a bit after the first day, which makes leftovers just as enjoyable. If you want to store it for longer, freezing works really well.
Slice the cheesecake first, then wrap each piece tightly in plastic wrap and place them in a sealed container or freezer bag.
This helps prevent freezer burn and makes it easy to take out just what you need. When you’re ready to enjoy it, let a slice thaw in the fridge for a few hours or overnight.
Avoid microwaving, as it can change the texture. Don’t worry if it feels firm at first, as it will soften as it sits, and you’ll get that same smooth, creamy texture back.
Serving Suggestions
Serve chilled for the best texture
For the best experience, serve your pistachio cheesecake straight from the fridge. You’ll notice the texture is firmer, smoother, and easier to slice when it’s well chilled.
If it sits out too long, it can soften too much and lose that clean, creamy structure.
A quick tip: use a sharp knife and wipe it clean between slices for neat edges.
Pair with Coffee or Tea
This cheesecake pairs beautifully with a warm drink. A cup of coffee balances the sweetness and brings out the nutty pistachio flavor, while tea offers a lighter, more delicate match.
Choose what you enjoy most because there’s no wrong option here. It’s a simple way to turn your dessert into a more complete, relaxing treat.
Add Toppings Just Before Serving
If you’re using toppings like whipped cream, crushed pistachios, or a white chocolate drizzle, add them right before serving.
This keeps everything fresh and prevents the toppings from softening or sinking into the cheesecake.
You can keep it simple or dress it up depending on the occasion. Either way, those final touches make each slice feel a little more special.
Final Thoughts
This pistachio cheesecake is simple to make, full of flavor, and has that smooth, creamy texture you’ll love from the first bite.
It’s a great recipe to keep on hand, whether you’re baking for a special moment or just because you feel like it.
Feel free to make it your own. Try different toppings or adjust the flavor to suit your taste.
FAQs
Yes, you can. It gives a stronger, sweeter flavor and brighter color, but the taste will be less natural than real pistachios.
Cracks usually happen from overmixing, baking at too high a temperature, or cooling too quickly. It will still taste great, and you can always cover it with toppings.
Yes, but the texture may be slightly less creamy and more prone to cracks. If you skip it, bake at a lower temperature and keep an eye on it.
The edges should be set, and the center should still have a slight jiggle when you gently shake the pan. It will firm up as it cools.
Absolutely. In fact, it’s better when made a day ahead since chilling helps the texture set and improves the flavor.
Creamy Pistachio Cheesecake Recipe You’ll Want to Make Again
Difficulty: Easy10
Slices20
minutes50
minutes6
hoursA smooth, creamy pistachio cheesecake with a rich nutty flavor and buttery crust—simple steps with a bakery-style result.
Ingredients
- Crust:
200 g graham crackers or digestive biscuits, crushed
100 g butter, melted
2 tbsp sugar (optional)
- Filling:
500 g cream cheese, softened
150 g sugar
3 eggs
120 ml sour cream or heavy cream
120 g pistachio paste or ground pistachios
1 tsp vanilla extract
½ tsp almond extract (optional)
Directions
- Preheat oven to 160°C (320°F). Mix crushed biscuits with melted butter and press into a lined springform pan. Chill.
- Beat cream cheese until smooth, then mix in sugar.
- Add eggs one at a time, mixing gently. Stir in cream, pistachio paste, and flavorings.
- Pour filling over the crust and smooth the top.
- Place the pan in a water bath and bake for 50–60 minutes, until edges are set and the center slightly jiggles.
- Cool slowly, then refrigerate for at least 4 hours or overnight before serving.
Notes
- Use room temperature ingredients for a smooth batter.
- Don’t overmix to avoid cracks.
- Chill overnight for the best texture and flavor.

Hi, I’m Sorenna Blythe, the baker and writer behind Mix Whisk Bake. I share simple, reliable recipes and honest kitchen moments to help home bakers bake with confidence and joy. When I’m not testing new treats, you’ll find me sipping coffee and dreaming up my next bake.


