Some days, you just want dessert without spending hours in the kitchen.
That’s where these quick and easy recipes come in.
They’re perfect for busy afternoons, beginner bakers, or those last-minute sweet cravings that need a fast fix.
Each dessert uses only a few simple ingredients and takes very little effort to make.
No fancy tools, complicated steps, or hard-to-find ingredients here—just easy homemade treats that anyone can make with confidence.

1. 3-Ingredient Peanut Butter Cookies
There’s something so satisfying about a dessert that comes together in minutes and still tastes homemade.
These peanut butter cookies are soft, chewy, and packed with rich peanut butter flavor.
Even better, you only need three simple ingredients that are probably already in your kitchen.
This is one of the easiest cookie recipes for beginners because there’s no flour, no mixer, and almost no cleanup. Just mix, shape, and bake.
The cookies turn out slightly crisp around the edges with a soft center that melts in your mouth.
Ingredients
- 1 cup peanut butter
- 1 cup granulated sugar
- 1 large egg
Optional Add-Ins
These extra ingredients are completely optional, but they add even more flavor and texture:
- 1/2 teaspoon vanilla extract for a warmer flavor
- 1/4 cup chocolate chips for extra sweetness
- A small pinch of sea salt on top before baking
- Crushed peanuts for a little crunch
How to Make 3-Ingredient Peanut Butter Cookies
Step 1: Prepare the Oven and Baking Sheet
Preheat your oven to 350°F (175°C). Line a baking sheet with parchment paper to keep the cookies from sticking and to make cleanup easier.
If you don’t have parchment paper, lightly grease the pan instead.
Step 2: Mix the Dough
In a medium bowl, combine the peanut butter, sugar, and egg. Stir everything together until the mixture becomes smooth and thick.
If you’re adding vanilla extract or chocolate chips, mix them in now.
The dough will look soft, but should still hold its shape when scooped.
Step 3: Roll the Cookies
Scoop about 1 tablespoon of dough and roll it into small balls by hand. Place them on the baking sheet with a little space between each cookie.
These cookies do not spread very much, so you can gently flatten them yourself.
Step 4: Create the Classic Fork Pattern
Use a fork to press down on each cookie in one direction gently, then press again the opposite way to create a crisscross pattern.
This step helps the cookies bake evenly and gives them that classic peanut butter cookie look.
Step 5: Bake Until Lightly Golden
Bake for 8–10 minutes, or until the edges look lightly golden.
The cookies may still seem soft when you remove them from the oven. That’s completely normal. Let them cool on the baking sheet for about 5 minutes so they can firm up properly.
Helpful Tips for the Best Peanut Butter Cookies
- Creamy peanut butter gives the softest texture. Natural peanut butter can work too, but the cookies may be a little more crumbly.
- Don’t overbake the cookies. They continue setting as they cool.
- If the dough feels sticky, chill it in the refrigerator for 10–15 minutes before rolling.
- Add a few chocolate chips on top before baking to make them look extra inviting.
Why You’ll Love This Recipe
- Only 3 basic ingredients
- Ready in under 20 minutes
- Flourless and beginner-friendly
- Soft, chewy texture with rich peanut butter flavor
- Easy to customize with simple add-ins
These cookies are perfect for quick dessert cravings, after-school snacks, or those moments when you want something homemade without a lot of work.
Even first-time bakers can make these successfully, so don’t stress about making them perfect. They’re simple, forgiving, and always delicious.
2. Easy Chocolate Mug Cake
When you want dessert fast, it’s hard to beat a warm chocolate mug cake.
This single-serve treat comes together in just a few minutes and cooks right in the microwave. No oven, no waiting, and barely any cleanup.
The texture is soft and rich, almost like a warm brownie cake.
It’s perfect for late-night cravings, quick desserts after dinner, or those moments when you want something homemade without baking a full cake.
Ingredients
- 4 tablespoons all-purpose flour
- 2 tablespoons cocoa powder
- 2 tablespoons granulated sugar
- 3 tablespoons milk
- 2 tablespoons vegetable oil
- 1/4 teaspoon baking powder
- Small pinch of salt
- 1/4 teaspoon vanilla extract (optional)
Optional Toppings
- Whipped cream
- Chocolate chips
- Vanilla ice cream
- Chocolate syrup
- Crushed cookies
- Fresh berries
How to Make an Easy Chocolate Mug Cake
Step 1: Choose the Right Mug
Use a microwave-safe mug that holds at least 12 ounces. A larger mug gives the cake room to rise while cooking and helps prevent spills.
Step 2: Mix the Dry Ingredients
Add the flour, cocoa powder, sugar, baking powder, and salt directly into the mug. Stir well with a fork until everything looks evenly combined.
Mixing the dry ingredients first helps prevent cocoa powder lumps.
Step 3: Add the Wet Ingredients
Pour in the milk, oil, and vanilla extract. Stir until a smooth batter forms.
Make sure to scrape the bottom of the mug so no dry flour is left behind.
If you want extra chocolate flavor, stir in a tablespoon of chocolate chips now.
Step 4: Microwave the Cake
Microwave on high for 60–90 seconds.
Cooking times can vary depending on your microwave, so start checking around the 60-second mark. The cake should look set on top but still soft in the center.
Step 5: Let It Cool Slightly and Serve
Carefully remove the mug because it will be hot. Let the cake cool for 1–2 minutes before eating.
Top with whipped cream, ice cream, or extra chocolate chips while the cake is still warm.
Helpful Tips for the Best Mug Cake
- Don’t overcook the cake, or it can turn rubbery. Slightly undercooked is better than dry.
- Stir the batter thoroughly for a smooth texture.
- Add a spoonful of peanut butter or Nutella in the center before microwaving for a gooey surprise.
- Eat the cake warm for the best flavor and texture.
Why You’ll Love This Recipe
- Ready in minutes
- Perfect single-serving dessert
- Minimal cleanup
- Soft, rich chocolate flavor
- Great for beginner bakers
This recipe is a lifesaver when you want dessert fast without turning on the oven.
It’s simple, comforting, and incredibly easy to customize with your favorite toppings.
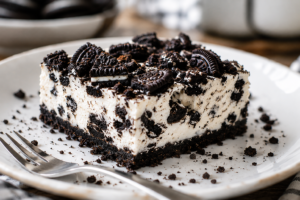
3. No-Bake Oreo Truffles
These Oreo truffles taste like something you’d buy from a bakery, but they’re surprisingly easy to make at home.
They’re creamy on the inside, coated in chocolate on the outside, and packed with cookies-and-cream flavor in every bite.
Since there’s no baking involved, this recipe is great for beginners or for days when you don’t feel like using the oven.
The hardest part is waiting for them to chill.
Ingredients
- 36 Oreo cookies
- 8 ounces cream cheese, softened
- 2 cups melted chocolate or chocolate chips
Optional Decorations
- Crushed Oreo crumbs
- Sprinkles
- White chocolate drizzle
- Mini chocolate chips
- Crushed nuts
How to Make No-Bake Oreo Truffles
Step 1: Crush the Oreos
Place the Oreo cookies into a food processor and blend until fine crumbs form.
If you don’t have a food processor, place the cookies in a sealed bag and crush them with a rolling pin.
Step 2: Mix with Cream Cheese
Add the softened cream cheese to the Oreo crumbs and mix until fully combined.
The mixture should look thick, smooth, and easy to shape.
Step 3: Roll into Balls
Scoop out small portions and roll into bite-sized balls using your hands.
Place the truffles onto a parchment-lined tray or plate.
If the mixture becomes sticky, chill it for 10 minutes before rolling.
Step 4: Chill Before Dipping
Refrigerate the truffles for about 20–30 minutes. This helps them firm up and makes dipping easier.
Step 5: Dip in Melted Chocolate
Melt the chocolate in the microwave using short 20-second intervals, stirring between each one.
Dip each truffle into the melted chocolate using a fork or spoon. Let the excess chocolate drip off before placing them back onto the tray.
Step 6: Decorate and Chill Again
Add sprinkles, Oreo crumbs, or white chocolate drizzle before the coating hardens.
Refrigerate until the chocolate is fully set.
Helpful Tips for Oreo Truffles
- Softened cream cheese mixes much more easily.
- Use a fork when dipping to keep the truffles neat.
- Chill the truffles well so they don’t fall apart in the chocolate.
- Store leftovers in the refrigerator for the best texture.
Why You’ll Love This Recipe
- No oven needed
- Only a few ingredients
- Rich cookies-and-cream flavor
- Great for parties and gifting
- Easy to decorate for holidays
These little treats look impressive but are incredibly beginner-friendly.
Once you make them once, you’ll want to experiment with different cookie flavors and toppings.
4. Banana Ice Cream
Banana ice cream is one of the easiest healthy desserts you can make at home.
The magic happens when frozen bananas are blended until smooth and creamy.
The texture becomes surprisingly similar to soft-serve ice cream without needing dairy or extra sugar.
It’s naturally sweet, refreshing, and perfect for warm days or quick snack cravings.
This recipe is especially helpful when you have ripe bananas sitting on the counter that need to be used up.
Ingredients
- 3 ripe bananas, sliced and frozen
Optional Flavor Ideas
- 1 tablespoon peanut butter
- 1 tablespoon cocoa powder
- 1 teaspoon honey
- 1/2 teaspoon cinnamon
- Vanilla extract
- Chocolate chips
- Crushed nuts
How to Make Banana Ice Cream
Step 1: Freeze the Bananas
Slice ripe bananas into small coins and place them in a freezer-safe container or bag.
Freeze for at least 3–4 hours, or until fully solid.
Very ripe bananas work best because they’re naturally sweeter.
Step 2: Blend Until Creamy
Add the frozen banana slices to a food processor or blender.
Blend slowly at first. The bananas will look crumbly, then thick, and finally smooth and creamy after a few minutes.
Be patient during this step. It always comes together.
Step 3: Add Extra Flavors
Once creamy, mix in cocoa powder, peanut butter, cinnamon, or other flavor add-ins if desired.
Blend briefly again until everything is combined.
Step 4: Serve or Freeze
Serve immediately for a soft-serve texture.
If you prefer firmer ice cream, freeze it for another 1–2 hours before scooping.
Helpful Tips for Banana Ice Cream
- Use ripe bananas with brown spots for the sweetest flavor.
- Slice bananas before freezing so blending is easier.
- A food processor usually creates the smoothest texture.
- Add a splash of milk if the mixture struggles to blend.
Why People Love Banana Ice Cream
- Naturally sweet without much added sugar
- Dairy-free option
- Great way to use ripe bananas
- Easy healthier dessert alternative
- Simple to customize with different flavors
This recipe proves that simple ingredients can still create something creamy, satisfying, and delicious.
It’s an easy dessert that feels fun to make and even better to eat.
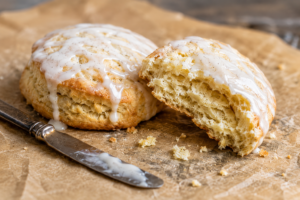
5. Lemon Bars with Cake Mix
These lemon bars are bright, soft, and full of fresh citrus flavor without requiring a complicated homemade crust.
Using cake mix keeps the recipe simple and beginner-friendly while still giving you a dessert that tastes homemade.
The buttery crust pairs perfectly with the smooth lemon filling.
They’re sweet, slightly tangy, and perfect for spring gatherings, afternoon snacks, or easy weekend baking.
Ingredients
For the Crust
- 1 box yellow cake mix
- 1/2 cup unsalted butter, melted
- 1 large egg
For the Filling
- 1 cup lemon curd or lemon pie filling
Optional Additions
- Powdered sugar for dusting
- Fresh lemon zest for extra flavor
- Whipped cream for serving
How to Make Lemon Bars with Cake Mix
Step 1: Prepare the Baking Dish
Preheat your oven to 350°F (175°C).
Lightly grease an 8×8-inch baking dish or line it with parchment paper for easier cleanup.
Step 2: Make the Crust
In a medium bowl, mix the cake mix, melted butter, and egg until a soft dough forms.
Press most of the mixture evenly into the bottom of the baking dish to create the crust. Save a small handful for the topping if desired.
Step 3: Add the Lemon Filling
Spread the lemon curd evenly over the crust.
If you saved some crust mixture, crumble small pieces over the top for extra texture.
Step 4: Bake Until Set
Bake for 22–26 minutes, or until the edges look lightly golden and the center is set.
The bars will continue to firm up as they cool.
Step 5: Cool and Slice
Let the bars cool completely before slicing. This helps them hold their shape and makes cleaner cuts.
Dust powdered sugar over the top right before serving.
Helpful Tips for Lemon Bars
- Chilling the bars before slicing gives neater squares.
- Lemon zest adds extra fresh citrus flavor without much effort.
- Don’t overbake or the bars may become dry.
- Use parchment paper if you want easy lifting and cleanup.
Why You’ll Love This Recipe
- Quick shortcut dessert
- Sweet and tangy flavor
- Minimal ingredients
- Beginner-friendly baking recipe
- Great for parties or potlucks
These lemon bars feel cheerful and homemade without requiring much work.
They’re the kind of dessert that disappears quickly once people take the first bite.
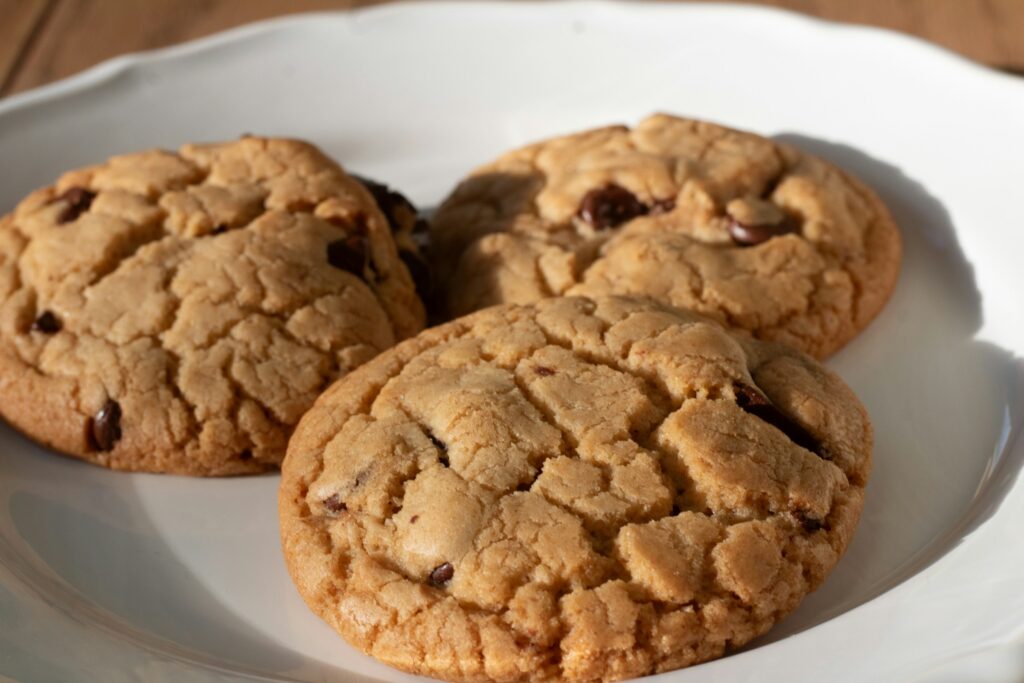
6. Chocolate-Dipped Strawberries
Chocolate-dipped strawberries are one of the easiest desserts you can make, but they always look elegant and impressive.
The combination of juicy strawberries and smooth chocolate feels special without requiring much effort.
They’re perfect for holidays, parties, date nights, or simple afternoon treats.
Best of all, you only need two main ingredients.
Ingredients
- 1 pound fresh strawberries
- 2 cups chocolate chips or melted chocolate
Optional Toppings
- Crushed nuts
- Coconut flakes
- White chocolate drizzle
- Sprinkles
- Crushed cookies
How to Make Chocolate-Dipped Strawberries
Step 1: Wash and Dry the Strawberries
Rinse the strawberries gently under cold water.
Dry them completely with paper towels. This step is important because water can prevent the chocolate from sticking properly.
Leave the stems attached for easier dipping.
Step 2: Melt the Chocolate
Place the chocolate chips in a microwave-safe bowl.
Microwave in 20-second intervals, stirring each time until smooth and glossy.
Be careful not to overheat the chocolate.
Step 3: Dip the Strawberries
Hold each strawberry by the stem and dip it into the melted chocolate.
Twist slightly as you lift it out to let excess chocolate drip away.
Place the dipped strawberries onto parchment paper.
Step 4: Add Toppings
Before the chocolate hardens, sprinkle on crushed nuts, coconut flakes, or other toppings.
For a decorative drizzle, melt white chocolate separately and lightly drizzle it over the strawberries.
Step 5: Let Them Set
Allow the strawberries to sit at room temperature or refrigerate them briefly until the chocolate firms up.
Helpful Tips for the Best Chocolate-Dipped Strawberries
- Dry strawberries fully so the chocolate sticks smoothly.
- Use good-quality chocolate for better flavor and texture.
- Refrigerate briefly if your kitchen is warm.
- Eat within 1–2 days for the freshest taste.
Serving Ideas
- Arrange them on dessert trays for parties
- Serve with champagne or coffee
- Pack them in small gift boxes
- Add them beside the ice cream or cake slices
Why You’ll Love This Recipe
- Only 2 main ingredients
- No baking required
- Beautiful presentation with very little work
- Easy to customize with toppings
- Perfect for beginners
These strawberries prove that simple desserts can still feel fancy.
They come together quickly but always make people smile.
7. Cinnamon Sugar Tortilla Chips
These cinnamon sugar tortilla chips are crispy, buttery, and incredibly easy to make.
They taste similar to churro chips and pair perfectly with fruit salsa, chocolate sauce, or sweet cream cheese dips.
This recipe is great when you need a fast dessert snack using ingredients already in your kitchen.
Ingredients
- 4 flour tortillas
- 3 tablespoons melted butter
- 1/4 cup granulated sugar
- 1 teaspoon ground cinnamon
Optional Dips
- Chocolate sauce
- Fruit salsa
- Cream cheese dip
- Caramel sauce
- Vanilla yogurt
How to Make Cinnamon Sugar Tortilla Chips
Step 1: Prepare the Tortillas
Preheat your oven to 375°F (190°C).
Stack the tortillas and slice them into triangles using a knife or pizza cutter.
Step 2: Add Butter and Cinnamon Sugar
Brush both sides of the tortilla triangles lightly with melted butter.
In a small bowl, mix the sugar and cinnamon together. Sprinkle the mixture generously over the tortillas.
Step 3: Bake Until Crispy
Arrange the tortilla pieces in a single layer on a baking sheet.
Bake for 8–10 minutes, flipping halfway through if needed, until crisp and lightly golden.
You can also cook them in the air fryer for extra crunch.
Step 4: Cool Slightly and Serve
Let the chips cool for a few minutes. They become crispier as they cool.
Serve with your favorite sweet dip.
Helpful Tips for Cinnamon Sugar Tortilla Chips
- Don’t overcrowd the baking tray, or the chips may turn soft instead of crispy.
- Watch closely near the end because they brown quickly.
- Add a tiny pinch of salt to balance the sweetness.
- Store leftovers in an airtight container to keep them crunchy.
Why You’ll Love This Recipe
- Quick and budget-friendly
- Perfect crunchy snack dessert
- Uses simple pantry ingredients
- Easy to customize with dips
- Kid-friendly recipe
These chips are fun to make and even more fun to snack on.
They’re great for movie nights, parties, or quick sweet cravings.
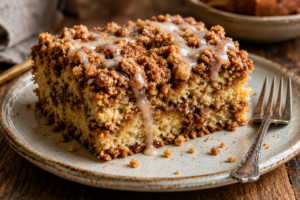
8. Mini Cheesecake Cups
These mini cheesecake cups are creamy, light, and incredibly easy to put together.
Since they’re no-bake, you don’t have to worry about water baths, cracking, or complicated baking steps.
They look beautiful served in small cups or jars and can easily be customized with different toppings.
Ingredients
- 8 ounces cream cheese, softened
- 1 cup whipped topping
- 1/4 cup granulated sugar
- 1 cup graham cracker crumbs
- 2 tablespoons melted butter
Optional Toppings
- Berry sauce
- Caramel drizzle
- Crushed cookies
- Chocolate chips
- Fresh fruit
How to Make Mini Cheesecake Cups
Step 1: Prepare the Crust
In a small bowl, combine the graham cracker crumbs and melted butter.
Spoon a layer into the bottom of small serving cups and press down gently.
Step 2: Make the Cheesecake Filling
In a medium bowl, beat the softened cream cheese and sugar until smooth.
Fold in the whipped topping gently until creamy and fluffy.
Step 3: Assemble the Cups
Spoon or pipe the cheesecake filling over the graham cracker crust layer.
Smooth the tops with a spoon if needed.
Step 4: Add Toppings
Top with berry sauce, caramel drizzle, crushed cookies, or fresh fruit.
You can mix and match toppings to create different flavors.
Step 5: Chill Before Serving
Refrigerate the cheesecake cups for at least 1 hour before serving.
This helps the filling firm up and improves the texture.
Helpful Tips for Mini Cheesecake Cups
- Softened cream cheese blends much more smoothly.
- Pipe the filling into cups for a cleaner look.
- Small mason jars make cute serving containers.
- Chill longer if you want a firmer cheesecake texture.
Why You’ll Love This Recipe
- No baking required
- Easy make-ahead dessert
- Creamy and customizable
- Perfect individual portions
- Beginner-friendly recipe
These cheesecake cups feel special without requiring much effort.
They’re simple enough for everyday desserts but pretty enough for celebrations too.
Tips for Making Quick Desserts Even Easier
Keep Pantry Staples Ready
Having a few dessert basics at home makes last-minute baking much less stressful.
- Cake mix — A quick shortcut for bars, cookies, and easy cakes without measuring multiple dry ingredients.
- Chocolate chips — Perfect for melting, mixing into batter, or sprinkling on top of desserts.
- Peanut butter — Adds rich flavor and works well in cookies, no-bake treats, and mug cakes.
- Oreos — Great for quick truffles, pie crusts, or easy dessert toppings.
Use Time-Saving Shortcuts
Simple shortcuts can help you make homemade desserts faster without sacrificing flavor.
- Store-bought crusts — Save prep time for cheesecakes, pies, and dessert bars.
- Microwave methods — Mug cakes and melted chocolate come together in just minutes.
- No-bake techniques — Perfect for warm days or when you don’t want to turn on the oven.
Make Desserts Kid-Friendly
Easy desserts can become a fun kitchen activity for the whole family.
- Let kids decorate toppings — Sprinkles, chocolate drizzle, and fruit make desserts more exciting.
- Use simple measuring steps — Easy recipes help kids feel confident and involved while baking.
Final Thoughts
Simple desserts don’t have to be boring or complicated to taste amazing.
With just a few ingredients and a little time, you can make sweet homemade treats that feel special without the stress.
Don’t be afraid to mix things up and add your favorite toppings, flavors, or extra ingredients along the way.
A small change can make each dessert feel completely new.
Most importantly, have fun with it and enjoy every bite.
FAQs
What desserts can I make with only a few ingredients?
Cookies, mug cakes, truffles, frozen desserts, and dessert bars are all simple options that use minimal ingredients.
Are quick desserts beginner-friendly?
Yes. Most quick desserts only require basic mixing, simple steps, and very little baking experience.
Can I make these desserts ahead of time?
Absolutely. Many no-bake desserts can be made in advance and stored in the refrigerator until ready to serve.
What are good pantry staples for easy desserts?
Peanut butter, chocolate chips, cake mix, cocoa powder, sugar, cream cheese, and Oreos are great ingredients to keep on hand for quick desserts.

Hi, I’m Sorenna Blythe, the baker and writer behind Mix Whisk Bake. I share simple, reliable recipes and honest kitchen moments to help home bakers bake with confidence and joy. When I’m not testing new treats, you’ll find me sipping coffee and dreaming up my next bake.