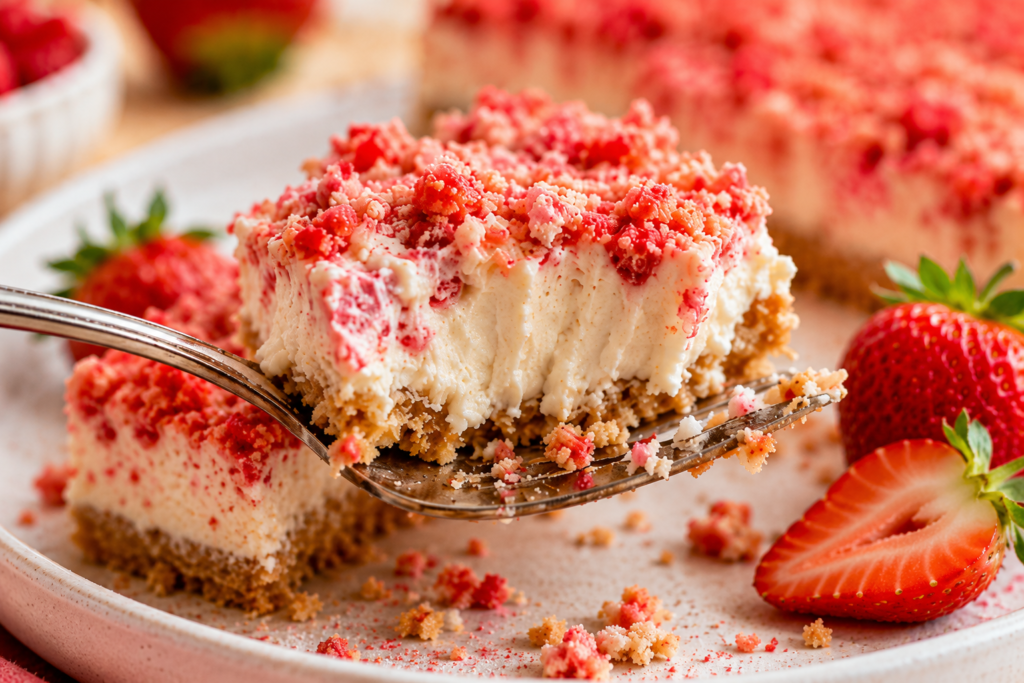
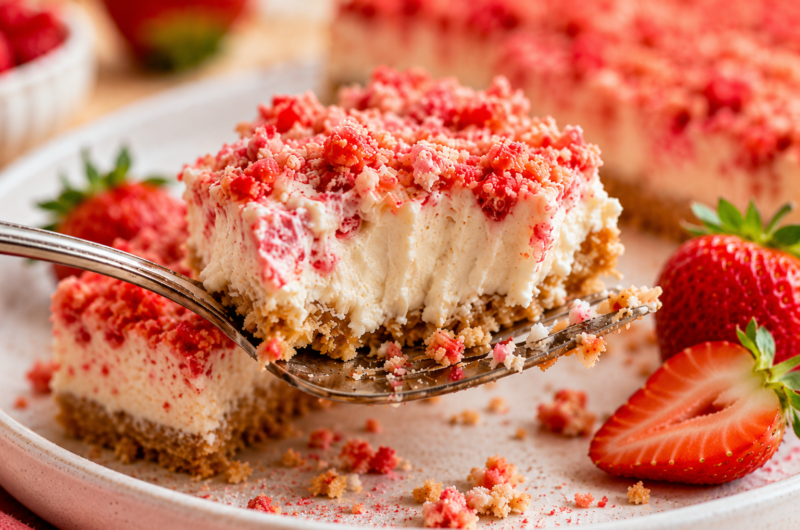
If you love creamy cheesecake and crunchy strawberry treats, these easy strawberry crunch cheesecake bars are about to become your new favorite dessert.
They have a rich cheesecake filling, a buttery cookie crust, and a sweet strawberry crunch topping that tastes just like those classic strawberry shortcake ice cream bars.
The best part? This is an easy cheesecake recipe that anyone can make. You don’t need fancy baking skills or complicated ingredients.
These strawberry cheesecake bars are simple, fun, and perfect for birthdays, summer parties, family gatherings, or a cozy weekend bake at home.
Every bite is creamy, fruity, and packed with crunch, making this the ultimate crunchy strawberry dessert for strawberry lovers.
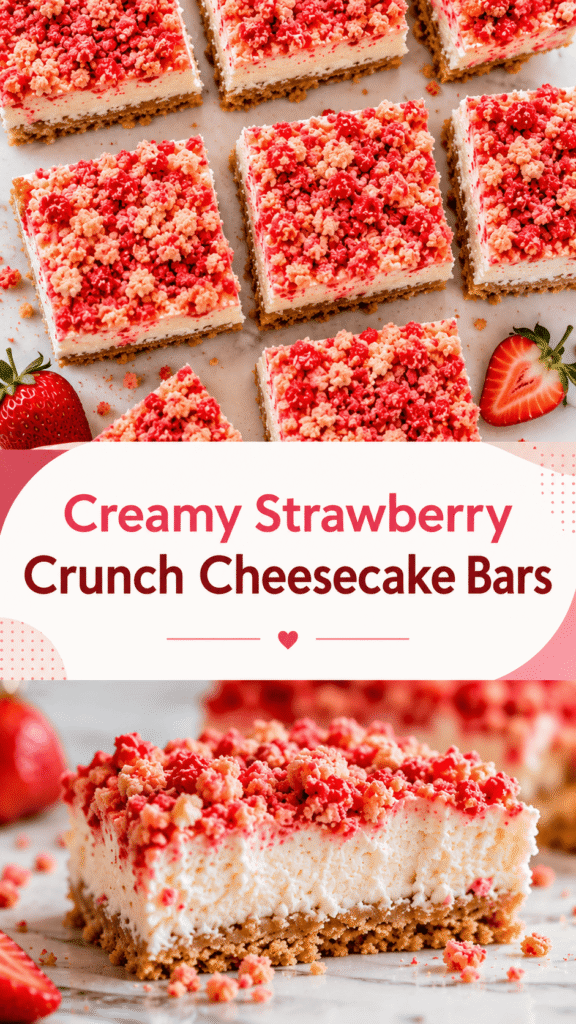
Why You’ll Love This Recipe
Easy to Make
These strawberry crunch cheesecake bars are perfect if you want a homemade dessert without spending hours in the kitchen.
The steps are simple, easy to follow, and beginner-friendly, so you don’t need a lot of baking experience to make them turn out beautifully.
The ingredient list is also refreshingly simple.
Most of the ingredients are easy to find at any grocery store, and you may already have some of them at home.
Using crushed cookies for the crust and topping keeps prep quick while adding plenty of flavor and texture.
You also don’t need any fancy tools.
A mixing bowl, a baking pan, and a hand mixer are enough to get the job done.
If this is your first cheesecake recipe, don’t worry.
These bars are much easier than making a full cheesecake, and the bar format makes slicing and serving simple too.
Creamy and Crunchy
One of the best things about this dessert is the texture in every bite.
The cheesecake layer is smooth, creamy, and rich without feeling too heavy.
It has just the right balance of sweet strawberry flavor and classic cheesecake taste.
Then comes the crunchy topping.
The mix of crushed cookies and strawberries adds a crispy finish that makes these bars extra special.
That creamy-and-crunchy combination is what keeps everyone reaching for another piece.
If you grew up loving strawberry shortcake ice cream bars, this recipe brings back that same fun flavor in a homemade dessert form.
Perfect for Any Occasion
These cheesecake bars fit almost any event or celebration.
They look pretty on a dessert table, travel well for gatherings, and can easily be sliced into smaller servings for sharing.
They’re especially great for:
- Summer parties and cookouts
- Potlucks and family gatherings
- Valentine’s Day desserts
- Birthday parties
- Weekend baking projects
The bright strawberry topping also makes them feel cheerful and fun, which is always a bonus when serving dessert to guests.
Make-Ahead Friendly
This recipe is even better after chilling in the fridge for a few hours.
The cheesecake becomes firmer, the flavors blend together beautifully, and the bars slice much more cleanly.
That makes these bars a great make-ahead dessert for busy days or special occasions.
You can prepare them the night before and simply serve when ready.
It’s one less thing to worry about when hosting or planning a celebration.
A little patience during chill time really pays off here.
The texture gets creamier, the topping settles perfectly, and every bite tastes even better the next day.
Ingredients You’ll Need
For the Crust
- 24 Golden Oreos or vanilla sandwich cookies, crushed
- 5 tablespoons unsalted butter, melted
For the Cheesecake Filling
- 16 ounces (2 blocks) cream cheese, softened
- 3/4 cup granulated sugar
- 2 large eggs
- 1 teaspoon vanilla extract
- 1/4 cup sour cream or heavy cream
- 1/4 cup strawberry jam or strawberry puree (optional, for extra strawberry flavor)
For the Strawberry Crunch Topping
- 12 Golden Oreos, crushed
- 1 cup freeze-dried strawberries, crushed
- 3 tablespoons unsalted butter, melted
Kitchen Tools Needed
You don’t need a lot of fancy equipment to make these easy strawberry crunch cheesecake bars.
A few basic kitchen tools will help everything come together smoothly and make the baking process much easier.
- 8×8 baking pan – Perfect for creating thick, creamy cheesecake bars with clean slices.
- Mixing bowls – You’ll need a few bowls for the crust, cheesecake filling, and strawberry crunch topping.
- Hand mixer or stand mixer – Helps create a smooth and creamy cheesecake filling without lumps.
- Food processor – Makes crushing the cookies and freeze-dried strawberries quick and easy. If you don’t have one, you can place everything in a zip-top bag and crush it with a rolling pin.
- Spatula – Great for scraping the bowl and spreading the cheesecake filling evenly.
- Parchment paper – Makes lifting the bars out of the pan much easier and helps prevent sticking.
A small tip before you start: lining the pan with parchment paper and leaving extra paper hanging over the sides creates easy “handles” for lifting the cheesecake bars out neatly after chilling.
Step-by-Step Instructions
Step 1: Prepare the Crust
Start by preheating your oven to 325°F (163°C).
Line your 8×8 baking pan with parchment paper, leaving a little extra hanging over the sides so the bars are easier to lift out later.
Add the Golden Oreos or vanilla sandwich cookies to a food processor and pulse until you have fine crumbs.
If you do not have a food processor, place the cookies in a sealed zip-top bag and crush them with a rolling pin.
Pour the cookie crumbs into a mixing bowl and stir in the melted butter until the texture looks like wet sand.
Every crumb should be lightly coated so the crust holds together properly after baking.
Transfer the mixture to the prepared pan and press it down firmly into an even layer.
Using the bottom of a measuring cup or glass helps create a smooth, compact crust.
Bake the crust for about 8 minutes, then let it cool slightly while you prepare the filling.
This quick bake helps the crust stay crisp under the creamy cheesecake layer.
Step 2: Make the Cheesecake Filling
In a large mixing bowl, beat the softened cream cheese and sugar together until smooth and creamy.
This step is important because it removes lumps and creates that rich cheesecake texture everyone loves.
Add the eggs one at a time, mixing gently after each addition. Then stir in the vanilla extract and sour cream or heavy cream.
If you want extra strawberry flavor, mix in the strawberry jam or puree at this stage.
Keep mixing just until everything is combined and silky smooth.
Try not to overmix the batter because too much air can cause cracks while baking.
The filling should look creamy, thick, and easy to spread.
Step 3: Bake the Cheesecake Bars
Pour the cheesecake filling over the cooled crust and spread it evenly with a spatula.
Place the pan in the oven and bake for 30–35 minutes. The edges should look set, while the center still has a slight jiggle when gently shaken.
That little movement is exactly what you want. The cheesecake will continue to firm up as it cools.
Avoid overbaking, especially if this is your first time making cheesecake bars.
Overbaked cheesecake can become dry instead of creamy.
Once baked, remove the pan from the oven and let the bars cool at room temperature for about 30 minutes.
Step 4: Make the Strawberry Crunch Topping
While the cheesecake cools, prepare the crunchy topping.
Crush the Golden Oreos and freeze-dried strawberries together until crumbly.
You can leave some slightly larger pieces for extra crunch and texture.
Place the crumbs in a bowl and stir in the melted butter until evenly coated.
The mixture should feel light and crumbly, not overly wet.
Sprinkle the strawberry crunch topping evenly over the cooled cheesecake layer.
Gently press down with your hands or the back of a spoon so the topping sticks without flattening the texture.
This topping adds the signature sweet crunch that makes these cheesecake bars so fun to eat.
Step 5: Chill and Slice
Let the cheesecake bars cool completely before transferring them to the refrigerator.
Chill for at least 4 hours, though overnight is even better if you have the time.
The chilling step helps the cheesecake fully set and makes slicing much cleaner and easier.
It also gives the flavors time to blend together beautifully.
Once chilled, lift the bars out of the pan using the parchment paper handles.
Use a sharp knife to cut into squares or rectangles. For extra neat slices, wipe the knife clean between cuts.
Now they’re ready to serve and enjoy.
Every bite is creamy, crunchy, sweet, and packed with strawberry flavor.
Tips for the Best Cheesecake Bars
Use Room Temperature Ingredients
One of the easiest ways to get a smooth and creamy cheesecake filling is to let your ingredients come to room temperature before mixing.
Cold cream cheese can stay lumpy no matter how long you beat it, which can affect the final texture of the bars.
Set the cream cheese, eggs, and sour cream out on the counter about 30–45 minutes before starting.
This small step makes mixing much easier and helps everything blend together evenly.
If you forget to take the cream cheese out early, cut it into small cubes to help it soften faster.
Don’t Overmix
It can be tempting to keep mixing until the batter looks extra fluffy, but cheesecake works a little differently.
Too much mixing adds extra air into the filling, which can lead to cracks while baking.
Once the ingredients are smooth and combined, stop mixing.
The batter should look creamy and silky, not overly whipped.
This tip is especially helpful for beginners because it keeps the cheesecake texture rich and smooth instead of dry or airy.
Chill Before Slicing
Patience really makes a difference with cheesecake bars.
Even if they look set after baking, they still need time to chill and fully firm up in the refrigerator.
Cutting too early can make the bars messy and soft.
Chilling for at least 4 hours gives you cleaner slices, better texture, and richer flavor.
For the neatest cuts, use a sharp knife and wipe it clean after each slice.
It takes an extra minute, but the bars will look bakery-worthy.
Use Freeze-Dried Strawberries
Freeze-dried strawberries are one of the secret ingredients that make the crunchy topping so flavorful.
They add a bright strawberry taste without adding extra moisture that could make the topping soggy.
Fresh strawberries are delicious, but they release liquid over time.
Freeze-dried strawberries stay crisp and blend perfectly with the cookie crumbs for that classic strawberry crunch texture.
You can usually find them near the dried fruit or snack section at the grocery store.
Once crushed, they create a beautiful pink topping that looks just as good as it tastes.
Recipe Variations
One of the best things about these strawberry crunch cheesecake bars is how easy they are to customize.
You can keep the classic version or switch things up depending on the occasion, season, or flavors you love most.
These simple variations are fun to try and still keep that creamy cheesecake texture and crunchy strawberry topping everyone loves.
No-Bake Strawberry Crunch Cheesecake Bars
If you want an easier version for hot summer days, you can turn this recipe into a no-bake dessert.
Instead of baking the cheesecake layer, prepare the crust as directed and chill it in the refrigerator while you make the filling.
For the filling, use whipped topping or homemade whipped cream folded into the cream cheese mixture to help it set without baking.
Once assembled, refrigerate the bars for several hours until firm.
The texture will be slightly lighter and fluffier than baked cheesecake, but still creamy and delicious.
This version is perfect when you want a quick dessert without turning on the oven.
Chocolate Strawberry Crunch Bars
Chocolate and strawberries always make a great pair, and this variation adds even more dessert flavor to the bars.
You can swap the Golden Oreo crust for a chocolate cookie crust if you want a richer base.
Crushed chocolate sandwich cookies work especially well here.
For extra flavor, drizzle melted chocolate over the chilled cheesecake bars before serving.
Milk chocolate, dark chocolate, or even white chocolate all taste amazing with the strawberry crunch topping.
This version feels a little more decadent and is perfect for birthdays, Valentine’s Day, or special occasions.
Mini Cheesecake Cups
If you’re serving a crowd or want a more party-friendly dessert, try making mini cheesecake cups instead of bars.
Simply press the crust into cupcake liners or small dessert cups, then add the cheesecake filling and bake as directed.
After chilling, top each one with the strawberry crunch mixture.
Mini versions are easier to serve at parties and look extra cute on dessert tables.
They also help with portioning, which is always helpful when guests want to try a little bit of everything.
Plus, there’s something fun about having your own personal cheesecake cup.
Extra Strawberry Flavor
For even more strawberry flavor, you can add diced fresh strawberries directly into the cheesecake filling or swirl strawberry jam through the batter before baking.
A small splash of strawberry extract can also boost the fruity flavor without changing the texture.
Just use a little at a time since the flavor can become strong quickly.
If you love bold strawberry desserts, this variation gives the bars an even brighter and sweeter strawberry taste in every bite.
What to Serve with Strawberry Crunch Cheesecake Bars
- Fresh strawberries – Add a fresh, juicy flavor that pairs perfectly with the creamy cheesecake.
- Whipped cream – A light and fluffy topping that makes the bars feel even more indulgent.
- Vanilla ice cream – The cold, creamy texture goes beautifully with the crunchy strawberry topping.
- Strawberry milkshakes – A fun and extra fruity pairing for strawberry lovers.
- Hot coffee or iced coffee – The rich coffee flavor balances the sweetness of the cheesecake bars perfectly.
How to Store
These strawberry crunch cheesecake bars store really well, which makes them perfect for making ahead or enjoying throughout the week.
Keeping them properly chilled helps maintain the creamy cheesecake texture and crunchy topping.
Refrigerator
Store the cheesecake bars in an airtight container in the refrigerator for up to 5 days.
If you are stacking the bars, place a sheet of parchment paper between layers to prevent the topping from sticking.
Keeping the bars covered also helps protect them from drying out or absorbing other flavors from the fridge.
The bars actually taste even better after a few hours of chilling because the flavors have more time to blend together.
Many people love them even more the next day.
Freezer
These cheesecake bars also freeze surprisingly well.
To freeze, first let the bars chill completely in the refrigerator so they firm up properly.
Wrap each bar individually in plastic wrap, then place them in a freezer-safe container or zip-top bag.
This helps prevent freezer burn and keeps the bars tasting fresh.
You can freeze them for up to 2 months.
When ready to enjoy, transfer the bars to the refrigerator and let them thaw overnight.
The cheesecake filling stays creamy, and the bars still taste delicious after thawing.
If possible, add a little extra strawberry crunch topping right before serving for the best texture.
Common Mistakes to Avoid
- Overbaking the cheesecake – Bake just until the center has a slight jiggle to keep the bars creamy instead of dry.
- Skipping chill time – Chilling helps the cheesecake fully set and gives you cleaner, firmer slices.
- Using warm cheesecake when adding topping – Let the bars cool first so the crunchy topping stays crisp instead of softening.
- Using too much butter in the crunch topping – Too much butter can make the topping greasy and heavy instead of light and crunchy.
Final Thoughts
These easy strawberry crunch cheesecake bars are creamy, crunchy, sweet, and packed with strawberry flavor in every bite.
From the smooth cheesecake filling to the crispy strawberry topping, this dessert is simple to make but feels extra special.
FAQs
Can I use fresh strawberries instead of freeze-dried?
Yes, but the topping will be softer because fresh strawberries release moisture. Freeze-dried strawberries keep the crunch topping crisp and flavorful.
Can I make these ahead of time?
Absolutely. These cheesecake bars are best made a day ahead because the texture and flavor improve after chilling overnight.
Do cheesecake bars need to stay refrigerated?
Yes. Since they contain cream cheese, they should always be stored in the refrigerator.
Can I use store-brand cookies?
Absolutely. Store-brand vanilla sandwich cookies work just as well in both the crust and the crunchy topping.
Easy Strawberry Crunch Cheesecake Bars That Taste Delicious
Difficulty: Easy9
Bars20
minutes35
minutes55
minutesThese strawberry crunch cheesecake bars are creamy, crunchy, and packed with sweet strawberry flavor. They’re easy to make and perfect for parties, summer desserts, or weekend baking.
Ingredients
- Crust
24 Golden Oreos, crushed
5 tablespoons melted butter
- Cheesecake Filling
16 oz cream cheese, softened
3/4 cup sugar
2 eggs
1 teaspoon vanilla extract
1/4 cup sour cream
- Strawberry Crunch Topping
12 Golden Oreos, crushed
1 cup freeze-dried strawberries, crushed
3 tablespoons melted butter
Directions
- Preheat oven to 325°F (163°C) and line an 8×8 pan with parchment paper.
- Mix crushed Oreos with melted butter and press into the pan. Bake for 8 minutes.
- Beat cream cheese and sugar until smooth. Add eggs, vanilla, and sour cream. Mix until creamy.
- Pour filling over crust and bake for 30–35 minutes until the center is slightly set.
- Mix topping ingredients together and sprinkle over cooled cheesecake bars.
- Chill for at least 4 hours before slicing and serving.
Notes
- Use room temperature cream cheese for a smoother filling.
- Chill overnight for the best texture and flavor.
- Freeze-dried strawberries work best for a crunchy topping.

Hi, I’m Sorenna Blythe, the baker and writer behind Mix Whisk Bake. I share simple, reliable recipes and honest kitchen moments to help home bakers bake with confidence and joy. When I’m not testing new treats, you’ll find me sipping coffee and dreaming up my next bake.