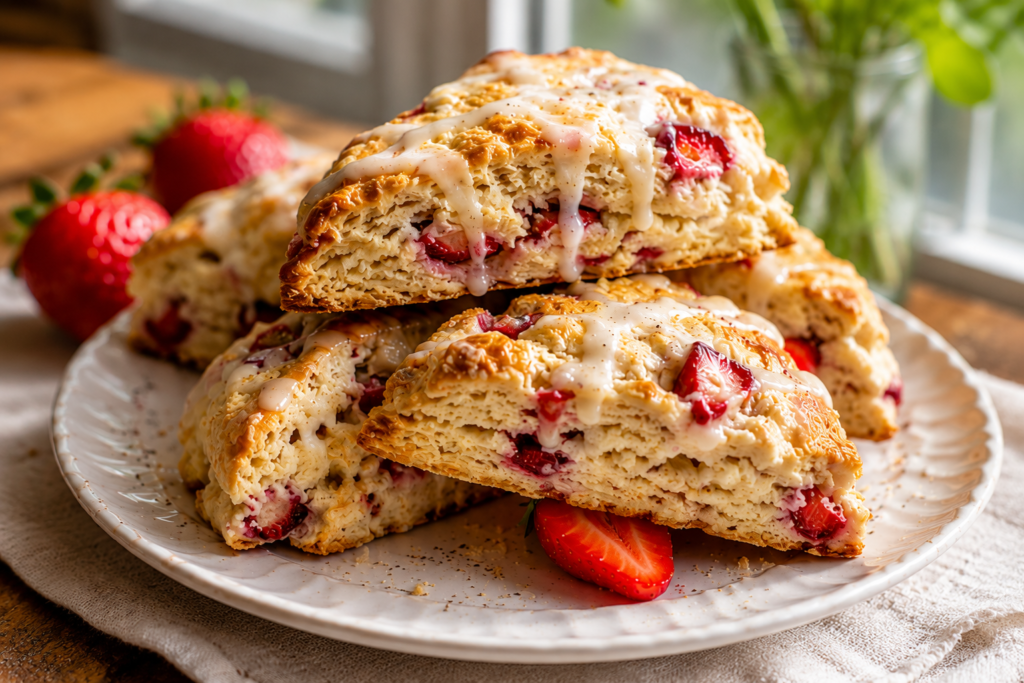
There’s something special about a warm, freshly baked scone, and these Strawberry Vanilla Bean Scones are no exception.
They’re tender, buttery, and filled with juicy strawberries in every bite, making them a simple treat that feels a little extra special.
Fresh strawberries bring bright, sweet flavor, while real vanilla bean adds a rich aroma that takes these scones to the next level.
The combination is classic, comforting, and hard to resist.
In this recipe, you’ll learn how to make flaky, bakery-style scones with easy-to-follow steps and helpful tips to ensure delicious results every time.
Why You’ll Love This Strawberry Vanilla Bean Scones Recipe
- Soft, flaky bakery-style texture – Cold butter creates tender layers that bake up light, buttery, and perfectly flaky.
- Bursting with juicy strawberry flavor – Fresh strawberries add sweet, fruity flavor and a pop of freshness in every bite.
- Rich vanilla bean aroma and taste – Real vanilla bean gives these scones a warm, bakery-quality flavor that makes them extra special.
- Easy to make with simple ingredients – This recipe uses basic pantry staples and comes together with minimal effort.
- Perfect balance of sweetness – Lightly sweet scones let the strawberry and vanilla flavors shine without being overpowering.

What Are Strawberry Vanilla Bean Scones?
Traditional scones are lightly sweet baked pastries made from a simple dough of flour, butter, and a liquid such as cream or milk, creating a tender texture that falls somewhere between a biscuit and a cake.
They have long been enjoyed as a breakfast treat, afternoon snack, or tea-time favorite because they are easy to prepare and pair well with both sweet and savory flavors.
British-style scones are typically softer, less sweet, and often served with jam and cream, while American-style scones tend to be richer, slightly sweeter, and have a more crumbly, buttery texture.
This recipe leans toward the American-style version, giving you golden edges, a tender center, and plenty of flavor in every bite.
Fresh strawberries bring natural sweetness and juicy bursts of fruit throughout the dough, making each scone taste bright and fresh rather than overly sweet.
Using real vanilla bean adds a deeper flavor than standard vanilla extract, with tiny specks of vanilla throughout the scones and a warm aroma that makes them feel bakery-worthy.
The combination of strawberries and vanilla bean works especially well because the fruity notes of the berries complement the rich, fragrant vanilla without overpowering it.
Together, they transform a classic scone into a special homemade treat that feels elegant enough for brunch guests yet simple enough to enjoy with your morning coffee or tea.
Ingredients You’ll Need
For the Scones
- 2 cups (250g) all-purpose flour – Provides the structure for soft, tender scones.
- 1/3 cup (67g) granulated sugar – Adds just the right amount of sweetness.
- 1 tablespoon baking powder – Helps the scones rise and become light and fluffy.
- 1/2 teaspoon salt – Balances the sweetness and enhances the flavors.
- 1/2 cup (113g) unsalted butter, cold and cubed – Creates flaky, buttery layers.
- 1 cup (150g) fresh strawberries, diced – Adds juicy bursts of fresh strawberry flavor.
- 1 vanilla bean, seeds scraped (or 1 tablespoon vanilla bean paste) – Provides rich vanilla flavor and beautiful vanilla specks.
- 1/2 cup (120ml) heavy cream, plus extra for brushing – Adds moisture and richness to the dough.
- 1 large egg – Helps bind the ingredients and creates a tender texture.
Optional Vanilla Glaze
- 1 cup (120g) powdered sugar – Creates a smooth, sweet glaze.
- 2–3 tablespoons milk or heavy cream – Thins the glaze to the perfect drizzling consistency.
- 1 teaspoon vanilla bean paste (or 1/2 teaspoon pure vanilla extract) – Adds extra vanilla flavor and aroma.
Ingredient Notes and Substitutions
Choosing the Best Strawberries
Fresh strawberries are the best choice for this recipe because they hold their shape well during baking and provide bright, natural flavor throughout the scones.
Look for strawberries that are firm, fully red, and fragrant, as these will give you the sweetest and most flavorful results.
If your strawberries are very large, cut them into small, evenly sized pieces so they distribute more evenly throughout the dough.
Frozen strawberries can also work when fresh berries are out of season, but they require a little extra care because they contain more moisture.
If using frozen strawberries, keep them frozen until you are ready to mix them into the dough, as thawing can make them soft and watery.
Too much extra liquid from thawed berries can affect the texture of the scones and make the dough harder to work with.
To help prevent excess moisture, wash fresh strawberries ahead of time and dry them thoroughly with paper towels before cutting.
After dicing the berries, gently pat them dry again to remove any remaining surface moisture.
Taking a few extra minutes to dry the strawberries can make a noticeable difference in the final texture of your scones.
Vanilla Bean Options
A whole vanilla bean provides the richest flavor and creates beautiful little specks of vanilla throughout the dough.
To use a vanilla bean, split it lengthwise with a small knife and scrape out the tiny seeds from inside the pod.
Those seeds contain most of the flavor and blend beautifully into the dough.
Vanilla bean paste is an excellent alternative if you want the same vanilla-speckled appearance without the extra preparation.
It delivers concentrated vanilla flavor and is often easier to find than whole vanilla beans.
If you regularly bake, vanilla bean paste is a convenient ingredient to keep in your pantry.
Pure vanilla extract is another great option and works well as a more budget-friendly substitute.
While it will not provide the visible vanilla specks, it still adds a warm, sweet vanilla flavor that pairs wonderfully with strawberries.
No matter which option you choose, using a high-quality vanilla product will give your scones the best flavor.
Dairy Alternatives
Heavy cream adds richness and moisture while helping create a soft, tender crumb.
If you need a dairy-free option, full-fat canned coconut milk is one of the best substitutes because it provides a similar richness.
Unsweetened oat cream or a thick, unsweetened plant-based cream alternative can also work well in this recipe.
For the butter, use a high-quality plant-based baking butter designed to replace regular butter.
Just like traditional butter, the dairy-free butter should be kept cold before mixing it into the flour.
Cold fat is one of the keys to creating flaky layers, regardless of whether you are using traditional butter or a dairy-free substitute.
With the right ingredient swaps, you can still achieve delicious, tender scones without sacrificing texture or flavor.
Kitchen Tools You’ll Need
- Mixing bowls – Used for combining the dry and wet ingredients separately before making the dough.
- Pastry cutter or fork – Helps cut the cold butter into the flour to create a flaky texture.
- Baking sheet – Provides a sturdy surface for baking the scones evenly.
- Parchment paper – Prevents sticking and makes cleanup much easier.
- Bench scraper or knife – Useful for shaping the dough and cutting it into neat wedges.
- Cooling rack – Allows air to circulate around the scones so they cool properly without becoming soggy.
How to Make Strawberry Vanilla Bean Scones
Step 1: Prepare the Strawberries
Start by washing the strawberries under cool running water to remove any dirt or debris.
Dry them thoroughly with paper towels because excess moisture can affect the texture of the dough.
Remove the stems and dice the strawberries into small, evenly sized pieces so they distribute well throughout the scones.
After cutting, gently pat the strawberries dry one more time to remove any remaining surface moisture.
This simple step helps prevent the dough from becoming too wet and keeps the scones light and flaky.
Step 2: Mix the Dry Ingredients
In a large mixing bowl, whisk together the all-purpose flour, granulated sugar, baking powder, and salt until evenly combined.
Mixing the dry ingredients first helps ensure the baking powder and salt are distributed throughout the dough.
A quick whisk is all you need to create a smooth, lump-free mixture that is ready for the butter.
Step 3: Cut in the Butter
Add the cold, cubed butter to the bowl with the dry ingredients.
Using a pastry cutter or fork, work the butter into the flour mixture until it resembles coarse crumbs with some pea-sized pieces of butter remaining.
Keeping the butter cold is one of the most important steps in making flaky scones.
As the butter melts in the oven, it creates small pockets of steam that help form tender layers.
If the butter starts to soften while you work, place the bowl in the refrigerator for a few minutes before continuing.
Step 4: Add the Wet Ingredients
In a separate bowl, whisk together the heavy cream, egg, and vanilla bean seeds until well combined.
Pour the wet mixture into the bowl with the flour and butter mixture.
Stir gently with a spoon or spatula until the ingredients begin to come together into a shaggy dough.
The dough may look slightly uneven at this stage, and that is perfectly normal.
Avoid mixing until completely smooth, as overmixing can lead to dense scones.
Step 5: Fold in the Strawberries
Add the diced strawberries to the dough once the wet and dry ingredients are mostly combined.
Gently fold the strawberries into the mixture using a spatula or your hands.
Work slowly to avoid crushing the berries and releasing too much juice into the dough.
Mix only until the strawberries are evenly distributed throughout the dough.
The goal is to bring everything together without overworking it.
Step 6: Shape the Dough
Transfer the dough onto a lightly floured surface.
Gently press it together into a round disk about 1 inch thick.
If the dough feels sticky, lightly dust your hands and work surface with a little flour.
Use a bench scraper or sharp knife to cut the circle into 8 equal wedges.
Place the wedges on a parchment-lined baking sheet, leaving a little space between each one.
For even flakier scones, chill the shaped dough in the refrigerator for 15 to 20 minutes before baking.
Step 7: Bake
Preheat your oven to 400°F (200°C) while the scones chill.
Brush the tops lightly with a little heavy cream to help them develop a beautiful golden finish.
Bake for 18 to 22 minutes, or until the tops are lightly golden and the edges are set.
The scones should feel firm on the outside while remaining tender inside.
If you’re unsure whether they are done, look for lightly browned edges and a dry, baked appearance on top.
Transfer the baked scones to a cooling rack and allow them to cool completely before glazing.
Step 8: Add the Vanilla Glaze
In a small bowl, whisk together the powdered sugar, milk or cream, and vanilla bean paste until smooth.
Add a little more liquid if needed to reach a drizzle-friendly consistency.
Once the scones have cooled, drizzle the glaze over the tops using a spoon.
Allow the glaze to set for a few minutes before serving.
The sweet vanilla glaze adds the perfect finishing touch and beautifully complements the fresh strawberries and rich vanilla bean flavor in every bite.
Tips for Perfect Strawberry Vanilla Bean Scones
Keep Ingredients Cold
Cold ingredients are one of the biggest secrets to making flaky, bakery-style scones.
Keep the butter in the refrigerator until you are ready to use it, and make sure the heavy cream and egg are chilled as well.
When cold butter hits the hot oven, it creates pockets of steam that help form the tender layers scones are known for.
If your kitchen is warm or the dough starts feeling soft while you work, place it in the refrigerator for a few minutes before continuing.
A little extra chilling time can make a noticeable difference in the final texture.
Avoid Overmixing
Scone dough should be mixed just until the ingredients come together.
Overmixing develops too much gluten, which can make the finished scones tough instead of tender.
The dough does not need to look perfectly smooth to bake well.
A slightly shaggy and uneven dough is exactly what you want.
Once the flour is incorporated and the dough holds together, stop mixing and move on to shaping.
Use Fresh, Firm Strawberries
Fresh, firm strawberries work best because they hold their shape during mixing and baking.
Very ripe or overly soft berries can release too much juice into the dough, making it wetter than intended.
Choose berries that are bright red, firm to the touch, and free from soft spots whenever possible.
Cut the strawberries into small, evenly sized pieces so they spread throughout the dough without creating large wet pockets.
Taking a few extra moments to select and prepare good strawberries helps create better flavor and texture in every bite.
Chill Dough Before Baking if Needed
If the dough feels sticky, soft, or difficult to handle, do not worry.
Simply place the shaped scones in the refrigerator for 15 to 20 minutes before baking.
This helps firm up the butter and relax the dough, making it easier for the scones to hold their shape in the oven.
Chilling is especially helpful during warmer months when ingredients soften more quickly.
Many bakers use this simple trick to achieve taller, flakier scones with cleaner edges.
Measure Flour Correctly
Using the right amount of flour is important for achieving a soft and tender texture.
Too much flour can make the dough dry and produce dense scones.
Instead of scooping directly from the flour bag, spoon the flour into your measuring cup and level it off with a knife.
This method helps prevent packing excess flour into the cup.
If you have a kitchen scale, weighing the flour is the most accurate option and provides the most consistent results every time you bake.
Common Mistakes to Avoid
Using Warm Butter
Warm butter can melt into the dough before the scones reach the oven, preventing the flaky layers from developing properly.
Cold butter creates small pockets throughout the dough that turn into tender, buttery layers as the scones bake.
If your butter begins to soften while you’re working, place it back in the refrigerator for a few minutes before continuing.
Starting with cold butter is one of the easiest ways to improve the texture of your scones.
Overworking the Dough
Handling the dough too much can lead to dense and tough scones instead of light and tender ones.
Mix the ingredients only until the dough comes together and no large pockets of dry flour remain.
It is perfectly fine if the dough looks slightly rough or uneven.
Gentle handling helps preserve the delicate texture that makes homemade scones so enjoyable.
Adding Overly Wet Strawberries
Strawberries naturally contain a lot of moisture, and excess liquid can make the dough sticky and difficult to work with.
After washing the berries, dry them thoroughly with paper towels before cutting them.
Once diced, gently pat them dry again to remove any remaining surface moisture.
Taking this extra step helps the scones bake evenly and prevents a soggy texture.
Overbaking the Scones
A few extra minutes in the oven can quickly turn soft, tender scones into dry ones.
Begin checking for doneness near the lower end of the recommended baking time.
The tops should be lightly golden, and the edges should look set without becoming dark brown.
Removing the scones at the right moment helps keep the centers moist and tender.
Applying Glaze While Scones Are Too Warm
It can be tempting to glaze the scones right away, but patience pays off here.
If the scones are still warm, the glaze will melt and run off instead of sitting nicely on top.
Allow the scones to cool completely on a wire rack before adding the glaze.
This gives you a beautiful finish and ensures every bite has the perfect balance of sweet vanilla glaze and buttery scone.
Variations to Try
Strawberry Lemon Vanilla Bean Scones
If you love bright, fresh flavors, try adding lemon zest to the dough.
The citrus notes complement the sweet strawberries and rich vanilla bean beautifully, creating a lighter and more vibrant flavor profile.
Add the finely grated zest of 1 medium lemon to the dry ingredients before mixing the dough.
For even more lemon flavor, you can add a small amount of lemon juice to the glaze.
This variation is especially delicious during spring and summer when you want a fresh and fruity baked treat.
White Chocolate Strawberry Scones
White chocolate adds a creamy sweetness that pairs wonderfully with strawberries and vanilla.
Fold ½ cup of white chocolate chips into the dough along with the strawberries.
The chocolate melts slightly as the scones bake, creating pockets of sweetness throughout each bite.
Because white chocolate is naturally sweet, this variation feels extra indulgent without requiring any major changes to the recipe.
These scones are perfect for brunches, celebrations, or whenever you’re craving something a little special.
Mixed Berry Vanilla Bean Scones
For even more berry flavor, replace part of the strawberries with raspberries or blueberries.
A combination of different berries adds beautiful color, natural sweetness, and a variety of textures.
Try using ½ cup diced strawberries and ½ cup raspberries or blueberries for a balanced mix.
Be gentle when folding the berries into the dough to prevent them from breaking apart too much.
This variation is a great way to use whatever berries you have on hand while still enjoying the rich vanilla bean flavor.
Strawberry Almond Scones
Almond and strawberry are a classic pairing that works wonderfully in these scones.
Add ½ teaspoon of almond extract along with the vanilla bean for a subtle nutty flavor.
You can also sprinkle ¼ cup of sliced almonds over the tops of the scones before baking for added crunch and visual appeal.
The almonds provide a pleasant texture contrast while enhancing the sweetness of the strawberries.
This variation feels elegant enough for special occasions but is simple enough to enjoy with your everyday morning coffee or tea.
How to Store Strawberry Vanilla Bean Scones
Room Temperature Storage
Strawberry Vanilla Bean Scones are best enjoyed within the first day or two after baking, when their texture is at its freshest.
Once completely cooled, store the scones in an airtight container to help prevent them from drying out.
You can place a sheet of paper towel in the container to absorb any excess moisture released by the strawberries.
Keep the container in a cool, dry place away from direct sunlight and heat sources.
Properly stored, the scones will stay fresh at room temperature for up to 2 days.
Refrigerating
Refrigeration can be helpful when your kitchen is warm or when you need to store the scones for a little longer.
Because fresh strawberries contain moisture, refrigerating can help maintain freshness beyond what room-temperature storage allows.
Place the completely cooled scones in an airtight container before refrigerating.
Stored this way, they can last for up to 5 days.
Keep in mind that refrigeration may slightly firm up the texture, so warming the scones before serving can help restore some of their softness.
Freezing Instructions
Freezing is an excellent option if you want to make the scones ahead of time or save leftovers for later.
For baked scones, allow them to cool completely before placing them in a freezer-safe container or zip-top freezer bag.
If possible, freeze the scones without the glaze and add it after thawing for the best appearance and texture.
Baked scones can be frozen for up to 3 months.
To serve, thaw them at room temperature and warm them in the oven for a few minutes before enjoying.
You can also freeze unbaked scones for freshly baked results whenever you need them.
After cutting the dough into wedges, place the pieces on a baking sheet and freeze until firm.
Transfer the frozen dough wedges to a freezer-safe bag or container and store for up to 3 months.
When ready to bake, place the frozen scones directly onto a lined baking sheet and bake from frozen.
You may need to add a few extra minutes to the baking time, but there is no need to thaw the dough first.
This make-ahead method is perfect for preparing a homemade breakfast or brunch with minimal effort on baking day.
How to Reheat Scones
Oven Method
The oven is one of the best ways to reheat scones because it helps restore their lightly crisp exterior while keeping the inside soft and tender.
Preheat your oven to 300°F (150°C).
Place the scones on a baking sheet and warm them for 5 to 8 minutes, or until heated through.
If the scones were refrigerated, they may need an extra minute or two.
Allow them to cool for a minute before serving so the texture can settle properly.
This method works especially well when reheating multiple scones at once.
Air Fryer Method
An air fryer is a quick and convenient option when you want to warm one or two scones.
Set the air fryer to 300°F (150°C).
Place the scones in the basket in a single layer, leaving a little space between them for airflow.
Heat for 2 to 4 minutes, checking them frequently to prevent overbrowning.
The air fryer can create a slightly crisp exterior while keeping the center soft and flavorful.
Because air fryers can vary in strength, it’s a good idea to start with the shortest heating time and add more if needed.
Microwave Method
The microwave is the fastest reheating option when you’re short on time.
Place a scone on a microwave-safe plate.
Heat for 10 to 15 seconds for a room-temperature scone or 15 to 20 seconds for a refrigerated one.
Check the warmth after the first interval and add a few more seconds if necessary.
Be careful not to overheat the scones, as this can make them tough or rubbery.
While the microwave won’t recreate the crisp texture of the oven or air fryer, it does a great job of quickly warming the scone and bringing back its soft, buttery center.
Serving Suggestions
- Fresh fruit – Serve with sliced strawberries, blueberries, or other seasonal fruit for a fresh and colorful addition.
- Coffee or tea – Pair with your favorite hot beverage to complement the buttery, vanilla-infused flavor of the scones.
- Whipped cream – Add a dollop of lightly sweetened whipped cream for an extra soft and creamy touch.
- Clotted cream – Spread a little clotted cream on each scone for a rich and traditional tea-time experience.
- Vanilla butter – Serve with softened vanilla-flavored butter to enhance the sweet vanilla notes in the scones.
Final Thoughts
These Strawberry Vanilla Bean Scones are a wonderful combination of buttery, flaky texture, sweet strawberries, and rich vanilla flavor, making them a treat that’s perfect for any time of day.
They’re simple enough for beginner bakers yet impressive enough to serve at brunches, gatherings, and special occasions.
Don’t be afraid to make the recipe your own by trying different berries, adding citrus zest, or experimenting with your favorite mix-ins.
Baking is all about having fun and creating something you love.
Happy baking!
FAQs
Can I use frozen strawberries?
Yes, frozen strawberries can be used, but keep them frozen until you add them to the dough to prevent excess moisture.
Can I make the dough ahead of time?
Yes, you can prepare and shape the dough up to 24 hours in advance and keep it covered in the refrigerator until ready to bake.
What if I don’t have a vanilla bean?
Vanilla bean paste is the closest substitute, but pure vanilla extract also works well and still provides great flavor.
Why are my scones dry?
Dry scones are often caused by too much flour, overmixing the dough, or baking them for too long.
Can I freeze unbaked scones?
Absolutely. Freeze the cut dough wedges until firm, then transfer them to a freezer-safe container and bake directly from frozen when needed.
These Strawberry Vanilla Bean Scones Are Buttery And Flaky
Difficulty: Easy8
Scones15
minutes20
minutes35
minutesTender, buttery strawberry vanilla bean scones filled with fresh strawberries and topped with a sweet vanilla glaze. Perfect for breakfast, brunch, or an afternoon treat.
Ingredients
- For the Scones
2 cups all-purpose flour
1/3 cup granulated sugar
1 tbsp baking powder
1/2 tsp salt
1/2 cup cold unsalted butter, cubed
1 cup fresh strawberries, diced
Seeds from 1 vanilla bean (or 1 tbsp vanilla bean paste)
1/2 cup heavy cream
1 large egg
- For the Vanilla Glaze
1 cup powdered sugar
2–3 tbsp milk or cream
1 tsp vanilla bean paste or 1/2 tsp vanilla extract
Directions
- Preheat the oven to 400°F (200°C) and line a baking sheet with parchment paper.
- Whisk together the flour, sugar, baking powder, and salt in a large bowl.
- Cut in the cold butter until the mixture resembles coarse crumbs.
- In a separate bowl, whisk together the cream, egg, and vanilla bean seeds.
- Add the wet ingredients to the dry ingredients and stir until a dough forms.
- Gently fold in the strawberries.
- Shape the dough into a 1-inch-thick circle and cut into 8 wedges.
- Place on the prepared baking sheet and bake for 18–22 minutes, or until lightly golden.
- Let the scones cool completely.
- Whisk together the glaze ingredients and drizzle over the cooled scones before serving.
Notes
- Keep the butter cold for the flakiest texture.
- Pat the strawberries dry before adding them to the dough.
- Do not overmix the dough, or the scones may become dense.
- Store leftovers in an airtight container for up to 2 days.


Hi, I’m Sorenna Blythe, the baker and writer behind Mix Whisk Bake. I share simple, reliable recipes and honest kitchen moments to help home bakers bake with confidence and joy. When I’m not testing new treats, you’ll find me sipping coffee and dreaming up my next bake.


