If you love flaky pastries and fresh fruit, these Tropical Fruit Danish Pastries are sure to become a favorite.
Each bite combines buttery layers of golden pastry, a creamy filling, and sweet tropical fruits for a bright, refreshing treat.
They’re perfect for breakfast, brunch, dessert, or anytime you want something a little special without spending hours in the kitchen.
Using ready-made puff pastry keeps the process simple, while the colorful fruit topping gives them a beautiful bakery-style look.
Grab your favorite tropical fruits and let’s make something delicious together.
Why You’ll Love This Tropical Fruit Danish Pastries Recipe
- Flaky, buttery pastry layers – Every bite is light, crisp, and filled with rich buttery flavor.
- Sweet and tangy tropical fruit flavors – Fresh tropical fruits add the perfect balance of sweetness and brightness.
- Beautiful presentation with vibrant colors – The colorful fruit topping makes these pastries look as impressive as they taste.
- Great for special occasions and weekend baking – Perfect for brunch gatherings, holidays, or a relaxing baking day at home.
- Can be customized with your favorite fruits – Mix and match different tropical fruits to create your own unique version.

What Are Danish Pastries?
Danish pastries are light, flaky baked treats made from a rich, layered dough that is often filled with ingredients such as fruit, cream cheese, custard, or jam.
Although they are closely associated with Denmark today, Danish pastries were influenced by Austrian baking techniques introduced to Danish bakers during the 1800s, eventually evolving into the sweet pastries that are enjoyed around the world.
Traditional Danish dough is made by repeatedly folding butter into a yeast-based dough, creating many thin layers that puff up as they bake and produce a soft, tender interior with a lightly crisp exterior.
This process, known as laminating, is similar to making croissants, but Danish dough is typically a little sweeter and often enriched with ingredients like eggs and milk, giving it a richer flavor and softer texture.
One of the reasons Danish pastries are so popular is their versatility, as they can be topped or filled with a wide variety of sweet ingredients while still maintaining their signature flaky layers.
Many homemade Danish pastry recipes, including this one, use ready-made puff pastry as a shortcut to save time without sacrificing texture or flavor.
While traditional Danish dough requires yeast and several rounds of folding and resting, puff pastry is usually made without yeast and focuses on creating crisp, buttery layers through laminated dough alone.
The result is slightly different, but puff pastry still delivers the flaky, golden texture that makes Danish-style pastries so appealing and enjoyable to eat.
Using puff pastry allows beginners to create beautiful bakery-style pastries with much less effort, making it an excellent option for home baking.
For this Tropical Fruit Danish Pastries recipe, puff pastry provides the perfect base for the creamy filling and colorful fruit topping, helping you achieve impressive results without the extra work of making Danish dough from scratch.
Ingredients You’ll Need
For the Pastry
- 1 sheet puff pastry, thawed according to package instructions
- 1 large egg, beaten (for egg wash)
For the Cream Cheese Filling
- 4 ounces (115g) cream cheese, softened
- 2 tablespoons granulated sugar
- 1 teaspoon vanilla extract
- 1 teaspoon finely grated lemon zest
For the Tropical Fruit Topping
- ½ cup diced mango
- ½ cup diced pineapple
- 1 kiwi, peeled and sliced or diced
- 1 passion fruit, pulp only
- Optional fruit variations: ½ cup papaya, ½ cup dragon fruit, ½ cup guava, or ½ cup banana slices
Optional Garnishes
- 1 tablespoon powdered sugar, for dusting
- 2 tablespoons apricot glaze, warmed
- 2 tablespoons toasted coconut flakes
- 1 tablespoon fresh mint leaves, finely chopped or left whole for garnish
Kitchen Equipment Needed
- Baking sheet – Provides a sturdy surface for baking the pastries evenly.
- Parchment paper – Prevents sticking and makes cleanup much easier.
- Mixing bowls – Used for preparing the cream cheese filling and organizing ingredients.
- Knife and cutting board – Needed for cutting the fruit and shaping the puff pastry.
- Pastry brush – Helps evenly apply the egg wash for a golden, glossy finish.
- Cooling rack – Allows the pastries to cool properly while keeping the bottoms crisp.
How to Make Tropical Fruit Danish Pastries
Step 1: Prepare the Cream Cheese Filling
Place the softened cream cheese, granulated sugar, vanilla extract, and lemon zest in a mixing bowl.
Stir everything together until the mixture becomes smooth, creamy, and free of lumps.
Take a moment to scrape down the sides of the bowl to make sure all the ingredients are fully incorporated.
Set the filling aside while you prepare the pastry, allowing the flavors to blend together.
Step 2: Prepare the Pastry Dough
Preheat your oven to 400°F (200°C) and line a baking sheet with parchment paper.
Place the thawed puff pastry sheet on a lightly floured surface and gently unfold it.
Cut the pastry into 4 equal squares using a sharp knife or pizza cutter.
Transfer the squares to the prepared baking sheet, leaving a little space between each one.
Using the tip of a knife, lightly score a border about ½ inch from the edge of each square without cutting all the way through the dough.
This scored border helps create a raised edge during baking while keeping the filling neatly contained in the center.
Step 3: Assemble the Danishes
Spoon a portion of the cream cheese filling into the center of each pastry square.
Spread the filling evenly within the scored border, leaving the edges uncovered.
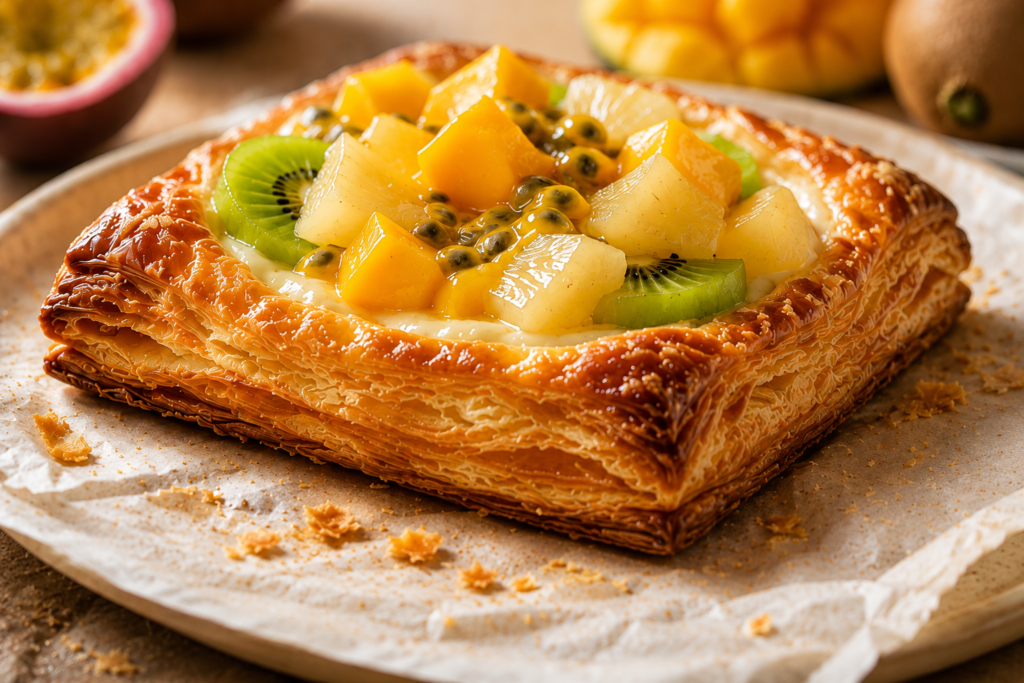
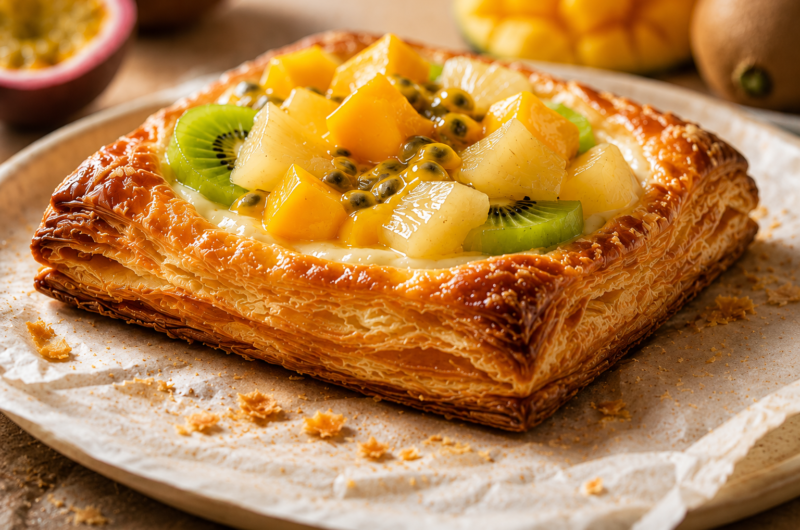
Arrange the diced mango, pineapple, kiwi, and passion fruit over the cream cheese filling.
Try to distribute the fruit evenly so every pastry gets a colorful mix of tropical flavors.
Avoid piling on too much fruit, as excessive moisture can make the pastries less crisp.
Step 4: Apply Egg Wash
Beat the egg until smooth and use a pastry brush to lightly coat the exposed pastry edges.
The egg wash helps the pastry bake into a beautiful golden-brown color while adding a glossy finish.
Take care not to brush the filling, as this can affect the appearance of the finished pastries.
Step 5: Bake
Place the baking sheet in the preheated oven and bake for 15 to 18 minutes.
Keep an eye on the pastries during the last few minutes of baking, as oven temperatures can vary slightly.
The pastries are ready when the edges are puffed, golden brown, and crisp to the touch.
The filling should look set, and the fruit should appear slightly softened and glossy.
Remove the baking sheet from the oven once the pastries reach this stage.
Step 6: Cool and Garnish
Allow the pastries to cool on the baking sheet for about 5 minutes before transferring them to a cooling rack.
Letting them cool slightly helps the filling firm up and makes the pastries easier to handle.
For extra shine, brush the fruit with warm apricot glaze while the pastries are still slightly warm.
If desired, dust the tops lightly with powdered sugar and sprinkle with toasted coconut flakes.
Add a few fresh mint leaves for a fresh pop of color and flavor.
Serve the pastries warm or at room temperature and enjoy every flaky, fruity bite.
Tips for Perfect Tropical Fruit Danish Pastries
Use Ripe but Firm Fruit
Choose fruit that is fully ripe for the best flavor, but still firm enough to hold its shape during baking.
Overripe fruit can become mushy in the oven and may make the pastries look less appealing.
Mangoes, pineapples, and kiwis should feel slightly soft when gently pressed but should not be overly squishy.
Firm fruit pieces create a better texture and help each pastry maintain a beautiful presentation.
Avoid Overly Juicy Fruit to Prevent Sogginess
Too much moisture is one of the most common reasons pastries lose their crisp texture.
If your fruit seems particularly juicy, gently pat it dry with paper towels before adding it to the pastries.
This simple step helps prevent excess liquid from soaking into the cream cheese filling and pastry layers.
When using fruits such as pineapple or passion fruit, avoid adding large amounts of extra juice to the pastry centers.
Keeping moisture under control allows the puff pastry to bake up light, flaky, and golden.
Chill Assembled Pastries Before Baking
After assembling the pastries, place the baking sheet in the refrigerator for 10 to 15 minutes before baking.
Chilling helps keep the butter in the puff pastry cold, which is important for creating distinct flaky layers.
Cold pastry also holds its shape better in the oven, helping the borders rise neatly around the filling.
This extra step takes very little effort but can make a noticeable difference in the final texture and appearance.
Don’t Overfill the Centers
It can be tempting to add extra filling and fruit, but a little restraint goes a long way.
Too much filling may spill over the edges as the pastries bake, creating a messy appearance and uneven texture.
A moderate amount of filling allows the pastry to cook evenly while keeping the fruit and cream cheese in place.
Leaving some space around the edges also helps the scored borders puff up properly and create that classic Danish look.
When in doubt, remember that balanced layers of pastry, filling, and fruit will always produce the best results.
Recipe Variations
Coconut Mango Danish
If you love the classic combination of mango and coconut, this variation is a wonderful choice.
Add a generous sprinkle of shredded coconut over the cream cheese filling before arranging the fruit on top.
Increase the amount of mango slightly to make its sweet, tropical flavor the star of the pastry.
For even more coconut flavor, finish the baked pastries with toasted coconut flakes instead of powdered sugar.
The combination of creamy filling, juicy mango, and lightly toasted coconut creates a dessert that feels like a tropical getaway in every bite.
Pineapple Cream Cheese Danish
Pineapple lovers will enjoy this bright and refreshing version.
Use extra diced pineapple and reduce or omit the other fruits to let its natural sweetness shine.
Fresh pineapple works especially well because it provides a juicy texture and vibrant flavor without overpowering the cream cheese filling.
A small amount of lemon zest in the filling complements the pineapple beautifully and enhances its natural freshness.
This variation is simple, colorful, and perfect for anyone who enjoys sweet and tangy flavors.
Mixed Tropical Fruit Danish
When you can’t choose just one fruit, a mixed tropical fruit Danish is the perfect solution.
Combine mango, pineapple, kiwi, passion fruit, papaya, or any other tropical fruits you enjoy.
Using a variety of fruits creates layers of flavor and adds beautiful color to the finished pastries.
Try to cut the fruit into similar-sized pieces, so they bake evenly and look balanced on top of the filling.
This variation is ideal for parties, brunches, and special occasions because every pastry looks unique and inviting.
Tropical Berry Fusion Danish
For a fresh twist, combine tropical fruits with your favorite berries.
Strawberries, blueberries, raspberries, and blackberries pair surprisingly well with mango, pineapple, and kiwi.
The berries add a slight tartness that balances the sweetness of the tropical fruit and cream cheese filling.
Mixing different colors also creates an eye-catching presentation that looks beautiful on any serving table.
This variation is a great way to use seasonal fruit while creating a pastry that is both vibrant and full of flavor.
Feel free to experiment with different combinations until you discover your favorite mix.
One of the best things about these Danish pastries is how easy they are to customize, making every batch a little different and uniquely your own.
Storage Instructions
Refrigerating
Once the pastries have cooled completely, place them in an airtight container to help maintain their freshness.
Storing them while still warm can create condensation inside the container, which may soften the flaky pastry layers.
For the best texture, arrange the pastries in a single layer whenever possible.
If you need to stack them, place a sheet of parchment paper between layers to prevent sticking.
These Tropical Fruit Danish Pastries will stay fresh in the refrigerator for up to 3 days.
Because the pastries contain cream cheese and fresh fruit, refrigeration is the safest way to store leftovers.
Keep in mind that the pastry may lose some of its crispness over time, but the flavors will remain delicious.
Freezing
If you would like to store the pastries for a longer period, freezing is a great option.
Allow the pastries to cool completely before preparing them for the freezer.
Wrap each pastry individually in plastic wrap or place them in a freezer-safe container to help protect them from freezer burn.
Individual wrapping also makes it easy to thaw only the number of pastries you need.
The pastries can be frozen for up to 2 months while maintaining good flavor and texture.
For the best results, freeze the pastries before adding powdered sugar, glaze, or fresh mint garnishes.
Best Methods for Freezing and Reheating
When you’re ready to enjoy a frozen pastry, transfer it to the refrigerator and allow it to thaw overnight.
For a quicker option, let the pastry sit at room temperature for about 30 to 60 minutes.
To restore the flaky texture, warm the thawed pastries in a 350°F (175°C) oven for 5 to 8 minutes.
The oven helps crisp the pastry layers far better than a microwave.
If using a microwave, heat the pastries only briefly to avoid making the pastry soft or chewy.
Once warmed, add a fresh dusting of powdered sugar or a light glaze if desired.
A few minutes of reheating can make leftover pastries taste surprisingly close to freshly baked.
What to Serve with Tropical Fruit Danish Pastries
- Coffee – A hot cup of coffee balances the sweetness of the pastries and makes them perfect for breakfast or brunch.
- Tea – Light teas such as green tea, black tea, or herbal blends pair beautifully with the fresh fruit flavors.
- Fresh Fruit Salad – A colorful fruit salad adds extra freshness and complements the tropical ingredients in the pastries.
- Yogurt Parfaits – Layers of yogurt, fruit, and granola create a creamy and satisfying side dish.
- Brunch Spreads – Serve the pastries alongside eggs, breakfast meats, cheeses, and other brunch favorites for a complete meal.
Common Mistakes to Avoid
- Using warm pastry dough – Puff pastry should stay cold before baking, as warm dough won’t puff up as well and can result in fewer flaky layers.
- Overloading with fruit – Adding too much fruit can release excess moisture during baking, making the pastry soggy and preventing it from crisping properly.
- Skipping the egg wash – Brushing the pastry edges with egg wash helps create a beautiful golden color and glossy finish that makes the pastries look bakery-worthy.
- Underbaking the pastry – Removing the pastries too soon can leave the centers doughy, so bake until the pastry is fully puffed and evenly golden brown.
Final Thoughts
These Tropical Fruit Danish Pastries are a simple way to bring together flaky pastry, creamy filling, and fresh tropical flavors in one beautiful treat.
The recipe is easy enough for beginners yet impressive enough to serve for brunches, gatherings, and special occasions.
Don’t be afraid to experiment with different fruit combinations and make the recipe your own using whatever tropical fruits you enjoy most.
Every batch can be a little different, which is part of the fun of baking at home.
Happy baking!
FAQs
Can I use canned tropical fruit?
Yes, you can use canned tropical fruit if fresh fruit is unavailable.
Be sure to drain it well and pat it dry to remove excess moisture before adding it to the pastries.
Can I make these pastries ahead of time?
Yes. You can assemble the pastries a few hours ahead and keep them refrigerated until you’re ready to bake them.
For the best texture, bake them just before serving.
Can I use homemade Danish dough?
Absolutely. Homemade Danish dough will give the pastries a more traditional texture and flavor, although it requires more time and preparation than puff pastry.
What other fruits work well?
Papaya, dragon fruit, guava, banana, strawberries, blueberries, and raspberries all work well in this recipe. Choose fruits that are ripe but still firm.
How do I keep the pastries crispy?
Use well-drained fruit, avoid overfilling the pastries, and bake until they are fully golden brown.
Reheating leftovers in the oven instead of the microwave will also help restore their crisp texture.
Tropical Fruit Danish Pastries That Taste Like a Bakery Treat
Difficulty: Easy4
Pastries15
minutes18
minutes33
minutesThese Tropical Fruit Danish Pastries combine flaky puff pastry, creamy vanilla-lemon filling, and fresh tropical fruit for an easy bakery-style treat that’s perfect for breakfast, brunch, or dessert.
Ingredients
1 sheet puff pastry, thawed
1 large egg, beaten
4 oz (115g) cream cheese, softened
2 tbsp granulated sugar
1 tsp vanilla extract
1 tsp lemon zest
½ cup diced mango
½ cup diced pineapple
1 kiwi, sliced
1 passion fruit, pulp only
Powdered sugar or apricot glaze (optional)
Directions
- Preheat oven to 400°F (200°C) and line a baking sheet with parchment paper.
- Mix cream cheese, sugar, vanilla, and lemon zest until smooth.
- Cut puff pastry into 4 squares and lightly score a border around each one.
- Spread the cream cheese mixture in the center of each pastry.
- Top with mango, pineapple, kiwi, and passion fruit.
- Brush the pastry edges with beaten egg.
- Bake for 15–18 minutes or until puffed and golden brown.
- Cool slightly, then garnish with powdered sugar or apricot glaze if desired.
Notes
- Use ripe but firm fruit for the best texture.
- Chill assembled pastries for 10 minutes before baking for extra flaky layers.
- Store leftovers in the refrigerator for up to 3 days.


Hi, I’m Sorenna Blythe, the baker and writer behind Mix Whisk Bake. I share simple, reliable recipes and honest kitchen moments to help home bakers bake with confidence and joy. When I’m not testing new treats, you’ll find me sipping coffee and dreaming up my next bake.


