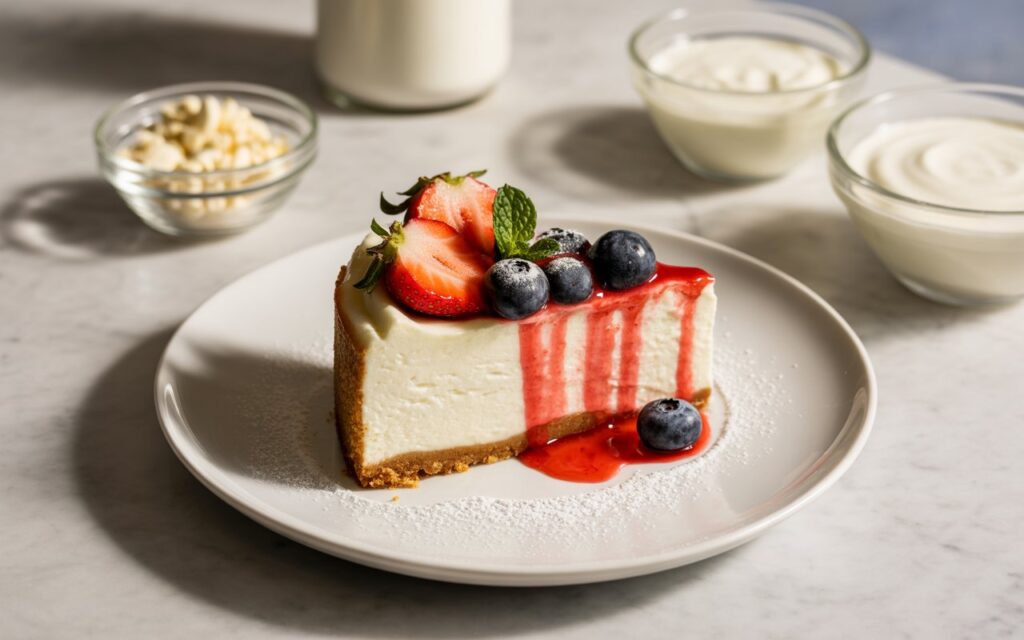
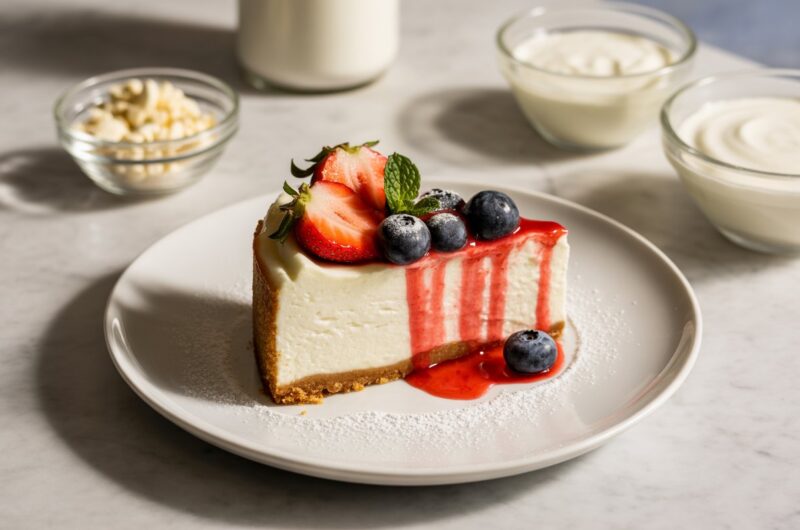
Craving cheesecake but don’t want the sugar overload? This version gives you that same creamy, rich bite, but just with more protein and less guilt.
It’s made with simple ingredients you probably already have, and it still tastes like a proper dessert, not a “healthy substitute.”
You’ll get a satisfying treat that actually keeps you full, whether it’s after a workout or just a long day.
If you love desserts but also want to eat a bit smarter, this recipe is for you.
Don’t worry if you’re new to baking because I’ll walk you through it step by step so you can feel confident from start to finish.
Why You’ll Love This High-Protein Cheesecake
Rich, Creamy Texture
You’ll notice right away that this cheesecake is smooth and creamy, just like the classic version. It’s not dry or dense. Each bite feels soft, rich, and satisfying.
The key is using ingredients like cream cheese and yogurt together. They blend into a silky filling that sets beautifully in the oven.
Don’t worry if it looks slightly jiggly when it comes out because that’s exactly what you want. It will firm up as it cools.
Packed With Protein
This isn’t just dessert because it actually helps keep you full. The added protein comes from ingredients like
Greek yogurt and protein powder, which blend right into the batter without changing the texture too much.
You get a treat that feels indulgent but also supports your daily protein goals. It’s especially helpful if you’re trying to eat more balanced meals without giving up sweets.
Lower in Sugar Than Traditional Cheesecake
Traditional cheesecake can be quite heavy on sugar. This version keeps things lighter while still tasting sweet and satisfying.
You can control how sweet it is by choosing your preferred sweetener.
Whether you go with honey, maple syrup, or a sugar substitute, you’ll still get that dessert-like flavor without the overload.
Easy to Make With Simple Ingredients
You don’t need anything complicated here. Most of the ingredients are easy to find, and you might already have them in your kitchen.
The steps are straightforward. Mix, pour, bake, and chill. That’s it.
Great for Meal Prep or Post-Workout Treats
This cheesecake stores well, which makes it perfect for planning ahead. You can slice it and keep it in the fridge for a few days, ready whenever you need something sweet.
It’s also a great option after a workout. You get protein and flavor in one bite, without needing a separate snack. Just grab a slice, and you’re good to go.
Key Ingredients Needed
Here’s everything you’ll need to make a smooth, creamy high-protein cheesecake. I’ve included simple amounts to keep things easy to follow:
- Cream cheese – 450 g (about 2 cups)
Use full-fat for the creamiest texture, or a light version if you prefer fewer calories. Make sure it’s softened so it mixes smoothly. - Greek yogurt – 240 g (1 cup)
This adds extra protein and keeps the cheesecake light and slightly tangy. Plain, unsweetened works best. - Protein powder – 30 g (1 scoop)
Whey or plant-based both work. Vanilla is a great choice for flavor, but you can use unflavored if you want more control over sweetness. - Eggs – 2 large
Eggs help the cheesecake set properly. Let them come to room temperature for easier mixing. - Sweetener – 80–120 ml (⅓–½ cup)
Use honey, maple syrup, or a sugar substitute. Start with less and adjust to taste because you can always add more. - Vanilla extract – 1 teaspoon
Adds warmth and depth to the flavor. Don’t skip this, as it makes a big difference.
Optional Crust (Choose One)
- Oats – 100 g (1 cup) + 2 tablespoons melted butter or coconut oil
A simple, wholesome base with a slight crunch. - Almond flour – 100 g (1 cup) + 2 tablespoons melted butter
Great for a low-carb option with a soft, nutty texture. - Crushed biscuits – 120 g (about 1 cup) + 3 tablespoons melted butter
Closer to a classic cheesecake base—slightly sweeter and firmer.
Equipment Needed
Just a few basic tools will help you get a smooth batter and an even bake.
- Mixing bowls (1–2 medium/large)
Use one for the filling and another if you’re making a crust. A larger bowl makes mixing easier and less messy. - Hand mixer or stand mixer
This helps you get a smooth, lump-free batter. A hand mixer works perfectly fine. If you don’t have one, you can mix by hand. Just take your time and make sure the cream cheese is very soft. - Springform pan (20–23 cm / 8–9 inch)
This is the best pan for cheesecake. The removable sides make it easy to take out clean slices without breaking the cake. - Oven
A standard oven works well. Try to avoid opening the door too often while baking, as this can affect how the cheesecake sets. - Measuring cups and spoons
Accurate measuring helps the texture turn out just right. Level off dry ingredients for better results.
How to Make High-Protein Cheesecake (Step-by-Step)
1. Prepare the Crust (Optional)
Start by mixing your chosen crust ingredients in a bowl. Stir until everything looks evenly combined and slightly moist. It should hold together when you press it between your fingers.
Pour the mixture into your springform pan. Press it down firmly using the back of a spoon or the bottom of a glass. Try to keep the layer even so it bakes evenly.
If you want a firmer base, pre-bake the crust at 180°C (350°F) for about 8–10 minutes. You’ll notice it sets slightly and smells lightly toasted. Let it cool while you prepare the filling.
2. Make the Filling
Place your softened cream cheese in a mixing bowl. Beat it until completely smooth. Take your time here because this step helps avoid lumps later.
Add the Greek yogurt, protein powder, and sweetener. Mix until everything is well combined and creamy. Scrape down the sides of the bowl so nothing gets left behind.
Now add the eggs and vanilla extract. Mix on low speed just until combined. Don’t overmix at this stage. You’re aiming for a smooth batter, not a fluffy one.
3. Assemble
Pour the filling over your prepared crust, or directly into the pan if you’re going crustless. It should spread easily.
Use a spatula to gently smooth the top. This helps it bake evenly and gives you a clean finish.
Give the pan a light tap on the counter to release any air bubbles. This small step can help prevent cracks later.
4. Bake
Place the cheesecake in a preheated oven at 160°C (320°F). Bake for about 40–50 minutes. The edges should look set, while the center still has a slight wobble.
For an extra creamy texture, you can use a water bath. This simply means placing your pan inside a larger pan with hot water.
It adds moisture to the oven and helps the cheesecake bake gently. Don’t worry if you skip this because it will still turn out well.
Avoid opening the oven door too often. Sudden temperature changes can cause cracks.
5. Cool & Set
Once baked, turn off the oven and leave the door slightly open. Let the cheesecake cool inside for about 30–60 minutes. This slow cooling helps prevent sinking or cracking.
After that, remove it and let it come to room temperature on the counter. You’ll notice it firm up as it cools.
Finally, place it in the fridge for at least 4 hours, or overnight if you can wait. This step is important. It gives the cheesecake its final texture—smooth, firm, and sliceable.
Tips for the Best High-Protein Cheesecake
These tips will help you get a smooth texture, clean slices, and a cheesecake you’ll feel proud of.
Use Room Temperature Ingredients
Before you start, let your cream cheese, yogurt, and eggs sit out for a bit. Room temperature ingredients mix more easily and give you a smoother batter.
If they’re too cold, you’ll notice lumps that are hard to fix later. Don’t worry if you forget, just give the mixture a bit more time to blend, but it’s always easier when everything starts soft.
Don’t Overmix After Adding Eggs
Once the eggs go in, mix gently and just until combined. You don’t need to beat the batter for long at this stage.
Overmixing adds too much air, which can cause the cheesecake to puff up in the oven and then sink or crack as it cools. A smooth, slightly thick batter is exactly what you’re aiming for.
Avoid Overbaking (Prevents Cracks)
It’s easy to think the cheesecake needs to be fully firm in the oven, but that’s not the case. You’ll notice the edges set first while the center still has a slight wobble, and that’s perfect.
If you bake it too long, it can dry out and crack. When in doubt, it’s better to take it out a little early. It will continue to set as it cools.
Chill Long Enough for Proper Texture
This step takes patience, but it’s worth it. After cooling, the cheesecake needs time in the fridge to fully set.
Give it at least 4 hours, but overnight is even better. You’ll notice the texture becomes firmer, creamier, and much easier to slice.
Don’t rush this part because it’s what turns a good cheesecake into a great one.
Variations & Flavor Ideas
Once you’ve made the base recipe, you can easily change the flavor to suit your taste. Think of this cheesecake as a starting point you can build on. Small tweaks go a long way.
Chocolate Protein Cheesecake
For a rich, dessert-style version, add 2–3 tablespoons of unsweetened cocoa powder to the filling. You can also use a chocolate protein powder instead of vanilla.
Mix it in with the yogurt and sweetener so it blends smoothly. If the batter feels slightly thicker, that’s normal. You’ll end up with a deeper flavor that still keeps the creamy texture.
Berry Swirl Cheesecake
This one looks beautiful and adds a fresh, slightly tangy taste. Simply mash or blend about ½ cup of berries (like strawberries, blueberries, or raspberries).
After pouring the filling into the pan, spoon small amounts of the berry mixture on top. Use a knife or toothpick to gently swirl it through the batter.
Don’t overdo it; just a few swirls create a nice pattern.
Lemon Cheesecake
If you enjoy a lighter, fresher flavor, lemon works really well here. Add 1–2 tablespoons of fresh lemon juice and a little zest (the outer yellow skin of the lemon).
You’ll notice it brightens the whole cheesecake without making it too sour. Taste the batter and adjust the sweetness slightly if needed.
No-Bake High-Protein Version
If you don’t want to use the oven, you can make a no-bake version. The texture will be softer but still creamy and satisfying.
To help it set, you’ll need to add a stabilizer like gelatin or agar-agar (a plant-based option).
Once mixed, pour the filling into your pan and let it chill in the fridge for several hours until firm.
Crustless Option for Lower Carbs
You can skip the crust completely if you want something lighter or lower in carbs. Just pour the filling straight into a lined or lightly greased pan.
It will still set well and slice cleanly after chilling. You’ll notice the texture feels a bit more like a baked custard—soft, smooth, and just as enjoyable.
Nutritional Benefits
High Protein Content (Estimate Per Slice)
Each slice gives you a solid boost of protein, thanks to the Greek yogurt and protein powder.
On average, you can expect around 8–12 grams of protein per slice, depending on the exact ingredients you use.
You’ll notice it feels more filling than a regular dessert. That’s because protein helps keep you satisfied for longer.
It’s a great option if you want something sweet that also supports your daily intake.
Lower Sugar Compared to Traditional Cheesecake
Traditional cheesecake often relies on a lot of sugar for both texture and flavor. This version keeps things lighter by using less sugar or swapping in alternatives.
You still get a sweet, enjoyable dessert, just without the heavy sugar load.
If you prefer, you can adjust the sweetness to suit your taste, which gives you more control than most store-bought options.
Can Be Adapted for Low-Carb or Gluten-Free Diets
This recipe is flexible, which makes it easy to adjust based on your needs. For a low-carb version, use a sugar substitute and choose an almond flour crust or skip the crust entirely.
If you need it gluten-free, simply use gluten-free oats or almond flour for the base. The filling itself is naturally gluten-free, so you don’t need to make many changes.
Storage & Meal Prep Tips
Once your cheesecake has fully set, you can store it in the fridge for 3–5 days, covered tightly or kept in an airtight container to prevent it from drying out or absorbing other smells.
You’ll notice it actually tastes even better the next day as the flavors settle.
If you want to keep it longer, slicing it first and then freezing individual pieces works really well; wrap each slice in cling wrap or baking paper, then place them in a sealed container or freezer bag so they stay fresh for up to 1–2 months.
When you’re ready to enjoy, let a slice thaw slowly in the fridge for a few hours or overnight for the best texture, because this keeps it creamy and smooth.
If you’re short on time, you can leave it at room temperature for about 20–30 minutes, and it will soften nicely.
For serving, you can enjoy it straight from the fridge for a firmer bite or let it sit out briefly if you prefer it extra soft. Both ways are delicious, so go with what you like.
Common Mistakes to Avoid
- Overmixing batter
Mixing too much, especially after adding eggs, adds excess air and can cause cracks or a sunken center. - Using cold ingredients
Cold cream cheese and eggs don’t blend smoothly, which can leave lumps in your batter. - Skipping chill time
Cutting too early results in a soft, messy texture instead of clean, firm slices. - Overbaking
Baking too long dries out the cheesecake and increases the chance of cracks, so look for a slightly wobbly center instead.
Final Thoughts
This cheesecake gives you the best of both worlds: rich, creamy flavor with a boost of protein and less sugar.
It’s simple to make, easy to adjust, and fits into a more balanced way of eating.
Give it a try and make it your own. You’ll notice how flexible the recipe is once you get comfortable with it.
FAQs
Yes. Simply leave it out; the texture will still be creamy, but the protein content will be lower.
A smooth whey or a fine plant-based powder works best. Vanilla is a safe choice for flavor.
Yes, but you’ll need a setting agent like gelatin or agar-agar to help it firm up.
Don’t overmix, avoid overbaking, and let it cool slowly before chilling.
Yes. Use dairy-free cream cheese, plant-based yogurt, and a vegan protein powder.
High-Protein Cheesecake (Creamy, Healthy & Easy)
Difficulty: Easy8
Slices15
minutes45
minutes5
hoursA creamy, high-protein cheesecake that’s lower in sugar but still rich, smooth, and satisfying, which is perfect for a balanced dessert.
Ingredients
450 g cream cheese (softened)
1 cup (240 g) Greek yogurt
1 scoop (30 g) protein powder
2 large eggs
⅓–½ cup (80–120 ml) honey or sweetener
1 tsp vanilla extract
- Optional crust:
1 cup (100 g) oats or almond flour
2 tbsp melted butter or coconut oil
Directions
- Preheat oven to 160°C (320°F).
- (Optional) Mix crust ingredients, press into the pan, and pre-bake for 10 minutes.
- Beat cream cheese until smooth.
- Add yogurt, protein powder, and sweetener; mix well.
- Mix in eggs and vanilla gently until combined.
- Pour into the pan and smooth the top.
- Bake for 40–50 minutes until edges are set and center slightly wobbly.
- Cool, then chill for at least 4 hours or overnight before slicing.
Notes
- Use room temperature ingredients for a smooth batter.
- Don’t overmix after adding eggs to avoid cracks.
- Chill fully for the best texture and clean slices.

Hi, I’m Sorenna Blythe, the baker and writer behind Mix Whisk Bake. I share simple, reliable recipes and honest kitchen moments to help home bakers bake with confidence and joy. When I’m not testing new treats, you’ll find me sipping coffee and dreaming up my next bake.


