
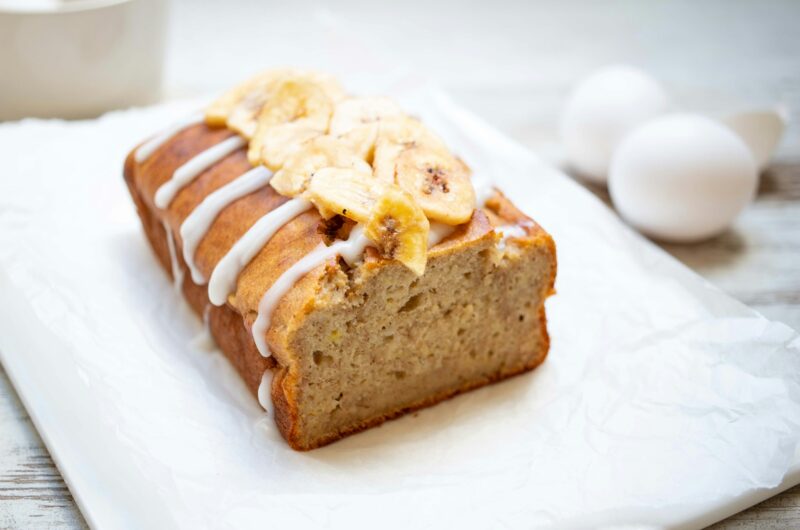
Banana bread doesn’t need loads of sugar to taste amazing. When your bananas are ripe and soft, they bring all the natural sweetness you need with no heavy sweetness required.
More and more people are choosing low-sugar baking to feel better and keep things balanced.
It’s a simple way to enjoy your favorite treats while being a bit more mindful, and you won’t feel like you’re missing out.
This recipe keeps things easy and stress-free. You’ll get a soft, moist loaf with a gentle sweetness that comes straight from the bananas.
Let’s make something delicious together, you’ve got this!
Why You’ll Love This Low-Sugar Banana Bread
Naturally Sweetened with Ripe Bananas
Ripe bananas do most of the work here. As they soften and darken, their natural sugars become stronger, which means you don’t need to add much extra sweetness.
You’ll notice the flavor is rich and slightly caramel-like without being overpowering.
If your bananas have brown spots, that’s perfect. Don’t worry if they look too ripe because they’re exactly what you want for the best taste.
Lower in Added Sugar Than Traditional Recipes
Most banana bread recipes rely heavily on white or brown sugar. This version keeps things lighter by using less added sugar while still tasting satisfying.
You still get that familiar sweetness, just without the heavy aftertaste. It’s a great option if you’re trying to cut back or simply want a more balanced treat you can enjoy more often.
Soft, Moist Texture
Even with less sugar, this bread stays soft and tender. The bananas add moisture, so every slice feels rich without being dense or dry.
You don’t need any special tricks here. Just avoid overmixing the batter, and you’ll end up with a loaf that’s light, fluffy, and easy to slice.
Simple Pantry Ingredients
You likely already have everything you need. Basic ingredients like flour, eggs, and a bit of oil or butter come together quickly.
There’s no need for anything fancy or hard to find. Let’s keep it simple so you can focus on baking, not shopping.
Suitable for Everyday Snacking or Breakfast
This is the kind of banana bread you can enjoy any time of day. It’s sweet enough for a treat but balanced enough for breakfast.
Try it with your morning coffee, pack a slice for later, or enjoy it as a quick snack. It fits easily into your routine, and you won’t feel like you’ve overdone it.
Ingredients Overview
Let’s keep this simple and practical. These are the exact amounts you’ll need, along with a few easy add-ins if you want to change things up.
A. Key Ingredients
- Ripe bananas (3 medium, about 1 to 1¼ cups mashed)
The riper, the better. Look for lots of brown spots—this is where the natural sweetness comes from. - Flour (1½ cups / 180g)
Use all-purpose flour for a soft texture, or whole wheat flour for a slightly heartier loaf. - Eggs (2 large)
These help bind everything together and give the bread structure. - Low-sugar sweetener (¼ to ⅓ cup / 60–80ml)
Honey or maple syrup works well. You can also use a sugar substitute if you prefer. Adjust slightly based on how sweet your bananas are. - Baking soda (1 teaspoon)
This helps the bread rise and keeps it light. - Butter or oil (¼ cup / 60ml, melted)
Use melted butter for flavor or a neutral oil for a softer texture. - Vanilla extract (1 teaspoon)
Adds warmth and brings all the flavors together.
B. Optional Add-Ins
- Chopped nuts (½ cup / 60g)
Walnuts or pecans add a nice crunch. Fold them in gently at the end. - Dark chocolate chips (⅓ cup / 50g)
Choose low-sugar or high-cocoa chocolate for a richer, less sweet bite. - Cinnamon or nutmeg (½ to 1 teaspoon)
A small amount adds warmth and depth. You can use either or both. - Seeds (1–2 tablespoons)
Chia or flax seeds are great for a little extra texture and nutrition.
Best Sweeteners for Low-Sugar Banana Bread
Natural Sweeteners vs Refined Sugar
Natural sweeteners like honey or maple syrup bring more than just sweetness. They add a gentle flavor and help keep the bread moist.
Refined sugar, on the other hand, is sweeter but doesn’t add much else. It can also make the bread feel heavier. If your goal is a lighter, more balanced loaf, natural options are a better fit.
Using Ripe Bananas to Reduce Added Sugar
This is where the magic happens. The riper your bananas, the sweeter your bread will be without needing extra sugar.
You’ll notice that deeply spotted bananas mash easily and taste almost like caramel.
That natural sweetness means you can cut back on added sweeteners without losing flavor. Don’t worry if they look too soft because they’re perfect for baking.
Alternatives to Try
If you want to switch things up, you’ve got a few good options:
- Honey – mild and smooth, blends easily into the batter
- Maple syrup – slightly richer flavor, still light and natural
- Coconut sugar – a less refined option with a subtle caramel taste
- Sugar substitutes – like stevia or erythritol, useful if you want very low sugar
Each one works a little differently, so you may notice small changes in texture or taste. That’s normal. Start simple, then adjust based on what you like.
Tips for Adjusting Sweetness Safely
Start with less sweetener than you think you need. You can always add a little more next time once you know your preference.
Taste your mashed bananas before mixing. If they’re very sweet, you can reduce the added sweetener even further.
Try to avoid adding too much liquid sweetener, as it can make the batter too wet. If you do increase it, balance it by slightly reducing another liquid, like oil.
Keep notes as you bake. A small adjustment can make a big difference, and you’ll quickly find your perfect level of sweetness.
How to Make Low-Sugar Banana Bread (Step-by-Step)
Let’s walk through this together. Take it one step at a time, and you’ll end up with a soft, flavorful loaf.
1. Preheat Oven and Prepare Loaf Pan
Start by preheating your oven to 180°C (350°F). This gives your batter the right environment to rise evenly.
Lightly grease a loaf pan or line it with baking paper. This makes it easier to remove the bread later, so nothing sticks or breaks.
2. Mash Bananas
Place your ripe bananas in a bowl and mash them with a fork.
You’re aiming for a smooth, slightly chunky texture. Don’t worry about making it perfect because small lumps are completely fine and add character to the bread.
3. Mix Wet Ingredients
Add the eggs, melted butter or oil, sweetener, and vanilla extract to the mashed bananas.
Stir until everything is well combined. You’ll notice the mixture becoming smooth and slightly glossy. That’s exactly what you want.
4. Combine Dry Ingredients
In a separate bowl, mix the flour and baking soda.
This step helps spread the baking soda evenly, so the bread rises properly. It only takes a few seconds but makes a big difference.
5. Fold Ingredients Together
Now, gently add the dry ingredients into the wet mixture.
Use a spoon or spatula and fold everything together slowly. Try not to overmix. Stop as soon as you no longer see dry flour, as this keeps the bread soft and tender.
6. Add Optional Mix-Ins
If you’re using nuts, chocolate chips, or seeds, fold them in at this stage.
Keep it light and gentle so the batter stays airy. You can mix and match, or keep it simple. Both work well.
7. Pour Into Pan and Bake
Pour the batter into your prepared loaf pan and smooth the top.
Place it in the oven and bake for 45–55 minutes. You’ll notice the top turning golden and slightly firm.
To check if it’s done, insert a toothpick into the center. If it comes out clean or with a few crumbs, it’s ready.
8. Cool and Slice
Remove the bread from the oven and let it cool in the pan for about 10–15 minutes.
Then transfer it to a rack to cool completely. This helps it set properly and makes slicing easier.
Once cooled, slice and enjoy. Don’t worry if you can’t wait because it’s just as good slightly warm.
Tips for Perfect Banana Bread
A few small details can make a big difference. Keep these tips in mind, and you’ll get a better result every time.
Use Overripe Bananas for Maximum Sweetness
The darker the bananas, the better the flavor. Look for peels with plenty of brown spots or even fully dark skins.
You’ll notice they mash easily and taste much sweeter than fresh bananas. This helps you keep added sugar low while still getting a rich, satisfying taste.
Don’t Overmix the Batter
Once you combine the wet and dry ingredients, mix just until everything comes together.
Overmixing can make the bread dense and heavy. Don’t worry if the batter looks a little lumpy because that’s completely fine and actually helps keep the texture soft.
Check Doneness with a Toothpick
Ovens can vary, so it’s always best to check.
Insert a toothpick into the center of the loaf. If it comes out clean or with a few crumbs, it’s ready. If you see wet batter, give it a few more minutes and check again.
Let It Cool Before Slicing
It’s tempting to cut into the bread right away, but letting it cool makes a big difference.
As it cools, the bread sets and becomes easier to slice. If you cut it too early, it may crumble or feel too soft in the middle.
Adjust Sweetness to Taste
Everyone’s preference is a little different, and that’s okay.
If you like it sweeter, you can add a bit more sweetener next time. If your bananas are very ripe, you might find you don’t need much at all.
Pay attention to what you enjoy, and adjust as you go.
Variations and Substitutions
This recipe is flexible, which makes it easy to adjust based on what you need or have on hand. Let’s walk through a few simple ways to change it up.
Gluten-Free Option
You can swap the regular flour for a gluten-free all-purpose blend.
Look for one labeled “1:1” or “cup-for-cup,” which means it replaces regular flour directly.
You’ll notice the texture may be slightly softer or more delicate, but it still holds together well. Don’t worry if it feels a bit different. It’s normal with gluten-free baking.
Dairy-Free Option
This one is very easy to adjust.
Just replace the butter with a neutral oil like vegetable oil, coconut oil, or even olive oil.
The bread will stay just as moist, and you won’t lose any flavor. You likely won’t even notice the difference.
Vegan Version (Egg Substitutes)
To make this recipe vegan, you can replace the eggs with simple alternatives.
Use 2 flax eggs (2 tablespoons ground flaxseed + 5 tablespoons water, let it sit for a few minutes to thicken) or ½ cup mashed banana or applesauce as a substitute.
You’ll notice the texture may be slightly softer, but it still works well.
Keto or Very Low-Carb Adaptation
If you’re aiming for very low sugar or carbs, a few swaps can help.
Replace the flour with almond flour or a low-carb flour blend, and use a sugar substitute like erythritol or stevia instead of honey or maple syrup.
Keep in mind, the texture will be more dense and slightly different, but still enjoyable.
Muffin Version Instead of a Loaf
If you prefer smaller portions, turn this into muffins instead of a loaf.
Divide the batter into a lined muffin tray, filling each cup about ¾ full. Bake at the same temperature, but reduce the time to 18–25 minutes.
You’ll notice they cook faster and are perfect for quick snacks or on-the-go breakfasts.
How to Store and Freeze Banana Bread
Once your banana bread is baked, storing it the right way helps keep it soft and fresh.
Room Temperature Storage Tips
If you plan to eat it within a few days, room temperature works perfectly.
Let the bread cool completely first. Then wrap it tightly in plastic wrap or store it in an airtight container.
This keeps moisture in and prevents it from drying out. You’ll notice it stays soft for about 2–3 days this way.
Keep it in a cool, dry spot, away from direct sunlight or heat.
Refrigeration for Longer Freshness
If you need it to last a bit longer, the fridge is a good option.
Wrap the bread well or place it in a sealed container before refrigerating. This helps prevent it from absorbing any fridge odors.
It can last up to 5–7 days, though you may notice it becomes slightly firmer.
That’s normal and easy to fix when reheating.
Freezing Slices for Convenience
Freezing is great if you want to save some for later.
Slice the bread first, then wrap each slice individually or place them in a freezer-safe bag. This makes it easy to take out just what you need. It can last up to 2–3 months in the freezer.
You’ll appreciate having ready-to-go slices whenever you want a quick snack.
How to Reheat
To bring back that fresh, soft texture, a little warmth helps.
Let frozen slices thaw at room temperature or microwave them for about 20–30 seconds. You can also warm slices in the oven for a few minutes if you prefer a slightly crisp edge.
You’ll notice the bread softens quickly and tastes just as good as when it was freshly baked.
Common Mistakes to Avoid
- Using underripe bananas
- Bananas that are still yellow don’t provide enough natural sweetness.
- Your bread may taste bland and less moist.
- Look for soft bananas with brown spots for the best flavor.
- Adding too much sweetener
- It’s easy to overdo it, especially if you’re unsure about sweetness.
- Too much can make the bread overly sweet and slightly sticky.
- Start with less because you can always adjust next time.
- Overbaking or underbaking
- Overbaking dries out the bread and makes it crumbly.
- Underbaking leaves the center too soft and wet.
- Use a toothpick to check—clean or slightly crumbly means it’s ready.
- Incorrect ingredient substitutions
- Swapping ingredients without adjusting ratios can affect texture.
- Too many changes at once can lead to dense or uneven results.
- Try one substitution at a time so you can see what works best.
Final Thoughts
Low-sugar banana bread is simple, satisfying, and easy to enjoy any day of the week. You still get great flavor and a soft texture, just with less added sugar and more balance.
Give it a try and see how it turns out in your kitchen. Don’t worry about making it perfect because you’ll learn as you go, and it only gets better each time.
FAQs
Yes. Use very ripe bananas for natural sweetness. The flavor will be milder but still enjoyable.
All-purpose flour gives a soft texture, while whole wheat adds more fiber and a slightly denser crumb.
Yes. Thaw them first and drain excess liquid before mashing.
Use extra ripe bananas, don’t overbake, and include enough fat like oil or butter.
It can be, with adjustments like reducing the sweetener or using a sugar substitute. It’s best to tailor it to individual needs.
Moist & Delicious Low-Sugar Banana Bread (Naturally Sweetened)
Difficulty: Easy8
Slices10
minutes45
minutes55
minutesA soft, moist banana bread naturally sweetened with ripe bananas and made with less added sugar.
Ingredients
3 ripe bananas (mashed)
1½ cups (180g) flour
2 eggs
¼–⅓ cup (60–80ml) honey or maple syrup
1 tsp baking soda
¼ cup (60ml) melted butter or oil
1 tsp vanilla extract
Optional: ½ cup nuts or ⅓ cup dark chocolate chips
Directions
- Preheat oven to 180°C (350°F) and prepare a loaf pan.
- Mash bananas in a bowl.
- Add eggs, sweetener, butter/oil, and vanilla. Mix well.
- In another bowl, combine flour and baking soda.
- Gently fold dry ingredients into the wet mixture.
- Stir in optional add-ins if using.
- Pour batter into the pan and smooth the top.
- Bake for 45–55 minutes, until a toothpick comes out clean.
- Let cool before slicing.
Notes
- Use very ripe bananas for the best natural sweetness.
- Do not overmix to keep the texture soft.
- Adjust the sweetener based on your taste.
- Store covered at room temperature for up to 3 days or freeze for longer.

Hi, I’m Sorenna Blythe, the baker and writer behind Mix Whisk Bake. I share simple, reliable recipes and honest kitchen moments to help home bakers bake with confidence and joy. When I’m not testing new treats, you’ll find me sipping coffee and dreaming up my next bake.


