There’s just something special about sharing dessert outside on a warm, sunny day.
Picnic desserts are fun, easy to pass around, and perfect for making simple moments feel a little more memorable.
The best part? They don’t need to be complicated to impress everyone at the table.
A good picnic dessert should be easy to carry, simple to serve, and able to hold up well while traveling.
That’s why this list is filled with make-ahead treats, handheld favorites, and crowd-pleasing sweets that are perfect for parks, beach days, backyard picnics, and summer gatherings.
From creamy no-bake cups to fruity bars and easy cookie treats, these recipes are packed with flavor without adding extra stress.
Grab your picnic basket, a few containers, and get ready to bring desserts everyone will ask for again and again.
1. Strawberry Shortcake Cups
Why You’ll Love It
These strawberry shortcake cups are light, fresh, and perfect for warm-weather picnics.
They’re easy to carry, simple to serve, and made in individual cups or jars, which means less mess and no slicing at the picnic table.
Recipe Overview
Layers of soft pound cake, juicy strawberries, and fluffy whipped cream come together in these easy no-fuss dessert cups.
They look beautiful, taste refreshing, and can be made ahead for stress-free entertaining.
Servings
6 cups
Prep Time
20 minutes
Chill Time
30 minutes
Ingredients
For the Strawberries
- 3 cups fresh strawberries, sliced
- 2 tablespoons granulated sugar
- 1 teaspoon lemon juice
For the Whipped Cream
- 1 ½ cups heavy whipping cream
- 3 tablespoons powdered sugar
- 1 teaspoon vanilla extract
For Assembly
- 4 cups cubed pound cake or biscuits
Instructions
Prepare the Strawberries
In a bowl, combine the sliced strawberries, granulated sugar, and lemon juice. Stir well and let them sit for about 10 minutes until juicy.
Make the Whipped Cream
In a large mixing bowl, beat the heavy whipping cream, powdered sugar, and vanilla extract until soft peaks form. Be careful not to overmix.
Assemble the Cups
Add a layer of pound cake cubes to the bottom of each jar or dessert cup. Spoon in some strawberries, then add whipped cream. Repeat the layers until the cups are full.
Chill Before Serving
Place the cups in the refrigerator for at least 30 minutes before serving for the best flavor and texture.
Serving Tip
Use mini mason jars with lids for easy transport and simple picnic serving.
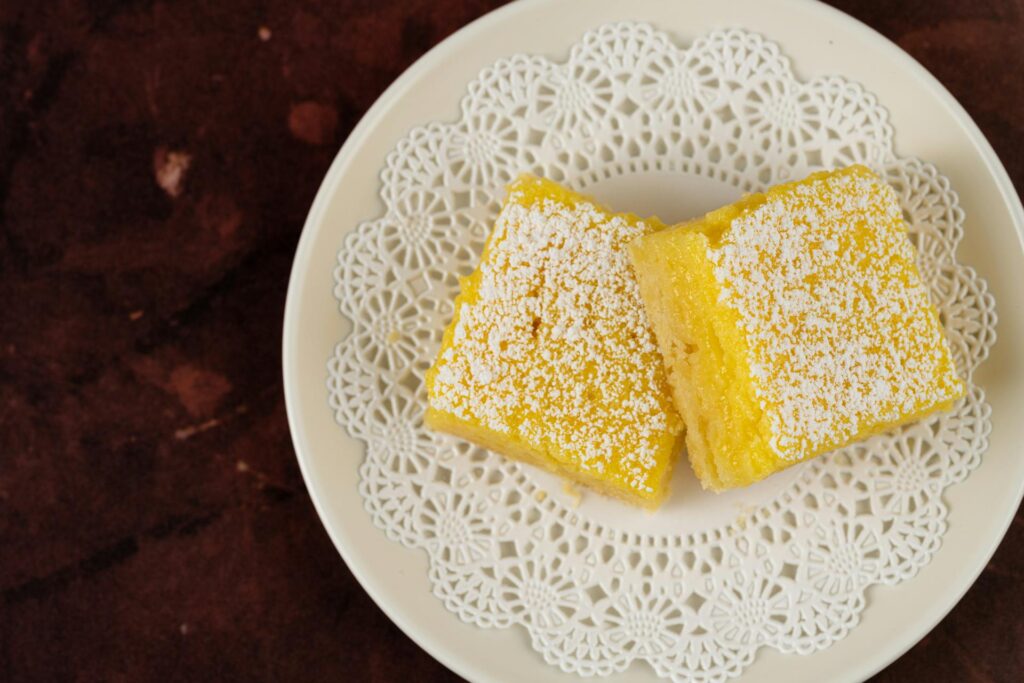
2. Lemon Bars
Why They’re Perfect for Picnics
These lemon bars are bright, buttery, and easy to pack into containers.
Their refreshing citrus flavor makes them especially popular during spring and summer gatherings.
Recipe Overview
A soft buttery crust is topped with a smooth lemon filling and finished with powdered sugar.
They’re sweet, tangy, and sturdy enough to travel well.
Servings
12 bars
Prep Time
15 minutes
Bake Time
40 minutes
Chill Time
1 hour
Ingredients
For the Crust
- 1 cup unsalted butter, softened
- 2 cups all-purpose flour
- ½ cup powdered sugar
- ¼ teaspoon salt
For the Lemon Filling
- 4 large eggs
- 1 ½ cups granulated sugar
- ¼ cup all-purpose flour
- ⅔ cup fresh lemon juice
- 1 tablespoon lemon zest
For Topping
- Powdered sugar for dusting
Instructions
Make the Crust
Preheat the oven to 350°F (175°C). Line a 9×13-inch baking dish with parchment paper.
In a bowl, mix the softened butter, flour, powdered sugar, and salt until crumbly. Press the mixture evenly into the baking dish.
Bake for 18 to 20 minutes, or until lightly golden.
Prepare the Filling
In another bowl, whisk together the eggs, granulated sugar, flour, lemon juice, and lemon zest until smooth.
Pour the filling over the warm crust.
Bake Again
Return the pan to the oven and bake for 20 to 22 minutes, or until the center is set.
Cool and Chill
Let the bars cool completely, then refrigerate for at least 1 hour before slicing.
Dust with powdered sugar right before serving.
Picnic Tip
Chilling the bars before slicing helps them hold their shape and makes them easier to pack.
3. No-Bake Oreo Cheesecake Cups
Why Everyone Loves Them
These creamy Oreo cheesecake cups are rich, easy to make, and require no baking at all.
They’re perfect for beginners and always disappear quickly at picnics and parties.
Recipe Overview
Crushed Oreos are layered with a fluffy cheesecake filling for a simple dessert that tastes impressive without much effort.
The individual cups also make serving quick and easy.
Servings
6 cups
Prep Time
20 minutes
Chill Time
2 hours
Ingredients
For the Oreo Crust
- 18 Oreo cookies, crushed
- 3 tablespoons melted butter
For the Cheesecake Filling
- 8 ounces cream cheese, softened
- ½ cup powdered sugar
- 1 teaspoon vanilla extract
- 1 ½ cups whipped topping
For Garnish
- Extra crushed Oreos
- Mini Oreo cookies (optional)
Instructions
Make the Oreo Base
In a bowl, mix the crushed Oreos and melted butter until combined.
Spoon a few tablespoons into the bottom of each dessert cup and gently press down.
Prepare the Cheesecake Filling
In a large bowl, beat the cream cheese until smooth. Add powdered sugar and vanilla extract, then mix again.
Fold in the whipped topping until light and creamy.
Assemble the Cups
Pipe or spoon the cheesecake filling over the Oreo layer. Add another sprinkle of crushed Oreos on top.
Chill
Refrigerate the cups for at least 2 hours before serving so the filling can set properly.
Make-Ahead Tip
Store the cups covered in the refrigerator for up to 2 days before your picnic.
4. Mini Fruit Tarts
Why They Stand Out
These mini fruit tarts are bright, colorful, and perfect for spring or summer picnics.
The individual servings make them easy to grab and enjoy without extra plates or cutting.
Recipe Overview
Buttery tart shells are filled with creamy vanilla custard and topped with fresh fruit for a dessert that looks impressive but is surprisingly simple to make.
They’re fresh, light, and always a favorite on dessert tables.
Servings
12 mini tarts
Prep Time
25 minutes
Bake Time
15 minutes
Chill Time
1 hour
Ingredients
For the Tart Shells
- 12 mini tart shells, baked and cooled
For the Vanilla Custard
- 2 cups whole milk
- ½ cup granulated sugar
- 3 tablespoons cornstarch
- 3 large egg yolks
- 2 tablespoons unsalted butter
- 1 teaspoon vanilla extract
For the Topping
- 1 cup strawberries, sliced
- ½ cup blueberries
- 2 kiwis, peeled and sliced
- ¼ cup raspberries
Instructions
Make the Custard
In a saucepan, heat the milk over medium heat until warm but not boiling.
In a separate bowl, whisk together the sugar, cornstarch, and egg yolks until smooth. Slowly pour in the warm milk while whisking constantly.
Return the mixture to the saucepan and cook over medium heat, stirring often, until thickened. Remove from heat and stir in the butter and vanilla extract.
Let the custard cool completely.
Fill the Tart Shells
Spoon the cooled custard evenly into the tart shells.
Add the Fruit
Top each tart with fresh strawberries, blueberries, kiwi slices, and raspberries.
Chill Before Serving
Refrigerate the tarts for at least 1 hour before serving.
Picnic Tip
Add the fruit shortly before serving to keep everything fresh and vibrant.
5. Chocolate Chip Cookie Bars
Why They’re Great for Sharing
These cookie bars are soft, chewy, and much faster to make than baking individual cookies.
They’re easy to slice, stack, and pack for picnics or potlucks.
Recipe Overview
Loaded with chocolate chips and rich brown sugar flavor, these bars have everything people love about classic chocolate chip cookies in a simple one-pan dessert.
Servings
16 bars
Prep Time
15 minutes
Bake Time
30 minutes
Ingredients
- 1 cup unsalted butter, melted
- 1 cup brown sugar
- ½ cup granulated sugar
- 2 large eggs
- 2 teaspoons vanilla extract
- 2 ¼ cups all-purpose flour
- 1 teaspoon baking soda
- ½ teaspoon salt
- 2 cups chocolate chips
Instructions
Prepare the Pan
Preheat the oven to 350°F (175°C). Line a 9×13-inch baking pan with parchment paper.
Make the Batter
In a large bowl, whisk together the melted butter, brown sugar, and granulated sugar until smooth.
Add the eggs and vanilla extract, then mix again.
Stir in the flour, baking soda, and salt until just combined. Fold in the chocolate chips.
Bake
Spread the batter evenly into the prepared baking pan.
Bake for 28 to 32 minutes, or until the edges are golden brown and the center is set.
Cool and Slice
Allow the bars to cool completely before slicing into squares.
Packing Tip
Place parchment paper between layers to keep the bars from sticking together during transport.
6. Mason Jar Banana Pudding
Why It’s Picnic-Friendly
These banana pudding jars are creamy, comforting, and easy to serve individually.
Since everything is layered in jars, they travel well and require no slicing or extra serving dishes.
Recipe Overview
Layers of vanilla pudding, bananas, whipped cream, and vanilla wafers create a classic dessert that feels homemade and nostalgic.
They’re cool, creamy, and perfect for warm outdoor gatherings.
Servings
6 jars
Prep Time
20 minutes
Chill Time
2 hours
Ingredients
- 1 box (5.1 ounces) instant vanilla pudding mix
- 2 cups cold milk
- 1 teaspoon vanilla extract
- 1 ½ cups whipped topping
- 3 bananas, sliced
- 30 vanilla wafers
Instructions
Prepare the Pudding
In a large bowl, whisk together the instant pudding mix, cold milk, and vanilla extract for about 2 minutes until thickened.
Fold in half of the whipped topping until smooth and creamy.
Assemble the Jars
Add a layer of vanilla wafers to the bottom of each mason jar.
Top with banana slices, then spoon in some pudding mixture.
Repeat the layers until the jars are full.
Add the Final Topping
Finish with the remaining whipped topping and a few crushed vanilla wafers on top.
Chill
Refrigerate for at least 2 hours before serving.
Storage Tip
Keep the jars chilled in a cooler with ice packs until ready to serve.
7. Peach Cobbler Muffins
Why They’re a Fun Twist
These peach cobbler muffins bring all the cozy flavors of classic peach cobbler into a soft, portable dessert that’s easy to pack for picnics.
They’re sweet, buttery, and perfect for grabbing on the go.
Recipe Overview
Soft peach muffins are topped with a cinnamon crumble for that classic cobbler texture everyone loves.
They taste amazing warm or chilled, making them a great make-ahead picnic dessert.
Servings
12 muffins
Prep Time
20 minutes
Bake Time
20 minutes
Ingredients
For the Muffins
- 2 cups all-purpose flour
- 1 teaspoon baking powder
- ½ teaspoon baking soda
- ½ teaspoon salt
- 1 teaspoon cinnamon
- ½ cup unsalted butter, melted
- ¾ cup brown sugar
- 2 large eggs
- ½ cup milk
- 1 teaspoon vanilla extract
- 1 ½ cups diced fresh peaches
For the Crumble Topping
- ½ cup all-purpose flour
- ¼ cup brown sugar
- 1 teaspoon cinnamon
- 3 tablespoons cold butter
Instructions
Prepare the Muffin Batter
Preheat the oven to 375°F (190°C). Line a muffin pan with paper liners.
In a bowl, whisk together the flour, baking powder, baking soda, salt, and cinnamon.
In another bowl, mix the melted butter and brown sugar until smooth. Add the eggs, milk, and vanilla extract.
Slowly stir the dry ingredients into the wet ingredients until combined. Fold in the diced peaches.
Make the Crumble
In a small bowl, combine the flour, brown sugar, cinnamon, and cold butter. Mix with a fork until crumbly.
Bake
Fill the muffin cups about ¾ full. Sprinkle the crumble topping over each muffin.
Bake for 18 to 22 minutes, or until a toothpick inserted into the center comes out clean.
Cool
Let the muffins cool slightly before serving.
Serving Idea
These muffins pair perfectly with iced coffee, sweet tea, or fresh lemonade.
8. Rice Krispie Treats with Chocolate Drizzle
Why Kids and Adults Love Them
These classic Rice Krispie treats are soft, chewy, and packed with nostalgic flavor.
The chocolate drizzle adds a fun upgrade while still keeping the recipe simple and beginner-friendly.
Recipe Overview
Made with just a few ingredients, these no-fuss treats are perfect for picnics because they travel well and don’t require refrigeration.
Servings
12 squares
Prep Time
15 minutes
Chill Time
30 minutes
Ingredients
- 6 cups crispy rice cereal
- 4 tablespoons unsalted butter
- 1 package (10 ounces) mini marshmallows
- 1 teaspoon vanilla extract
- ½ cup melted chocolate
Instructions
Melt the Marshmallow Mixture
In a large pot, melt the butter over low heat.
Add the mini marshmallows and stir until completely melted and smooth. Stir in the vanilla extract.
Mix with the Cereal
Remove the pot from the heat and gently fold in the crispy rice cereal until evenly coated.
Press into the Pan
Transfer the mixture into a greased 9×13-inch pan. Lightly press it down with a spatula or buttered hands.
Add the Chocolate Drizzle
Drizzle the melted chocolate over the top.
Cool and Slice
Allow the treats to cool for about 30 minutes before cutting into squares.
Picnic Tip
Wrap each square individually with parchment paper or plastic wrap for easy serving outdoors.
9. Berry Crumble Bars
Why They’re Ideal Outdoors
These berry crumble bars are buttery, fruity, and sturdy enough to travel well.
They’re easy to eat by hand, making them perfect for picnics, road trips, and outdoor gatherings.
Recipe Overview
A soft berry filling is layered between a buttery oat crumble crust and topping.
The sweet berries and hint of lemon make these bars taste bright and fresh without being overly heavy.
Servings
12 bars
Prep Time
20 minutes
Bake Time
40 minutes
Ingredients
For the Crumble
- 1 ½ cups all-purpose flour
- 1 cup old-fashioned oats
- ¾ cup brown sugar
- ½ teaspoon baking powder
- ½ teaspoon salt
- ¾ cup melted butter
For the Berry Filling
- 2 cups mixed berries
- ¼ cup granulated sugar
- 1 tablespoon cornstarch
- 1 teaspoon lemon zest
- 1 tablespoon lemon juice
Instructions
Prepare the Crumble Mixture
Preheat the oven to 350°F (175°C). Line an 8×8-inch baking pan with parchment paper.
In a large bowl, mix together the flour, oats, brown sugar, baking powder, salt, and melted butter until crumbly.
Press about two-thirds of the mixture firmly into the bottom of the prepared pan.
Make the Filling
In another bowl, stir together the mixed berries, granulated sugar, cornstarch, lemon zest, and lemon juice.
Spread the berry mixture evenly over the crust.
Add the Topping
Sprinkle the remaining crumble mixture over the berries.
Bake
Bake for 35 to 40 minutes, or until golden brown and bubbly.
Cool and Slice
Let the bars cool completely before slicing into squares.
Make-Ahead Tip
These bars taste even better the next day after the flavors have had time to settle.
10. Mini Key Lime Pies
Why They’re Refreshing
These mini key lime pies are cool, creamy, and packed with bright citrus flavor.
Their small size makes them perfect for summer picnics and easy outdoor serving.
Recipe Overview
A crunchy graham cracker crust is filled with smooth key lime filling and topped with whipped cream for a dessert that feels refreshing and light after a picnic meal.
Servings
12 mini pies
Prep Time
20 minutes
Bake Time
15 minutes
Chill Time
2 hours
Ingredients
For the Crust
- 1 ½ cups graham cracker crumbs
- ⅓ cup melted butter
- 2 tablespoons granulated sugar
For the Filling
- 1 can (14 ounces) sweetened condensed milk
- ½ cup key lime juice
- 1 teaspoon lime zest
- 2 large egg yolks
For Topping
- 1 cup whipped cream
- Extra lime zest for garnish
Instructions
Make the Crust
Preheat the oven to 350°F (175°C). Line a muffin pan with cupcake liners.
In a bowl, combine the graham cracker crumbs, melted butter, and sugar. Press the mixture firmly into the bottom of each liner.
Bake for 5 minutes, then let cool slightly.
Prepare the Filling
In a mixing bowl, whisk together the sweetened condensed milk, key lime juice, lime zest, and egg yolks until smooth.
Pour the filling evenly into the crusts.
Bake
Bake for 10 minutes, then remove from the oven and cool completely.
Chill
Refrigerate the mini pies for at least 2 hours.
Add the Topping
Top each pie with whipped cream and extra lime zest before serving.
Serving Tip
Serve these mini pies in cupcake liners or small jars for easy picnic transport and cleanup.
Tips for Packing Picnic Desserts
A little planning can make a huge difference when it comes to bringing desserts to a picnic.
The goal is to keep everything fresh, easy to carry, and simple to serve once you arrive.
With the right containers and a few smart packing tricks, your desserts can look just as good outdoors as they did in your kitchen.
Keep Desserts Cool
Warm weather and creamy desserts do not always mix well, especially during longer outings.
Chilled desserts like cheesecake cups, banana pudding, whipped cream desserts, and mini pies should stay cold until serving time to keep their texture and flavor at their best.
An insulated cooler with a few ice packs works perfectly for most picnic desserts.
Try placing the coldest items at the bottom of the cooler and avoid opening it too often throughout the day. This helps everything stay chilled longer.
If possible, keep your cooler in a shaded spot instead of direct sunlight.
Even a few extra minutes in the heat can soften whipped toppings or melt chocolate drizzles faster than expected.
A picnic table under a tree or a covered area can help a lot.
Choose Easy-to-Carry Containers
The right container makes transporting desserts so much easier.
Individual servings are especially helpful because they prevent messes and make serving quick and simple.
Mason jars are one of the best options for layered desserts like banana pudding, cheesecake cups, and shortcakes.
The lids help prevent spills, and they stack nicely inside coolers or baskets.
Airtight containers work well for bars, brownies, cookies, and Rice Krispie treats.
Adding parchment paper between layers helps keep desserts from sticking together during travel.
Cupcake carriers are perfect for muffins, mini pies, and fruit tarts.
They help desserts stay upright and protect delicate toppings from getting smashed on the way to the picnic.
Bring Simple Serving Supplies
Packing a few extra supplies ahead of time can make serving dessert much easier once everyone is ready to eat.
Small details often save the most stress later.
A few helpful items to bring include:
- Napkins for easy cleanup
- Small forks or spoons for creamy desserts
- Wet wipes for sticky fingers
- A small knife for slicing bars if needed
- Extra paper liners or cupcake wrappers for quick serving
Keeping everything organized in one small bag or basket can make setup feel fast and effortless.
It also lets you spend less time digging for supplies and more time enjoying dessert with everyone else.
Final Thoughts
Picnic desserts should be easy to make, simple to pack, and fun to share, and these recipes check all the boxes.
From fruity bars and creamy no-bake treats to soft muffins and refreshing mini pies, there’s something here for every summer gathering.
Try a few favorites for your next picnic, barbecue, beach day, or backyard party.
Even one homemade dessert can make the whole day feel a little more special.
Save this post for later, and don’t forget to share your favorite picnic dessert ideas too.
There’s always room for one more sweet treat in the picnic basket.


Hi, I’m Sorenna Blythe, the baker and writer behind Mix Whisk Bake. I share simple, reliable recipes and honest kitchen moments to help home bakers bake with confidence and joy. When I’m not testing new treats, you’ll find me sipping coffee and dreaming up my next bake.