There’s something special about a pineapple upside-down cake.
The moment you flip it, you’re greeted with golden, caramelized pineapple and a soft, buttery cake that feels both simple and a little bit magical.
This dessert has been loved for generations, and it’s easy to see why.
It’s comforting, beautiful without much effort, and always a crowd-pleaser.
Don’t worry if you’re new to baking because this recipe keeps things straightforward and forgiving.
I’ll guide you through each step so you can bake with confidence and enjoy every part of the process.
What Is Pineapple Upside-Down Cake?
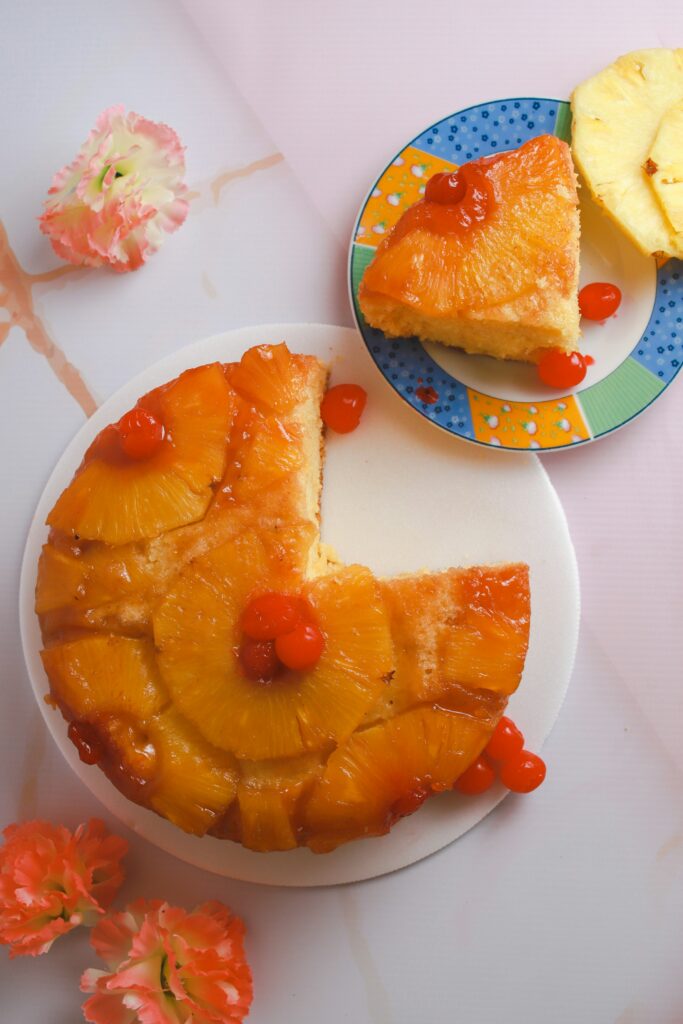
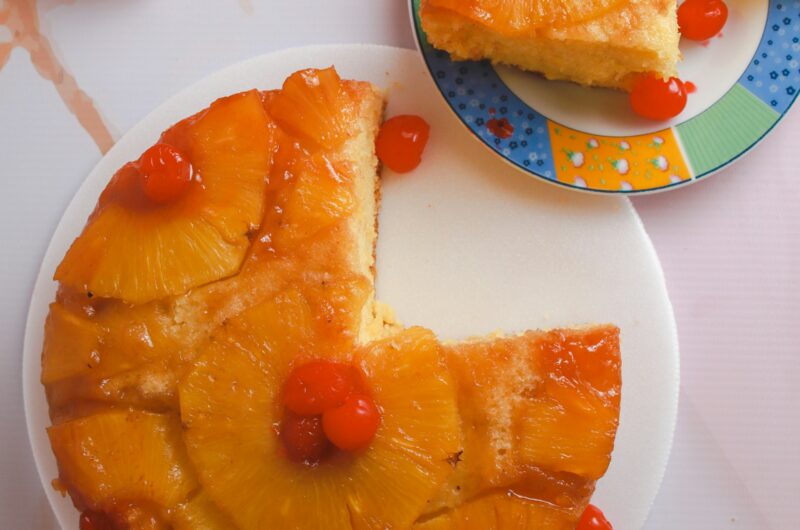
Pineapple upside-down cake is a soft, buttery cake that’s baked with fruit at the bottom of the pan and then flipped over after baking, so the topping becomes the star.
You’ll notice the top is glossy and golden, with pineapple slices nestled into a rich caramel layer made from butter and brown sugar.
This melts together in the oven and creates that sweet, slightly sticky finish everyone loves. The cake itself stays light and tender, soaking up some of that caramel flavor without becoming heavy.
Don’t worry if flipping the cake sounds tricky because it’s simpler than it seems, and that moment is part of the fun.
This dessert has been around for decades, becoming especially popular when canned pineapple made it easy for home bakers to recreate.
Since then, it’s remained a favorite because it’s reliable, uses simple ingredients, and always looks impressive without needing fancy decorating skills.
Why You’ll Love This Recipe
Moist, Buttery Cake Texture
This cake bakes up soft and tender with a rich, buttery crumb that stays moist without feeling heavy. You’ll notice how each bite has a light, fluffy texture while still holding together nicely.
That balance comes from simple mixing and not overworking the batter, so don’t worry, you don’t need advanced skills to get it right.
Sweet and Slightly Tangy Pineapple Flavor
The pineapple brings a natural sweetness with a gentle tang that keeps the cake from tasting too sugary.
As it bakes, the fruit blends with the brown sugar and butter to create a caramel-like topping that’s deep in flavor but still fresh and bright.
This contrast is what makes the cake so satisfying and easy to enjoy slice after slice.
Simple Ingredients and Beginner-Friendly
You likely already have most of the ingredients in your kitchen, and the steps are straightforward. There’s no need for special tools or complicated techniques. If you can mix, pour, and bake, you’re ready to make this cake. Even the flip at the end is simple—just give it a moment to cool slightly, then turn it out with confidence.
Perfect for Gatherings or Everyday Baking
This cake works just as well for a casual dessert as it does for sharing with guests.
It looks impressive once flipped, with its golden topping and neat pineapple rings, but it doesn’t require extra decorating.
You can serve it warm or at room temperature, and it holds up well if made a little ahead of time, which makes planning easier.
Ingredients Needed
For the Topping
- Pineapple slices (fresh or canned): 6–8 slices (drained if canned)
- Brown sugar: ½ cup (100g), packed
- Butter: ¼ cup (60g), melted
- Maraschino cherries (optional): 6–8 cherries
For the Cake Batter
- All-purpose flour: 1½ cups (190g)
- Baking powder: 1½ teaspoons
- Salt: ¼ teaspoon
- Granulated sugar: ¾ cup (150g)
- Eggs: 2 large
- Milk: ½ cup (120ml)
- Butter: ½ cup (115g), softened
- Vanilla extract: 1 teaspoon
Equipment Needed
- Round cake pan (8 or 9-inch): This size helps the cake bake evenly and keeps the topping layer just right.
- Mixing bowls: Use at least one large bowl for the batter and a smaller one for dry ingredients to keep things organized.
- Electric mixer or whisk: An electric mixer makes creaming butter and sugar easier, but a whisk works fine if you mix well and take your time.
- Spatula: Helpful for scraping down the bowl and gently folding the batter so nothing goes to waste.
- Measuring cups and spoons: Accurate measuring keeps the texture consistent, so try to level off your ingredients for the best results.
Step-by-Step Instructions
1. Prepare the Pan and Preheat the Oven
Start by preheating your oven to 180°C (350°F), so it’s ready when your cake is assembled. Lightly grease your cake pan to help prevent sticking.
This small step makes a big difference later when you flip the cake, so don’t skip it.
2. Make the Caramel Topping
Pour the melted butter into the bottom of the pan, then sprinkle the brown sugar evenly over it.
You’ll notice it starts to look like a thick, sandy layer, and that’s exactly what you want. As it bakes, this will melt into a rich caramel.
3. Arrange Pineapple Slices and Cherries
Place the pineapple slices on top of the sugar mixture, fitting them in a single layer. Add a cherry in the center of each slice if you like.
Don’t worry about making it perfect. Just aim for an even layout so every slice gets some topping.
4. Prepare the Cake Batter
In a bowl, cream the butter and sugar together until light and slightly fluffy. This means mixing until it looks pale and soft.
Add the eggs one at a time, mixing well after each. Stir in the vanilla. In a separate bowl, combine the flour, baking powder, and salt, then add this to the wet mixture along with the milk.
Mix until just combined, as you’ll notice the batter is smooth but not overly thick.
5. Pour Batter Over Topping
Gently spoon or pour the batter over the arranged pineapple. Use a spatula to spread it evenly so it covers all the fruit.
Try not to press too hard, as you don’t want to disturb the topping underneath.
6. Bake Until Golden and Cooked Through
Place the pan in the oven and bake for about 35–40 minutes. You’ll know it’s ready when the top is golden, and a toothpick inserted into the center comes out clean.
If the top browns too quickly, you can loosely cover it with foil.
7. Cool Slightly and Invert onto a Plate
Let the cake cool in the pan for about 10 minutes. This helps the topping set slightly so it doesn’t slide off. Then place a plate over the pan and carefully flip it over in one smooth motion.
Lift the pan slowly. You’ll see the glossy pineapple topping revealed. If a piece sticks, just place it back gently.
Tips for the Perfect Cake
Don’t Overmix the Batter
Once you combine the wet and dry ingredients, mix just until everything comes together. You’ll notice the batter looks smooth, and that’s your cue to stop.
Overmixing can make the cake dense instead of soft and tender, so keep it gentle and simple.
Properly Grease the Pan
Take a moment to grease your pan well, even if it’s non-stick. A light layer of butter or oil helps the caramel topping release cleanly after baking.
This step is especially important for upside-down cakes, where sticking can affect how the final cake looks.
Use the Right Pan Size
An 8 or 9-inch round pan works best for even baking. If the pan is too small, the batter may overflow. Too large, and the cake can turn out thin and dry.
Sticking to the right size helps you get that balanced texture and proper baking time.
Let the Cake Cool Briefly Before Flipping
After baking, give the cake about 10 minutes to rest. This allows the caramel to settle slightly, making it easier to release.
If you flip it too soon, it may fall apart. If you wait too long, it can stick, so timing matters here.
How to Avoid Sticking
Run a knife gently around the edges before flipping to loosen the sides. When turning the cake out, do it in one confident motion.
Don’t worry if a piece sticks; just place it back while the topping is still warm, and it will blend right in.
Variations & Substitutions
Using Fresh vs Canned Pineapple
You can use either fresh or canned pineapple, and both work well; it just depends on what you have on hand.
Canned pineapple is convenient and already soft, which makes it easy to arrange and bake evenly. Just be sure to drain it well so the cake doesn’t get too wet.
Fresh pineapple gives a brighter, slightly firmer texture and a more natural flavor. If using fresh, slice it thinly and remove the core so it softens nicely in the oven.
Adding Coconut or Rum Flavor
If you want to add a twist, a little coconut or rum flavor pairs beautifully with pineapple.
You can mix a few tablespoons of shredded coconut into the batter or sprinkle some over the topping before baking.
For a subtle rum flavor, add a small splash of rum or rum extract to the batter or even to the caramel layer. You’ll notice it adds warmth without overpowering the cake.
Gluten-Free Option
To make this cake gluten-free, simply replace the all-purpose flour with a good-quality gluten-free flour blend that’s meant for baking.
Look for one that can be used as a direct substitute (often labeled “1:1” or “cup-for-cup”).
Don’t worry if the texture is slightly different, as it should still turn out soft and enjoyable with the same great flavor.
Using a Boxed Cake Mix Shortcut
If you’re short on time, a boxed cake mix is a helpful shortcut.
Prepare the topping as usual, then mix the cake batter according to the package instructions and pour it over the pineapple layer.
This option saves time while still giving you that classic upside-down look and taste. It’s a great way to ease into baking if you’re just starting out.
Serving Suggestions
This cake is lovely served slightly warm or at room temperature, so you can choose what works best for you.
If you serve it warm, you’ll notice the topping is extra soft, and the caramel feels rich and gooey.
At room temperature, the flavors settle, and the slices hold their shape a bit more neatly, which makes serving easier.
For an extra treat, add a spoonful of whipped cream or a scoop of vanilla ice cream. The cool, creamy texture balances the sweet pineapple topping beautifully.
This cake fits just about any occasion, from a relaxed afternoon tea to a special gathering with family or friends.
It looks inviting without needing extra decoration, so you can place it straight on the table and let it shine.
Storage & Make-Ahead Tips
How to Store Leftovers
Once the cake has cooled completely, store any leftovers in an airtight container or cover it tightly with plastic wrap.
You can keep it at room temperature for up to one day if your kitchen isn’t too warm. After that, it’s best to move it to the fridge to keep it fresh.
You’ll notice the topping stays moist, which helps the cake hold up well.
Refrigeration Guidelines
Place the cake in the fridge if you plan to keep it for more than a day. It will stay fresh for about 3–4 days when properly covered.
The texture may firm up slightly in the cold, which is normal. To keep it from drying out, make sure it’s sealed well so it doesn’t absorb any fridge odors.
Reheating Tips
To bring back that soft, fresh-baked feel, warm individual slices in the microwave for about 15–20 seconds. You’ll notice the topping softens again and the cake becomes more tender.
If you prefer, you can warm larger portions in a low oven (around 150°C/300°F) for a few minutes. Don’t overheat, as this can dry the cake out.
Can You Freeze It?
Yes, you can freeze pineapple upside-down cake, but it’s best done without the topping sticking to anything. Wrap slices tightly in plastic wrap, then place them in a freezer-safe container.
Freeze for up to 2 months. When ready to enjoy, thaw in the fridge overnight, then warm slightly before serving.
Final Thoughts
This pineapple upside-down cake works because it keeps things simple while delivering big flavor—a soft, buttery base with a rich, caramelized topping that comes together without fuss.
You don’t need special skills, just a few steps and a bit of care, and you’ll end up with a cake that looks and tastes impressive.
Give it a try, and you’ll see how rewarding it is from the first flip to the last bite!
FAQs
Yes, canned pineapple works great and is the most convenient option. Just drain it well to avoid excess moisture.
This usually happens if the pan wasn’t greased properly or the cake cooled for too long before flipping. Grease well and flip after about 10 minutes.
Yes, you can bake it a day in advance. Store it covered, then gently warm before serving for the best texture.
Drain the pineapple thoroughly and avoid adding extra liquid. Also, don’t cover the cake while it’s still warm, as steam can make it soggy.
Pineapple Upside-Down Cake – Classic, Moist & Caramelized
Difficulty: Easy8
Slices15
minutes40
minutes55
minutesA soft, buttery cake topped with caramelized pineapple slices and a rich brown sugar glaze—simple, classic, and beginner-friendly.
Ingredients
- Topping:
6–8 pineapple slices (drained if canned)
½ cup (100g) brown sugar
¼ cup (60g) melted butter
6–8 maraschino cherries (optional)
- Cake Batter:
1½ cups (190g) all-purpose flour
1½ tsp baking powder
¼ tsp salt
¾ cup (150g) sugar
2 eggs
½ cup (120ml) milk
½ cup (115g) butter, softened
1 tsp vanilla extract
Directions
- Preheat oven to 180°C (350°F) and grease a round cake pan.
- Pour melted butter into the pan and sprinkle brown sugar evenly over it.
- Arrange pineapple slices and cherries on top.
- Cream butter and sugar, then add eggs and vanilla.
- Mix in dry ingredients and milk until just combined.
- Pour batter over the topping and spread gently.
- Bake for 35–40 minutes, until golden and cooked through.
- Cool for 10 minutes, then flip onto a plate and serve.
Notes
- Drain pineapple well to prevent sogginess.
- Don’t overmix the batter to keep the cake soft.
- Flip while still slightly warm for the best release.

Hi, I’m Sorenna Blythe, the baker and writer behind Mix Whisk Bake. I share simple, reliable recipes and honest kitchen moments to help home bakers bake with confidence and joy. When I’m not testing new treats, you’ll find me sipping coffee and dreaming up my next bake.


