A rainbow cake isn’t just a dessert, but it’s a celebration on a plate.
It’s the kind of cake that makes people smile before they even take a bite, perfect for birthdays, parties, or any day that needs a little extra color.
What makes it so special is simple: those bright, layered colors hidden inside. Slice into it, and you get that wow moment every single time.
And the best part? It’s easier to make than it looks.
In this guide, I’ll walk you through each step so you can bake a soft, fluffy cake with clean, vibrant layers.
What is a Rainbow Cake?
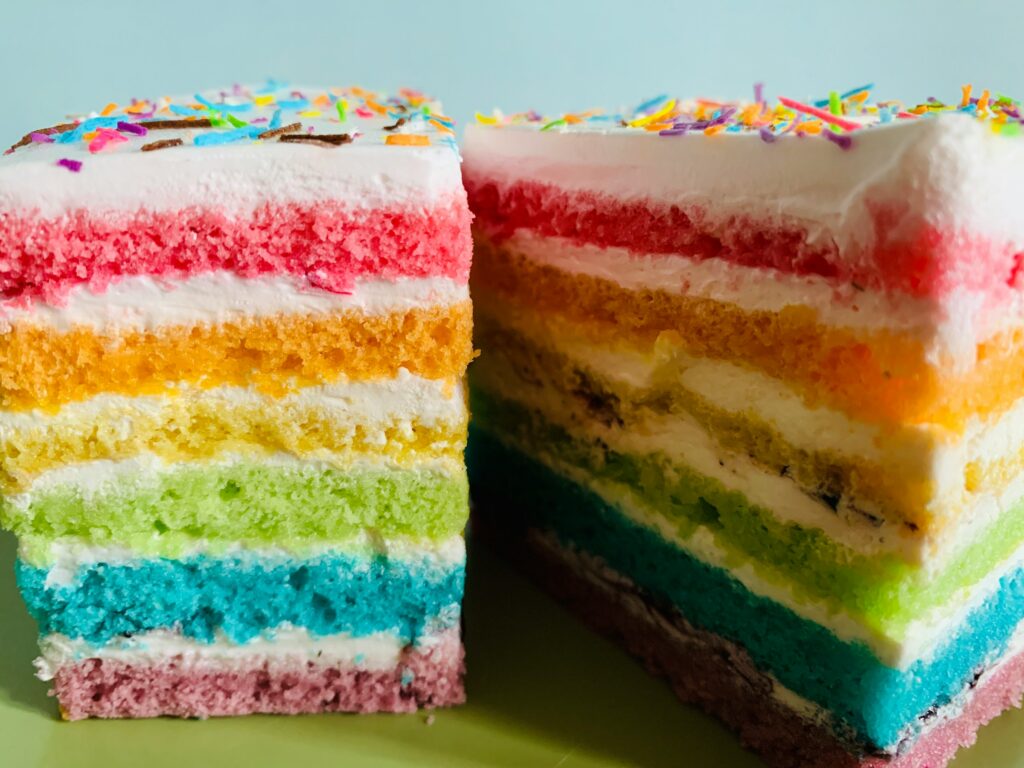
A rainbow cake is a layered cake made up of brightly colored sponge layers stacked together to create a full rainbow effect inside.
From the outside, it can look simple and smooth, but once you slice into it, you’ll see those bold, colorful layers that instantly grab attention.
It’s that surprise “wow” moment that makes this cake so fun.
It’s a popular choice for birthdays, kids’ parties, pride celebrations, and any occasion where you want something cheerful and eye-catching on the table.
The flavor is usually kept simple, most often a soft vanilla or white cake, so the focus stays on the colors while still tasting light, sweet, and crowd-pleasing.
The cake looks exciting, but the flavor is familiar and comforting, which means almost everyone will enjoy it.
Why You’ll Love This Recipe
Moist and Fluffy Texture
This cake is soft, light, and stays moist from the first slice to the last.
You’ll notice the crumb (that’s the inside texture of the cake) is tender and not dry, which makes each bite easy and enjoyable.
The method we use keeps the batter smooth and well-balanced, so you don’t end up with dense layers.
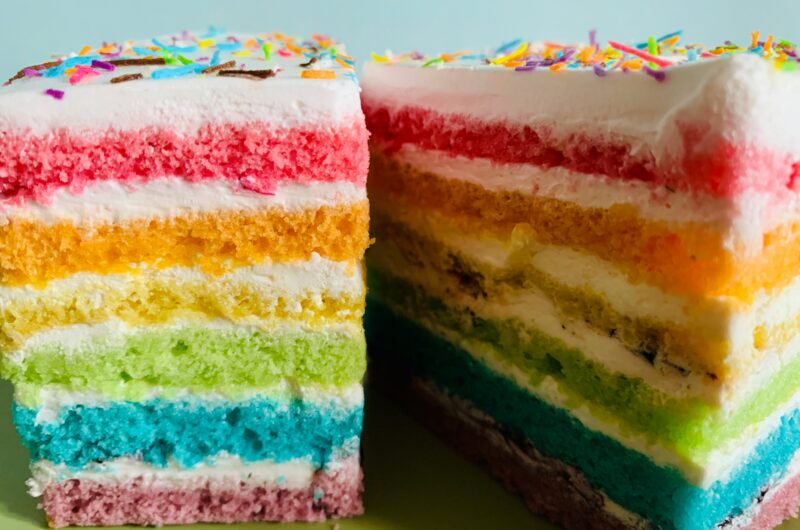
Vibrant, Evenly Colored Layers
One of the best parts of a rainbow cake is those clean, bright layers. With a few simple tips, you’ll get bold colors that don’t fade or blend into each other.
Using gel food coloring helps keep the shades strong without thinning the batter, and dividing the batter evenly ensures each layer bakes at the same height.
You’ll see a clear rainbow when you slice into it, which is exactly what makes this cake so fun to serve.
Simple Ingredients, Beginner-Friendly Steps
You won’t need anything complicated here—just basic baking ingredients you likely already have at home. The steps are straightforward to follow, even if this is your first layered cake.
We’ll take it one stage at a time, so you can focus on getting each part right without feeling rushed. If you can mix, pour, and bake, you can make this cake.
Customizable Colors and Frosting
This recipe is flexible, so you can make it your own. You can stick with classic rainbow colors or switch things up with pastels, bold shades, or even a themed color palette.
The frosting is just as adaptable. Use a simple vanilla buttercream, or try something like cream cheese if you want a slight tang.
Once you get the basics down, you’ll have the freedom to create a cake that fits any occasion.
Ingredients Needed
A. Cake Batter
- 3 cups (375g) all-purpose flour
- 1 tablespoon baking powder
- ½ teaspoon salt
- 1 cup (225g) unsalted butter, softened
- 2 cups (400g) granulated sugar
- 4 large eggs, room temperature
- 1 tablespoon vanilla extract
- 1 cup (240ml) milk, room temperature
B. Food Coloring
- Red gel food coloring (a few drops, as needed)
- Orange gel food coloring (a few drops, as needed)
- Yellow gel food coloring (a few drops, as needed)
- Green gel food coloring (a few drops, as needed)
- Blue gel food coloring (a few drops, as needed)
- Purple gel food coloring (a few drops, as needed)
C. Frosting
- 1 cup (225g) unsalted butter, softened
- 4 cups (480g) powdered sugar
- 1 tablespoon vanilla extract
- 2–3 tablespoons heavy cream or milk (adjust for consistency)
Equipment Needed
- Mixing bowls (use a few so you can divide and color the batter easily)
- Electric mixer (hand or stand mixer—either works well for smooth batter and frosting)
- Measuring cups and spoons (for accurate results, which really matters in baking)
- 6–7 round cake pans (or reuse 2–3 pans and bake in batches if needed)
- Offset spatula (helps spread batter and frosting evenly without tearing the cake)
- Cooling rack (allows the layers to cool properly so they don’t become soggy)
Step-by-Step Instructions
1. Prepare the Batter
Start by preheating your oven to 180°C (350°F) and greasing your cake pans or lining them with baking paper so the layers release easily later.
In one bowl, mix your dry ingredients (flour, baking powder, and salt) until evenly combined.
In a separate bowl, beat the butter and sugar together until the mixture looks pale and fluffy; this step adds air and helps create a soft cake.
Add the eggs one at a time, mixing well after each one, then stir in the vanilla extract. Now, slowly add the dry ingredients and milk, alternating between the two, and mix just until smooth.
Don’t overmix here; once the batter looks combined, you’re good to go.
2. Divide and Color the Batter
Next, let’s create those signature rainbow layers. Divide the batter evenly into separate bowls. Try to keep the amounts as equal as possible so the layers bake evenly.
Add a small amount of gel food coloring to each bowl and mix until you get bright, even colors.
You’ll notice gel coloring gives stronger shades without making the batter too runny. Don’t worry if the colors look bold because they soften slightly once baked.
3. Bake the Layers
Pour each colored batter into its own prepared pan and spread it out gently so the surface is even.
Bake in the preheated oven until a toothpick inserted in the center comes out clean, usually around 12–18 minutes, depending on the pan size.
Keep an eye on them, as thinner layers bake faster. Once done, remove the cakes from the oven and let them cool in the pans for a few minutes before turning them out onto a cooling rack.
Make sure the layers are completely cool before stacking, or the frosting will melt.
4. Make the Frosting
In a clean bowl, beat the butter until it becomes smooth and creamy. Gradually add the powdered sugar, mixing well so it doesn’t spill out of the bowl.
Stir in the vanilla extract, then add a little cream or milk at a time until the frosting reaches a soft, spreadable consistency.
You’re looking for something smooth that holds its shape but spreads easily. If it feels too thick, add a small splash of liquid; if too thin, a bit more powdered sugar will fix it.
5. Assemble the Cake
Now comes the fun part, which is putting it all together. Start by placing one layer on your cake board or plate, then spread a thin, even layer of frosting on top.
Continue stacking the layers in rainbow order, adding frosting between each one.
Once stacked, apply a thin “crumb coat” (a light layer of frosting that traps loose crumbs) over the entire cake and chill it briefly to set.
After that, spread the final layer of frosting smoothly over the cake. Take your time here.
You’ll notice that the smoother the finish, the more polished your cake will look when it’s done.
Tips for Perfect Rainbow Cake
Use Gel Coloring for Vibrant Shades
Gel food coloring is your best choice for bold, bright layers. It gives strong color without adding extra liquid, which helps keep your batter thick and stable.
Start with a small amount and build up the color slowly until you reach the shade you want.
You’ll notice the colors look slightly lighter after baking, so don’t be afraid to go a bit deeper when mixing.
Measure Batter Evenly for Uniform Layers
Even layers make a big difference in how your cake looks and stacks.
Try to divide the batter as evenly as possible between bowls. Using a kitchen scale helps, but you can also eyeball it carefully.
When you pour the batter into the pans, spread it out gently so each layer is level. This helps everything bake evenly and keeps your cake from leaning when stacked.
Chill Layers Before Stacking
Once your cake layers are fully cooled, it helps to chill them in the fridge for a bit before assembling. Cold layers are firmer, easier to handle, and less likely to break or crumble.
You’ll also find that frosting spreads more smoothly on chilled cake, giving you a cleaner finish. Don’t skip this step if you want a neat, stable cake.
Avoid Overmixing Batter
Mix just until everything comes together and looks smooth. Overmixing can make the cake dense instead of soft and fluffy.
When you add the dry ingredients and milk, stir gently and stop as soon as there are no visible streaks of flour.
If you’re unsure, it’s better to slightly undermix than overdo it, as you’ll still get a great result.
Variations and Customizations
Chocolate Rainbow Cake
If you prefer a richer flavor, you can turn this into a chocolate rainbow cake. Simply replace a portion of the flour with cocoa powder to create a chocolate base.
Keep in mind that darker batter will slightly affect how bright the colors appear, so you may need a bit more gel coloring to make them stand out.
You’ll notice the result is a deeper, more indulgent cake with the same fun rainbow surprise inside.
Pastel Rainbow Cake
For a softer, more delicate look, go with pastel colors instead of bold shades. Use a very small amount of gel coloring to create light tones like baby pink, pale yellow, and soft blue.
This style works especially well for baby showers or elegant celebrations. Don’t worry if the colors seem subtle because they create a beautiful effect when sliced.
Ombre-Style Cake
Instead of using multiple different colors, you can choose one color and create an ombre effect by varying the shade from light to dark.
Divide the batter and gradually add more coloring to each portion to build the gradient.
When stacked, the layers will shift smoothly from one shade to another, giving the cake a clean and modern look.
It’s a great option if you want something a little different but still eye-catching.
Different Frosting Options
You’re not limited to classic buttercream, so feel free to switch things up based on your taste.
A cream cheese frosting adds a slight tang that balances the sweetness, while whipped cream frosting is lighter and less rich.
Just keep in mind that softer frostings may need to be chilled more often to hold their shape.
Storage and Make-Ahead Tips
Once your cake is baked and frosted, storing it the right way will keep it fresh and tasting great.
If you plan to serve it within a day, you can keep it at room temperature in a covered container, as long as the room isn’t too warm. This helps the cake stay soft and prevents the frosting from hardening.
If your kitchen is warm or you need to store it longer, place the cake in the fridge; just make sure it’s well covered so it doesn’t dry out or absorb fridge smells, and let it sit at room temperature for a bit before serving so it softens again.
If you want to get ahead, you can freeze the cake layers before assembling—wrap each cooled layer tightly in plastic wrap and store them in the freezer for up to a month.
When you’re ready to use them, let them thaw in the fridge or at room temperature while still wrapped to keep moisture in.
You can also make the frosting in advance and store it in the fridge for a few days; when you’re ready to use it, let it come to room temperature and give it a quick mix to bring back its smooth, spreadable texture.
Serving Suggestions
Ideal Occasions
Rainbow cake is perfect for moments when you want something fun and memorable on the table.
It works especially well for birthdays, kids’ parties, and celebrations where color and excitement matter.
You can also use it for themed events, pride celebrations, or even as a surprise dessert for family gatherings.
You’ll notice it instantly becomes the center of attention once sliced, so it’s a great choice when you want that extra “wow” factor.
Decoration Ideas (Sprinkles, Toppers, Candles)
You can keep the outside simple or go all out with decorations, depending on your style.
A smooth layer of frosting with colorful sprinkles is an easy way to match the inside of the cake.
If you want something more playful, add cake toppers, candles, or even piped frosting details around the edges.
Small touches like a few bright sprinkles or a fun topper can make the cake feel complete without much effort.
Pairings (Ice Cream, Milk, Coffee)
This cake pairs well with simple sides that balance its sweetness. A scoop of vanilla ice cream adds a cool, creamy contrast, while a glass of milk keeps things classic and comforting.
If you’re serving adults, coffee works nicely too, as it cuts through the sweetness and complements the soft vanilla flavor.
You can keep it simple here because the cake already does most of the work.
Final Thoughts
This rainbow cake is fun to make, beautiful to serve, and even better to eat.
You get soft layers, bright colors, and that satisfying surprise when you slice into it.
Give it a try, take your time, and enjoy the process. If you make it, feel free to share your results or save this recipe for later; you’ll want to come back to it.
FAQs
Yes, you can bake in batches using the same pans. Just keep the batter covered while waiting so it doesn’t dry out.
Gel food coloring works best. It gives bright colors without thinning the batter.
Yes. You can bake the layers a day or two in advance, or freeze them for longer storage, then assemble when ready.
Mix each color separately and avoid overmixing. Also, bake layers individually rather than combining colors in one pan.
Yes, a box mix works fine. Just prepare the batter, divide it, and color it the same way.
This Rainbow Cake Recipe Is Guaranteed to Steal the Show
Difficulty: Easy10
Slices30
minutes15
minutes1
hour30
minutesA soft, fluffy vanilla cake with vibrant rainbow layers, stacked and frosted for a fun, colorful dessert perfect for celebrations.
Ingredients
- Cake Batter:
3 cups (375g) all-purpose flour
1 tbsp baking powder
½ tsp salt
1 cup (225g) unsalted butter, softened
2 cups (400g) sugar
4 eggs
1 tbsp vanilla extract
1 cup (240ml) milk
- Food Coloring:
Gel food coloring (red, orange, yellow, green, blue, purple)
- Frosting:
1 cup (225g) butter, softened
4 cups (480g) powdered sugar
1 tbsp vanilla extract
2–3 tbsp cream or milk
Directions
- Preheat oven to 180°C (350°F) and prepare cake pans.
- Mix dry ingredients in one bowl. In another, beat butter and sugar until fluffy.
- Add eggs and vanilla, then alternate adding dry ingredients and milk.
- Divide the batter evenly and color each portion.
- Pour into pans and bake for 12–18 minutes. Cool completely.
- Beat frosting ingredients until smooth and spreadable.
- Stack cake layers with frosting between each, then frost the outside.
Notes
- Use gel coloring for bright, even layers.
- Chill cake layers before assembling for easier stacking.
- Don’t overmix the batter to keep the cake soft and fluffy.

Hi, I’m Sorenna Blythe, the baker and writer behind Mix Whisk Bake. I share simple, reliable recipes and honest kitchen moments to help home bakers bake with confidence and joy. When I’m not testing new treats, you’ll find me sipping coffee and dreaming up my next bake.


