There’s something special about citrus desserts.
The bright, fresh flavors make every bite feel light, sweet, and refreshing without being too heavy.
A little lemon, lime, or orange can completely transform a simple dessert into something vibrant and memorable.
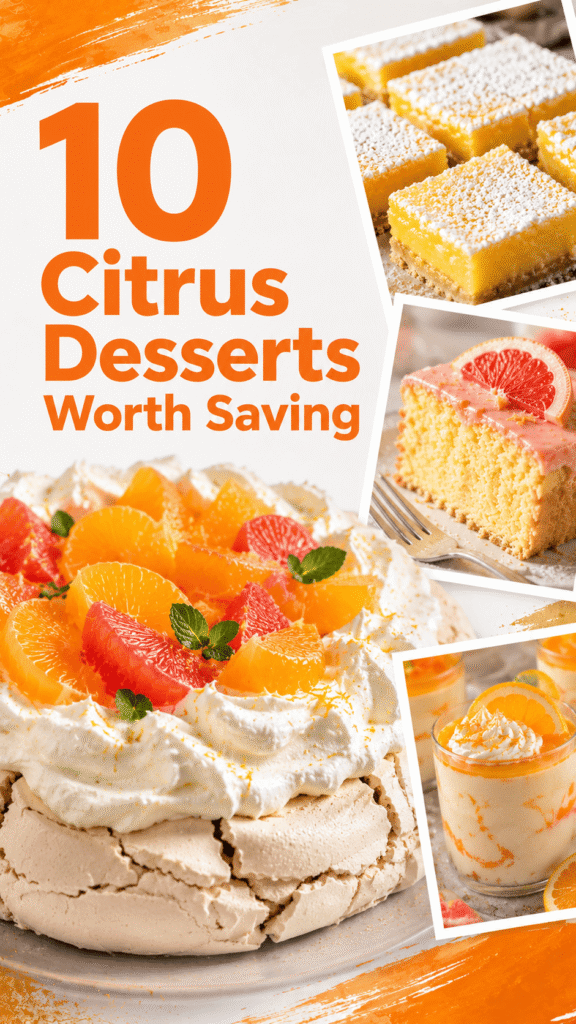
This collection brings together some of the best citrus treats to bake all year long.
You’ll find everything from creamy pies and soft cakes to chilled desserts, cookies, bars, and frozen favorites.
Some are rich and comforting, while others are cool and perfect for warm days.
1. Classic Lemon Bars
Classic lemon bars are one of those desserts that never go out of style.
They’re bright, buttery, sweet, and tangy all at once.
The soft lemon filling paired with a crisp shortbread crust creates the perfect balance of texture and flavor.
They also happen to be surprisingly simple to make.
If you’re new to baking, this is a great recipe to start with because the steps are straightforward and the ingredients are easy to find.
These bars taste even better after chilling, which makes them perfect for preparing ahead of time for parties, holidays, or weekend treats.
Why You’ll Love This Recipe
These lemon bars are packed with fresh citrus flavor without being too sour.
The filling is smooth and creamy, while the crust stays rich and buttery underneath.
Here’s why they’re always a favorite:
- Fresh lemon juice gives them a bright, homemade taste
- The buttery crust adds the perfect contrast to the soft filling
- They’re easy to slice and serve
- The recipe uses simple pantry ingredients
- They taste amazing, chilled straight from the fridge
Key Ingredients
For the Shortbread Crust
- 1 cup unsalted butter, softened
- ½ cup granulated sugar
- 2 cups all-purpose flour
- ¼ teaspoon salt
For the Lemon Filling
- 4 large eggs
- 1½ cups granulated sugar
- ¼ cup all-purpose flour
- ⅔ cup fresh lemon juice (about 3–4 lemons)
- 1 tablespoon lemon zest
For Serving
- Powdered sugar for dusting
How to Make Classic Lemon Bars
Step 1: Prepare the Baking Pan
Preheat your oven to 350°F (175°C).
Line a 9×13-inch baking pan with parchment paper, leaving a little overhang on the sides.
This makes lifting the bars out much easier later.
Step 2: Make the Shortbread Crust
In a large mixing bowl, combine the softened butter and sugar until smooth.
Add the flour and salt, then mix until a soft dough forms.
Press the dough evenly into the bottom of the prepared pan.
Try to create a smooth, even layer so the bars bake evenly.
Bake for 18–20 minutes, or until the edges look lightly golden.
Step 3: Prepare the Lemon Filling
While the crust bakes, whisk together the eggs and sugar in a separate bowl until smooth.
Add the flour, fresh lemon juice, and lemon zest. Whisk again until fully combined and slightly frothy.
Fresh lemon juice makes a huge difference here.
Bottled juice can work in a pinch, but fresh lemons give the bars a brighter and more natural flavor.
Step 4: Bake the Lemon Bars
Pour the lemon filling directly over the warm crust.
Return the pan to the oven and bake for 20–25 minutes.
The center should look set and no longer jiggle when gently moved.
Avoid overbaking. The filling will continue to firm up as it cools.
Step 5: Cool and Chill
Let the bars cool completely at room temperature first.
Then transfer them to the refrigerator for at least 2 hours.
Chilling helps the filling set properly and gives the bars their classic texture.
Helpful Tips for the Best Lemon Bars
Use Fresh Lemons
Fresh lemon juice and zest create the best flavor.
The zest adds extra citrus aroma without making the filling too liquid.
Don’t Skip the Parchment Paper
It makes removing and slicing the bars much easier and keeps the edges neat.
Chill Before Slicing
Cold lemon bars cut more cleanly and hold their shape better.
Wipe the Knife Between Cuts
A clean knife helps create smooth, bakery-style slices.
Serving Ideas
These lemon bars are delicious on their own, but a few simple touches can make them feel extra special.
- Dust generously with powdered sugar before serving
- Serve chilled for the best flavor and texture
- Add fresh berries on the side
- Pair with tea, coffee, or iced lemonade
2. Orange Creamsicle Cheesecake Cups
If you love the classic orange creamsicle flavor, these cheesecake cups are going to become a favorite quickly.
They’re creamy, smooth, and packed with fresh orange flavor, while the vanilla adds that nostalgic creamsicle taste everyone recognizes right away.
One of the best parts about this dessert is how easy it is to make.
There’s no need to turn on the oven, which makes these cheesecake cups perfect for warm days, busy weekends, or last-minute gatherings.
The individual servings also make them great for parties because they look beautiful with very little effort.
The texture is light yet rich, and the citrus flavor keeps every bite refreshing instead of overly heavy.
Why You’ll Love This Recipe
These cheesecake cups are simple, fun, and beginner-friendly.
Even if you’ve never made cheesecake before, this recipe is easy to follow.
Here’s why they work so well:
- No baking required
- Creamy texture with bright orange flavor
- Easy to prepare ahead of time
- Perfect for parties and holidays
- Simple ingredients with big flavor
They also store well in the fridge, so you can make them the night before and have dessert ready to go.
Key Ingredients
For the Graham Cracker Base
- 1½ cups graham cracker crumbs
- 5 tablespoons unsalted butter, melted
- 2 tablespoons granulated sugar
For the Cheesecake Filling
- 16 ounces cream cheese, softened
- ¾ cup powdered sugar
- 1 teaspoon vanilla extract
- ⅓ cup fresh orange juice
- 1 tablespoon orange zest
- 1 cup whipped cream or whipped topping
Optional Toppings
- Extra orange zest
- Whipped cream
- Orange slices
- Crushed graham crackers
How to Make Orange Creamsicle Cheesecake Cups
Step 1: Prepare the Crust
In a medium bowl, combine the graham cracker crumbs, melted butter, and sugar.
Stir until the crumbs look evenly coated and resemble wet sand.
Spoon the mixture into small dessert jars or cups.
Press it down gently using the back of a spoon to create a firm base.
Place the cups in the refrigerator while you prepare the filling.
Step 2: Make the Cheesecake Filling
In a large mixing bowl, beat the softened cream cheese until smooth and creamy.
This step is important because it helps prevent lumps later.
Add the powdered sugar and vanilla extract. Mix again until fully combined.
Pour in the fresh orange juice and add the orange zest.
The zest adds a stronger citrus flavor without making the filling watery, so don’t skip it if possible.
Step 3: Fold in the Whipped Cream
Gently fold the whipped cream into the cheesecake mixture using a spatula.
Take your time here. Folding keeps the filling light and fluffy instead of dense.
Mix just until everything looks smooth and evenly combined.
Step 4: Assemble the Cheesecake Cups
Spoon or pipe the filling into the prepared cups over the graham cracker crust.
Smooth the tops with a spoon or leave soft swirls for a more casual homemade look.
Step 5: Chill Before Serving
Refrigerate the cheesecake cups for at least 3–4 hours so the filling can firm up properly.
If you have extra time, letting them chill overnight gives the best texture and flavor.
Helpful Tips for the Best Cheesecake Cups
Use Softened Cream Cheese
Cold cream cheese can leave small lumps in the filling.
Let it sit at room temperature for about 30 minutes before mixing.
Use Fresh Orange Juice
Fresh juice gives the dessert a brighter and more natural citrus flavor compared to bottled juice.
Don’t Overmix the Filling
Once the whipped cream is added, mix gently to keep the texture airy and smooth.
Make Them Ahead
These cups are ideal for preparing in advance because they hold their shape well after chilling.
Serving Ideas
These cheesecake cups already look beautiful on their own, but simple toppings can make them even more special.
- Garnish with fresh orange zest for extra citrus flavor
- Add a swirl of whipped cream before serving
- Top with crushed graham crackers for texture
- Serve in clear jars or dessert glasses to show the layers
3. Lime Coconut Cupcakes
These lime coconut cupcakes taste like a little tropical getaway in dessert form.
The fresh lime adds a bright citrus flavor, while the coconut keeps the cupcakes soft, rich, and incredibly moist.
Together, they create a dessert that feels light, fresh, and perfect for warm weather.
They’re especially great for summer parties, birthdays, and casual weekend baking.
The flavors are simple but memorable, and the cupcakes look beautiful with very little decorating effort.
Even beginners can make these with confidence.
The best part is how balanced they taste.
The lime keeps the sweetness from feeling too heavy, while the coconut adds warmth and texture to every bite.
Why You’ll Love This Recipe
These cupcakes are soft, fluffy, and packed with fresh flavor.
They stay moist for days and work well for both casual desserts and special occasions.
Here’s why they’re worth making:
- Bright lime flavor keeps them refreshing
- Coconut milk creates a soft texture
- Easy recipe with simple ingredients
- Great for parties and gatherings
- Beautiful tropical flavor combination
They also smell amazing while baking, which is always a bonus.
Key Ingredients
For the Cupcakes
- 1½ cups all-purpose flour
- 1 teaspoon baking powder
- ¼ teaspoon baking soda
- ¼ teaspoon salt
- ½ cup unsalted butter, softened
- ¾ cup granulated sugar
- 2 large eggs
- 1 teaspoon vanilla extract
- 1 tablespoon lime zest
- ¼ cup fresh lime juice
- ½ cup canned coconut milk
- ½ cup shredded coconut
For the Coconut Frosting
- 1 cup unsalted butter, softened
- 3 cups powdered sugar
- 2 tablespoons coconut milk
- 1 teaspoon vanilla extract
Optional Toppings
- Toasted coconut
- Thin lime slices
- Extra lime zest
How to Make Lime Coconut Cupcakes
Step 1: Prepare the Oven and Pan
Preheat your oven to 350°F (175°C).
Line a 12-cup muffin pan with cupcake liners.
This helps prevent sticking and makes cleanup easier.
Step 2: Mix the Dry Ingredients
In a medium bowl, whisk together the flour, baking powder, baking soda, and salt.
This helps evenly distribute the ingredients so the cupcakes bake properly.
Step 3: Cream the Butter and Sugar
In a large bowl, beat the softened butter and sugar together until light and fluffy.
This usually takes about 2–3 minutes.
Don’t rush this step.
Creaming the butter properly helps create soft cupcakes with a lighter texture.
Step 4: Add the Wet Ingredients
Mix in the eggs one at a time. Then add the vanilla extract, lime zest, and fresh lime juice.
The batter may look slightly curdled after adding the lime juice, and that’s completely normal.
Step 5: Combine Everything Together
Add half of the dry ingredients to the bowl, followed by the coconut milk.
Then add the remaining dry ingredients.
Mix gently until just combined. Fold in the shredded coconut last.
Try not to overmix the batter. Overmixing can make cupcakes dense instead of soft and fluffy.
Step 6: Bake the Cupcakes
Fill each cupcake liner about two-thirds full.
Bake for 18–20 minutes, or until the tops spring back lightly when touched and a toothpick inserted into the center comes out clean.
Let the cupcakes cool completely before frosting.
How to Make the Coconut Frosting
In a large bowl, beat the softened butter until creamy.
Gradually add the powdered sugar, mixing slowly at first.
Add the coconut milk and vanilla extract, then beat until the frosting becomes smooth and fluffy.
If the frosting feels too thick, add a small splash of coconut milk. If it feels too soft, add a little more powdered sugar.
Decorating the Cupcakes
Spread or pipe the frosting onto the cooled cupcakes.
Top with toasted coconut for extra crunch and flavor.
A small lime slice or a sprinkle of lime zest adds a fresh, bright finish that makes the cupcakes look bakery-worthy without much effort.
Helpful Tips for the Best Cupcakes
Use Fresh Lime Juice and Zest
Fresh lime gives the cupcakes a cleaner and brighter flavor than bottled juice.
Shake the Coconut Milk First
Coconut milk can separate in the can, so give it a good shake before measuring.
Cool Completely Before Frosting
Warm cupcakes can melt the frosting quickly, so be patient here.
Toast the Coconut Carefully
Toasted coconut adds wonderful flavor, but it can burn fast. Keep an eye on it while cooking.
Serving Ideas
These cupcakes are best served fresh, but they also stay moist for a couple of days when stored in an airtight container.
Here are a few fun serving ideas:
- Top with toasted coconut for crunch
- Add thin lime slices for decoration
- Serve chilled on hot summer days
- Pair with iced tea, lemonade, or coffee
4. Grapefruit Yogurt Cake
Grapefruit yogurt cake is soft, fresh, and wonderfully light without feeling plain.
The grapefruit adds a slightly bittersweet citrus flavor that makes this cake stand out from more traditional lemon or orange desserts.
Paired with creamy Greek yogurt and olive oil, the result is a moist cake with a tender crumb and a delicate citrus finish.
This is the kind of dessert that feels elegant without requiring complicated steps.
It works just as well for a quiet afternoon treat as it does for brunch, holidays, or casual gatherings.
The flavors are simple, but they come together beautifully.
If you’ve never baked with grapefruit before, this recipe is a great place to start.
The citrus flavor stays balanced and mellow once baked, especially with the soft sweetness of the cake.
Why You’ll Love This Recipe
This cake is easy to make and has a fresh flavor that feels a little different from classic citrus desserts.
Here’s what makes it special:
- Greek yogurt keeps the cake soft and moist
- Grapefruit adds a bright but slightly bittersweet flavor
- Olive oil creates a tender texture
- Simple ingredients with beautiful results
- Perfect with tea, coffee, or brunch spreads
It also tastes even better a few hours after baking, once the citrus flavors settle into the cake.
Key Ingredients
For the Cake
- 1½ cups all-purpose flour
- 2 teaspoons baking powder
- ¼ teaspoon salt
- 1 cup granulated sugar
- 2 large eggs
- ½ cup plain Greek yogurt
- ½ cup olive oil
- ⅓ cup fresh grapefruit juice
- 1 tablespoon grapefruit zest
- 1 teaspoon vanilla extract
For the Grapefruit Glaze
- 1 cup powdered sugar
- 2–3 tablespoons fresh grapefruit juice
How to Make Grapefruit Yogurt Cake
Step 1: Prepare the Pan and Oven
Preheat your oven to 350°F (175°C).
Grease a standard loaf pan and line it with parchment paper for easier removal later.
Step 2: Mix the Dry Ingredients
In a medium bowl, whisk together the flour, baking powder, and salt.
This simple step helps the cake rise evenly and prevents pockets of baking powder in the batter.
Step 3: Combine the Wet Ingredients
In a large mixing bowl, whisk together the sugar and eggs until smooth and slightly pale.
Add the Greek yogurt, olive oil, grapefruit juice, grapefruit zest, and vanilla extract. Mix until fully combined.
The batter will smell fresh and citrusy right away, which is always a good sign.
Step 4: Mix the Batter
Gradually add the dry ingredients into the wet ingredients.
Stir gently until no dry streaks remain. Avoid overmixing, because too much mixing can make the cake dense instead of soft.
The batter should look smooth and slightly thick.
Step 5: Bake the Cake
Pour the batter into the prepared loaf pan and smooth the top.
Bake for 45–50 minutes, or until a toothpick inserted into the center comes out clean.
If the top starts browning too quickly, loosely cover the cake with foil during the last 10 minutes of baking.
Step 6: Cool the Cake
Allow the cake to cool in the pan for about 15 minutes before transferring it to a wire rack.
Let it cool completely before adding the glaze.
How to Make the Grapefruit Glaze
In a small bowl, whisk together the powdered sugar and grapefruit juice until smooth.
Start with 2 tablespoons of juice, then add more if needed until the glaze reaches a pourable consistency.
Drizzle the glaze over the cooled cake and let it set for a few minutes before slicing.
The glaze adds extra citrus flavor while keeping the cake soft and moist.
Helpful Tips for the Best Grapefruit Cake
Use Fresh Grapefruit Juice
Fresh juice gives the cake a cleaner, brighter flavor that bottled juice can’t fully match.
Don’t Skip the Zest
The zest holds a lot of the grapefruit’s natural oils, which adds extra flavor without making the batter too wet.
Measure Flour Carefully
Too much flour can make the cake dry. Spoon the flour into the measuring cup and level it off gently.
Let the Cake Cool Fully
Adding glaze to a warm cake can cause it to soak in too quickly instead of sitting nicely on top.
Serving Ideas
This cake is simple enough for everyday baking but elegant enough to serve to guests.
Here are a few easy ways to serve it:
- Drizzle with grapefruit glaze for extra citrus flavor
- Pair with tea or coffee
- Serve with whipped cream or yogurt
- Add fresh grapefruit slices on the side
5. Lemon Blueberry Cheesecake
Lemon blueberry cheesecake is the kind of dessert that always feels special.
The creamy cheesecake filling, bright lemon flavor, and sweet blueberries create a combination that tastes fresh, rich, and perfectly balanced in every bite.
The tartness from the lemon keeps the cheesecake from feeling too heavy, while the blueberries add natural sweetness and a beautiful pop of color.
It’s a dessert that looks impressive on the table but is much easier to make than many people expect.
This recipe is perfect for holidays, birthdays, summer gatherings, or anytime you want a dessert that feels a little extra comforting and elegant at the same time.
Why You’ll Love This Recipe
This cheesecake is creamy, smooth, and full of bright citrus flavor without being overly sweet.
Here’s why so many people love this combination:
- Lemon and blueberries pair beautifully together
- The texture is rich and creamy
- Graham cracker crust adds a buttery crunch
- The blueberry topping makes it look bakery-style
- It tastes even better after chilling overnight
Even beginner bakers can make this recipe successfully by taking their time and following the simple steps carefully.
Key Ingredients
For the Graham Cracker Crust
- 2 cups graham cracker crumbs
- 6 tablespoons unsalted butter, melted
- 2 tablespoons granulated sugar
For the Cheesecake Filling
- 24 ounces cream cheese, softened
- 1 cup granulated sugar
- 3 large eggs
- ¾ cup sour cream
- ¼ cup fresh lemon juice
- 1 tablespoon lemon zest
- 1 teaspoon vanilla extract
- 1 cup fresh blueberries
For the Blueberry Topping
- 1½ cups blueberries
- 2 tablespoons sugar
- 1 tablespoon lemon juice
- 1 teaspoon cornstarch mixed with 1 tablespoon water
How to Make Lemon Blueberry Cheesecake
Step 1: Prepare the Pan and Oven
Preheat your oven to 325°F (160°C).
Grease a 9-inch springform pan lightly and wrap the outside with foil if using a water bath.
A springform pan makes removing cheesecake much easier later.
Step 2: Make the Graham Cracker Crust
In a medium bowl, combine the graham cracker crumbs, melted butter, and sugar.
Mix until the crumbs resemble wet sand. Press the mixture firmly into the bottom of the prepared pan.
Bake the crust for 8–10 minutes, then let it cool slightly while preparing the filling.
Step 3: Make the Cheesecake Filling
In a large mixing bowl, beat the softened cream cheese until smooth and creamy.
Add the sugar and mix again until fully combined.
Mix in the eggs one at a time, stirring gently after each addition.
Then add the sour cream, lemon juice, lemon zest, and vanilla extract.
Try not to overmix once the eggs are added. Too much air in the batter can lead to cracks while baking.
Step 4: Add the Blueberries
Gently fold the blueberries into the cheesecake batter.
Fresh blueberries work best because they hold their shape nicely during baking.
Pour the filling over the prepared crust and smooth the top.
Step 5: Bake the Cheesecake
Bake for 55–65 minutes, or until the edges look set while the center still has a slight jiggle.
Turn off the oven and leave the cheesecake inside with the door slightly open for about 1 hour. This gradual cooling helps prevent cracks.
Afterward, transfer the cheesecake to the refrigerator and chill for at least 6 hours, though overnight is even better.
How to Make the Blueberry Topping
In a small saucepan, combine the blueberries, sugar, and lemon juice over medium heat.
Cook until the berries begin to soften and release their juices.
Stir in the cornstarch mixture and cook for another 1–2 minutes until the sauce thickens slightly.
Let the topping cool completely before spooning it over the chilled cheesecake.
Helpful Tips for the Best Cheesecake
Use Room Temperature Ingredients
Softened cream cheese mixes more smoothly and helps create a creamy filling without lumps.
Don’t Overbake
The center should still wobble slightly when the cheesecake comes out of the oven. It will continue setting as it cools.
Chill Overnight If Possible
Cheesecake develops its best texture and flavor after several hours in the fridge.
Slice with a Warm Knife
Run a knife under warm water and wipe it clean between slices for neat, smooth cuts.
Serving Ideas
This cheesecake already looks beautiful with its blueberry topping, but a few small touches can make it even more inviting.
- Spoon extra blueberry sauce over each slice
- Garnish with fresh lemon zest
- Add whipped cream on the side
- Serve chilled for the creamiest texture
6. Tangerine Panna Cotta
Tangerine panna cotta is one of those desserts that looks fancy but is surprisingly simple to make.
The texture is smooth, silky, and creamy, while the fresh tangerine flavor keeps it light and refreshing instead of overly rich.
This dessert works beautifully for dinner parties, holidays, or quiet evenings when you want something elegant without spending hours in the kitchen.
Since panna cotta is made ahead of time and chilled, it’s also a great stress-free dessert for entertaining.
The fresh citrus aroma gives every spoonful a bright and delicate flavor that feels both comforting and refreshing at the same time.
Why You’ll Love This Recipe
This panna cotta is simple, creamy, and incredibly satisfying.
Here’s why it’s such a favorite:
- Smooth and silky texture
- Fresh tangerine flavor without being too strong
- Easy make-ahead dessert
- Beautiful presentation with very little effort
- Perfect balance of creamy and refreshing
Even if you’ve never made panna cotta before, don’t worry.
The process is easier than it sounds, and the recipe comes together with just a few simple ingredients.
Key Ingredients
For the Tangerine Panna Cotta
- 2 cups heavy cream
- 1 cup whole milk
- ½ cup granulated sugar
- 1 tablespoon gelatin powder
- 3 tablespoons cold water
- ½ cup fresh tangerine juice
- 1 tablespoon tangerine zest
- 1 teaspoon vanilla extract
Optional Garnishes
- Fresh mint leaves
- Tangerine slices
- Whipped cream
- Extra tangerine zest
How to Make Tangerine Panna Cotta
Step 1: Bloom the Gelatin
In a small bowl, sprinkle the gelatin over the cold water.
Let it sit for about 5 minutes. This step is called “blooming,” and it helps the gelatin dissolve smoothly later.
The mixture will thicken and look slightly jelly-like once ready.
Step 2: Heat the Cream Mixture
In a medium saucepan, combine the heavy cream, milk, and sugar.
Warm the mixture over medium-low heat, stirring occasionally until the sugar fully dissolves. The mixture should feel hot but should not boil.
Boiling can affect the smooth texture, so gentle heat works best here.
Step 3: Add the Gelatin
Remove the saucepan from the heat.
Add the bloomed gelatin and stir until completely dissolved. Then mix in the tangerine juice, tangerine zest, and vanilla extract.
The fresh citrus smell at this stage is incredible and makes the dessert feel extra special already.
Step 4: Pour Into Serving Glasses
Carefully pour the mixture into small dessert glasses, ramekins, or jars.
Clear glasses work especially well because they show off the smooth, creamy texture beautifully.
Leave a little space at the top for garnishes later.
Step 5: Chill Until Set
Place the panna cotta in the refrigerator for at least 4–6 hours, or until fully set.
The texture should gently wobble when moved but still hold its shape.
If you’re preparing this for guests, making it the night before is even better.
Helpful Tips for the Best Panna Cotta
Don’t Boil the Cream
Gentle heat keeps the texture smooth and creamy instead of grainy.
Use Fresh Tangerine Juice
Fresh juice gives the dessert a brighter and more natural citrus flavor.
Stir the Gelatin Well
Make sure the gelatin fully dissolves so the panna cotta sets evenly without lumps.
Chill Long Enough
Panna cotta needs time to firm up properly, so try not to rush the chilling step.
Serving Ideas
This dessert is naturally elegant, so simple toppings work best.
Here are a few easy serving ideas:
- Garnish with fresh mint leaves
- Add thin tangerine slices on top
- Serve in clear dessert glasses for a beautiful presentation
- Top with whipped cream for extra richness
7. Key Lime Pie
Key lime pie is one of the most loved citrus desserts for a reason.
It’s creamy, smooth, sweet, and perfectly tangy all at the same time.
The filling has a rich texture, but the bright lime flavor keeps every bite refreshing and light.
This pie is also wonderfully simple to make.
With just a handful of ingredients, you can create a dessert that feels classic, comforting, and impressive enough for holidays or gatherings.
It’s the kind of recipe that works year-round, but it’s especially refreshing during warm weather.
The combination of the creamy lime filling and buttery graham cracker crust is hard to resist.
Once chilled, the pie slices beautifully and tastes even better cold.
Why You’ll Love This Recipe
This recipe keeps things simple while still delivering plenty of flavor.
Here’s why key lime pie remains a favorite:
- Bright citrus flavor with creamy texture
- Easy ingredient list
- Graham cracker crust adds a buttery crunch
- Great make-ahead dessert
- Perfect balance of sweet and tangy
It’s also beginner-friendly, which makes it a great choice if you’re new to baking pies.
Key Ingredients
For the Graham Cracker Crust
- 1½ cups graham cracker crumbs
- 6 tablespoons unsalted butter, melted
- 2 tablespoons granulated sugar
For the Key Lime Filling
- 4 large egg yolks
- 1 can (14 ounces) sweetened condensed milk
- ½ cup key lime juice
- 1 tablespoon lime zest
Optional Toppings
- Whipped cream
- Lime slices
- Extra lime zest
How to Make Key Lime Pie
Step 1: Prepare the Oven and Pie Dish
Preheat your oven to 350°F (175°C).
Lightly grease a 9-inch pie dish if needed.
Step 2: Make the Graham Cracker Crust
In a medium bowl, mix together the graham cracker crumbs, melted butter, and sugar.
Stir until the crumbs are evenly coated and resemble wet sand.
Press the mixture firmly into the bottom and sides of the pie dish.
Using the bottom of a measuring cup can help create an even crust.
Bake the crust for 8–10 minutes, then let it cool slightly.
Step 3: Prepare the Filling
In a large mixing bowl, whisk the egg yolks until slightly thickened.
Add the sweetened condensed milk and whisk until smooth and creamy.
Pour in the key lime juice and add the lime zest. Continue whisking until fully combined.
The filling naturally thickens slightly once the lime juice is added, which is completely normal.
Step 4: Bake the Pie
Pour the filling into the prepared crust and smooth the top.
Bake for 15–18 minutes. The center should look mostly set but still have a slight wobble.
Avoid overbaking, since the pie continues firming up as it cools.
Step 5: Chill Before Serving
Let the pie cool at room temperature first.
Transfer it to the refrigerator and chill for at least 4 hours, though overnight gives the best texture and flavor.
Cold key lime pie tastes creamier, smoother, and more refreshing.
Helpful Tips for the Best Key Lime Pie
Use Fresh Lime Juice When Possible
Fresh juice gives the pie a brighter and more natural citrus flavor.
Don’t Overmix the Filling
Mix until smooth, but avoid whipping too much air into the filling.
Chill Fully Before Slicing
The pie slices much more cleanly once thoroughly chilled.
Use a Sharp Knife for Clean Slices
Wipe the knife between cuts for smooth bakery-style slices.
Serving Ideas
Key lime pie is delicious on its own, but simple toppings make it even better.
Here are a few easy ways to serve it:
- Add swirls of whipped cream
- Garnish with thin lime slices
- Sprinkle extra lime zest on top
- Serve cold straight from the refrigerator
8. Orange Olive Oil Cake
Orange olive oil cake is simple, comforting, and full of fresh citrus flavor.
The olive oil gives the cake a rich, moist texture, while the oranges add brightness and natural sweetness.
Together, they create a dessert that feels rustic in the best possible way.
This cake has the cozy feel of something you’d find in a small bakery or café.
It doesn’t need heavy frosting or complicated decorating because the flavor and texture already shine on their own.
The golden color, soft crumb, and fresh orange aroma make it feel special with very little effort.
It’s also one of those cakes that tastes even better the next day, making it perfect for preparing ahead of time.
Why You’ll Love This Recipe
This cake is easy to make, beautifully moist, and packed with fresh orange flavor.
Here’s what makes it such a favorite:
- Olive oil creates a soft and tender texture
- Fresh oranges add natural sweetness and brightness
- Simple ingredients come together easily
- Perfect for brunch, dessert, or afternoon coffee
- Rustic bakery-style look without complicated decorating
The texture stays moist for days, so it’s a great recipe to keep on hand for gatherings or casual baking weekends.
Key Ingredients
For the Cake
- 1¾ cups all-purpose flour
- 1½ teaspoons baking powder
- ¼ teaspoon baking soda
- ½ teaspoon salt
- 3 large eggs
- 1 cup granulated sugar
- ¾ cup olive oil
- ½ cup fresh orange juice
- 1 tablespoon orange zest
- ½ cup whole milk
- 1 teaspoon vanilla extract
Optional Toppings
- Powdered sugar
- Whipped cream
- Orange slices
- Extra orange zest
How to Make Orange Olive Oil Cake
Step 1: Prepare the Oven and Pan
Preheat your oven to 350°F (175°C).
Grease an 8-inch or 9-inch round cake pan and line the bottom with parchment paper for easier removal.
Step 2: Mix the Dry Ingredients
In a medium bowl, whisk together the flour, baking powder, baking soda, and salt.
This helps the cake rise evenly and keeps the texture soft throughout.
Step 3: Whisk the Wet Ingredients
In a large bowl, whisk the eggs and sugar together until smooth and slightly lighter in color.
Slowly pour in the olive oil while whisking continuously.
Add the fresh orange juice, orange zest, milk, and vanilla extract. Mix until everything is fully combined.
The batter will smell wonderfully fresh and citrusy at this stage.
Step 4: Combine the Batter
Gradually add the dry ingredients to the wet ingredients.
Stir gently until no dry streaks remain. Be careful not to overmix the batter because that can make the cake dense.
The finished batter should look smooth and slightly thin.
Step 5: Bake the Cake
Pour the batter into the prepared cake pan and smooth the top.
Bake for 35–40 minutes, or until the top is golden and a toothpick inserted into the center comes out clean.
Allow the cake to cool in the pan for about 10–15 minutes before transferring it to a wire rack.
Helpful Tips for the Best Orange Olive Oil Cake
Use Fresh Orange Juice and Zest
Fresh oranges give the cake a brighter and more natural flavor than bottled juice.
Choose a Mild Olive Oil
A lighter olive oil works best here, so the citrus flavor stays balanced.
Don’t Overmix the Batter
Mix just until combined to keep the cake soft and tender.
Let the Cake Cool Before Topping
Powdered sugar and whipped cream look best once the cake has cooled completely.
Serving Ideas
This cake is beautiful in its simplicity, so light toppings work perfectly.
Here are a few easy serving ideas:
- Dust with powdered sugar for a classic finish
- Serve with whipped cream on the side
- Add fresh orange slices for decoration
- Pair with coffee or tea
9. Lemon Raspberry Icebox Cake
Lemon raspberry icebox cake is one of the easiest desserts to make when you want something cool, creamy, and refreshing.
It has layers of soft graham crackers, creamy lemon filling, fluffy whipped topping, and fresh raspberries that come together beautifully after chilling.
The best part is that there’s no baking required.
The refrigerator does most of the work as the graham crackers soften into delicate cake-like layers overnight.
The result tastes light, creamy, and perfect for warm weather.
This dessert is simple enough for beginners but still feels impressive when sliced and served.
The bright lemon flavor paired with sweet raspberries creates a combination that tastes fresh and balanced without being too heavy.
Why You’ll Love This Recipe
This icebox cake is easy, refreshing, and perfect for make-ahead desserts.
Here’s why it works so well:
- No oven needed
- Cool and creamy texture
- Fresh lemon and raspberry flavor combination
- Great for summer gatherings and holidays
- Easy to prepare ahead of time
It’s also very forgiving, which makes it a wonderful recipe for beginner bakers.
Key Ingredients
For the Icebox Cake
- 2 boxes (3.4 ounces each) instant lemon pudding mix
- 3 cups cold milk
- 1 container (8 ounces) whipped topping
- 1 teaspoon lemon zest
- 1 box graham crackers
- 2 cups fresh raspberries
Optional Toppings
- Extra whipped topping
- Lemon slices
- Fresh raspberries
- Crushed graham crackers
How to Make Lemon Raspberry Icebox Cake
Step 1: Prepare the Lemon Filling
In a large mixing bowl, whisk together the lemon pudding mix and cold milk for about 2 minutes until thickened.
Let the pudding sit for a few minutes to firm up slightly.
Fold in the whipped topping and lemon zest gently until smooth and creamy.
The filling should feel light and fluffy while still holding its shape.
Step 2: Prepare the Baking Dish
Use a 9×13-inch baking dish for layering.
Place a single layer of graham crackers along the bottom of the dish. Break a few crackers if needed to fit the edges neatly.
Don’t worry if it isn’t perfect. Everything softens together beautifully once chilled.
Step 3: Add the First Layer
Spread about one-third of the lemon filling over the graham crackers.
Top with a layer of fresh raspberries.
The raspberries add little bursts of sweetness and freshness throughout the dessert.
Step 4: Continue Layering
Repeat the layers:
- Graham crackers
- Lemon filling
- Fresh raspberries
Continue until all ingredients are used, finishing with a final layer of lemon filling on top.
Smooth the top gently with a spoon or spatula.
Step 5: Chill Overnight
Cover the dish and refrigerate for at least 8 hours, though overnight is best.
This chilling time is important because it softens the graham crackers into soft cake-like layers.
The texture becomes much creamier and easier to slice after resting overnight.
Helpful Tips for the Best Icebox Cake
Use Fresh Raspberries
Fresh berries hold their texture better and add a brighter flavor.
Let It Chill Long Enough
The dessert needs time to soften and set properly, so overnight chilling really makes a difference.
Fold the Whipped Topping Gently
Mix slowly to keep the filling light and fluffy.
Slice with a Sharp Knife
Clean slices look much prettier when serving. Wipe the knife between cuts if needed.
Serving Ideas
This dessert is already beautiful with its soft layers and bright berries, but simple garnishes make it even more inviting.
Here are a few easy serving ideas:
- Garnish with lemon slices
- Add extra fresh raspberries on top
- Pipe whipped topping before serving
- Sprinkle crushed graham crackers for texture
10. Citrus Pavlova
Citrus pavlova is light, crisp, creamy, and full of fresh flavor.
The delicate meringue shell has a crisp outside with a soft marshmallow-like center, while the whipped cream and citrus topping keep the dessert bright and refreshing.
It’s the kind of dessert that instantly stands out on the table.
The colorful citrus slices layered over fluffy whipped cream create a beautiful presentation without needing complicated decorating skills.
Even though pavlova looks elegant, the process is much simpler than many people expect.
The sweetness of the meringue balances the tart citrus perfectly, giving every bite a light and refreshing flavor that works especially well after heavier meals.
Why You’ll Love This Recipe
This pavlova feels special while still using simple ingredients.
Here’s why it’s such a favorite:
- Crisp and airy texture
- Beautiful dessert for gatherings and holidays
- Fresh citrus flavors keep it light
- Sweet meringue balances tart fruit perfectly
- Naturally elegant without difficult decorating
It’s also a wonderful make-ahead dessert because the meringue base can be prepared ahead of time and assembled just before serving.
Key Ingredients
For the Pavlova
- 4 large egg whites, room temperature
- 1 cup granulated sugar
- 1 teaspoon cornstarch
- 1 teaspoon white vinegar
- 1 teaspoon vanilla extract
For the Topping
- 1 cup heavy cream
- 2 tablespoons powdered sugar
- 1 teaspoon vanilla extract
Citrus Toppings
- 1 orange, peeled and sliced
- 1 lemon, thinly sliced or segmented
- 1 mandarin or tangerine, peeled
- Extra citrus zest for garnish
How to Make Citrus Pavlova
Step 1: Prepare the Oven
Preheat your oven to 250°F (120°C).
Line a baking sheet with parchment paper and draw an 8-inch circle on the paper as a guide for shaping the pavlova.
Turn the parchment over so the pencil mark stays underneath.
Step 2: Whip the Egg Whites
In a clean mixing bowl, beat the egg whites on medium speed until soft peaks form.
Soft peaks mean the egg whites hold their shape briefly before gently folding over.
Gradually add the sugar one tablespoon at a time while continuing to beat.
This slow addition helps create a smooth, glossy meringue.
Step 3: Finish the Meringue
Continue beating until stiff peaks form, and the mixture looks thick and shiny.
Rub a little meringue between your fingers. If it still feels grainy, continue mixing until the sugar dissolves fully.
Gently fold in the cornstarch, vinegar, and vanilla extract.
These ingredients help create the pavlova’s soft center and crisp outer shell.
Step 4: Shape the Pavlova
Spoon the meringue onto the prepared baking sheet using the circle as a guide.
Shape it into a round with slightly raised edges and a shallow center for holding the toppings later.
Don’t worry about making it perfectly smooth. Slight swirls and texture give pavlova its beautiful homemade look.
Step 5: Bake the Pavlova
Bake for 1 hour and 15 minutes.
Once finished, turn off the oven and leave the pavlova inside with the door slightly open until completely cooled.
Slow cooling helps prevent cracks and keeps the texture light and crisp.
How to Make the Whipped Cream Topping
In a chilled mixing bowl, beat the heavy cream, powdered sugar, and vanilla extract until soft peaks form.
Be careful not to overwhip. The cream should look soft, smooth, and easy to spread.
Assemble the Citrus Pavlova
Carefully place the cooled pavlova on a serving plate.
Spread the whipped cream gently over the center.
Top with the orange slices, lemon segments, and mandarins. Finish with extra citrus zest if desired.
The bright colors make the dessert look fresh, cheerful, and naturally beautiful.
Helpful Tips for the Best Pavlova
Use Room Temperature Egg Whites
They whip more easily and create better volume.
Add Sugar Slowly
This helps create a stable, glossy meringue.
Avoid Humid Weather if Possible
Humidity can soften the crisp outer shell of the pavlova.
Assemble Just Before Serving
The whipped cream and fruit can soften the meringue over time, so it’s best assembled shortly before eating.
Serving Ideas
This dessert already makes a beautiful centerpiece, but a few small touches can make it feel even more special.
Here are a few serving ideas:
- Top with mixed citrus slices and segments
- Add extra whipped cream on the side
- Sprinkle fresh citrus zest for extra flavor
- Serve immediately after assembling
Tips for Making the Best Citrus Desserts
- Use Fresh Citrus – Fresh juice and zest give desserts a brighter, cleaner, and more natural citrus flavor than bottled alternatives.
- Don’t Skip the Zest – Citrus zest adds bold aroma and concentrated flavor without adding extra liquid to recipes.
- Balance Sweetness Carefully – A good citrus dessert should have the right mix of sweet and tart for the freshest flavor.
- Chill When Needed – Many citrus desserts develop better texture and flavor after chilling in the refrigerator before serving.
Final Thoughts
Citrus desserts are a simple way to bring fresh, bright flavor into your kitchen any time of year.
From creamy cheesecakes and chilled treats to soft cakes and crisp pavlovas, there’s something here for every craving and occasion.
Don’t be afraid to try different citrus flavors and make each recipe your own.
A little lemon, lime, orange, or grapefruit can completely transform a homemade dessert into something refreshing and memorable.
Most importantly, have fun baking and enjoy sharing these sweet, citrus-filled treats with the people you love.
FAQs
What citrus fruits work best in desserts?
Lemons, limes, oranges, grapefruits, and tangerines are all great choices for desserts.
Can I use bottled citrus juice?
Yes, but fresh juice gives the best flavor and brightness.
How do I make citrus flavor stronger?
Add extra zest for a stronger citrus taste without adding too much liquid.
Which citrus dessert is easiest for beginners?
Lemon bars and no-bake cheesecake cups are simple and beginner-friendly options.


Hi, I’m Sorenna Blythe, the baker and writer behind Mix Whisk Bake. I share simple, reliable recipes and honest kitchen moments to help home bakers bake with confidence and joy. When I’m not testing new treats, you’ll find me sipping coffee and dreaming up my next bake.