Sometimes you just want something sweet without loading up on heavily processed ingredients.
That’s where clean-eating desserts come in.
They’re made with simple, wholesome ingredients and natural sweetness from things like fruit, honey, maple syrup, and dark chocolate.
The best part? They still taste rich, creamy, chocolatey, and completely satisfying.
From fruity frozen treats to cozy baked desserts and no-bake favorites, these recipes prove that healthier desserts never have to feel boring.
Even beginners can make them with confidence.
1. Dark Chocolate Almond Energy Bites
These dark chocolate almond energy bites are the perfect clean-eating treat when you want something sweet fast.
They’re soft, chewy, naturally sweetened with dates, and packed with rich chocolate flavor.
Since they’re completely no-bake, they’re also great for busy days or beginner bakers.
Why You’ll Love It
- No-bake and ready in minutes
- Naturally sweetened with dates
- Great for snacks, desserts, or meal prep
- Easy to store in the fridge or freezer
Ingredients
- 1 cup rolled oats
- 1/2 cup natural almond butter
- 8 Medjool dates, pitted
- 1/4 cup dark chocolate chips
- 1 tablespoon chia seeds
- 1 teaspoon vanilla extract
- Pinch of salt
Instructions
Step 1: Blend the Ingredients
Add the oats, almond butter, dates, chia seeds, vanilla extract, and salt to a food processor. Blend until the mixture becomes sticky and starts holding together.
Step 2: Add the Chocolate
Stir in the dark chocolate chips by hand so they stay chunky instead of getting blended down.
Step 3: Roll Into Balls
Scoop out small portions of the mixture and roll into bite-sized balls using your hands.
Step 4: Chill Before Serving
Place the energy bites in the refrigerator for about 20 minutes to firm up. Serve chilled or store in an airtight container for later.
2. Greek Yogurt Berry Parfaits
These Greek yogurt berry parfaits are light, creamy, and naturally sweet.
Fresh berries add brightness while crunchy granola gives every bite a little texture.
They work beautifully as a healthy dessert, quick breakfast, or afternoon snack.
Why You’ll Love It
- Creamy, fresh, and refreshing
- Packed with protein from Greek yogurt
- Easy to customize with your favorite fruit
- Takes only minutes to assemble
Ingredients
- 2 cups plain Greek yogurt
- 1 cup fresh strawberries, sliced
- 1 cup fresh blueberries
- 1 cup granola
- 2 tablespoons honey
Instructions
Step 1: Prepare the Ingredients
Wash and slice the strawberries. Gather the yogurt, blueberries, granola, and honey.
Step 2: Start Layering
Spoon a layer of Greek yogurt into serving glasses or jars.
Step 3: Add the Fruit and Granola
Top with strawberries, blueberries, and a sprinkle of granola.
Step 4: Repeat the Layers
Continue layering until the glasses are full.
Step 5: Finish and Serve
Drizzle honey over the top just before serving for extra sweetness and shine.
3. Banana Oatmeal Cookies
These banana oatmeal cookies are soft, hearty, and naturally sweetened with ripe bananas.
They’re simple enough for beginners and make a great healthier cookie option for both kids and adults.
The oats add texture while dark chocolate and walnuts make them extra satisfying.
Why You’ll Love It
- Made with simple pantry ingredients
- Soft and naturally sweet
- Great for lunchboxes or snacks
- Easy one-bowl recipe
Ingredients
- 2 ripe bananas
- 1 1/2 cups rolled oats
- 1 teaspoon ground cinnamon
- 1/3 cup dark chocolate chunks
- 1/4 cup chopped walnuts
- 1 teaspoon vanilla extract
Instructions
Step 1: Preheat the Oven
Preheat your oven to 350°F (175°C). Line a baking tray with parchment paper.
Step 2: Mash the Bananas
Place the bananas in a mixing bowl and mash until mostly smooth.
Step 3: Mix the Ingredients
Stir in the oats, cinnamon, vanilla extract, chocolate chunks, and walnuts until everything is evenly combined.
Step 4: Shape the Cookies
Scoop spoonfuls of the mixture onto the prepared baking tray and gently flatten them slightly with the back of a spoon.
Step 5: Bake Until Golden
Bake for 12–15 minutes, or until the cookies are lightly golden around the edges.
Step 6: Cool and Enjoy
Let the cookies cool for a few minutes before serving. They become slightly firmer as they cool.
4. Coconut Chia Pudding
Coconut chia pudding is one of those desserts that feels fancy even though it’s incredibly simple to make.
The chia seeds soak up the creamy coconut milk overnight, creating a rich pudding texture without any cooking.
It’s naturally dairy-free, lightly sweet, and perfect for meal prep.
Why You’ll Love It
- Creamy and satisfying
- Easy make-ahead dessert
- Naturally dairy-free
- Perfect with fresh fruit toppings
Ingredients
- 1/4 cup chia seeds
- 1 cup canned coconut milk
- 1 tablespoon maple syrup
- 1 teaspoon vanilla extract
- Fresh berries or sliced mango for topping
Instructions
Step 1: Mix the Ingredients
In a medium bowl or jar, combine the chia seeds, coconut milk, maple syrup, and vanilla extract. Stir well until everything is evenly mixed.
Step 2: Let the Chia Seeds Absorb
Allow the mixture to sit for 5 minutes, then stir again to help prevent clumps from forming.
Step 3: Refrigerate Overnight
Cover and refrigerate for at least 4 hours, though overnight gives the best thick and creamy texture.
Step 4: Add Fresh Fruit
Before serving, top with fresh berries, mango slices, or your favorite fruit for extra flavor and freshness.
5. Peanut Butter Frozen Yogurt Bark
This peanut butter frozen yogurt bark is cold, creamy, and perfect for warm days when you want a healthier dessert.
The combination of tangy yogurt, peanut butter, juicy berries, and dark chocolate makes every bite feel like a frozen treat from a café.
Why You’ll Love It
- Cool and refreshing
- Easy freezer dessert
- Great for meal prep
- Easy to customize with toppings
Ingredients
- 2 cups plain Greek yogurt
- 1/3 cup natural peanut butter
- 2 tablespoons honey
- 1/2 cup mixed berries
- 2 tablespoons melted dark chocolate
Instructions
Step 1: Prepare the Yogurt Mixture
In a mixing bowl, stir together the Greek yogurt, peanut butter, and honey until smooth and creamy.
Step 2: Spread Onto a Tray
Line a small baking tray or plate with parchment paper. Spread the yogurt mixture evenly into a thin layer.
Step 3: Add the Toppings
Scatter the berries over the top. Drizzle with melted dark chocolate for extra flavor.
Step 4: Freeze Until Firm
Place the tray in the freezer for 2–3 hours, or until completely firm.
Step 5: Break Into Pieces
Remove from the freezer and break into rustic bark pieces. Serve immediately or store frozen in an airtight container.
6. Baked Cinnamon Apples
These baked cinnamon apples are warm, soft, and full of cozy flavor.
They taste similar to apple pie filling but use simple clean ingredients instead of heavy sugars or buttery crusts.
They’re delicious on their own or served with yogurt, oatmeal, or ice cream.
Why You’ll Love It
- Warm and comforting
- Naturally sweet and flavorful
- Easy everyday dessert
- Makes the kitchen smell amazing
Ingredients
- 4 apples, sliced
- 1 teaspoon ground cinnamon
- 2 tablespoons maple syrup
- 1/4 cup rolled oats
- 1/4 cup chopped pecans
Instructions
Step 1: Preheat the Oven
Preheat your oven to 375°F (190°C).
Step 2: Prepare the Apples
Slice the apples into thin wedges and place them in a baking dish.
Step 3: Add the Flavoring
Drizzle the maple syrup over the apples, then sprinkle with cinnamon. Toss everything gently until the apples are evenly coated.
Step 4: Add the Topping
Sprinkle the oats and chopped pecans over the apples for a little crunch.
Step 5: Bake Until Soft
Bake for 25–30 minutes, stirring once halfway through, until the apples are soft and lightly caramelized.
Step 6: Serve Warm
Serve warm straight from the oven. They pair beautifully with Greek yogurt or a drizzle of almond butter.
7. Avocado Chocolate Mousse
This avocado chocolate mousse is rich, silky, and incredibly satisfying.
The avocado creates a smooth and creamy texture while cocoa powder adds deep chocolate flavor.
It’s a simple, clean-eating dessert that feels indulgent without being overly heavy.
Why You’ll Love It
- Rich and creamy texture
- Made with healthier fats
- Naturally sweetened
- Tastes surprisingly decadent
Ingredients
- 2 ripe avocados
- 1/4 cup unsweetened cocoa powder
- 3 tablespoons maple syrup
- 1 teaspoon vanilla extract
- 3 tablespoons almond milk
- Fresh berries or dark chocolate shavings for topping
Instructions
Step 1: Prepare the Ingredients
Cut the avocados in half, remove the pits, and scoop the flesh into a blender or food processor.
Step 2: Blend Until Smooth
Add the cocoa powder, maple syrup, vanilla extract, and almond milk. Blend until completely smooth and creamy. Scrape down the sides if needed.
Step 3: Adjust the Texture
If the mousse feels too thick, add another small splash of almond milk until you reach your desired consistency.
Step 4: Chill Before Serving
Transfer the mousse into serving bowls and refrigerate for at least 30 minutes for the best texture and flavor.
Step 5: Add Toppings
Top with fresh berries or dark chocolate shavings before serving.
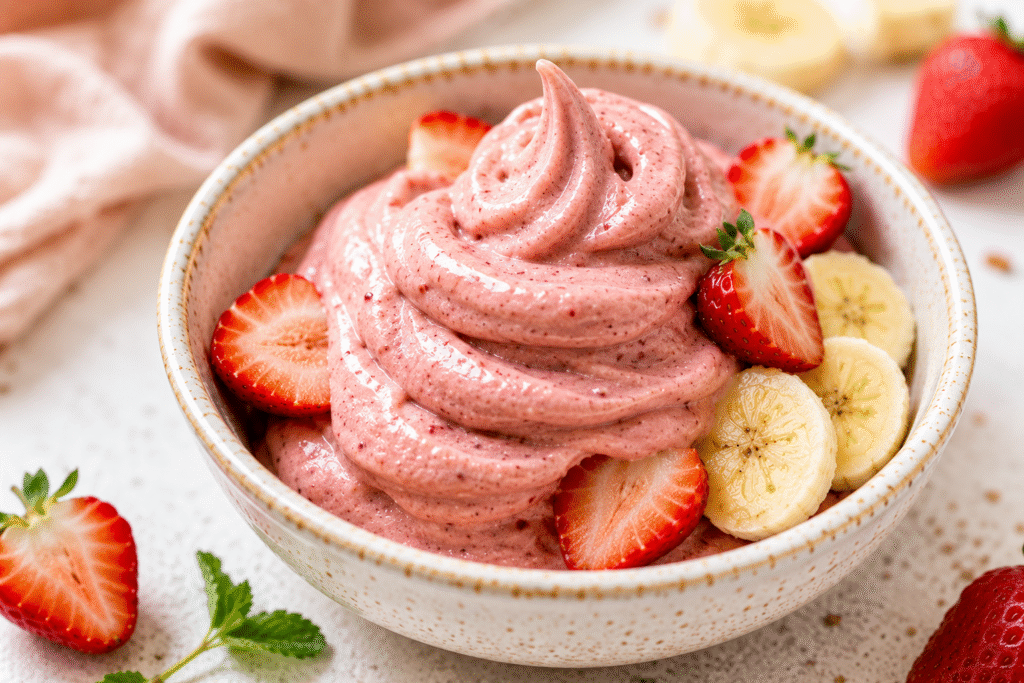
8. Strawberry Banana Nice Cream
Strawberry banana nice cream is a naturally sweet frozen dessert made entirely from fruit.
Frozen bananas create an ultra-creamy texture while strawberries add fresh fruity flavor.
It’s refreshing, simple, and perfect when you want a quick, healthy dessert.
Why You’ll Love It
- Naturally sweet with no added sugar
- Super creamy and refreshing
- Easy to make in minutes
- Great for warm weather
Ingredients
- 3 frozen bananas, sliced
- 1 cup frozen strawberries
- 2–3 tablespoons almond milk
- 1 teaspoon vanilla extract
Instructions
Step 1: Add Ingredients to Blender
Place the frozen bananas, frozen strawberries, vanilla extract, and 2 tablespoons of almond milk into a blender or food processor.
Step 2: Blend Until Creamy
Blend until the fruit becomes smooth and creamy. Stop occasionally to scrape down the sides if needed.
Step 3: Adjust the Consistency
If the mixture is too thick, add another small splash of almond milk. Be careful not to add too much, or the texture will become runny.
Step 4: Serve Immediately
Serve right away for a soft-serve texture, or freeze for 30 minutes if you prefer it firmer.
9. Almond Flour Brownies
These almond flour brownies are rich, fudgy, and full of chocolate flavor.
They’re made with simple pantry ingredients and have a soft, moist texture that feels just as satisfying as traditional brownies.
They’re also naturally gluten-free, making them great for sharing.
Why You’ll Love It
- Fudgy and chocolatey
- Gluten-free friendly
- Made with simple ingredients
- Easy one-bowl recipe
Ingredients
- 1 1/2 cups almond flour
- 1/3 cup unsweetened cocoa powder
- 2 eggs
- 1/2 cup coconut sugar
- 1/4 cup melted coconut oil
- 1 teaspoon vanilla extract
- 1/4 teaspoon salt
- 1/3 cup dark chocolate chips
Instructions
Step 1: Preheat the Oven
Preheat your oven to 350°F (175°C). Line an 8-inch baking pan with parchment paper.
Step 2: Mix the Wet Ingredients
In a large mixing bowl, whisk together the eggs, coconut sugar, melted coconut oil, and vanilla extract.
Step 3: Add the Dry Ingredients
Stir in the almond flour, cocoa powder, and salt until a thick brownie batter forms.
Step 4: Fold in the Chocolate
Mix in the dark chocolate chips for extra richness.
Step 5: Bake the Brownies
Spread the batter evenly into the prepared pan. Bake for 20–25 minutes, or until the center is set.
Step 6: Cool Before Slicing
Allow the brownies to cool completely before slicing for the best fudgy texture.
10. Lemon Blueberry Yogurt Popsicles
These lemon blueberry yogurt popsicles are bright, creamy, and refreshing.
The combination of tangy lemon, sweet blueberries, and creamy yogurt creates the perfect frozen treat for warm days.
They’re naturally sweetened and easy enough for anyone to make.
Why You’ll Love It
- Bright and refreshing flavor
- Perfect warm-weather dessert
- Naturally sweetened
- Kid-friendly and easy to make
Ingredients
- 2 cups plain Greek yogurt
- 1 cup blueberries
- 2 tablespoons lemon juice
- 2 tablespoons honey
- 1 teaspoon vanilla extract
Instructions
Step 1: Blend the Ingredients
Add the Greek yogurt, blueberries, lemon juice, honey, and vanilla extract to a blender. Blend until smooth.
Step 2: Fill the Popsicle Molds
Pour the mixture evenly into popsicle molds.
Step 3: Freeze Until Solid
Insert popsicle sticks and freeze for at least 4–6 hours, or until completely firm.
Step 4: Remove and Serve
Run the molds briefly under warm water to help release the popsicles easily before serving.
Tips For Making Clean Eating Desserts
- Use natural sweeteners like honey, maple syrup, or dates — They add sweetness while keeping desserts less processed and full of flavor.
- Choose whole food ingredients whenever possible — Simple ingredients like oats, fruit, nuts, and yogurt create desserts that feel both wholesome and satisfying.
- Keep desserts balanced with healthy fats or protein — Ingredients like nut butter, chia seeds, and Greek yogurt help make treats more filling and nourishing.
- Store homemade desserts properly for freshness — Keep desserts in airtight containers and refrigerate or freeze them when needed to maintain the best texture and flavor.
Final Thoughts
Clean eating desserts can still be rich, creamy, chocolatey, and completely satisfying.
Sometimes all it takes is a few simple ingredients to make something you’ll genuinely look forward to eating.
Try a few recipes and find your favorites.
Don’t forget to save this post and share your favorite recipe with someone who loves dessert just as much as you do.
FAQs
What makes a dessert “clean eating”?
Clean eating desserts are usually made with minimally processed ingredients and naturally sweetened with foods like fruit, honey, or maple syrup.
Are clean-eating desserts healthy?
They can be a healthier alternative to traditional desserts, especially when enjoyed in moderation as part of a balanced diet.
Can I make these desserts dairy-free?
Yes. Many of these recipes can easily be made dairy-free by using coconut milk, almond milk, or dairy-free yogurt alternatives.
Which clean-eating dessert is best for meal prep?
Energy bites, chia pudding, and frozen yogurt bark are all great make-ahead options because they store well in the fridge or freezer.

Hi, I’m Sorenna Blythe, the baker and writer behind Mix Whisk Bake. I share simple, reliable recipes and honest kitchen moments to help home bakers bake with confidence and joy. When I’m not testing new treats, you’ll find me sipping coffee and dreaming up my next bake.