Making dessert for a crowd can feel overwhelming fast. You want something easy to make, but you also want it to look impressive when you set it on the table.
That’s exactly why these desserts are perfect.
They’re simple, delicious, and made to feed a group without keeping you stuck in the kitchen for hours.
From creamy no-bake treats to warm baked favorites, these crowd-pleasing desserts are easy enough for beginners and tasty enough for everyone to ask for seconds.
1. No-Bake Oreo Cheesecake Cups
Why Everyone Loves Them
These no-bake Oreo cheesecake cups are creamy, rich, and incredibly easy to make.
Since they’re served in individual cups, they’re perfect for parties, birthdays, BBQs, and potlucks where guests can grab a dessert without extra slicing or serving.
The best part? You don’t even need to turn on the oven.
These chilled dessert cups come together quickly and always look impressive on the table.
Ingredients
For the Oreo Crust
- 24 Oreo cookies
- 4 tablespoons melted butter
For the Cheesecake Filling
- 16 ounces cream cheese, softened
- 1 cup powdered sugar
- 1 teaspoon vanilla extract
- 2 cups heavy whipping cream
- 10 crushed Oreo cookies
For Topping
- Whipped cream
- Extra crushed Oreos
- Mini Oreo cookies (optional)
How to Make It
Step 1: Make the Crust
Place the Oreo cookies in a food processor and blend until fine crumbs form. Mix the crumbs with melted butter until evenly combined.
Spoon about 2 tablespoons of the mixture into the bottom of each dessert cup and gently press down.
Step 2: Prepare the Cheesecake Filling
In a large bowl, beat the softened cream cheese until smooth and creamy. Add the powdered sugar and vanilla extract, then mix until fully combined.
In a separate bowl, whip the heavy cream until stiff peaks form. Gently fold the whipped cream into the cream cheese mixture until light and fluffy. Fold in the crushed Oreos.
Step 3: Assemble the Dessert Cups
Pipe or spoon the cheesecake filling over the Oreo crust layer. Smooth the tops with a spoon or spatula.
Step 4: Chill
Place the cups in the refrigerator for at least 2 hours before serving so the filling can firm up properly.
Step 5: Add Toppings
Top each cup with whipped cream, extra Oreo crumbs, or mini Oreo cookies right before serving.
Easy Variations
Mint Oreo Version
Use Mint Oreos instead of regular Oreos and add a few drops of peppermint extract to the filling for a cool minty flavor.
Peanut Butter Drizzle
Warm a few spoonfuls of peanut butter and drizzle it over the cheesecake cups before serving.
Mini Chocolate Chips Topping
Sprinkle mini chocolate chips on top for extra texture and chocolate flavor.
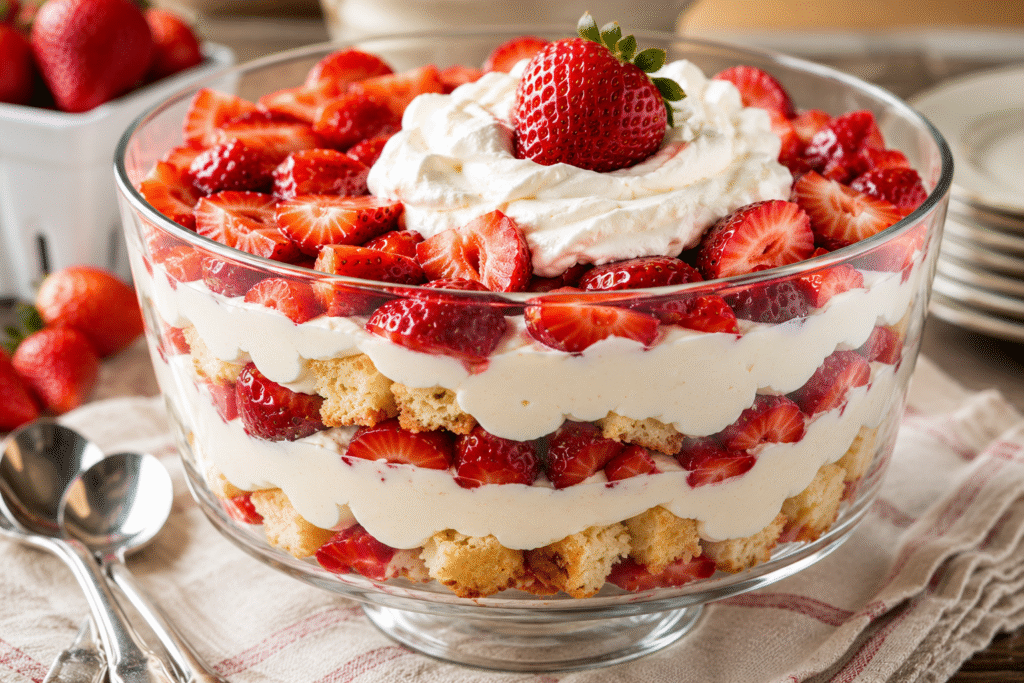
2. Strawberry Shortcake Trifle
Why It’s Perfect for a Crowd
Strawberry shortcake trifle is one of those desserts that instantly grabs attention on a dessert table.
The beautiful layers of cake, whipped cream, and strawberries make it look fancy without requiring complicated steps.
It’s also a great make-ahead dessert, which makes party prep so much easier.
Ingredients
For the Trifle
- 1 store-bought pound cake, cut into cubes
- 2 pounds fresh strawberries, sliced
- 1/4 cup granulated sugar
- 8 ounces cream cheese, softened
- 1 cup powdered sugar
- 1 teaspoon vanilla extract
- 2 cups heavy whipping cream
How to Make It
Step 1: Prepare the Strawberries
Place the sliced strawberries in a bowl and sprinkle with granulated sugar. Stir gently and let them sit for about 20 minutes to release their juices.
Step 2: Make the Cream Layer
In a large bowl, beat the cream cheese until smooth. Add powdered sugar and vanilla extract, then mix until creamy.
In another bowl, whip the heavy cream until stiff peaks form. Fold the whipped cream into the cream cheese mixture until fully combined.
Step 3: Build the Trifle
In a large trifle bowl or serving dish, add a layer of pound cake cubes.
Top with a layer of strawberries, followed by a layer of cream mixture. Repeat the layers until all ingredients are used.
Step 4: Chill Before Serving
Cover and refrigerate for at least 2 hours before serving. This helps the flavors blend together and gives the dessert the best texture.
Helpful Tips
Use Store-Bought Pound Cake for Convenience
Using pre-made pound cake saves time and still tastes delicious in this recipe.
Chill Before Serving for Best Flavor
The longer the trifle chills, the better the layers taste together. Overnight chilling works especially well.
3. Chocolate Sheet Cake
Why This Dessert Works So Well
Chocolate sheet cake is a classic crowd-pleasing dessert for a reason.
It feeds a large group easily, slices quickly, and stays soft and moist for hours.
It’s perfect for birthdays, school events, potlucks, family gatherings, and holiday parties when you need a simple dessert everyone will enjoy.
Ingredients
For the Cake
- 2 cups all-purpose flour
- 2 cups granulated sugar
- 1/2 cup unsweetened cocoa powder
- 1 teaspoon baking soda
- 1/2 teaspoon salt
- 2 large eggs
- 1 cup buttermilk
- 1/2 cup vegetable oil
- 1 teaspoon vanilla extract
- 1 cup hot coffee or hot water
For the Chocolate Frosting
- 1/2 cup unsalted butter
- 1/4 cup unsweetened cocoa powder
- 1/3 cup milk
- 3 cups powdered sugar
- 1 teaspoon vanilla extract
How to Make It
Step 1: Prepare the Pan
Preheat your oven to 350°F. Grease a 9×13-inch baking pan or line it with parchment paper.
Step 2: Mix the Dry Ingredients
In a large bowl, whisk together the flour, sugar, cocoa powder, baking soda, and salt.
Step 3: Add the Wet Ingredients
Add the eggs, buttermilk, vegetable oil, and vanilla extract. Mix until smooth. Slowly stir in the hot coffee or water. The batter will be thin, which helps create a moist cake.
Step 4: Bake the Cake
Pour the batter into the prepared pan and bake for 30 to 35 minutes, or until a toothpick inserted into the center comes out clean.
Step 5: Make the Frosting
In a saucepan over medium heat, melt the butter. Stir in the cocoa powder and milk until smooth. Remove from heat and whisk in powdered sugar and vanilla extract until creamy.
Step 6: Frost the Cake
Pour the warm frosting over the slightly cooled cake and spread evenly.
Topping Ideas
Chocolate Frosting
Classic chocolate frosting keeps the cake rich, soft, and extra chocolatey.
Sprinkles
Add colorful sprinkles for birthdays or party celebrations.
Crushed Candy Bars
Top the cake with chopped chocolate bars, toffee pieces, or crushed cookies for extra texture and flavor.
4. Banana Pudding Dessert
Why It’s Always a Hit
Banana pudding dessert is the kind of classic treat that never goes out of style.
It’s creamy, sweet, and packed with comforting flavors that both kids and adults love.
The layers of vanilla pudding, bananas, whipped topping, and cookies create a soft, rich dessert that’s perfect for feeding a crowd.
Ingredients
- 2 boxes (3.4 ounces each) instant vanilla pudding mix
- 4 cups cold milk
- 1 can (14 ounces) sweetened condensed milk
- 1 teaspoon vanilla extract
- 8 ounces cream cheese, softened
- 1 container (8 ounces) whipped topping
- 4 to 5 bananas, sliced
- 1 box vanilla wafer cookies
How to Make It
Step 1: Prepare the Pudding
In a large bowl, whisk together the instant pudding mix and cold milk for about 2 minutes until thickened. Stir in the sweetened condensed milk and vanilla extract.
Step 2: Make the Creamy Filling
In another bowl, beat the cream cheese until smooth and creamy. Fold in the whipped topping until fully combined.
Add the cream cheese mixture to the pudding mixture and stir gently until smooth.
Step 3: Layer the Dessert
In a large serving dish, trifle bowl, or dessert cups, add a layer of vanilla wafer cookies.
Top with sliced bananas, then spread a layer of pudding mixture over the top. Repeat the layers until all ingredients are used.
Step 4: Chill Before Serving
Cover and refrigerate for at least 4 hours so the cookies can soften slightly and the flavors blend together.
Serving Suggestions
Individual Cups
Serve the banana pudding in clear plastic cups for easy grab-and-go party desserts.
Large Trifle Bowl Presentation
Layer everything in a large glass trifle bowl for a beautiful centerpiece dessert that shows off all the layers.
5. Lemon Bars
Why Guests Love Them
Lemon bars are bright, refreshing, and packed with fresh citrus flavor.
The buttery crust and smooth lemon filling create the perfect balance of sweet and tart in every bite.
They’re especially great for spring parties, summer BBQs, baby showers, and holiday dessert trays.
Ingredients
For the Crust
- 2 cups all-purpose flour
- 1/2 cup granulated sugar
- 1 cup unsalted butter, softened
For the Lemon Filling
- 4 large eggs
- 1 1/2 cups granulated sugar
- 1/4 cup all-purpose flour
- 2/3 cup fresh lemon juice
- 1 tablespoon lemon zest
For Topping
- Powdered sugar for dusting
How to Make It
Step 1: Prepare the Crust
Preheat your oven to 350°F. Grease a 9×13-inch baking dish or line it with parchment paper.
In a bowl, mix the flour, sugar, and softened butter until crumbly. Press the mixture evenly into the prepared baking dish.
Step 2: Bake the Crust
Bake the crust for 18 to 20 minutes, or until lightly golden around the edges.
Step 3: Make the Lemon Filling
While the crust bakes, whisk together the eggs, sugar, flour, lemon juice, and lemon zest until smooth.
Step 4: Bake the Lemon Bars
Pour the filling over the warm crust and return the pan to the oven. Bake for 20 to 25 minutes, or until the center is set.
Step 5: Cool and Slice
Allow the bars to cool completely before slicing into squares.
Tips for Success
Dust With Powdered Sugar Before Serving
A light dusting of powdered sugar makes the bars look extra pretty and balances the tart lemon flavor.
Chill for Cleaner Slices
Refrigerate the lemon bars for at least 1 hour before cutting for neater, cleaner squares.
6. Brownie Ice Cream Sandwiches
Why They’re Fun for Parties
Brownie ice cream sandwiches are rich, fun, and incredibly easy to serve at parties.
Since they’re handheld, guests can enjoy them without needing plates or forks.
They’re especially perfect for summer gatherings, birthdays, cookouts, and family celebrations.
Ingredients
For the Brownies
- 1 box brownie mix, plus ingredients listed on the package
For the Filling
- 1 quart vanilla ice cream, softened slightly
Optional Toppings
- Mini chocolate chips
- Crushed cookies
- Rainbow sprinkles
- Caramel sauce
How to Make It
Step 1: Bake the Brownies
Prepare the brownie mix according to the package instructions and bake in a 9×13-inch pan. Allow the brownies to cool completely.
Step 2: Slice the Brownies
Cut the brownies into evenly sized squares or rectangles.
Step 3: Add the Ice Cream
Spread softened ice cream onto one brownie piece, then top with another brownie piece to create a sandwich.
Step 4: Freeze
Place the sandwiches on a baking sheet and freeze for at least 1 hour until firm.
Step 5: Decorate and Serve
Roll the edges in sprinkles, mini chocolate chips, or crushed cookies before serving.
Flavor Ideas
Cookies and Cream Ice Cream
Use cookies and cream ice cream for extra Oreo flavor and crunch.
Caramel Drizzle
Drizzle caramel sauce over the brownie sandwiches before serving for a rich, sweet finish.
Rainbow Sprinkles
Add rainbow sprinkles around the edges for a colorful party-friendly dessert.
7. Peach Cobbler
Why It’s a Crowd Favorite
Peach cobbler is one of those desserts that instantly makes people feel at home.
It’s warm, soft, buttery, and filled with sweet peaches in every bite.
This cozy dessert is perfect for BBQs, holiday dinners, potlucks, and family gatherings because it’s simple to make and feeds a large group easily.
Ingredients
For the Peach Filling
- 6 cups sliced peaches (fresh, canned, or frozen)
- 3/4 cup granulated sugar
- 1 tablespoon lemon juice
- 1 teaspoon cinnamon
- 1 tablespoon cornstarch
For the Cobbler Topping
- 1 cup all-purpose flour
- 1 cup granulated sugar
- 1 teaspoon baking powder
- 1/4 teaspoon salt
- 1 cup milk
- 1/2 cup unsalted butter, melted
How to Make It
Step 1: Prepare the Peach Filling
Preheat your oven to 350°F.
In a large bowl, mix the peaches, sugar, lemon juice, cinnamon, and cornstarch until evenly coated.
Step 2: Add the Filling to the Pan
Pour the peach mixture into a greased 9×13-inch baking dish.
Step 3: Make the Cobbler Batter
In another bowl, whisk together the flour, sugar, baking powder, and salt. Stir in the milk and melted butter until smooth.
Step 4: Assemble the Cobbler
Pour the batter evenly over the peach filling. Do not stir. The batter will rise around the peaches as it bakes.
Step 5: Bake
Bake for 40 to 45 minutes, or until the top is golden brown and the filling is bubbly.
Step 6: Cool Slightly Before Serving
Let the cobbler rest for about 10 minutes before serving warm.
Optional Add-Ons
Vanilla Ice Cream
Serve warm peach cobbler with a scoop of vanilla ice cream for the ultimate comforting dessert.
Cinnamon Sugar Topping
Sprinkle cinnamon sugar over the batter before baking for extra sweetness and crunch.
8. Mini Dessert Parfaits
Why They’re Great for Entertaining
Mini dessert parfaits are one of the easiest party desserts because they can be customized in so many ways.
They also look beautiful in clear cups or jars, making them perfect for dessert tables and special events.
Guests love the individual servings, and you can prepare them ahead of time to make entertaining less stressful.
Ingredients
Basic Parfait Ingredients
- 2 cups whipped cream or whipped topping
- 2 cups pudding, mousse, or cheesecake filling
- 2 cups crushed cookies, cake cubes, or granola
- Fresh fruit for layering
- Small dessert cups or jars
How to Make It
Step 1: Prepare the Layers
Choose your filling, crunchy layer, and fruit toppings. Crush cookies or cut cake into small cubes if needed.
Step 2: Start Layering
Add a spoonful of crushed cookies or cake to the bottom of each dessert cup.
Step 3: Add the Cream Layer
Spoon or pipe pudding, mousse, or cheesecake filling over the base layer.
Step 4: Add Fruit
Top with fresh fruit such as strawberries, blueberries, raspberries, or bananas.
Step 5: Repeat the Layers
Repeat the layers until the cups are full. Finish with whipped cream and toppings.
Step 6: Chill Before Serving
Refrigerate the parfaits for at least 1 hour before serving for the best texture and flavor.
Popular Flavor Combos
Chocolate Mousse and Berries
Layer chocolate mousse with strawberries or raspberries for a rich but refreshing dessert.
Cheesecake and Strawberries
Use cheesecake filling with crushed graham crackers and fresh strawberries for a simple cheesecake parfait.
Lemon Cream and Cookies
Layer lemon pudding or lemon mousse with vanilla cookies for a bright and creamy dessert.
9. Rice Krispie Treat Bars
Why They’re So Easy
Rice Krispie treat bars are one of the quickest desserts you can make for a crowd.
They use minimal ingredients, require no baking, and come together in just minutes.
They’re perfect for birthday parties, bake sales, school events, and casual family gatherings.
Ingredients
- 6 cups Rice Krispies cereal
- 1 bag (10 ounces) mini marshmallows
- 4 tablespoons unsalted butter
- 1 teaspoon vanilla extract
How to Make It
Step 1: Melt the Butter
In a large pot over medium heat, melt the butter completely.
Step 2: Add the Marshmallows
Stir in the mini marshmallows and cook until fully melted and smooth.
Step 3: Mix Everything Together
Remove the pot from the heat and stir in the vanilla extract. Add the Rice Krispies cereal and mix until evenly coated.
Step 4: Press Into the Pan
Transfer the mixture into a greased 9×13-inch pan. Gently press the mixture evenly into the pan using a spatula or buttered hands.
Step 5: Cool and Slice
Allow the bars to cool completely before slicing into squares.
Fun Variations
Chocolate Drizzle
Drizzle melted chocolate over the bars for extra sweetness and decoration.
Peanut Butter Version
Stir 1/2 cup creamy peanut butter into the melted marshmallow mixture before adding the cereal.
Birthday Cake Sprinkles
Mix colorful sprinkles into the cereal mixture for a fun party dessert.
10. Cherry Dump Cake
Why Busy Hosts Love It
Cherry dump cake is one of the easiest desserts you can make when you need something quick for a large group.
You simply layer the ingredients in a baking dish and let the oven do the work.
It’s buttery, fruity, warm, and perfect for potlucks, holidays, and last-minute gatherings.
Ingredients
- 2 cans (21 ounces each) cherry pie filling
- 1 box yellow cake mix
- 3/4 cup unsalted butter, melted
- 1 teaspoon vanilla extract
How to Make It
Step 1: Prepare the Baking Dish
Preheat your oven to 350°F and grease a 9×13-inch baking dish.
Step 2: Add the Cherry Filling
Spread the cherry pie filling evenly across the bottom of the baking dish.
Step 3: Add the Cake Mix
Sprinkle the dry cake mix evenly over the cherry filling.
Step 4: Add the Butter
Drizzle the melted butter and vanilla extract evenly over the cake mix. Try to cover as much of the surface as possible.
Step 5: Bake
Bake for 45 to 50 minutes, or until the top is golden brown and bubbly around the edges.
Step 6: Cool Slightly
Let the dump cake cool for about 10 minutes before serving.
Best Serving Ideas
Warm With Whipped Cream
Serve warm with a generous spoonful of whipped cream for an easy comforting dessert.
Vanilla Ice Cream on Top
A scoop of vanilla ice cream melts perfectly into the warm cherry filling and buttery cake topping.
Tips for Serving Desserts to a Crowd
Make-Ahead Dessert Tips
One of the best ways to reduce stress when feeding a crowd is to prepare desserts ahead of time.
It gives you more time to enjoy the event instead of rushing around the kitchen at the last minute.
Prep Desserts the Night Before
Many crowd-friendly desserts actually taste even better after chilling overnight.
Banana pudding, trifles, cheesecake cups, and lemon bars all benefit from extra time in the fridge because the flavors have time to blend together.
If possible, bake cakes, brownies, and bars the day before your event.
Once cooled, cover them tightly to keep them fresh. This simple step makes party day much easier.
For desserts with whipped cream or fresh fruit toppings, wait until shortly before serving to add the final decorations. This keeps everything looking fresh and beautiful.
Use Disposable Serving Trays for Easy Cleanup
When serving a large group, cleanup can become overwhelming quickly.
Disposable trays, foil pans, dessert cups, and plastic serving containers can save a huge amount of time after the party ends.
Clear plastic dessert cups are especially helpful for layered desserts like parfaits or cheesecake cups because guests can easily grab one without needing plates or utensils.
They also make dessert tables look neat and organized.
If you prefer reusable dishes, placing parchment paper inside baking pans can also make cleanup much easier.
Budget-Friendly Dessert Ideas
Feeding a crowd doesn’t mean you have to spend a fortune on ingredients.
Some of the best desserts are made with simple, affordable pantry staples.
Use Seasonal Fruit
Seasonal fruit is usually fresher, sweeter, and less expensive.
In summer, strawberries, peaches, blueberries, and cherries make excellent dessert fillings and toppings.
During cooler months, apples and pears are great for cobblers, crisps, and baked desserts.
Using fruit that’s in season also adds natural color and flavor without needing extra decorations.
Frozen fruit can also work well in many baked desserts if fresh fruit is too expensive or out of season.
Choose Simple Pantry Ingredients
Many easy crowd desserts use ingredients you may already have at home, including:
- Flour
- Sugar
- Butter
- Cocoa powder
- Vanilla extract
- Cake mix
- Marshmallows
- Pudding mix
Simple recipes are often the most reliable when cooking for a large group.
They’re easier to prepare, less stressful for beginners, and usually faster to make in bigger batches.
Easy Presentation Tips
A dessert doesn’t need complicated decorations to look impressive.
Small finishing touches can make even the simplest recipe feel party-ready.
Garnish With Whipped Cream, Chocolate Drizzle, or Fresh Fruit
Adding toppings right before serving instantly makes desserts look more polished and inviting.
A swirl of whipped cream, a drizzle of chocolate sauce, or a few fresh berries can completely change the appearance of a dessert with very little effort.
Crushed cookies, sprinkles, caramel drizzle, or powdered sugar are also quick ways to add texture and color.
The key is to keep it simple. A clean and fresh presentation almost always looks better than overdecorating.
Use Clear Cups or Trays for Visual Appeal
Clear dessert cups, glass bowls, and serving trays help show off beautiful layers and textures.
This works especially well for trifles, parfaits, banana pudding, and cheesecake cups.
Guests are naturally drawn to desserts that look colorful and layered.
Even a simple recipe can feel extra special when served neatly in individual cups or arranged nicely on a tray.
If you’re serving multiple desserts, try placing them at different heights on the table using cake stands or trays.
This creates a more inviting dessert display without much extra work.
Final Thoughts
Making dessert for a crowd doesn’t have to be complicated to feel special.
With a few simple ingredients and easy recipes, you can create desserts that look beautiful, taste amazing, and keep everyone coming back for seconds.
Don’t be afraid to try a few different options and make them your own.
If you found these dessert ideas helpful, be sure to save this post and share it with friends and family who love easy crowd-pleasing desserts too.
FAQs
What is the easiest dessert to make for a large group?
No-bake desserts like Oreo cheesecake cups, banana pudding, and Rice Krispie treats are some of the easiest options for a crowd. They require simple ingredients, minimal prep, and are easy to serve.
How far in advance can I make party desserts?
Many party desserts can be made 1 to 2 days ahead of time. Desserts like trifles, cheesecake cups, brownies, and lemon bars often taste even better after chilling overnight.
What desserts travel well for potlucks?
Sheet cakes, brownies, lemon bars, Rice Krispie treats, and dump cakes travel especially well because they’re easy to cover, transport, and serve.
What are the best no-bake desserts for a crowd?
No-bake Oreo cheesecake cups, banana pudding, mini parfaits, and Rice Krispie treat bars are all great crowd-friendly desserts that save time and don’t require an oven.

Hi, I’m Sorenna Blythe, the baker and writer behind Mix Whisk Bake. I share simple, reliable recipes and honest kitchen moments to help home bakers bake with confidence and joy. When I’m not testing new treats, you’ll find me sipping coffee and dreaming up my next bake.