Fresh fruit desserts are one of the easiest ways to make something sweet, colorful, and satisfying without spending hours in the kitchen.
They’re perfect for busy weekdays, summer parties, or those moments when you want a quick homemade treat fast.
In this collection, you’ll find simple desserts packed with fresh flavor, creamy textures, and bright fruit combinations that feel special without being difficult to make.
Every recipe comes together in under 30 minutes, so you can enjoy a homemade dessert even on your busiest days.
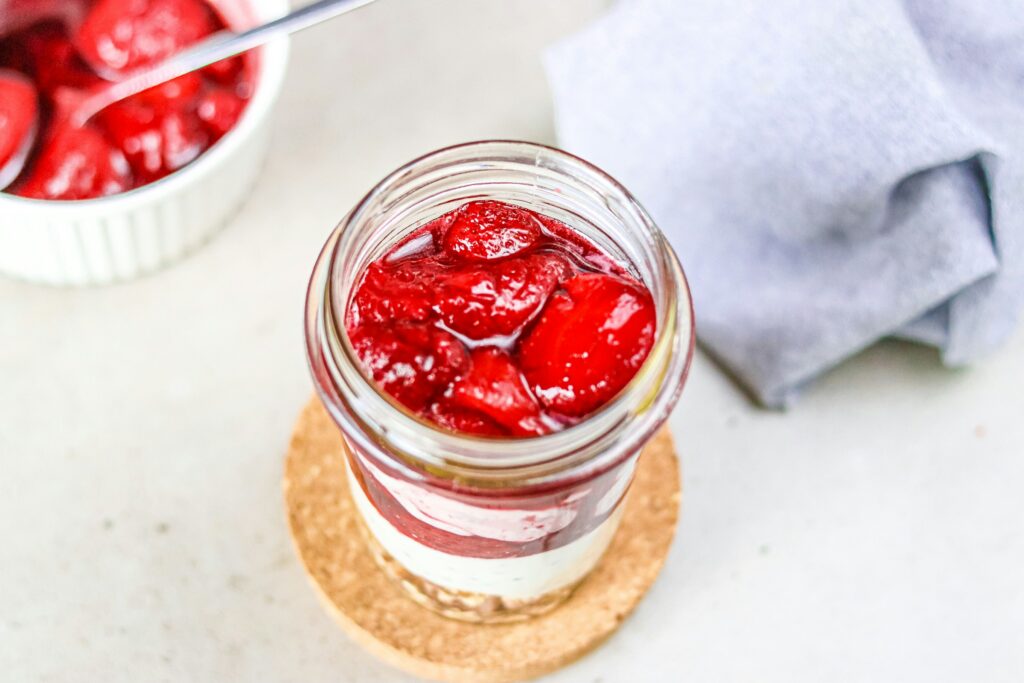
1. Strawberry Cheesecake Cups
If you want a dessert that looks impressive without spending hours in the kitchen, these strawberry cheesecake cups are a great place to start.
They’re creamy, fruity, and completely no-bake, which makes them perfect for warm days when you don’t want to turn on the oven.
The layers come together quickly, and the individual cups make serving easy for parties, picnics, or simple weeknight desserts.
Even if you’ve never made cheesecake before, this recipe is very beginner-friendly.
Why You’ll Love It
- No baking required
- Ready in about 20 minutes
- Creamy cheesecake filling with fresh strawberries
- Easy to customize with different toppings
- Perfect make-ahead dessert for gatherings
Ingredients
For the cheesecake filling:
- 8 oz (225 g) cream cheese, softened
- 1 cup whipped topping or whipped cream
- 1/4 cup powdered sugar
- 1 teaspoon vanilla extract
For the layers:
- 2 cups fresh strawberries, diced
- 1 cup crushed graham crackers
- 2 tablespoons melted butter
Instructions
Step 1: Make the crust layer
In a small bowl, mix the crushed graham crackers with melted butter until the crumbs are evenly coated.
The texture should feel similar to damp sand.
Spoon a layer into the bottom of small dessert cups or glasses.
Step 2: Prepare the cheesecake filling
In a mixing bowl, beat the softened cream cheese until smooth.
Add powdered sugar and vanilla extract, then mix again until creamy.
Fold in the whipped topping gently. This keeps the filling light and fluffy instead of dense.
Step 3: Assemble the cups
Add a layer of cheesecake filling over the graham cracker crumbs. Spoon diced strawberries on top.
Repeat the layers if your cups are tall enough.
Step 4: Chill and serve
Place the cups in the refrigerator for at least 15 minutes before serving. This helps the layers set and gives the dessert a colder, creamier texture.
Helpful Tips
- Let the cream cheese soften fully before mixing to avoid lumps.
- Pat strawberries dry if they’re extra juicy so the layers stay neat.
- Use clear cups or jars to show off the pretty layers.
- For extra flavor, add a little lemon zest to the cheesecake filling.
Optional Variations
Graham Cracker Crust
Add a pinch of cinnamon to the crumb mixture for a warmer flavor.
Chocolate Drizzle
Drizzle melted chocolate over the top just before serving for a richer dessert.
Mixed Berry Version
Swap some of the strawberries for blueberries or raspberries for extra color and flavor.
2. Mango Yogurt Parfaits
These mango yogurt parfaits are light, fresh, and incredibly easy to make.
They work beautifully as a quick dessert, but they’re also great for breakfast or an afternoon snack.
The sweet mango pairs perfectly with creamy yogurt, and the layers make the parfaits look bright and inviting.
This recipe is especially handy during warmer months when you want something cool and refreshing without much effort.
Why You’ll Love It
- Fresh and naturally sweet
- Takes less than 15 minutes to make
- No cooking needed
- Great for breakfast or dessert
- Easy to adjust with your favorite toppings
Ingredients
- 2 ripe mangoes, diced
- 2 cups vanilla Greek yogurt
- 1 cup granola
- 1 tablespoon honey (optional)
- 2 tablespoons shredded coconut (optional)
- Fresh mint leaves for garnish
Instructions
Step 1: Prepare the mango
Peel and dice the mangoes into small cubes. Try to use ripe mangoes for the best sweetness and texture.
Step 2: Start layering
Spoon a layer of yogurt into serving glasses or bowls.
Add a layer of diced mango, followed by a sprinkle of granola.
Step 3: Repeat the layers
Continue layering until the cups are full. Finish with extra mango pieces on top for a fresh, colorful finish.
Step 4: Add toppings
Drizzle honey over the top if you want extra sweetness. Sprinkle with shredded coconut and garnish with mint leaves.
Serve immediately for the crunchiest granola texture.
Helpful Tips
- Keep the granola separate until serving if making these ahead of time.
- Greek yogurt gives a thicker and creamier texture.
- Chill the mango beforehand for an even more refreshing dessert.
- A squeeze of lime juice can brighten the flavors nicely.
Optional Variations
Granola Layers
Use chocolate granola or nut granola for added texture and flavor.
Coconut Flakes
Toast the coconut flakes lightly in a dry pan for a deeper flavor.
Honey Drizzle
Swap honey for maple syrup if you prefer a richer sweetness.
3. Grilled Peaches with Honey
Grilled peaches are one of the easiest warm fruit desserts you can make.
The heat brings out the peaches’ natural sweetness and creates soft caramelized edges that taste amazing with honey.
This recipe feels fancy but only takes a few simple ingredients.
It’s a wonderful dessert for summer evenings, backyard cookouts, or whenever you want something warm and comforting without spending much time cooking.
Why You’ll Love It
- Simple ingredients
- Naturally sweet and juicy
- Ready in under 20 minutes
- Perfect balance of warm fruit and honey
- Easy to pair with ice cream or yogurt
Ingredients
- 4 ripe peaches, halved and pits removed
- 1 tablespoon olive oil or melted butter
- 2 tablespoons honey
- 1/2 teaspoon cinnamon
- Fresh mint leaves for garnish
Instructions
Step 1: Prepare the peaches
Cut the peaches in half and remove the pits carefully.
Brush the cut sides lightly with olive oil or melted butter. This helps prevent sticking and gives better grill marks.
Step 2: Grill the peaches
Place the peaches cut-side down on a grill pan or outdoor grill over medium heat.
Cook for about 3–4 minutes until grill marks appear and the peaches begin to soften.
Flip and cook for another 2–3 minutes.
Step 3: Add the toppings
Transfer the peaches to a serving plate.
Drizzle honey over the warm peaches and sprinkle with cinnamon.
Step 4: Serve warm
Serve immediately while warm and juicy. Add mint leaves for a fresh finishing touch.
Helpful Tips
- Slightly firm peaches work best because overly soft peaches can fall apart.
- Don’t move the peaches too early while grilling, or the grill marks won’t form properly.
- If you don’t have a grill, a grill pan or skillet works well too.
- Warm honey slightly before drizzling for easier pouring.
Optional Variations
Vanilla Ice Cream Topping
Serve the peaches with a scoop of vanilla ice cream for a classic summer dessert.
Cinnamon Sugar Sprinkle
Mix cinnamon with a little brown sugar for extra caramelized sweetness.
Maple Syrup Option
Replace the honey with maple syrup for a deeper, cozy flavor.
4. Blueberry Banana Smoothie Bowls
Blueberry banana smoothie bowls are a quick way to make breakfast or dessert feel a little more fun.
They’re cold, creamy, naturally sweet, and packed with fresh fruit flavor.
The thick texture makes them feel more filling than a regular smoothie, and the toppings add extra crunch and color.
This recipe is especially great for beginners because it’s hard to mess up.
You can easily adjust the thickness, sweetness, and toppings to match what you like or what you already have in your kitchen.
Why You’ll Love It
- Thick, creamy, and refreshing
- Naturally sweet from fruit
- Easy to customize with toppings
- Ready in about 10 minutes
- Great for breakfast, snacks, or dessert
Ingredients
- 2 ripe bananas, sliced and frozen
- 1 cup frozen blueberries
- 1/2 cup Greek yogurt
- 1/4 cup milk of choice
- 1 teaspoon honey or maple syrup (optional)
Topping ideas:
- Fresh blueberries
- Banana slices
- Granola
- Coconut flakes
- Chia seeds
Instructions
Step 1: Blend the smoothie base
Add the frozen bananas, blueberries, Greek yogurt, and milk to a blender.
Blend until thick and smooth. Stop occasionally to scrape down the sides if needed.
If the mixture feels too thick to blend, add a small splash of milk at a time. Try not to add too much so the smoothie bowl stays thick and creamy.
Step 2: Pour into bowls
Spoon the smoothie mixture into serving bowls. A thick smoothie bowl should be easy to scoop with a spoon rather than drink through a straw.
Step 3: Add toppings
Top with fresh fruit, granola, coconut flakes, or any toppings you enjoy.
Serve right away while cold and thick.
Helpful Tips
- Freeze ripe bananas ahead of time for the creamiest texture.
- Use frozen blueberries instead of fresh to keep the bowl cold and thick.
- Start with less milk first. You can always add more later.
- A powerful blender helps, but any blender can work with a little patience.
Optional Variations
Chia Seeds
Sprinkle chia seeds on top for extra texture and a light crunch.
Almond Butter
Add a spoonful of almond butter to the blender for a richer, nuttier flavor.
Coconut Flakes
Top with toasted coconut flakes for a tropical twist.
5. Pineapple Coconut Dessert Cups
These pineapple coconut dessert cups are bright, creamy, and full of tropical flavor.
They come together quickly with simple ingredients and require no baking at all, which makes them perfect for hot days or last-minute desserts.
The sweet pineapple pairs beautifully with creamy coconut, creating a dessert that feels light but still satisfying.
They also look beautiful served in clear cups with layered textures and toppings.
Why You’ll Love It
- Tropical flavors in every bite
- No oven needed
- Quick and beginner-friendly
- Light, creamy, and refreshing
- Great for parties or summer gatherings
Ingredients
- 2 cups crushed pineapple, drained
- 1 cup whipped topping or whipped cream
- 1 cup coconut yogurt or vanilla yogurt
- 1/2 cup shredded coconut
- 1 cup crushed vanilla cookies or graham crackers
Instructions
Step 1: Prepare the creamy filling
In a bowl, mix the coconut yogurt and whipped topping until smooth and fluffy.
Fold in half of the shredded coconut.
Step 2: Start layering
Spoon crushed cookies into the bottom of dessert cups.
Add a layer of the creamy coconut mixture, followed by a spoonful of crushed pineapple.
Step 3: Repeat the layers
Continue layering until the cups are filled.
Finish with extra pineapple and shredded coconut on top.
Step 4: Chill before serving
Place the dessert cups in the refrigerator for 15–20 minutes before serving. This helps the flavors blend together and makes the dessert extra refreshing.
Helpful Tips
- Drain the pineapple well so the dessert doesn’t become watery.
- Toast the coconut lightly for a deeper flavor and a little crunch.
- Use chilled ingredients for the best texture.
- Small glass jars or clear cups make the layers stand out beautifully.
Optional Variations
Toasted Coconut
Toast shredded coconut in a dry pan for 2–3 minutes until lightly golden.
Lime Zest
Add fresh lime zest on top to brighten the tropical flavors.
Crushed Cookies
Try shortbread cookies or vanilla wafers instead of graham crackers for a slightly different texture.
6. Raspberry Chocolate Dip Cups
These raspberry chocolate dip cups are simple, rich, and perfect when you want something sweet without making a full dessert from scratch.
Fresh raspberries paired with smooth, melted chocolate create a combination that feels elegant but takes very little effort.
They’re wonderful for parties, date nights, holiday trays, or quick weekend treats.
Since everything is served in small cups, they’re easy to prepare ahead and even easier to enjoy.
Why You’ll Love It
- Rich chocolate and fresh berry flavor
- Quick to prepare
- Perfect for sharing
- Great for parties and special occasions
- Easy to customize with toppings
Ingredients
- 2 cups fresh raspberries
- 1 cup semi-sweet chocolate chips
- 1/2 cup heavy cream
- 1 teaspoon vanilla extract
Optional toppings:
- Chopped almonds
- Crushed pistachios
- Whipped cream
- Mint leaves
Instructions
Step 1: Make the chocolate dip
Add the chocolate chips and heavy cream to a microwave-safe bowl.
Heat in 20-second intervals, stirring each time, until smooth and glossy.
Stir in the vanilla extract.
Step 2: Assemble the cups
Divide the raspberries between small serving cups.
Spoon the warm chocolate dip over the berries or serve it alongside for dipping.
Step 3: Add toppings
Sprinkle chopped nuts or add whipped cream if desired.
Serve immediately while the chocolate is warm and smooth.
Helpful Tips
- Use fresh, firm raspberries for the best texture.
- Let the chocolate cool slightly before pouring so it doesn’t soften the berries too much.
- If the chocolate thickens, warm it for a few seconds and stir again.
- Dark chocolate works beautifully if you prefer a less sweet dessert.
Optional Variations
White Chocolate Version
Swap semi-sweet chocolate for melted white chocolate for a sweeter flavor.
Nut Toppings
Add chopped almonds, pecans, or pistachios for extra crunch.
Mint Garnish
Top with fresh mint leaves for a fresh and colorful finish.
7. Watermelon Sorbet
Watermelon sorbet is one of the easiest frozen desserts you can make at home.
It’s icy, refreshing, and packed with fresh fruit flavor.
Since watermelon already has so much natural sweetness and water, you only need a few simple ingredients to turn it into a cool summer treat.
This recipe is perfect for hot afternoons, backyard gatherings, or anytime you want something light after dinner.
The texture becomes smooth and scoopable after freezing, almost like a fruity snow cone mixed with sorbet.
Why You’ll Love It
- Super refreshing on warm days
- Made with simple ingredients
- Naturally sweet and fruity
- Easy to prepare ahead of time
- No ice cream maker needed
Ingredients
- 5 cups seedless watermelon, cubed
- 2 tablespoons honey or maple syrup
- 1 tablespoon fresh lime juice
- Pinch of salt
Instructions
Step 1: Freeze the watermelon
Spread the watermelon cubes on a baking tray or plate lined with parchment paper.
Freeze for at least 3 hours, or until fully frozen. This helps create the thick sorbet texture.
Step 2: Blend the ingredients
Add the frozen watermelon to a blender or food processor.
Pour in the lime juice, honey, and a small pinch of salt.
Blend until smooth and creamy. Stop to scrape down the sides if needed.
Step 3: Serve or freeze
Serve immediately for a softer texture.
For firmer scoops, transfer the sorbet to a container and freeze for another 1–2 hours.
Helpful Tips
- Use ripe watermelon for the sweetest flavor.
- A small pinch of salt helps balance the sweetness and brings out the fruit flavor.
- If the blender struggles, let the watermelon sit for 2–3 minutes before blending.
- Store leftovers in the freezer and let them soften slightly before scooping.
Optional Variations
Lime Juice
Add extra lime juice for a brighter, tangier flavor.
Mint Leaves
Blend in a few fresh mint leaves for a cool and refreshing twist.
Strawberry Blend
Replace 1 cup of watermelon with frozen strawberries for extra sweetness and color.
8. Apple Cinnamon Nachos
Apple cinnamon nachos are a fun dessert that comes together in minutes and always disappears quickly.
Crisp apple slices are layered with sweet toppings to create a snack that feels playful, colorful, and satisfying.
This recipe is especially great for families because everyone can customize their own plate.
It’s simple enough for kids to help with, and it works well as an afternoon snack, quick dessert, or party platter.
Why You’ll Love It
- Crunchy, sweet, and easy to make
- Great for sharing
- Kid-friendly and customizable
- No baking required
- Ready in under 15 minutes
Ingredients
- 3 apples, thinly sliced
- 2 tablespoons lemon juice
- 1/4 cup peanut butter
- 2 tablespoons honey
- 1 teaspoon cinnamon
- 1/4 cup granola
- 2 tablespoons mini chocolate chips (optional)
Instructions
Step 1: Prepare the apples
Slice the apples thinly and arrange them on a large plate or serving tray.
Drizzle with lemon juice to help prevent browning.
Step 2: Make the drizzle
In a small bowl, warm the peanut butter slightly in the microwave for 10–15 seconds so it becomes easier to drizzle.
Mix in the honey and cinnamon.
Step 3: Assemble the nachos
Drizzle the peanut butter mixture over the apple slices.
Sprinkle granola and mini chocolate chips on top.
Step 4: Serve immediately
These taste best fresh while the apples are crisp and crunchy.
Helpful Tips
- Use a mix of sweet and tart apples for more flavor.
- Slice the apples evenly, so they’re easier to eat.
- Don’t overload the toppings, or the apples can become messy to pick up.
- A squeeze bottle makes drizzling easier if you have one.
Optional Variations
Peanut Butter Drizzle
Swap peanut butter for almond butter or cookie butter.
Caramel Sauce
Add a light drizzle of caramel sauce for a richer dessert.
Granola Topping
Use cinnamon granola for extra crunch and flavor.
9. Lemon Berry Icebox Cake
This lemon berry icebox cake is creamy, cool, and full of bright citrus flavor.
Since it’s completely no-bake, it’s a wonderful dessert for warmer months or busy days when you want something homemade without much effort.
As the cake chills, the cookies soften into delicate layers that taste almost like cake.
The combination of lemon cream and juicy berries keeps every bite light and refreshing.
Why You’ll Love It
- No oven required
- Creamy and refreshing
- Perfect make-ahead dessert
- Bright lemon flavor with sweet berries
- Beautiful layered presentation
Ingredients
- 2 cups whipped topping or whipped cream
- 8 oz (225 g) cream cheese, softened
- 1/3 cup powdered sugar
- 2 tablespoons lemon juice
- 1 teaspoon lemon zest
- 1 box vanilla wafers or graham crackers
- 1 1/2 cups mixed berries
Instructions
Step 1: Make the lemon filling
In a bowl, beat the cream cheese until smooth.
Add powdered sugar, lemon juice, and lemon zest. Mix until creamy.
Fold in the whipped topping gently to keep the mixture light.
Step 2: Start layering
Spread a thin layer of the lemon mixture into the bottom of a dish or container.
Add a layer of vanilla wafers, followed by more lemon filling and berries.
Step 3: Repeat the layers
Continue layering until all the ingredients are used.
Finish with extra berries on top.
Step 4: Chill the cake
Cover and refrigerate for at least 4 hours, or overnight if possible.
The cookies will soften as the dessert chills, creating a cake-like texture.
Helpful Tips
- Let the dessert chill long enough for the layers to soften properly.
- Pat berries dry before using so the layers stay creamy instead of watery.
- Fresh lemon juice gives the best flavor.
- This dessert slices more cleanly after a longer chill time.
Optional Variations
Mixed Berries
Use strawberries, blueberries, raspberries, or blackberries.
Crushed Vanilla Wafers
Sprinkle crushed wafers on top for extra texture.
Whipped Cream Topping
Add extra whipped cream before serving for a softer finish.
10. Chocolate-Dipped Orange Slices
Chocolate-dipped orange slices are simple, elegant, and full of fresh citrus flavor.
The juicy sweetness of oranges pairs beautifully with rich, melted chocolate, creating a dessert that feels special with very little effort.
They’re perfect for holiday trays, quick desserts, or simple party snacks.
Since they only need a handful of ingredients, they’re also a great last-minute option when you want something homemade fast.
Why You’ll Love It
- Easy but impressive
- Sweet and citrusy flavor combination
- Great for parties and gifting
- No baking needed
- Ready in about 20 minutes
Ingredients
- 2 oranges, sliced into rounds
- 1 cup semi-sweet chocolate chips
- 1 teaspoon coconut oil or butter
- Sea salt or chopped pistachios for topping (optional)
Instructions
Step 1: Prepare the orange slices
Pat the orange slices dry with paper towels. Removing extra moisture helps the chocolate stick better.
Step 2: Melt the chocolate
Add the chocolate chips and coconut oil to a microwave-safe bowl.
Heat in 20-second intervals, stirring between each one, until smooth.
Step 3: Dip the oranges
Dip each orange slice halfway into the melted chocolate.
Place them on a parchment-lined tray.
Step 4: Add toppings and chill
Sprinkle with sea salt or chopped pistachios while the chocolate is still soft.
Refrigerate for about 10–15 minutes until the chocolate sets.
Helpful Tips
- Drying the orange slices well makes a big difference.
- Use good-quality chocolate for smoother melting and better flavor.
- Chill the tray flat so the chocolate sets evenly.
- These are best enjoyed fresh the same day.
Optional Variations
Dark Chocolate
Use dark chocolate for a richer flavor with less sweetness.
Sea Salt Sprinkle
A tiny pinch of flaky sea salt makes the chocolate flavor stand out more.
Pistachio Topping
Chopped pistachios add crunch and a beautiful pop of color.
Tips for Making Quick Fruit Desserts
- Use ripe fruit for better flavor
Ripe fruit is naturally sweeter, juicier, and softer, which helps desserts taste fresher without needing lots of extra sugar. - Keep frozen fruit on hand for smoothies and sorbets
Frozen fruit makes quick desserts cold, creamy, and refreshing while saving prep time during busy days. - Simple toppings instantly elevate desserts
A drizzle of chocolate, toasted coconut, chopped nuts, whipped cream, or fresh mint can make even the simplest dessert feel special. - Choose fruits that work well in no-bake recipes
Berries, bananas, mangoes, peaches, pineapple, and watermelon are great options because they’re naturally sweet, soft, and easy to prepare.
Final Thoughts
Fresh fruit desserts are proof that homemade treats don’t have to be complicated or time-consuming.
With just a few simple ingredients and under 30 minutes, you can make desserts that feel fresh, colorful, and full of flavor.
Don’t be afraid to mix and match your favorite fruits, toppings, and textures to make these recipes your own.
Whether you’re planning a summer gathering, a holiday dessert table, or a quick family treat after dinner, these easy recipes make sweet moments feel effortless and fun.
FAQs
What fruits work best for quick desserts?
Berries, bananas, mangoes, peaches, pineapple, watermelon, and apples work especially well because they’re naturally sweet and easy to prepare.
Can I use frozen fruit instead of fresh?
Yes. Frozen fruit is perfect for smoothies, sorbets, and chilled desserts, and it helps save prep time.
How do I store leftover fruit desserts?
Most fruit desserts should be stored in an airtight container in the refrigerator and enjoyed within 1–3 days for the best texture and flavor.
Are these desserts good for parties?
Absolutely. Many of these recipes are easy to make in large batches and work well for summer gatherings, holidays, and family events.
Can these desserts be made ahead of time?
Yes. Desserts like parfaits, cheesecake cups, and icebox cakes can be prepared ahead and chilled until ready to serve.

Hi, I’m Sorenna Blythe, the baker and writer behind Mix Whisk Bake. I share simple, reliable recipes and honest kitchen moments to help home bakers bake with confidence and joy. When I’m not testing new treats, you’ll find me sipping coffee and dreaming up my next bake.