Sometimes you want something sweet without loading your dessert with refined sugar.
That’s where fruit-sweetened desserts come in.
They use naturally sweet ingredients like bananas, dates, apples, and berries to create treats that still taste rich, creamy, and satisfying.
Fruit adds more than sweetness, too.
It brings fiber, nutrients, and fresh flavor to every bite, making these desserts a great option for healthier snacking or simple everyday treats.
Even better, these recipes are easy to make, family-friendly, and perfect for beginners.
1. Banana Oat Cookies
These banana oat cookies are soft, chewy, and naturally sweet thanks to ripe bananas.
They’re simple to make with everyday ingredients and work perfectly as a quick snack, healthy dessert, or lunchbox treat.
The oats give them a hearty texture while the peanut butter adds richness and helps keep the cookies satisfying.
Ingredients
- 2 large ripe bananas, mashed
- 1 ½ cups rolled oats
- ¼ cup natural peanut butter
- ¼ cup dark chocolate chips
- 1 teaspoon cinnamon
- 1 teaspoon vanilla extract
- Pinch of salt
Instructions
Step 1: Prepare the Oven
Preheat your oven to 350°F (175°C). Line a baking tray with parchment paper.
Step 2: Mix the Ingredients
In a large bowl, mash the bananas until mostly smooth. Stir in the peanut butter and vanilla extract.
Add the rolled oats, cinnamon, and salt. Mix until fully combined. Fold in the chocolate chips.
Step 3: Shape the Cookies
Scoop small portions of dough onto the prepared baking tray. Gently flatten them slightly with the back of a spoon since they won’t spread much while baking.
Step 4: Bake
Bake for 12–15 minutes or until the edges are lightly golden.
Step 5: Cool and Serve
Let the cookies cool on the tray for a few minutes before transferring them to a wire rack.
Helpful Tips
- Use extra ripe bananas for the sweetest flavor.
- Add chopped walnuts or raisins for extra texture.
- Store leftovers in an airtight container for up to 4 days.
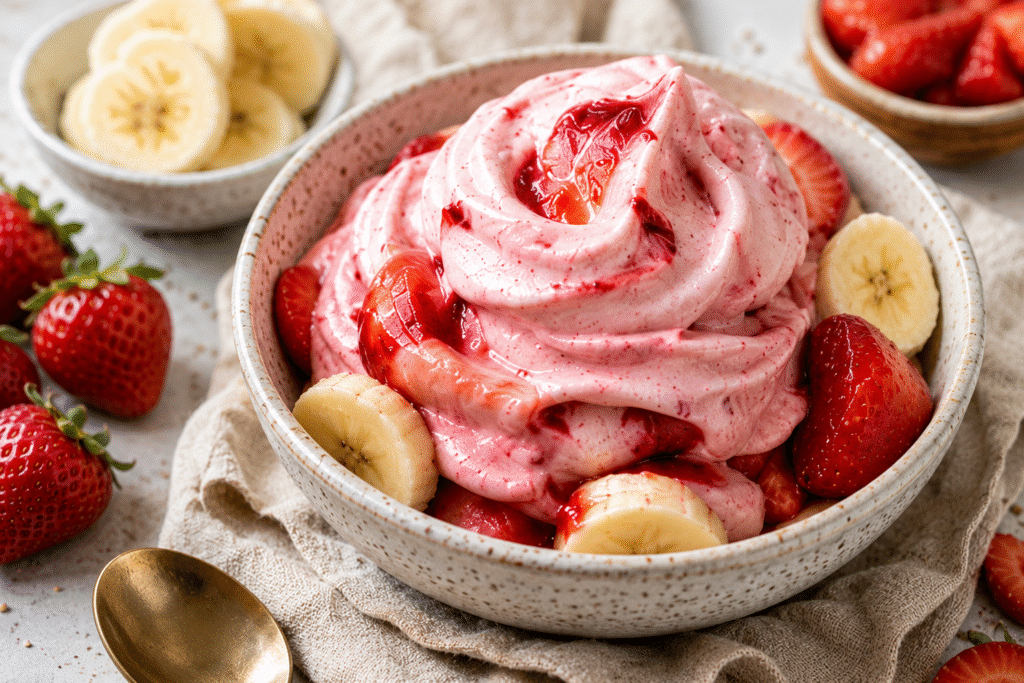
2. Strawberry Banana Nice Cream
This strawberry banana nice cream is creamy, refreshing, and incredibly easy to make.
It tastes like soft-serve ice cream but uses only fruit and a few simple ingredients.
It’s perfect for warm days or whenever you want a quick healthier dessert.
Ingredients
- 3 frozen bananas, sliced
- 1 ½ cups frozen strawberries
- 2–4 tablespoons almond milk
- 1 teaspoon vanilla extract
Instructions
Step 1: Freeze the Fruit
Slice the bananas and freeze them along with the strawberries for at least 6 hours or overnight.
Step 2: Blend the Ingredients
Add the frozen bananas, strawberries, vanilla extract, and 2 tablespoons of almond milk to a food processor or high-speed blender.
Blend until smooth and creamy. Stop occasionally to scrape down the sides. Add more almond milk if needed, but keep it minimal for a thick texture.
Step 3: Serve
Serve immediately for a soft-serve consistency.
For a firmer texture, freeze the nice cream for 1–2 hours before scooping.
Helpful Tips
- Freeze the fruit in a single layer so it blends more easily.
- Add a spoonful of peanut butter for extra creaminess.
- Top with fresh berries, granola, or coconut flakes before serving.
3. Date Sweetened Brownies
These date-sweetened brownies are rich, fudgy, and packed with deep chocolate flavor.
Medjool dates naturally sweeten the brownies while keeping them moist and soft.
They’re a great healthier option when you want something chocolatey without refined sugar.
Ingredients
- 1 cup Medjool dates, pitted
- ½ cup hot water
- 2 eggs
- ¼ cup melted coconut oil
- 1 teaspoon vanilla extract
- ½ cup cocoa powder
- ¾ cup almond flour
- ½ teaspoon baking soda
- ¼ teaspoon salt
- ⅓ cup dark chocolate chunks
Instructions
Step 1: Prepare the Dates
Place the pitted dates in a bowl and pour the hot water over them. Let them soak for about 10 minutes to soften.
Step 2: Preheat the Oven
Preheat your oven to 350°F (175°C). Grease or line an 8×8-inch baking pan with parchment paper.
Step 3: Blend the Wet Ingredients
Add the soaked dates and soaking water to a blender or food processor. Blend until mostly smooth.
Add the eggs, coconut oil, and vanilla extract. Blend again until creamy.
Step 4: Mix the Batter
Transfer the mixture to a bowl. Stir in the cocoa powder, almond flour, baking soda, and salt until combined.
Fold in the chocolate chunks.
Step 5: Bake
Spread the batter evenly into the prepared baking pan.
Bake for 20–25 minutes or until the center is set.
Step 6: Cool Before Slicing
Allow the brownies to cool completely before cutting into squares. This helps them stay fudgy and rich.
Helpful Tips
- Soaking the dates makes blending much easier.
- Don’t overbake or the brownies may lose their fudgy texture.
- Store in the fridge for an even richer texture the next day.
4. Apple Cinnamon Muffins
These apple cinnamon muffins are soft, moist, and full of cozy flavor.
The applesauce keeps them naturally sweet and tender, while fresh apples add texture and extra freshness.
They’re perfect for breakfast, snacks, or an easy healthier dessert the whole family can enjoy.
Ingredients
- 1 cup unsweetened applesauce
- 1 cup diced apples
- 1 ½ cups whole wheat flour
- 1 teaspoon baking powder
- ½ teaspoon baking soda
- 1 ½ teaspoons cinnamon
- ¼ teaspoon nutmeg
- ¼ teaspoon salt
- 2 eggs
- ⅓ cup plain Greek yogurt
- ¼ cup melted coconut oil
- 1 teaspoon vanilla extract
- ¼ cup rolled oats for topping
Instructions
Step 1: Prepare the Oven
Preheat your oven to 350°F (175°C). Line a muffin pan with paper liners or lightly grease it.
Step 2: Mix the Dry Ingredients
In a large bowl, whisk together the whole wheat flour, baking powder, baking soda, cinnamon, nutmeg, and salt.
Step 3: Mix the Wet Ingredients
In a separate bowl, whisk together the applesauce, eggs, Greek yogurt, coconut oil, and vanilla extract until smooth.
Step 4: Combine Everything
Pour the wet ingredients into the dry ingredients and stir gently until just combined.
Fold in the diced apples. Be careful not to overmix the batter.
Step 5: Fill the Muffin Pan
Divide the batter evenly between the muffin cups, filling each about ¾ full.
Sprinkle rolled oats over the tops for extra texture.
Step 6: Bake
Bake for 18–22 minutes or until a toothpick inserted into the center comes out clean.
Step 7: Cool and Serve
Let the muffins cool in the pan for 5 minutes before transferring them to a wire rack.
Helpful Tips
- Use unsweetened applesauce to keep the muffins naturally sweetened.
- Dice the apples into small pieces so they bake evenly.
- These muffins freeze well for quick snacks later.
5. Mango Coconut Chia Pudding
This mango coconut chia pudding is creamy, refreshing, and packed with tropical flavor.
The chia seeds create a rich pudding texture while the mango adds natural sweetness and brightness.
It’s a simple make-ahead dessert that also works well for breakfast or an afternoon snack.
Ingredients
- 1 cup mango puree
- 1 cup canned coconut milk
- ¼ cup chia seeds
- 1 teaspoon vanilla extract
- 1 tablespoon maple syrup (optional)
- Fresh mango cubes for topping
- Toasted coconut flakes for garnish
Instructions
Step 1: Mix the Ingredients
In a medium bowl or jar, whisk together the mango puree, coconut milk, vanilla extract, and optional maple syrup.
Stir in the chia seeds until evenly distributed.
Step 2: Let the Chia Seeds Absorb
Let the mixture sit for 5 minutes, then stir again to break up any clumps.
Step 3: Chill
Cover and refrigerate for at least 4 hours, but overnight is best for the thickest texture.
Step 4: Serve
Give the pudding a quick stir before serving.
Top with fresh mango cubes and toasted coconut flakes.
Helpful Tips
- Chilling overnight gives the pudding the creamiest consistency.
- Use ripe mangoes for the sweetest flavor.
- Add extra coconut milk if you prefer a thinner pudding.
6. Peanut Butter Date Energy Bites
These peanut butter date energy bites are soft, chewy, and naturally sweetened with dates.
They’re packed with protein, fiber, and healthy fats, making them a great grab-and-go snack or quick dessert.
Since they’re no-bake, they come together fast with very little effort.
Ingredients
- 1 cup Medjool dates, pitted
- ¾ cup rolled oats
- ½ cup natural peanut butter
- 2 tablespoons ground flaxseed
- 1 tablespoon cocoa powder
- 1 teaspoon vanilla extract
- Pinch of salt
- ¼ cup shredded coconut for rolling
Instructions
Step 1: Soften the Dates
If the dates feel dry, soak them in warm water for 5–10 minutes. Drain well before using.
Step 2: Blend the Ingredients
Add the dates, oats, peanut butter, flaxseed, cocoa powder, vanilla extract, and salt to a food processor.
Blend until the mixture becomes sticky and holds together when pressed.
Step 3: Form the Energy Bites
Scoop out small portions and roll them into balls using your hands.
Roll each ball in shredded coconut if desired.
Step 4: Chill
Place the energy bites in the refrigerator for at least 20 minutes to firm up.
Step 5: Serve or Store
Store the bites in an airtight container in the fridge for up to 1 week.
Helpful Tips
- Keep them refrigerated for the best texture.
- Add mini dark chocolate chips for extra richness.
- If the mixture feels too dry, add a spoonful of peanut butter.
7. Blueberry Yogurt Popsicles
These blueberry yogurt popsicles are creamy, fruity, and perfect for warm days.
The combination of blueberries, banana, and Greek yogurt creates a naturally sweet frozen treat that tastes refreshing while still feeling satisfying.
They’re easy to make and great for both kids and adults.
Ingredients
- 1 ½ cups blueberries
- 1 ripe banana
- 1 ½ cups plain Greek yogurt
- 1 teaspoon vanilla extract
- 1–2 tablespoons honey or maple syrup (optional)
Instructions
Step 1: Blend the Ingredients
Add the banana, Greek yogurt, vanilla extract, and half of the blueberries to a blender. Blend until smooth and creamy.
Step 2: Create Blueberry Swirls
Add the remaining blueberries and pulse the blender a few times instead of fully blending. This creates small blueberry swirls throughout the popsicles.
Step 3: Fill the Molds
Pour the mixture evenly into popsicle molds.
Insert popsicle sticks and gently tap the molds on the counter to remove air bubbles.
Step 4: Freeze
Freeze for at least 4–6 hours or until fully solid.
Step 5: Remove and Serve
Run warm water over the outside of the molds for a few seconds to help release the popsicles.
Helpful Tips
- Silicone molds make removal much easier.
- Add extra blueberries for a stronger berry flavor.
- Use full-fat yogurt for creamier popsicles.
8. Pear Almond Crumble
This pear almond crumble is warm, cozy, and full of comforting flavor.
Soft-baked pears pair perfectly with the crunchy oat and almond topping.
It’s an easy dessert that feels special without requiring complicated ingredients or steps.
Ingredients
For the Pear Filling
- 4 ripe pears, sliced
- 1 teaspoon cinnamon
- 1 teaspoon vanilla extract
- 1 tablespoon lemon juice
For the Crumble Topping
- 1 cup rolled oats
- ½ cup almond flour
- ¼ cup melted coconut oil
- 2 tablespoons maple syrup
- ½ teaspoon cinnamon
- ¼ cup chopped pecans (optional)
Instructions
Step 1: Prepare the Oven
Preheat your oven to 375°F (190°C).
Lightly grease a baking dish.
Step 2: Make the Pear Filling
Add the sliced pears to the baking dish.
Stir in the cinnamon, vanilla extract, and lemon juice until the pears are evenly coated.
Step 3: Prepare the Crumble Topping
In a bowl, mix together the rolled oats, almond flour, coconut oil, maple syrup, and cinnamon.
Fold in the chopped pecans if using.
Step 4: Assemble the Crumble
Sprinkle the crumble topping evenly over the pears.
Step 5: Bake
Bake for 30–35 minutes or until the pears are soft and the topping is golden brown.
Step 6: Serve
Let the crumble cool slightly before serving warm.
Helpful Tips
- Serve with yogurt or coconut whip for extra creaminess.
- Use ripe but firm pears, so they hold their shape while baking.
- Add chopped walnuts or pecans for extra crunch.
9. Chocolate Avocado Pudding
This chocolate avocado pudding is rich, silky, and surprisingly creamy.
The avocado creates a smooth texture, while banana or dates naturally sweeten the pudding without refined sugar.
It’s a simple dessert that feels indulgent while still using wholesome ingredients.
Ingredients
- 2 ripe avocados
- 1 ripe banana or 4 Medjool dates
- ¼ cup cocoa powder
- ¼ cup almond milk
- 1 teaspoon vanilla extract
- Pinch of salt
- Dark chocolate shavings for topping (optional)
Instructions
Step 1: Prepare the Dates
If using dates instead of bananas, soak them in warm water for 10 minutes to soften.
Step 2: Blend Everything
Add the avocados, banana or dates, cocoa powder, almond milk, vanilla extract, and salt to a blender or food processor.
Blend until completely smooth and creamy.
Step 3: Adjust the Texture
If the pudding feels too thick, add a little more almond milk and blend again.
Step 4: Chill
Transfer the pudding to serving bowls and refrigerate for at least 30 minutes before serving.
Step 5: Serve
Top with dark chocolate shavings, berries, or chopped nuts if desired.
Helpful Tips
- Blend thoroughly for the smoothest texture.
- Chilling helps the pudding become thicker and richer.
- Use ripe avocados for the creamiest consistency.
10. Baked Cinnamon Peaches
These baked cinnamon peaches are warm, juicy, and naturally sweet.
Roasting brings out the peaches’ flavor and creates soft caramelized edges that taste incredible with crunchy walnuts and creamy toppings.
This easy dessert feels comforting while staying light and fresh.
Ingredients
- 4 fresh peaches, halved and pitted
- 1 teaspoon cinnamon
- 1 tablespoon melted coconut oil
- ¼ cup chopped walnuts
- Coconut cream or yogurt for serving
- Drizzle of honey or maple syrup (optional)
Instructions
Step 1: Prepare the Oven
Preheat your oven to 400°F (200°C).
Line a baking tray or baking dish with parchment paper.
Step 2: Season the Peaches
Place the peach halves cut-side up on the tray.
Brush them lightly with melted coconut oil and sprinkle with cinnamon.
Step 3: Add the Walnuts
Scatter the chopped walnuts over the peaches.
Step 4: Bake
Bake for 20–25 minutes or until the peaches are soft and lightly caramelized around the edges.
Step 5: Serve
Serve warm with coconut cream, yogurt, or an optional drizzle of honey or maple syrup.
Helpful Tips
- Bake until the peaches are soft but still hold their shape.
- Use ripe peaches for the best natural sweetness.
- Try adding a pinch of nutmeg for extra warmth and flavor.
Tips for Making Fruit-Sweetened Desserts
- Use ripe fruit for better natural sweetness
The riper the fruit, the sweeter and more flavorful your desserts will taste without needing added sugar. - Frozen fruit works well in smoothies and frozen desserts
Frozen bananas, berries, and mangoes create a thick, creamy texture that’s perfect for nice cream and popsicles. - Dates are excellent for brownies, bars, and energy bites
Dates add natural sweetness while also helping create a soft, chewy texture in no-bake and baked desserts. - Applesauce and bananas can replace sugar in baking
Both ingredients add moisture and sweetness, making muffins, cakes, and cookies softer and naturally delicious.
Final Thoughts
Fruit-sweetened desserts prove that healthier treats can still taste rich, satisfying, and full of flavor.
With simple ingredients like bananas, dates, berries, and apples, it’s easy to make desserts that feel comforting without relying on refined sugar.
Small swaps can make a big difference, and these desserts are a great place to start.
FAQs
Are fruit-sweetened desserts healthy?
Yes, they can be a healthier alternative because they provide natural sweetness along with fiber, vitamins, and nutrients.
What fruits are best for sweetening desserts?
Bananas, dates, apples, mangoes, and berries are some of the best fruits for natural sweetness and flavor.
Can I make these desserts dairy-free?
Yes, many of these recipes can easily be made dairy-free with plant-based milk and yogurt alternatives.
How should I store fruit-sweetened desserts?
Most desserts can be stored in the refrigerator for 3–5 days or frozen for longer storage.

Hi, I’m Sorenna Blythe, the baker and writer behind Mix Whisk Bake. I share simple, reliable recipes and honest kitchen moments to help home bakers bake with confidence and joy. When I’m not testing new treats, you’ll find me sipping coffee and dreaming up my next bake.