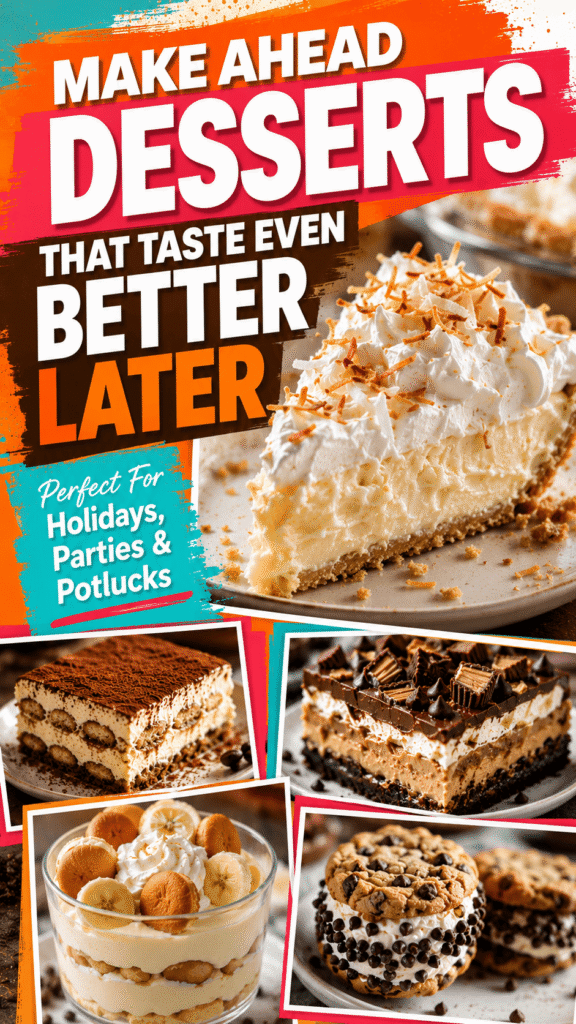
Some desserts are even better when you make them ahead of time.
The flavors have time to blend, the texture gets creamier, and you can skip the last-minute kitchen stress when guests arrive.
That’s a huge win for busy weeknights, holidays, birthdays, and potlucks.
This list is packed with easy desserts you can prep early and enjoy later.
You’ll find creamy cheesecakes, layered treats, chilled desserts, and crowd-pleasing favorites that look impressive without requiring hours in the kitchen.

1. No-Bake Oreo Cheesecake Cups
These no-bake Oreo cheesecake cups are creamy, rich, and packed with cookies-and-cream flavor in every bite.
They’re simple to make, easy to portion, and perfect for parties, birthdays, or busy weekends when you want dessert ready ahead of time.
Since they chill in the fridge, the texture becomes even smoother after a few hours, making them an ideal make-ahead treat.
Why You’ll Love It
- No oven required
- Easy to make ahead for parties and gatherings
- Creamy cheesecake filling with crunchy Oreo layers
- Perfect individual dessert cups for easy serving
- Beginner-friendly and hard to mess up
Ingredients
Oreo Crust Layer
- 18 Oreo cookies
- 3 tablespoons melted butter
Cheesecake Filling
- 16 ounces cream cheese, softened
- 1 cup powdered sugar
- 1 teaspoon vanilla extract
- 1 ½ cups heavy whipping cream
- 10 Oreo cookies, crushed
Topping
- Whipped cream
- Extra crushed Oreos
- Mini Oreo cookies for garnish
Instructions
Step 1: Make the Oreo Crust
Place the Oreo cookies in a food processor and blend into fine crumbs. Mix the crumbs with melted butter until evenly coated.
Spoon a few tablespoons into the bottom of each dessert cup and gently press down to form the crust layer.
Step 2: Prepare the Cheesecake Filling
In a large bowl, beat the softened cream cheese until smooth and creamy. Add powdered sugar and vanilla extract, then mix again until fully combined.
In a separate bowl, whip the heavy cream until stiff peaks form. Fold the whipped cream into the cheesecake mixture gently to keep the filling light and fluffy.
Fold in the crushed Oreos.
Step 3: Assemble the Cups
Spoon or pipe the cheesecake filling over the Oreo crust layer. Add another small layer of Oreo crumbs if desired for extra texture.
Top with whipped cream, crushed Oreos, and mini Oreo cookies.
Step 4: Chill
Cover the cups and refrigerate for at least 4 hours before serving. Overnight chilling gives the best texture and flavor.
Make-Ahead Tips
- These cups can be made up to 2 days in advance.
- Keep covered in the refrigerator until ready to serve.
- Add whipped cream topping shortly before serving for the freshest look.
- Use disposable dessert cups for easy party cleanup.
Variations
- Swap Oreos for golden sandwich cookies for a vanilla version.
- Add chocolate syrup between the layers for extra richness.
- Mix mini chocolate chips into the filling.
- Top with fresh strawberries or raspberries for a fruity twist.
2. Strawberry Icebox Cake
Strawberry icebox cake is one of those desserts that feels fancy but takes very little effort.
Layers of graham crackers, whipped cream, and fresh strawberries soften together in the fridge to create a cool, creamy dessert that tastes almost like strawberry shortcake.
It’s light, refreshing, and perfect for warm days when you don’t want to turn on the oven.
Why You’ll Love It
- Easy no-bake dessert with simple ingredients
- Perfect for spring and summer gatherings
- Tastes even better after chilling overnight
- Soft cake-like texture without baking
- Great for making ahead for parties
Ingredients
- 2 pounds fresh strawberries, sliced
- 2 cups heavy whipping cream
- ½ cup powdered sugar
- 1 teaspoon vanilla extract
- 1 box graham crackers
Instructions
Step 1: Prepare the Whipped Cream
In a large mixing bowl, whip the heavy cream, powdered sugar, and vanilla extract until stiff peaks form.
Step 2: Layer the Dessert
Spread a thin layer of whipped cream on the bottom of a 9×13-inch dish.
Add a single layer of graham crackers. Spread more whipped cream over the crackers, then top with sliced strawberries.
Repeat the layers until the dish is filled, finishing with whipped cream and strawberries on top.
Step 3: Chill
Cover the dish and refrigerate for at least 6 hours, but overnight is best. The graham crackers will soften into a cake-like texture as it chills.
Make-Ahead Tips
- Make this dessert the night before serving for the best texture.
- Store covered in the refrigerator for up to 3 days.
- Slice strawberries shortly before assembling to keep them fresh.
- Chill thoroughly before slicing for cleaner servings.
Variations
- Use blueberries or raspberries along with strawberries.
- Add a layer of cheesecake pudding for extra creaminess.
- Swap graham crackers for vanilla wafers.
- Drizzle melted chocolate over the top before serving.
3. Chocolate Peanut Butter Lasagna
Chocolate peanut butter lasagna is a rich layered dessert packed with creamy peanut butter filling, chocolate pudding, whipped topping, and crushed cookies.
It’s completely no-bake, easy to prepare ahead, and always a crowd favorite at parties and potlucks.
Every layer adds a different texture, making each bite creamy, crunchy, and chocolatey all at once.
Why You’ll Love It
- Rich chocolate and peanut butter flavor combination
- No baking required
- Perfect dessert for feeding a crowd
- Easy to prepare ahead of time
- Layers look impressive with minimal effort
Ingredients
Cookie Crust
- 36 Oreo cookies
- 6 tablespoons melted butter
Peanut Butter Layer
- 8 ounces cream cheese, softened
- 1 cup creamy peanut butter
- 1 cup powdered sugar
- 1 container whipped topping, divided
Chocolate Layer
- 2 boxes instant chocolate pudding mix
- 3 cups cold milk
Topping
- Chocolate shavings
- Crushed Oreos
- Peanut butter drizzle
Instructions
Step 1: Make the Crust
Crush the Oreo cookies into fine crumbs and mix with melted butter.
Press the mixture firmly into the bottom of a 9×13-inch baking dish. Refrigerate while preparing the filling.
Step 2: Prepare the Peanut Butter Layer
Beat the cream cheese, peanut butter, and powdered sugar together until smooth.
Fold in half of the whipped topping until creamy and fluffy.
Spread the mixture evenly over the chilled crust.
Step 3: Make the Chocolate Layer
In a separate bowl, whisk together the chocolate pudding mix and cold milk until smooth and thickened.
Spread the pudding evenly over the peanut butter layer.
Step 4: Add the Topping
Spread the remaining whipped topping over the pudding layer.
Top with chocolate shavings, crushed Oreos, and a drizzle of melted peanut butter if desired.
Step 5: Chill
Cover and refrigerate for at least 6 hours before serving. Overnight chilling works even better.
Make-Ahead Tips
- Best made a day ahead for cleaner slices and better flavor.
- Keep refrigerated until serving time.
- Freeze for 20 minutes before slicing for neater layers.
- Store leftovers covered in the fridge for up to 4 days.
Variations
- Use chocolate sandwich cookies with peanut butter filling for extra flavor.
- Add chopped peanut butter cups between the layers.
- Swap chocolate pudding for vanilla pudding for a lighter version.
- Drizzle caramel sauce on top for extra richness.
4. Lemon Blueberry Trifle
This lemon blueberry trifle is bright, fresh, and packed with layers of soft cake, creamy lemon filling, and juicy blueberries.
It looks beautiful in a large trifle bowl or individual cups, making it perfect for holidays, brunches, baby showers, or summer gatherings.
The flavors get even better as the dessert chills, so it’s an excellent make-ahead option.
Why You’ll Love It
- Light and refreshing flavor combination
- Beautiful layered presentation
- Easy to prepare ahead for parties
- Soft cake texture with creamy filling
- Perfect balance of sweet and tangy
Ingredients
Lemon Cream Layer
- 8 ounces cream cheese, softened
- 1 cup powdered sugar
- 1 teaspoon vanilla extract
- 1 tablespoon lemon zest
- 2 tablespoons fresh lemon juice
- 1 ½ cups heavy whipping cream
Cake Layer
- 1 prepared pound cake, cut into cubes
Fruit Layer
- 3 cups fresh blueberries
- 1 tablespoon sugar
Topping
- Extra whipped cream
- Lemon slices
- Additional blueberries
Instructions
Step 1: Prepare the Lemon Cream
In a large bowl, beat the cream cheese until smooth. Add powdered sugar, vanilla extract, lemon zest, and lemon juice. Mix until creamy.
In a separate bowl, whip the heavy cream until stiff peaks form. Gently fold the whipped cream into the lemon mixture until light and fluffy.
Step 2: Prepare the Blueberries
Place the blueberries in a bowl and sprinkle with sugar. Toss gently and let them sit for about 10 minutes to release some juices.
Step 3: Assemble the Trifle
Add a layer of pound cake cubes to the bottom of a trifle dish or dessert cups.
Top with a layer of lemon cream, followed by blueberries.
Repeat the layers until the dish is full, finishing with lemon cream on top.
Step 4: Garnish and Chill
Decorate with whipped cream, lemon slices, and extra blueberries.
Cover and refrigerate for at least 4 hours before serving.
Make-Ahead Tips
- Assemble the trifle up to 24 hours in advance.
- Keep chilled until ready to serve.
- Add fresh garnishes shortly before serving for the best appearance.
- Individual cups are great for parties and easy serving.
Variations
- Swap blueberries for raspberries or strawberries.
- Use angel food cake instead of pound cake for a lighter dessert.
- Add lemon curd between the layers for extra citrus flavor.
- Sprinkle crushed vanilla cookies between layers for added texture.
5. Classic Tiramisu
Classic tiramisu is a rich Italian dessert made with layers of coffee-soaked ladyfingers, creamy mascarpone filling, and a dusting of cocoa powder.
It may look fancy, but it’s surprisingly simple to make at home.
Since tiramisu needs time to chill, it’s one of the best desserts to prepare ahead for dinner parties and special occasions.
Why You’ll Love It
- Rich coffee flavor with creamy layers
- Elegant dessert that feels special
- No baking required
- Tastes even better after chilling overnight
- Perfect make-ahead dessert for entertaining
Ingredients
- 6 egg yolks
- ¾ cup granulated sugar
- 1 cup heavy cream
- 16 ounces mascarpone cheese
- 2 cups strong brewed coffee, cooled
- 2 tablespoons coffee liqueur (optional)
- 1 package ladyfinger cookies
- Unsweetened cocoa powder for dusting
Instructions
Step 1: Make the Cream Filling
In a large bowl, whisk the egg yolks and sugar together until pale and creamy.
In another bowl, whip the heavy cream until stiff peaks form.
Fold the mascarpone cheese into the egg mixture until smooth, then gently fold in the whipped cream.
Step 2: Prepare the Coffee Mixture
Combine the cooled coffee and coffee liqueur in a shallow bowl.
Quickly dip each ladyfinger into the coffee mixture. Do not soak them too long, or they will become mushy.
Step 3: Assemble the Tiramisu
Arrange a layer of soaked ladyfingers in the bottom of a baking dish.
Spread half of the mascarpone filling over the top.
Repeat with another layer of soaked ladyfingers and the remaining filling.
Step 4: Chill
Cover and refrigerate for at least 6 hours, but overnight is best for the flavors to fully develop.
Before serving, dust generously with cocoa powder.
Make-Ahead Tips
- Tiramisu is best made the day before serving.
- Keep refrigerated until ready to serve.
- Dust with cocoa powder right before serving for the freshest look.
- Store leftovers covered in the fridge for up to 3 days.
Variations
- Add chocolate shavings between the layers.
- Use espresso for a stronger coffee flavor.
- Swap coffee liqueur with vanilla extract for an alcohol-free version.
- Add a layer of Nutella for extra richness.
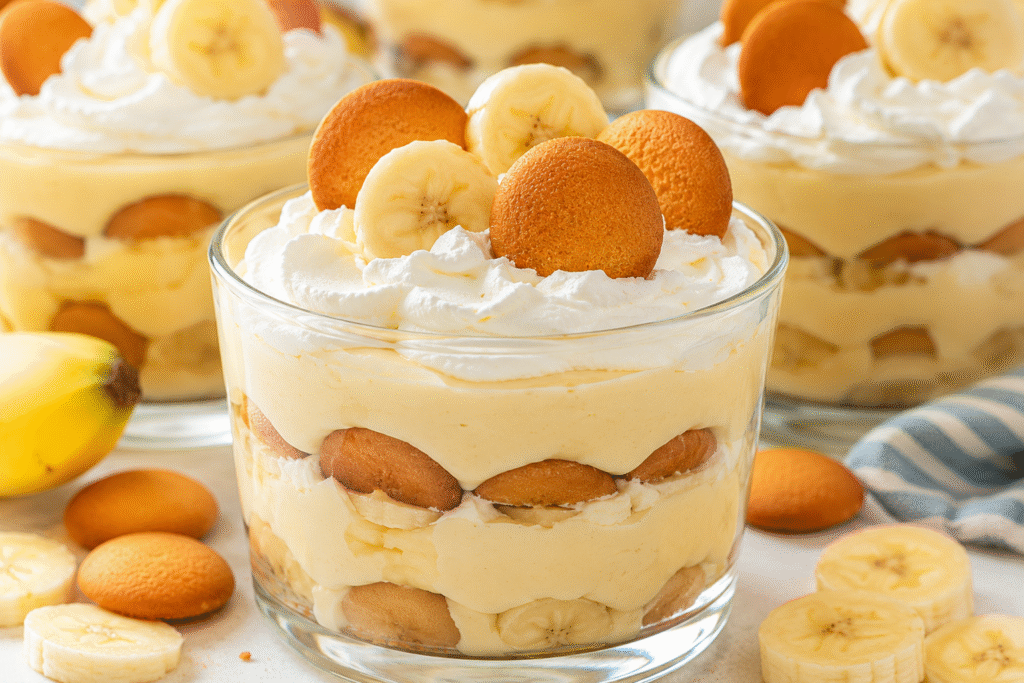
6. Banana Pudding Dessert Cups
Banana pudding dessert cups are creamy, nostalgic, and incredibly easy to make ahead.
With layers of vanilla pudding, bananas, whipped topping, and cookies, these individual desserts are always a hit at picnics, cookouts, and family gatherings.
They’re simple enough for beginners but still look fun and impressive when served in clear cups.
Why You’ll Love It
- Easy no-bake dessert
- Perfect for individual servings
- Creamy and comforting flavor
- Great for potlucks and parties
- Easy to prepare ahead of time
Ingredients
- 2 boxes instant vanilla pudding mix
- 4 cups cold milk
- 1 can of sweetened condensed milk
- 1 teaspoon vanilla extract
- 2 cups whipped topping
- 4 bananas, sliced
- 1 box vanilla wafer cookies
Instructions
Step 1: Prepare the Pudding
In a large bowl, whisk together the pudding mix and cold milk until smooth.
Add the sweetened condensed milk and vanilla extract, then mix until creamy.
Fold in the whipped topping gently.
Step 2: Assemble the Dessert Cups
Place a few vanilla wafer cookies in the bottom of each dessert cup.
Add a layer of banana slices, followed by pudding mixture.
Repeat the layers until the cups are full, finishing with pudding on top.
Step 3: Garnish
Top with crushed vanilla wafers, whipped topping, and extra banana slices if desired.
Step 4: Chill
Cover and refrigerate for at least 3 hours before serving.
Make-Ahead Tips
- Assemble the cups several hours ahead for the best flavor.
- Add fresh banana slices on top shortly before serving to prevent browning.
- Store covered in the refrigerator for up to 2 days.
- Use airtight containers if transporting to a picnic or party.
Variations
- Add caramel sauce between the layers.
- Use chessman cookies instead of vanilla wafers.
- Mix crushed cookies directly into the pudding for extra texture.
- Add mini chocolate chips for a chocolate banana version.
7. Chocolate Chip Cookie Ice Cream Sandwiches
Chocolate chip cookie ice cream sandwiches are a fun frozen dessert that’s always a hit with both kids and adults.
Soft cookies paired with creamy ice cream create the perfect sweet treat for hot days, birthday parties, and summer gatherings.
They’re easy to make ahead and store in the freezer, so dessert is always ready when you need it.
Why You’ll Love It
- Fun dessert everyone enjoys
- Perfect make-ahead freezer treat
- Easy to customize with different ice cream flavors
- Great for parties and summer events
- Simple to store and serve later
Ingredients
- 24 chocolate chip cookies
- 1 quart vanilla ice cream, slightly softened
- ½ cup mini chocolate chips
- ½ cup sprinkles
Instructions
Step 1: Prepare the Cookies
Lay half of the cookies flat-side up on a baking sheet or tray.
Step 2: Add the Ice Cream
Scoop ice cream onto each cookie and gently spread it evenly.
Top with another cookie and press lightly to create sandwiches.
Step 3: Decorate the Edges
Roll the sides of the sandwiches in mini chocolate chips or sprinkles.
Step 4: Freeze
Place the sandwiches on a tray and freeze for at least 3 hours or until firm.
Make-Ahead Tips
- Wrap each sandwich individually in plastic wrap for easy storage.
- Freeze for up to 2 weeks.
- Let sandwiches sit at room temperature for 2 to 3 minutes before serving for easier biting.
- Use store-bought cookies for a quicker dessert.
Variations
- Use mint chocolate chip or cookies-and-cream ice cream.
- Roll the edges in crushed Oreos or chopped nuts.
- Use brownie cookies for an extra-rich version.
- Drizzle melted chocolate over the sandwiches before freezing.
8. Raspberry Cheesecake Bars
These raspberry cheesecake bars combine a rich cheesecake filling with sweet and tangy raspberry swirls on top of a buttery graham cracker crust.
They’re easy to slice, simple to serve, and perfect for making ahead for holidays, brunches, or dessert trays.
Why You’ll Love It
- Sweet and tangy flavor combination
- Creamy cheesecake texture
- Easy to make ahead and chill
- Simple to slice and serve
- Great for parties and gatherings
Ingredients
Crust
- 2 cups graham cracker crumbs
- 6 tablespoons melted butter
- 2 tablespoons granulated sugar
Cheesecake Filling
- 16 ounces cream cheese, softened
- ¾ cup granulated sugar
- 2 eggs
- 1 teaspoon vanilla extract
Raspberry Swirl
- 1 cup raspberry preserves
Instructions
Step 1: Prepare the Crust
Preheat the oven to 325°F.
Mix the graham cracker crumbs, melted butter, and sugar in a bowl until combined.
Press the mixture firmly into a lined 9×9-inch baking pan.
Step 2: Make the Cheesecake Filling
Beat the cream cheese until smooth.
Add sugar, eggs, and vanilla extract, then mix until creamy and fully combined.
Pour the filling over the crust.
Step 3: Add the Raspberry Swirl
Drop spoonfuls of raspberry preserves over the cheesecake filling.
Use a knife to gently swirl the preserves into the batter.
Step 4: Bake and Chill
Bake for 35 to 40 minutes or until the center is set.
Allow the bars to cool completely, then refrigerate for at least 4 hours before slicing.
Make-Ahead Tips
- Best made a day ahead for cleaner slices.
- Chill thoroughly before cutting.
- Store covered in the refrigerator for up to 4 days.
- Use parchment paper for easy removal from the pan.
Variations
- Swap raspberry preserves for strawberry or blackberry jam.
- Add white chocolate chips to the filling.
- Use crushed vanilla cookies instead of graham crackers for the crust.
- Top with fresh raspberries before serving.
9. Coconut Cream Pie
Coconut cream pie is smooth, creamy, and packed with rich coconut flavor.
The silky filling paired with whipped cream and toasted coconut creates a dessert that feels comforting and special at the same time.
It’s a great make-ahead pie because the filling needs time to chill and set before serving.
Why You’ll Love It
- Rich and creamy texture
- Delicious tropical coconut flavor
- Perfect make-ahead dessert
- Great for holidays and family dinners
- Beautiful topped with whipped cream and toasted coconut
Ingredients
Pie Crust
- 1 baked 9-inch pie crust
Coconut Filling
- 2 cups whole milk
- 1 cup heavy cream
- ¾ cup granulated sugar
- ¼ cup cornstarch
- 4 egg yolks
- 1 teaspoon vanilla extract
- 1 ½ cups sweetened shredded coconut
- 2 tablespoons butter
Topping
- Whipped cream
- Toasted coconut flakes
Instructions
Step 1: Make the Filling
In a saucepan, whisk together milk, heavy cream, sugar, cornstarch, and egg yolks.
Cook over medium heat, whisking constantly, until the mixture thickens.
Remove from heat and stir in vanilla extract, butter, and shredded coconut.
Step 2: Fill the Pie
Pour the coconut filling into the baked pie crust and smooth the top.
Step 3: Chill
Cover and refrigerate for at least 4 hours or until fully set.
Step 4: Add Toppings
Before serving, top with whipped cream and toasted coconut flakes.
Make-Ahead Tips
- Prepare the pie one day ahead for the best texture.
- Keep refrigerated until serving.
- Add whipped cream shortly before serving for the freshest look.
- Toast coconut flakes ahead of time and store in an airtight container.
Variations
- Add sliced bananas for a banana coconut version.
- Use coconut milk for an even stronger coconut flavor.
- Top with white chocolate curls.
- Make mini coconut cream pies in individual jars or cups.
10. Brownie Trifle
Brownie trifle is a rich layered dessert filled with fudgy brownies, chocolate pudding, whipped cream, and chocolate toppings.
It’s easy to assemble, feeds a crowd, and looks impressive in a trifle bowl.
Since the layers soften and blend together while chilling, it’s one of the best desserts to prepare ahead for parties and holidays.
Why You’ll Love It
- Rich chocolate flavor in every bite
- Easy dessert for large groups
- Beautiful layered presentation
- Great make-ahead party dessert
- Simple to customize with different toppings
Ingredients
- 1 batch of brownies, baked and cut into cubes
- 2 boxes instant chocolate pudding mix
- 4 cups cold milk
- 2 cups whipped topping
- 1 cup chocolate chips
- Chocolate syrup for drizzling
Instructions
Step 1: Prepare the Pudding
Whisk together the chocolate pudding mix and cold milk until smooth and thickened.
Step 2: Layer the Trifle
Place a layer of brownie cubes in the bottom of a trifle dish.
Top with chocolate pudding and whipped topping.
Repeat the layers until the dish is full.
Step 3: Add Toppings
Sprinkle chocolate chips over the top and drizzle with chocolate syrup.
Step 4: Chill
Cover and refrigerate for at least 4 hours before serving.
Make-Ahead Tips
- Assemble the trifle a day ahead for the best flavor.
- Store covered in the refrigerator.
- Add extra chocolate drizzle right before serving.
- Use store-bought brownies to save time.
Variations
- Add crushed peanut butter cups between layers.
- Use caramel pudding instead of chocolate pudding.
- Add fresh strawberries or raspberries for a fruity twist.
- Swap brownies for chocolate cake cubes for a lighter texture.
Tips For Making Desserts Ahead Of Time
Best Storage Containers
Airtight glass containers are one of the best options for storing make-ahead desserts because they help keep desserts fresh without absorbing fridge odors.
Disposable dessert cups with lids are especially helpful for parties, picnics, and potlucks since they make serving simple and mess-free.
For larger desserts like icebox cakes, trifles, and dessert lasagnas, covered 9×13-inch baking dishes work very well.
Cake carriers are another great option for transporting pies and cheesecakes safely.
If you plan to freeze desserts, always use freezer-safe containers or tightly wrapped pans to help prevent freezer burn and keep the texture as fresh as possible.
How Long Desserts Last In The Fridge
Most cheesecake desserts stay fresh for about 3 to 5 days when stored covered in the refrigerator.
Trifles and pudding desserts are usually best enjoyed within 2 to 3 days since the layers can soften over time.
Icebox cakes are often at their best within the first 2 days, when the texture is creamy but still holds together nicely.
Cream pies generally last around 3 to 4 days in the fridge.
Desserts topped with fresh fruit should usually be eaten sooner because fruit can release moisture and start to brown after sitting for too long.
Freezing Tips
Wrapping desserts tightly before freezing helps protect them from freezer burn and keeps flavors fresh.
Using both plastic wrap and foil or airtight freezer-safe containers gives the best protection.
Freezing desserts in individual portions can also make serving easier later, since you can thaw only what you need.
Fresh fruit toppings like bananas and strawberries do not always freeze well because they can become watery after thawing.
Labeling containers with the date is helpful so you know how long desserts have been stored.
For the best texture, thaw frozen desserts slowly in the refrigerator overnight instead of leaving them out at room temperature.
Transporting Desserts For Parties
Cold desserts should stay chilled during transport, especially desserts made with cream cheese, whipped cream, or pudding.
Insulated bags or coolers with ice packs can help keep everything cold until serving time.
Keeping toppings separate while traveling can also help desserts look fresher and prevent soggy textures.
Containers with secure lids help avoid spills and shifting during the drive.
Desserts like cheesecake bars, brownie trifles, and dessert cups usually travel very well because they are more stable.
For delicate layered desserts, assembling final toppings at the destination often keeps everything looking neat and party-ready.
Final Thoughts
Make-ahead desserts are one of the easiest ways to save time without giving up something homemade and delicious.
With a little prep done early, you can spend less time stressing in the kitchen and more time enjoying the moment with family and friends.
Save this post for later, share it with someone who loves baking, and have fun trying a few new favorites along the way.

Hi, I’m Sorenna Blythe, the baker and writer behind Mix Whisk Bake. I share simple, reliable recipes and honest kitchen moments to help home bakers bake with confidence and joy. When I’m not testing new treats, you’ll find me sipping coffee and dreaming up my next bake.