This mango mousse cake is light, creamy, and packed with fresh tropical flavor. Each bite feels soft and airy, with just the right amount of sweetness from ripe mangoes.
It’s the kind of dessert that fits anywhere. Perfect for warm summer days, birthdays, or when you want something that looks impressive but is surprisingly simple to make.
You don’t need complicated steps or special skills to get it right.
Even better, you can make this as a no-bake cake, which means less stress and more fun in the kitchen.
Don’t worry if you’re new to mousse because I’ll guide you through it, and you’ll see how easy it is to create something truly beautiful.
What is Mango Mousse Cake?
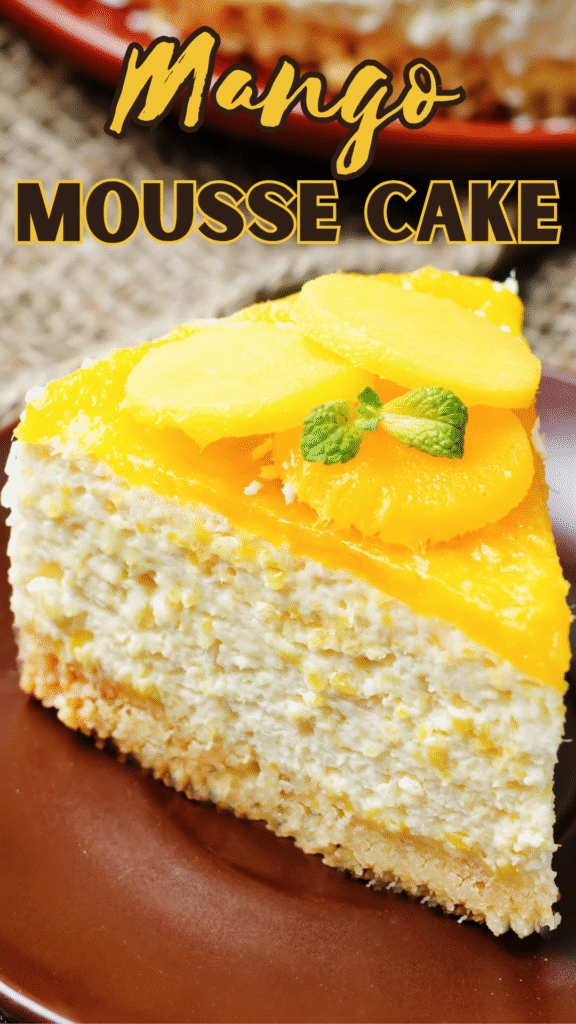
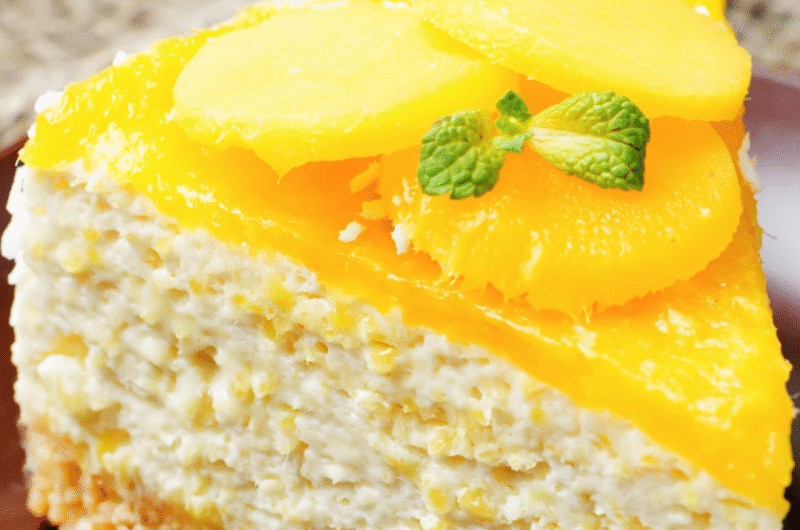
Mango mousse cake is a soft, chilled dessert made with a light and airy mango filling that almost melts as you take a bite.
You’ll notice it feels creamy but not heavy, thanks to whipped cream folded into the mixture to create that fluffy texture we call “mousse.”
Unlike cheesecake, which is dense and rich, or sponge cake, which is more bready and structured, a mousse cake sits right in between with a smooth, cloud-like consistency that still holds its shape when sliced.
It’s usually built in simple layers, starting with a base that can be either a soft sponge cake or a buttery biscuit crust for a slight crunch, followed by the star of the show—the mango mousse, made from fresh mango puree and cream.
Some versions include a glossy mango glaze or fresh fruit on top, which adds both flavor and a beautiful finish.
Don’t worry if this sounds fancy because once you break it down, each layer is straightforward, and together they create a dessert that looks impressive but is very doable at home.
Why You’ll Love This Recipe
Fresh, Fruity Flavor
This cake is all about real mango flavor, and you’ll notice the difference right away.
Using ripe mangoes gives the mousse a naturally sweet, slightly tangy taste that feels refreshing rather than heavy.
It’s not artificial or overpowering. Just clean, bright flavor in every bite. If your mangoes are extra sweet, you can even reduce the sugar a little.
Light and Not Overly Sweet
One of the best things about this cake is how light it feels. The whipped cream gives it an airy texture, so it doesn’t sit heavy like some desserts. It’s sweet, but balanced.
If you usually find cakes too rich, this is a great option, and you can enjoy a slice without feeling overwhelmed.
Can Be Made Ahead
This is a very convenient dessert to plan in advance. Since the cake needs time to chill and set, making it a day ahead actually works in your favor.
You’ll have one less thing to worry about on the day you’re serving it, and the texture turns out even better after resting in the fridge.
Beginner-Friendly Steps
Don’t worry if this is your first time making a mousse cake. The steps are simple and easy to follow, and there’s no complicated baking technique involved.
As long as you take your time, especially when folding the cream, you’ll get a smooth, fluffy result. It’s a great recipe to build confidence in the kitchen.
Flexible (No-Bake or Baked Base Options)
You can easily adapt this recipe to suit what you prefer or what you have on hand. If you want something quick, go for a no-bake biscuit base.
If you enjoy baking, you can use a soft sponge layer instead. Both options work well, so you can choose what feels easiest and most comfortable for you.
Ingredients Needed
For the Base
- 200 g digestive biscuits (crushed) or 1 prepared 8-inch sponge cake layer
- 100 g unsalted butter, melted (for biscuit base)
For the Mango Mousse
- 2 cups (480 ml) fresh mango puree (about 3–4 ripe mangoes)
- 1½ cups (360 ml) cold whipping cream
- ½ cup (100 g) sugar (adjust based on mango sweetness)
- 2 tsp gelatin powder + 3 tbsp water (for blooming)
or 2 tsp agar-agar powder + 3 tbsp water
For the Topping (Optional)
- 1 cup (240 ml) mango glaze or mango jelly
- 1 cup fresh mango cubes
- A few fresh mint leaves (for garnish)
Equipment Needed
- Springform pan (8-inch / 20 cm)
This makes it much easier to remove the cake neatly once it’s set. If you don’t have one, you can use a regular pan lined with parchment paper, but just go slowly when lifting it out. - Mixing bowls (2–3 medium to large)
You’ll need separate bowls for whipping cream and mixing the mango base. Using a larger bowl helps prevent spills when folding everything together. - Electric mixer or whisk
An electric mixer makes whipping cream quicker and more consistent, but don’t worry if you don’t have one, because a hand whisk works too; it just takes a bit more effort. - Spatula
A soft spatula is key for gently folding the whipped cream into the mango mixture. This helps keep the mousse light and airy. - Saucepan (small)
You’ll use this to gently heat and dissolve the gelatin or agar-agar. Keep the heat low and stir well to avoid lumps.
How to Make Mango Mousse Cake (Step-by-Step)
Step 1: Prepare the Base
Start by crushing your digestive biscuits into fine crumbs. You can use a food processor or simply place them in a bag and crush with a rolling pin.
Mix the crumbs with melted butter until the texture feels like wet sand. Press this mixture firmly into the bottom of your pan, making sure it’s even and compact.
Chill it in the fridge for about 20–30 minutes so it sets properly. If you’re using a sponge base instead, simply place your sponge layer into the pan and make sure it fits snugly.
Step 2: Make Mango Puree
Peel and chop ripe mangoes, then blend them until completely smooth. You’ll notice the color becomes vibrant.
If your puree has any fibers, strain it through a sieve for a smoother texture. This step is optional, but it helps create a more refined mousse.
Step 3: Prepare Gelatin / Agar-Agar
If using gelatin, sprinkle it over water and let it sit for a few minutes until it blooms (it will look thick and slightly gel-like). Gently heat it until fully dissolved, but don’t boil it.
For agar-agar, dissolve it in water and bring it to a light simmer until fully melted. Once ready, slowly mix it into the mango puree, stirring well so it blends evenly.
Step 4: Whip the Cream
In a cold bowl, whip the cream until it reaches soft peaks. This means when you lift the whisk, the cream holds its shape but still has a slight curl at the tip.
Don’t overwhip, or it can turn grainy. Take your time here because this step helps give the mousse its light texture.
Step 5: Combine Mousse
Now, gently fold the mango mixture into the whipped cream using a spatula. Do this in batches and use slow, sweeping motions.
Don’t rush this step because you want to keep as much air in the mixture as possible so the mousse stays soft and fluffy.
Step 6: Assemble
Pour the mango mousse over your prepared base. Spread it evenly and smooth the top with a spatula.
Tap the pan lightly on the counter to remove any air bubbles and level the surface.
Step 7: Chill
Place the cake in the fridge and let it set for at least 4–6 hours, or until firm. If you have time, leaving it overnight gives the best results.
You’ll notice it becomes stable and easy to slice once fully set.
Step 8: Add Topping (Optional)
Once the cake is set, you can pour a layer of mango glaze on top for extra flavor and shine. Let it set briefly, then decorate with fresh mango cubes and a few mint leaves.
This final touch adds both texture and a beautiful finish.
Tips for the Perfect Mango Mousse Cake
Use Ripe, Sweet Mangoes for the best flavor
The flavor of this cake depends heavily on your mangoes, so choose ones that are fully ripe, soft to the touch, and naturally sweet.
You’ll notice that ripe mangoes blend into a smoother, more fragrant puree with a deeper color.
If your mangoes taste slightly sour, you can balance them with a bit more sugar, but starting with good fruit makes everything easier.
Do Not Overwhip Cream
When whipping the cream, stop once you reach soft peaks. This means the cream holds its shape but still looks smooth and slightly soft.
If you keep whipping past this stage, it can turn thick and grainy, which will affect the final texture of your mousse.
Don’t worry if you’re unsure, just check frequently and stop early rather than late.
Fold Gently to Keep Mousse Airy
Folding is what keeps the mousse light, so take your time here. Use a spatula and gently combine the mango mixture with the whipped cream using slow, sweeping motions.
You’ll notice the mixture stays fluffy when handled carefully. If you stir too quickly or aggressively, the air gets knocked out, and the mousse can become dense.
Chill Long Enough for Clean Slices
Patience really pays off with this cake. Let it chill for at least 4–6 hours, or overnight if possible. As it sets, the texture becomes firm but still soft and creamy.
When it’s properly chilled, you’ll get neat, clean slices instead of a soft, messy cut. If it feels too soft, just give it a bit more time in the fridge.
Variations & Substitutions
Eggless Version
This recipe is naturally eggless if you’re using a biscuit base, which makes it a great option for many diets. If you choose a sponge base, simply use an eggless sponge cake instead.
You’ll still get the same soft layers and creamy texture without changing the overall result.
Vegan Version (Coconut Cream + Agar)
You can easily make this cake vegan with a few simple swaps.
Replace whipping cream with chilled coconut cream, and you’ll notice it still whips up nicely and adds a light coconut flavor that pairs well with mango.
Use agar-agar instead of gelatin to help the mousse set. Make sure to dissolve the agar properly, as it needs a bit more heat to activate than gelatin.
No Gelatin Version
If you prefer not to use gelatin, agar-agar is the best alternative. It sets a bit more firmly, so the texture will be slightly different but still smooth and sliceable.
Just keep in mind that agar sets faster, so work a little quicker when mixing and assembling.
Add Layers (Jelly, Sponge, or Cream)
You can build more depth into your cake by adding extra layers. A thin mango jelly layer on top adds a nice shine and extra flavor.
You could also add a second sponge layer in the middle or even a light cream layer for contrast.
Use Canned Mango Puree if Fresh Isn’t Available
If fresh mangoes aren’t in season, canned mango puree works well. Choose a good-quality puree with no added flavors, and taste it before using.
You may need to adjust the sugar depending on how sweet it already is. This is a helpful option when you want consistent results year-round.
Storage & Make-Ahead Tips
This mango mousse cake stores well in the fridge, which makes it easy to plan ahead without stress.
Once set, keep it covered in the refrigerator for up to 3 days to maintain its freshness and texture—you’ll notice it stays creamy and holds its shape best when kept chilled.
If you’re preparing for an event, you can make the cake a day in advance, and in fact, it often tastes even better the next day as the flavors settle and the mousse firms up nicely.
Just wait to add any fresh fruit toppings until closer to serving so they stay bright and fresh.
Freezing isn’t recommended for this cake, as the texture can change once thawed, and the mousse may become watery or slightly grainy.
If you do need to store leftovers, keeping them chilled and well-covered is the simplest way to enjoy the cake at its best.
Serving Suggestions
This mango mousse cake is best served chilled, straight from the fridge, when the texture is firm yet creamy, and each slice holds its shape cleanly.
You’ll notice the flavors feel more refreshing and balanced when it’s cold, especially on warmer days.
For a simple pairing, serve it with a cup of tea or coffee. The light, fruity taste of the cake goes well with both, without feeling too heavy after a meal.
It’s also a great choice for special moments like birthdays or casual brunches, since it looks elegant but doesn’t require last-minute effort.
If you’re hosting in the summer, this dessert fits right in, offering something cool, fresh, and easy to enjoy.
Final Thoughts
This mango mousse cake is light, fresh, and simple to make, yet it looks and tastes special enough for any occasion.
Once you try it, you’ll see how easy it is to adjust the flavors and make it your own.
Give it a go, have fun with it, and don’t worry about making it perfect the first time.
We all started somewhere!
FAQs
Yes, you can. Choose a good-quality puree and adjust the sugar if it’s already sweetened.
Use agar-agar instead. It sets well but slightly firmer, so follow the correct heating steps.
This usually happens if the gelatin or agar wasn’t properly dissolved or measured, or if the cake didn’t chill long enough.
Yes, it’s perfect for making a day ahead. It sets better and saves time later.
Any ripe, sweet, and non-fibrous mango works well, like Ataulfo or Alphonso.
Mango Mousse Cake Recipe (Light, Creamy & No-Bake Option!)
Difficulty: Easy8
Slices25
minutes5
minutes6
hoursA light, creamy mango mousse cake with a soft base and fresh tropical flavor—perfect for warm days and simple to make.
Ingredients
- Base:
200 g digestive biscuits (crushed)
100 g melted butter
- Mango Mousse:
2 cups mango puree
1½ cups whipping cream
½ cup sugar
2 tsp gelatin + 3 tbsp water (or agar-agar)
- Topping (optional):
1 cup mango glaze
Fresh mango cubes
Mint leaves
Directions
- Mix crushed biscuits with melted butter, press into a pan, and chill for 20–30 minutes.
- Blend mangoes into a smooth puree and strain if needed.
- Bloom and dissolve gelatin (or prepare agar), then mix into the mango puree.
- Whip cream to soft peaks.
- Gently fold the mango mixture into the whipped cream.
- Pour over the base and smooth the top.
- Chill for 4–6 hours until set.
- Add glaze and decorate if desired.
Notes
- Use ripe, sweet mangoes for the best flavor.
- Do not overwhip the cream because it should stay soft and smooth.
- Chill overnight for cleaner slices and better texture.
- Store in the fridge and serve cold for the best results.

Hi, I’m Sorenna Blythe, the baker and writer behind Mix Whisk Bake. I share simple, reliable recipes and honest kitchen moments to help home bakers bake with confidence and joy. When I’m not testing new treats, you’ll find me sipping coffee and dreaming up my next bake.


