Planning a party is already enough work, so dessert should be simple, fun, and easy to serve.
That’s exactly why dessert cups are such a favorite.
They look impressive, keep portions mess-free, and make it easy for guests to grab a sweet treat without needing plates or forks.
From creamy cheesecake cups to chocolatey layered desserts, there’s something here for every kind of celebration.
These ideas are perfect for birthdays, holidays, BBQs, baby showers, potlucks, or anytime you want desserts that feel special without a lot of stress.
Grab your cups, your favorite toppings, and get ready to make desserts everyone will want seconds of.
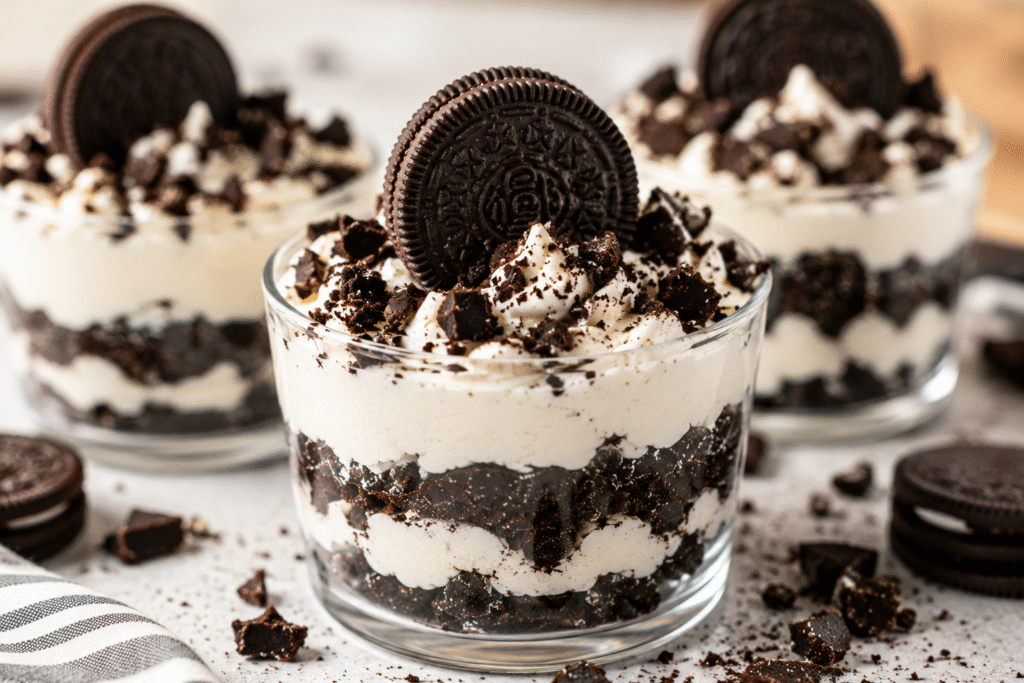
1. No-Bake Oreo Cheesecake Cups
Why You’ll Love It
These Oreo cheesecake cups are creamy, rich, and incredibly easy to make ahead for parties.
The layers of crushed cookies and fluffy cheesecake filling make them look bakery-worthy without much effort.
Since they’re served in individual cups, they’re also easy to grab and enjoy during busy celebrations.
Ingredients
For the Oreo Crust
- 24 Oreo cookies, crushed
- 4 tablespoons melted butter
For the Cheesecake Filling
- 8 oz (225 g) cream cheese, softened
- 1/2 cup powdered sugar
- 1 teaspoon vanilla extract
- 1 1/2 cups whipped topping or whipped cream
For Topping
- Extra crushed Oreos
- Mini Oreo cookies
- Whipped cream
Instructions
Prepare the Oreo Layer
In a medium bowl, mix the crushed Oreos with melted butter until the crumbs are evenly coated. The mixture should feel similar to wet sand.
Spoon a few tablespoons into the bottom of each dessert cup and gently press down to create the crust layer.
Make the Cheesecake Filling
In a large mixing bowl, beat the softened cream cheese until smooth and creamy. Add powdered sugar and vanilla extract, then mix again until fully combined.
Fold in the whipped topping gently to keep the filling light and fluffy.
Assemble the Dessert Cups
Add a layer of cheesecake filling over the Oreo crust. Repeat the layers if your cups are tall enough.
Top with whipped cream, extra Oreo crumbs, and mini Oreos for extra crunch and a fun party look.
Chill Before Serving
Place the cups in the refrigerator for at least 2 hours before serving. This helps the filling set and gives the flavors time to blend together.
Helpful Party Tip
These dessert cups can easily be made a day ahead, which makes party prep much less stressful.
2. Strawberry Shortcake Dessert Cups
Why They’re Popular
These strawberry shortcake cups are light, fresh, and perfect for spring or summer parties.
The soft cake, juicy strawberries, and fluffy whipped cream create beautiful layers that look as good as they taste.
Ingredients
For the Strawberry Layer
- 2 cups fresh strawberries, sliced
- 2 tablespoons granulated sugar
For the Dessert Cups
- 1 prepared pound cake, cut into small cubes
- 2 cups whipped cream or whipped topping
Optional Toppings
- Extra strawberries
- Crushed shortbread cookies
- Mint leaves
Instructions
Prepare the Strawberries
Place the sliced strawberries into a bowl and sprinkle with sugar. Stir gently and let them sit for about 10 minutes. This helps the strawberries become juicy and flavorful.
Build the Layers
Add a layer of pound cake cubes to the bottom of each dessert cup.
Spoon some strawberries and juice over the cake, then add a layer of whipped cream.
Repeat the layers until the cups are full.
Finish and Chill
Top with extra strawberries or crushed cookies if desired.
Refrigerate for at least 30 minutes before serving so the flavors can come together.
Helpful Party Tip
Clear cups work best for this recipe because the colorful layers make the dessert look extra pretty on a party table.
3. Chocolate Mousse Cups
Why Everyone Loves Them
Chocolate mousse cups feel elegant but are surprisingly simple to make.
They’re smooth, rich, and perfect when you want a dessert that looks impressive without needing hours in the kitchen.
Ingredients
For the Chocolate Mousse
- 1 box (3.9 oz) instant chocolate pudding mix
- 2 cups cold milk
- 1 cup whipped topping
For Garnish
- Whipped cream
- Chocolate shavings
- Mini chocolate chips
- Crushed chocolate cookies
Instructions
Make the Chocolate Filling
In a large bowl, whisk together the chocolate pudding mix and cold milk for about 2 minutes until thickened.
Fold in the whipped topping gently to create a lighter mousse texture.
Fill the Cups
Spoon or pipe the chocolate mousse into individual dessert cups.
Smooth the tops with the back of a spoon if needed.
Chill the Dessert
Place the cups in the refrigerator for at least 1 hour before serving. This helps the mousse become thicker and creamier.
Add Toppings
Right before serving, top with whipped cream, chocolate shavings, or crushed cookies for extra texture and flavor.
Helpful Party Tip
For an extra fancy presentation, pipe the mousse into the cups using a piping bag or zip-top bag with the corner snipped off.
4. Mini Banana Pudding Cups
Why They’re a Crowd Favorite
These mini banana pudding cups are sweet, creamy, and full of comforting flavor.
They’re easy to make, perfect for parties, and always disappear quickly from the dessert table.
The soft vanilla wafers and fresh bananas create that classic homemade taste everyone loves.
Ingredients
For the Pudding Layer
- 1 box (3.4 oz) instant vanilla pudding mix
- 2 cups cold milk
- 1 cup whipped topping
For the Layers
- 2 ripe bananas, sliced
- 30 vanilla wafers
Optional Toppings
- Whipped cream
- Crushed vanilla wafers
- Caramel drizzle
Instructions
Prepare the Pudding
In a large bowl, whisk together the vanilla pudding mix and cold milk for about 2 minutes until thickened.
Fold in the whipped topping gently to make the pudding extra creamy and fluffy.
Assemble the Dessert Cups
Place a few vanilla wafers into the bottom of each dessert cup.
Add a spoonful of pudding, followed by banana slices. Repeat the layers until the cups are filled.
Chill Before Serving
Refrigerate the dessert cups for at least 2 hours. This gives the cookies time to soften slightly and creates that classic banana pudding texture.
Add Final Toppings
Top with whipped cream, crushed vanilla wafers, or caramel drizzle right before serving.
Helpful Party Tip
If making these ahead of time, add the banana slices closer to serving time to keep them looking fresh.
5. Funfetti Cake Batter Cups
Why They’re Fun for Parties
These funfetti cake batter cups are colorful, cheerful, and perfect for birthdays or celebrations.
The soft cake layers, creamy frosting, and rainbow sprinkles make them especially fun for kids, but adults love them too.
Ingredients
For the Cake
- 1 box Funfetti cake mix
- Ingredients listed on the cake mix box (usually eggs, oil, and water)
For the Layers
- 2 cups vanilla frosting
- 1/2 cup rainbow sprinkles
Optional Toppings
- Whipped cream
- Extra sprinkles
- Mini candies
Instructions
Bake the Cake
Prepare the Funfetti cake according to the package instructions. Bake and allow it to cool completely.
Crumble the Cake
Once cooled, crumble the cake into small pieces using your hands or a fork.
Layer the Dessert Cups
Add a layer of cake crumbs to the bottom of each cup.
Pipe or spoon frosting over the cake layer, then repeat the layers until the cups are full.
Decorate the Tops
Finish with rainbow sprinkles, whipped cream, or small candies for a bright party look.
Helpful Party Tip
Use colorful spoons or mini dessert forks to make the dessert table feel even more festive.
6. Lemon Cheesecake Dessert Cups
Why They Stand Out
These lemon cheesecake dessert cups are creamy, tangy, and refreshing.
The bright lemon flavor balances perfectly with the rich cheesecake filling, making it a great dessert for spring, summer, or holiday gatherings.
Ingredients
For the Crust
- 1 1/2 cups graham cracker crumbs
- 3 tablespoons melted butter
For the Cheesecake Filling
- 8 oz (225 g) cream cheese, softened
- 1/2 cup powdered sugar
- 1 teaspoon vanilla extract
- 1 cup whipped topping
For the Lemon Layer
- 1/2 cup lemon curd
Optional Toppings
- Lemon zest
- Whipped cream
- Graham cracker crumbs
Instructions
Prepare the Crust
Mix the graham cracker crumbs and melted butter in a bowl until evenly combined.
Spoon the mixture into the bottom of each dessert cup and gently press down.
Make the Cheesecake Filling
In a mixing bowl, beat the cream cheese until smooth.
Add powdered sugar and vanilla extract, then mix until creamy. Fold in the whipped topping gently.
Assemble the Cups
Spoon cheesecake filling over the graham cracker layer.
Top each cup with lemon curd and gently swirl if desired for a pretty finish.
Chill the Dessert
Refrigerate for at least 2 hours before serving so the layers can firm up.
Garnish and Serve
Top with lemon zest, whipped cream, or extra graham cracker crumbs just before serving.
Helpful Party Tip
A small amount of fresh lemon zest on top makes these cups look extra fresh and flavorful without much extra work.
7. Peanut Butter Chocolate Cups
Why Chocolate Lovers Love Them
These peanut butter chocolate cups are rich, creamy, and packed with classic candy-bar flavor.
The combination of smooth chocolate pudding and fluffy peanut butter mousse makes every bite feel extra indulgent while still being simple enough for beginner bakers.
Ingredients
For the Chocolate Layer
- 1 box (3.9 oz) instant chocolate pudding mix
- 2 cups cold milk
For the Peanut Butter Layer
- 3/4 cup creamy peanut butter
- 4 oz cream cheese, softened
- 1/2 cup powdered sugar
- 1 cup whipped topping
For the Layers and Topping
- 1 cup crushed peanut butter cups
- Whipped cream
- Chocolate drizzle
Instructions
Prepare the Chocolate Pudding
In a medium bowl, whisk together the chocolate pudding mix and cold milk for about 2 minutes until thickened. Place in the refrigerator while preparing the peanut butter layer.
Make the Peanut Butter Filling
In another bowl, beat the peanut butter and softened cream cheese until smooth.
Add powdered sugar and mix until creamy. Fold in the whipped topping gently until light and fluffy.
Assemble the Dessert Cups
Spoon a layer of chocolate pudding into each dessert cup.
Add a layer of peanut butter mousse, then sprinkle in crushed peanut butter cups. Repeat the layers until the cups are filled.
Chill Before Serving
Refrigerate the dessert cups for at least 1 to 2 hours so the layers can firm up.
Finish the Tops
Top with whipped cream, extra crushed peanut butter cups, or chocolate drizzle before serving.
Helpful Party Tip
Using a piping bag for the peanut butter mousse makes the layers look extra neat and professional.
8. Raspberry Cheesecake Cups
Why They Look Impressive
These raspberry cheesecake cups are creamy, fruity, and beautifully colorful.
The sweet-tart raspberry sauce adds freshness and makes the dessert look elegant enough for parties, showers, or holiday gatherings.
Ingredients
For the Crust
- 1 1/2 cups crushed vanilla cookies or graham crackers
- 3 tablespoons melted butter
For the Cheesecake Filling
- 8 oz (225 g) cream cheese, softened
- 1/2 cup powdered sugar
- 1 teaspoon vanilla extract
- 1 cup whipped topping
For the Raspberry Layer
- 3/4 cup raspberry sauce or raspberry preserves
Optional Toppings
- Fresh raspberries
- White chocolate shavings
- Mint leaves
Instructions
Prepare the Cookie Crumbs
Mix the crushed cookies with melted butter until combined.
Spoon a small amount into the bottom of each dessert cup and gently press down.
Make the Cheesecake Filling
In a large bowl, beat the cream cheese until smooth.
Mix in powdered sugar and vanilla extract. Fold in the whipped topping until fluffy.
Layer the Dessert Cups
Add cheesecake filling over the cookie crumbs.
Spoon raspberry sauce over the filling and gently swirl with a toothpick or spoon for a marble effect.
Repeat the layers if desired.
Chill Before Serving
Refrigerate for at least 2 hours before serving for the best texture.
Garnish the Dessert
Top with fresh raspberries or white chocolate shavings right before serving.
Helpful Party Tip
A few fresh raspberries on top instantly make these dessert cups look more elegant with very little effort.
9. Tiramisu Dessert Cups
Why They Feel Fancy
These tiramisu dessert cups bring all the flavor of classic tiramisu into easy individual servings.
The layers of coffee-soaked cookies and creamy mascarpone filling create a rich dessert that feels special without being difficult to make.
Ingredients
For the Coffee Layer
- 1 cup brewed coffee, cooled
- 1 tablespoon sugar
For the Cream Filling
- 8 oz (225 g) mascarpone cheese
- 1 cup heavy whipping cream
- 1/3 cup powdered sugar
- 1 teaspoon vanilla extract
For the Layers
- 18 ladyfinger cookies
For Topping
- Unsweetened cocoa powder
- Chocolate shavings
Instructions
Prepare the Coffee Mixture
In a shallow bowl, combine the cooled coffee and sugar. Stir until dissolved.
Make the Cream Filling
In a mixing bowl, beat the heavy cream until soft peaks form.
In another bowl, mix mascarpone cheese, powdered sugar, and vanilla extract until smooth.
Fold the whipped cream into the mascarpone mixture gently.
Build the Dessert Cups
Quickly dip the ladyfingers into the coffee mixture. Do not soak them too long, or they may become too soft.
Break the cookies into pieces if needed and place them into the dessert cups.
Add a layer of mascarpone cream, then repeat the layers.
Chill the Cups
Refrigerate for at least 3 hours before serving so the flavors can develop fully.
Finish with Cocoa Powder
Dust the tops with cocoa powder and add chocolate shavings before serving.
Helpful Party Tip
These dessert cups taste even better the next day, making them perfect for preparing ahead of time.
10. S’mores Pudding Cups
Why They’re Perfect for Parties
These s’mores pudding cups are fun, chocolatey, and full of cozy campfire flavor.
They’re easy to make indoors and always a hit with both kids and adults.
Ingredients
For the Chocolate Layer
- 1 box (3.9 oz) instant chocolate pudding mix
- 2 cups cold milk
For the Crumb Layer
- 1 1/2 cups graham cracker crumbs
- 2 tablespoons melted butter
For the Topping
- 2 cups mini marshmallows
- Whipped cream
- Chocolate pieces or syrup
Instructions
Make the Chocolate Pudding
Whisk together the pudding mix and cold milk in a bowl for about 2 minutes until thickened.
Place in the refrigerator while preparing the graham cracker layer.
Prepare the Graham Crumbs
Mix the graham cracker crumbs with melted butter until evenly combined.
Assemble the Dessert Cups
Add a layer of graham cracker crumbs to the bottom of each cup.
Spoon in chocolate pudding, then repeat the layers until the cups are filled.
Add the Marshmallow Topping
Top each dessert cup with mini marshmallows.
If desired, lightly toast the marshmallows using a kitchen torch for a classic s’mores flavor.
Chill or Serve
Serve immediately after toasting or refrigerate until ready to serve.
Helpful Party Tip
Toasted marshmallows give these dessert cups that true campfire taste and make them feel extra special for parties.
Tips for Making Dessert Cups Ahead of Time
Store Dessert Cups Covered in the Fridge
One of the best things about dessert cups is how easy they are to prepare ahead for parties and gatherings.
Most cheesecake cups, pudding cups, mousse desserts, and layered treats taste even better after chilling because the flavors have more time to blend together.
Once your dessert cups are assembled, cover them tightly before placing them in the fridge.
Plastic wrap works well, but lids are even better if your cups come with them.
Keeping the cups covered helps prevent them from drying out or absorbing fridge smells.
For the freshest flavor and texture, most dessert cups can be made up to one day in advance.
This simple step can save a huge amount of time on the day of your party.
Add Crunchy Toppings Right Before Serving
Crunchy toppings can soften quickly if they sit on creamy desserts too long.
Cookies, graham crackers, crushed candies, nuts, and cereal toppings all stay fresher when added just before serving.
If you’re preparing desserts ahead of time, keep toppings stored separately in small containers or zip-top bags.
Right before guests arrive, sprinkle them over the tops for the best texture and presentation.
This small extra step makes a big difference.
Your dessert cups will look fresher, taste better, and still have that satisfying crunch everyone loves.
Use Small Clear Cups or Mason Jars
Clear dessert cups help show off all those beautiful layers.
Whether it’s colorful fruit, creamy cheesecake filling, chocolate pudding, or cookie crumbs, the layers become part of the presentation.
Small plastic cups are affordable, lightweight, and easy for parties.
They’re especially helpful for birthdays, BBQs, baby showers, and larger gatherings where guests may be walking around while eating.
Mini mason jars are another great option if you want a slightly more rustic or elegant look.
They also come with lids, which makes storing and transporting desserts much easier.
Try not to overfill the cups.
Leaving a little space at the top gives room for toppings and makes the desserts easier to carry without spilling.
Prep a Day Ahead for Easy Entertaining
Making dessert cups ahead of time can make party day feel far less stressful.
Instead of rushing to prepare desserts at the last minute, you can focus on decorating, cooking other dishes, or simply enjoying time with your guests.
A good plan is to prepare the dessert cups the evening before your event.
Chill them overnight, then add whipped cream, fresh fruit, or crunchy toppings shortly before serving.
If you’re serving several flavors, label the trays or arrange similar desserts together to make setup easier. This also helps guests quickly spot their favorites.
Most importantly, don’t stress about making everything look perfect. Dessert cups naturally look fun and inviting because of their layered style.
Even simple decorations can make them feel special and party-ready.
Best Toppings for Dessert Cups
- Crushed Cookies – Add extra crunch and flavor while making dessert cups look more layered and textured.
- Chocolate Chips – A quick and easy topping that adds a little extra sweetness and chocolate flavor to every bite.
- Fresh Fruit – Strawberries, raspberries, blueberries, or banana slices make dessert cups feel fresher, brighter, and more colorful.
- Caramel Drizzle – A light drizzle of caramel adds richness and makes simple desserts feel extra special.
- Sprinkles – Perfect for birthdays and celebrations because they instantly make dessert cups look more fun and festive.
- Whipped Cream – A soft, creamy topping that finishes dessert cups beautifully and pairs well with almost every flavor.
Final Thoughts
Dessert cups are one of the easiest ways to serve fun, crowd-pleasing treats at any party.
They’re simple to make, easy to customize, and perfect for everything from birthdays and baby showers to holidays and backyard BBQs.
Try a few different flavors, so everyone has something they’ll love.
Mixing chocolate, fruity, and cheesecake-style cups together also makes your dessert table look more exciting and colorful.
Save these ideas for your next celebration and share them with friends or family who love easy party desserts.
Once you make them, you’ll see why dessert cups are always a favorite.
FAQs
How far ahead can dessert cups be made?
Most dessert cups can be prepared 1–2 days ahead and stored covered in the refrigerator until serving.
What size cups work best?
Small 5–9 oz cups work best because they’re easy to hold, serve, and portion for parties.
Can dessert cups be frozen?
Some cheesecake and mousse dessert cups freeze well, but fresh fruit toppings are best added after thawing.
Are dessert cups good for large parties?
Yes, dessert cups are great for large parties because they’re easy to serve, portion, and prepare ahead of time.

Hi, I’m Sorenna Blythe, the baker and writer behind Mix Whisk Bake. I share simple, reliable recipes and honest kitchen moments to help home bakers bake with confidence and joy. When I’m not testing new treats, you’ll find me sipping coffee and dreaming up my next bake.