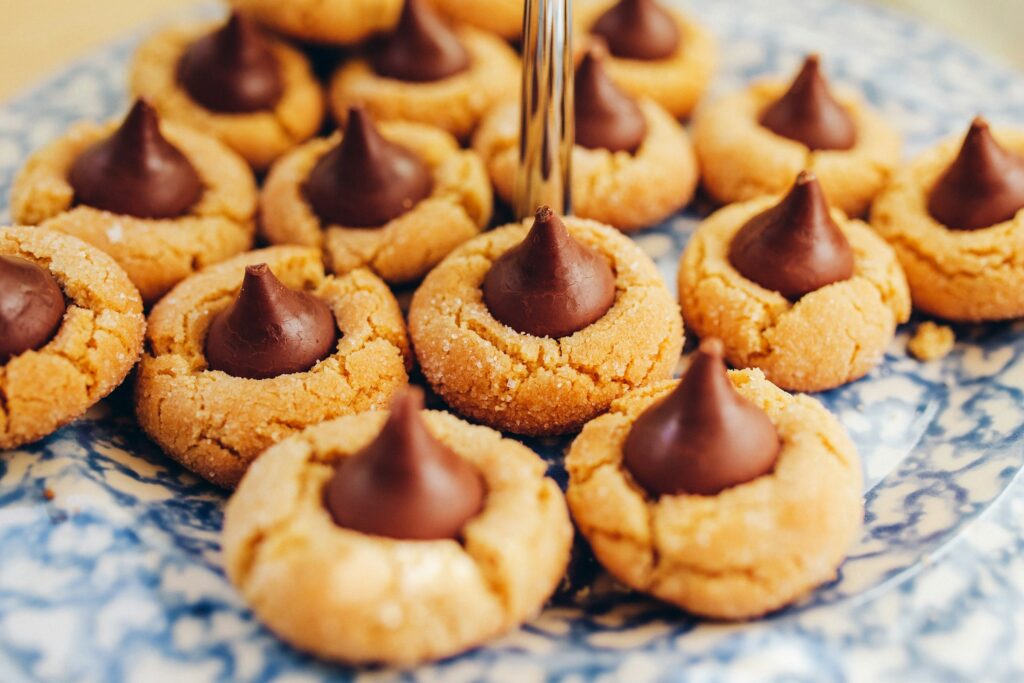
Peanut Butter Blossoms are a timeless cookie that combines soft, chewy peanut butter cookies with a rich chocolate kiss in the center.
They’re a holiday favorite, but they’re just as perfect for bake sales, family gatherings, or an everyday sweet treat.
This easy recipe uses simple ingredients and straightforward steps, making it a great choice for both beginners and experienced bakers.
You’ll learn how to make perfectly soft Peanut Butter Blossoms, avoid common baking mistakes, and discover helpful tips for getting delicious results every time.
Why You’ll Love This Peanut Butter Blossoms Recipe
- Soft and chewy texture – Every cookie stays tender in the center with just the right amount of chewiness.
- Classic chocolate kiss center – The combination of peanut butter and chocolate creates a timeless flavor everyone loves.
- Simple ingredients – Made with everyday pantry staples that are easy to find and budget-friendly.
- Easy to make – The straightforward steps make this recipe perfect for beginners and experienced bakers alike.
- Perfect for sharing – These cookies are always a hit at holiday gatherings, cookie exchanges, parties, and gift boxes.
- Make-ahead friendly – The dough can be prepared in advance, saving time when you need it most.
- Freezer-friendly – Both the dough and baked cookies freeze well, making it easy to enjoy fresh cookies whenever the craving strikes.

What Are Peanut Butter Blossoms?
Peanut Butter Blossoms are soft peanut butter cookies topped with a chocolate kiss, creating one of the most loved cookie combinations in home baking.
The recipe was first introduced in 1957 by Freda Smith of Ohio, who entered it into the Pillsbury Bake-Off Contest and named the cookies “Black-Eyed Susans” before they later became widely known as Peanut Butter Blossoms.
Although the recipe did not win the contest’s grand prize, it quickly gained popularity because of its simple ingredients, attractive appearance, and delicious blend of peanut butter and chocolate.
Over the years, Peanut Butter Blossoms became a holiday baking tradition in many households, often appearing on Christmas cookie trays, at cookie exchanges, and during family baking days.
Part of their lasting appeal comes from the fact that they look impressive without requiring advanced baking skills, making them a great choice for bakers of all experience levels.
The combination of a soft, slightly chewy peanut butter cookie and a smooth chocolate center creates a balance of flavors and textures that appeals to both children and adults.
Another reason these cookies remain so popular is their versatility, as they can be customized with different chocolates, seasonal decorations, or festive sugars while still keeping their classic charm.
While Peanut Butter Blossoms and traditional peanut butter cookies share many of the same ingredients, the biggest difference is the chocolate kiss pressed into the center immediately after baking.
Traditional peanut butter cookies are often flattened with a fork to create the familiar crisscross pattern, while Peanut Butter Blossoms are usually baked as round cookie balls coated in sugar.
The chocolate center not only adds extra sweetness and flavor but also gives Peanut Butter Blossoms their signature look, making them instantly recognizable on any dessert table.
This simple addition transforms an ordinary peanut butter cookie into a special treat that feels festive, nostalgic, and perfect for sharing with family and friends.
Ingredients You’ll Need
For the Cookie Dough
- 1 cup creamy peanut butter – Creates the rich peanut butter flavor and helps keep the cookies soft and chewy.
- ½ cup unsalted butter, softened – Adds richness and contributes to a tender cookie texture.
- ½ cup granulated sugar – Sweetens the dough and helps create a lightly crisp exterior.
- ½ cup packed light brown sugar – Adds moisture and a subtle caramel-like flavor.
- 1 large egg – Binds the ingredients together and provides structure.
- 1 teaspoon vanilla extract – Enhances the flavor of both the peanut butter and chocolate.
- 1½ cups all-purpose flour – Forms the base of the cookie dough.
- 1 teaspoon baking soda – Helps the cookies rise and spread properly while baking.
- ¼ teaspoon salt – Balances the sweetness and enhances the overall flavor.
For Rolling and Topping
- ¼ cup granulated sugar – Used for rolling the dough balls before baking to add a delicate crunch and sparkle.
- 36 milk chocolate kisses, unwrapped – Pressed into the warm cookies after baking for the classic Peanut Butter Blossoms finish.
Ingredient Notes and Substitutions
Best Peanut Butter to Use
Creamy peanut butter is the best choice for Peanut Butter Blossoms because it creates a smooth dough that is easy to mix, roll, and bake.
Traditional shelf-stable brands such as Jif, Skippy, and similar varieties tend to produce the most consistent results because their texture remains stable throughout the baking process.
These peanut butters contain added oils and stabilizers that help the cookies hold their shape while staying soft and chewy.
If you enjoy a little extra texture, crunchy peanut butter can also be used, though the cookies will have small peanut pieces throughout the dough.
Whichever peanut butter you choose, make sure it is well mixed and at room temperature for easier blending with the other ingredients.
Can Natural Peanut Butter Be Used?
Natural peanut butter can be used, but it may change the texture of the cookies.
Because natural peanut butter often separates into oil and peanut solids, it can make the dough either too oily or too dry if it is not mixed thoroughly before measuring.
If you decide to use natural peanut butter, stir it very well until the oils are fully incorporated.
A no-stir natural peanut butter generally works better than varieties that separate heavily in the jar.
Keep in mind that cookies made with natural peanut butter may spread more during baking and have a slightly different texture than the classic version.
If your dough feels too soft, chilling it in the refrigerator for 30 minutes before baking can help prevent excessive spreading.
Alternative Chocolate Candies
Milk chocolate kisses are the traditional topping, but there are plenty of delicious alternatives if you’d like to change things up.
Dark chocolate kisses add a richer flavor that balances the sweetness of the cookie.
Cookies and cream candies provide a fun twist and create a striking contrast against the peanut butter base.
Mini peanut butter cups are another popular choice and add even more peanut butter flavor to every bite.
For holiday baking, seasonal chocolates in festive wrappers can make the cookies look extra special without changing the recipe itself.
If you’re making these for a party, using a variety of chocolate centers can give guests several flavor options to enjoy.
Gluten-Free Options
Peanut Butter Blossoms can easily be made gluten-free with a few simple ingredient swaps.
Replace the all-purpose flour with a good-quality gluten-free all-purpose flour blend that is designed for baking.
Choose a blend that includes a binding ingredient such as xanthan gum, as this helps create a texture that closely resembles traditional cookies.
Always check the labels on your peanut butter, chocolate candies, and other ingredients to ensure they are certified gluten-free if you are baking for someone with gluten sensitivity or celiac disease.
The baking time usually remains the same, though the cookies may have a slightly softer texture when warm.
Dairy-Free Substitutions
Making dairy-free Peanut Butter Blossoms is simple and does not require major changes to the recipe.
Replace the butter with a dairy-free baking stick or a plant-based butter substitute that is intended for baking.
Choose a product that behaves similarly to traditional butter for the best texture and flavor.
Many dairy-free butter alternatives can be substituted in equal amounts without affecting the overall recipe.
For the topping, use dairy-free chocolate kisses or another dairy-free chocolate candy of your choice.
Kitchen Tools You’ll Need
- Mixing bowls – Needed for combining the wet and dry ingredients efficiently.
- Hand or stand mixer – Helps cream the butter, peanut butter, and sugars until smooth and fluffy.
- Baking sheets – Provide a sturdy surface for baking the cookies evenly.
- Parchment paper – Prevents sticking and makes cleanup much easier.
- Cookie scoop – Creates evenly sized dough balls for consistent baking results.
- Cooling rack – Allows the cookies to cool properly while maintaining their texture.
How to Make Peanut Butter Blossoms
Step 1: Prepare the Oven and Baking Sheets
Preheat your oven to 375°F (190°C) so it reaches the correct temperature before the cookies go in.
Line two baking sheets with parchment paper to prevent sticking and encourage even baking.
Unwrap all of the chocolate kisses now and set them aside in a bowl so they are ready to use as soon as the cookies come out of the oven.
Taking a few minutes to prepare everything before mixing the dough will make the baking process much smoother.
Step 2: Mix the Wet Ingredients
Place the softened butter, peanut butter, granulated sugar, and brown sugar in a large mixing bowl.
Beat the ingredients together until the mixture becomes light, creamy, and well combined.
Add the egg and vanilla extract.
Mix again until everything is fully incorporated and the mixture looks smooth.
Properly creaming the butter and sugars helps create a soft cookie with a tender texture.
Step 3: Add the Dry Ingredients
In a separate bowl, whisk together the flour, baking soda, and salt.
Gradually add the dry ingredients to the wet ingredients while mixing on low speed.
Continue mixing just until a soft dough forms and no dry flour remains visible.
Avoid overmixing at this stage, as too much mixing can make the cookies denser than desired.
The finished dough should be soft, easy to handle, and slightly thick.
Step 4: Roll the Dough into Balls
Use a cookie scoop or tablespoon to portion the dough into evenly sized pieces.
Roll each portion between your palms to create smooth balls.
Keeping the cookies a uniform size helps them bake evenly and gives the finished batch a more polished appearance.
If the dough feels sticky, chilling it for 15 to 20 minutes can make rolling easier.
Step 5: Coat in Sugar
Place the extra granulated sugar in a small bowl.
Roll each dough ball in the sugar until lightly coated on all sides.
The sugar coating adds a subtle crunch and creates a beautiful sparkle once the cookies are baked.
Arrange the dough balls on the prepared baking sheets, leaving about 2 inches of space between each one.
Step 6: Bake the Cookies
Place the baking sheets in the preheated oven.
Bake for 8 to 10 minutes, or until the cookies are lightly golden around the edges.
The centers may still look slightly soft, which is exactly what you want.
The cookies will continue to set as they cool, helping them stay soft and chewy instead of becoming dry.
Be careful not to overbake, as even an extra minute can affect the texture.
Step 7: Add the Chocolate Kisses
Remove the cookies from the oven and immediately press one chocolate kiss into the center of each cookie.
Press gently until the cookie cracks slightly around the edges.
The warmth of the cookie will soften the chocolate just enough without completely melting it.
Working quickly ensures the chocolate adheres properly before the cookies begin to cool.
Step 8: Cool Completely
Allow the cookies to rest on the baking sheet for about 5 minutes.
Carefully transfer them to a cooling rack to finish cooling completely.
During this time, the cookies will firm up while maintaining their soft centers.
Letting the cookies cool fully also helps the chocolate kisses set back into place.
Once cooled, your Peanut Butter Blossoms are ready to serve, share, or store for later enjoyment.
Expert Tips for Perfect Peanut Butter Blossoms
Don’t Overbake
One of the most important secrets to soft and chewy Peanut Butter Blossoms is removing them from the oven at the right time.
The cookies should look lightly golden around the edges while the centers still appear slightly soft.
Many bakers assume the cookies need to look completely done before they come out of the oven, but that often leads to dry, crumbly results.
The residual heat from the baking sheet continues cooking the cookies after they leave the oven.
If you’re unsure, it’s usually better to take them out a little early rather than leave them in too long.
A perfectly baked Peanut Butter Blossom should stay soft for days, not become hard after cooling.
Add Chocolate Kisses Immediately After Baking
As soon as the cookies come out of the oven, place a chocolate kiss in the center of each one.
The warmth of the cookies helps secure the chocolate without causing it to completely melt.
Waiting too long can make the cookies firm up, which makes it harder to press the chocolate into the center.
Press the chocolate gently and steadily until it sits securely in place.
You may notice small cracks forming around the edges of the cookie, and that’s completely normal.
These small cracks are part of the classic Peanut Butter Blossoms appearance and add to their homemade charm.
Use Room-Temperature Ingredients
Allow the butter and egg to come to room temperature before starting the recipe.
Room-temperature ingredients blend together more easily and create a smoother, more evenly mixed dough.
Cold butter can leave lumps in the mixture and prevent proper creaming with the sugars.
A room-temperature egg mixes into the dough more evenly, helping create a consistent texture throughout the cookies.
If you forget to set out your ingredients ahead of time, place the egg in a bowl of warm water for a few minutes and cut the butter into small pieces to help it soften faster.
This simple step can make a noticeable difference in the final texture of your cookies.
Keep Cookie Sizes Uniform
Using a cookie scoop is one of the easiest ways to ensure every cookie is the same size.
Uniform dough balls bake at the same rate, which helps prevent some cookies from becoming overbaked while others remain underbaked.
Evenly sized cookies also create a more attractive presentation, especially when serving them on a holiday platter or giving them as gifts.
If you don’t have a cookie scoop, use a measuring spoon to portion the dough as consistently as possible.
Taking a little extra care during this step leads to more reliable baking results.
Prevent Cracked Cookies
A few small cracks are expected when the chocolate kiss is pressed into the warm cookie, but excessive cracking can usually be avoided.
Make sure the dough is mixed thoroughly so all ingredients are evenly distributed.
Avoid adding too much flour, as dry dough is more likely to crack during baking.
Measure flour carefully by spooning it into the measuring cup and leveling it off rather than scooping directly from the bag.
If the dough feels dry or crumbly while rolling, it may benefit from a few minutes at room temperature before shaping.
Properly mixed dough with the correct moisture level will produce cookies that hold together beautifully while still showcasing the classic Peanut Butter Blossoms look.
Common Mistakes to Avoid
- Using overly oily peanut butter – Excess oil can cause the cookies to spread too much and affect their texture.
- Overmixing the dough – Mixing longer than necessary can result in denser, less tender cookies.
- Adding chocolate too late – Waiting too long makes it harder for the chocolate kisses to stick securely to the warm cookies.
- Baking too long – Overbaking removes moisture and can leave the cookies dry instead of soft and chewy.
- Not allowing cookies to cool properly – Skipping the cooling process can cause the cookies to break apart and prevent the chocolate from setting correctly.
Flavor Variations to Try
Chocolate Peanut Butter Blossoms
If you love the combination of chocolate and peanut butter, this variation is a must-try.
Simply add a few tablespoons of unsweetened cocoa powder to the cookie dough to create a rich chocolate base.
The chocolate cookie paired with the chocolate kiss creates a deeper flavor while still allowing the peanut butter to shine through.
For an even more intense chocolate experience, use dark chocolate kisses instead of traditional milk chocolate.
This version is especially popular with chocolate lovers and makes a great addition to holiday cookie trays.
Double Chocolate Blossoms
Double Chocolate Blossoms take the classic recipe one step further by adding chocolate both inside and on top of the cookie.
Mix mini chocolate chips into the dough before rolling the cookies into balls.
The chocolate chips create little pockets of melted chocolate throughout every bite.
After baking, press a chocolate kiss into the center just like the traditional version.
The result is a soft, chewy cookie packed with layers of chocolate flavor from start to finish.
This variation is perfect when you’re craving something extra rich and indulgent.
Reese’s Peanut Butter Cup Blossoms
Replacing the chocolate kiss with a miniature peanut butter cup creates a delicious twist on the classic recipe.
The peanut butter cup melts slightly when pressed into the warm cookie, creating an extra creamy center.
This variation enhances the peanut butter flavor while still providing the chocolate element that makes these cookies so popular.
Mini peanut butter cups work best because they fit neatly in the center of the cookie.
If you’re serving peanut butter lovers, this version often disappears even faster than the original.
Holiday Sprinkle Blossoms
Holiday Sprinkle Blossoms are an easy way to make these cookies feel festive for any celebration.
Instead of rolling the dough balls in plain sugar, roll them in colored sanding sugar or holiday-themed sprinkles.
Red and green sprinkles work beautifully for Christmas, while pastel colors are perfect for spring gatherings.
The sprinkles add a fun pop of color without changing the flavor of the cookies.
This simple variation is a great option for cookie exchanges, parties, and family baking days with children.
Nutella-Stuffed Blossoms
Nutella-Stuffed Blossoms add a surprise center that makes every bite extra special.
Before shaping the dough, freeze small spoonfuls of Nutella until firm.
Wrap a portion of cookie dough around each frozen Nutella piece and seal it completely before rolling into a ball.
As the cookies bake, the Nutella becomes soft and creamy inside the peanut butter cookie.
Finish the cookies with a chocolate kiss for an irresistible combination of peanut butter, chocolate, and hazelnut flavors.
How to Store Peanut Butter Blossoms
Peanut Butter Blossoms store very well, making them a great choice for baking ahead of holidays, parties, or whenever you want homemade cookies ready to enjoy.
For room-temperature storage, place the completely cooled cookies in an airtight container and keep them in a cool, dry place away from direct sunlight.
When stored properly at room temperature, Peanut Butter Blossoms typically stay fresh for up to 5 days while maintaining their soft texture and delicious flavor.
If you need to keep them fresh a little longer, you can store the cookies in an airtight container in the refrigerator.
Refrigerated Peanut Butter Blossoms can last for up to 10 days, making this a useful option when preparing cookies several days before an event.
Before serving refrigerated cookies, allow them to sit at room temperature for about 15 to 20 minutes so they can soften slightly and regain their best texture.
One of the easiest ways to keep Peanut Butter Blossoms soft for longer is to store them in a tightly sealed container as soon as they have completely cooled.
Limiting exposure to air helps prevent the cookies from drying out and becoming crumbly.
Adding a slice of sandwich bread to the storage container can also help maintain softness because the bread releases moisture that the cookies absorb.
Replace the bread slice as needed if it becomes dry.
Avoid storing the cookies while they are still warm, as trapped steam can create excess moisture and affect their texture.
Can You Freeze Peanut Butter Blossoms?
Peanut Butter Blossoms freeze exceptionally well, making them a convenient option for holiday baking, meal prep, or keeping a sweet treat on hand whenever the craving strikes.
If you’d like to freeze the cookie dough, prepare the dough as directed and roll it into individual balls before placing them on a baking sheet lined with parchment paper.
Freeze the dough balls until firm, then transfer them to a freezer-safe container or zip-top bag to save space.
Label the container with the date so you can easily keep track of freshness.
Frozen cookie dough can typically be stored for up to 3 months without a noticeable loss in quality.
When you’re ready to bake, roll the frozen dough balls in sugar and bake as directed, adding an extra minute or two to the baking time if needed.
You can also freeze fully baked Peanut Butter Blossoms after they have cooled completely.
Arrange the cookies in a freezer-safe container, placing sheets of parchment paper between layers to prevent sticking and protect the chocolate centers.
Properly stored baked cookies can maintain their quality in the freezer for up to 3 months.
For the best results, keep the container tightly sealed to prevent freezer burn and preserve freshness.
When it’s time to enjoy your frozen cookies, remove the desired amount and allow them to thaw at room temperature.
Most Peanut Butter Blossoms will thaw within 30 to 60 minutes and return to their soft, chewy texture.
If you prefer a freshly baked taste, you can warm thawed cookies in the microwave for a few seconds before serving.
Serving Suggestions
- With milk – Enjoy Peanut Butter Blossoms with a cold glass of milk for a classic and comforting pairing.
- Cookie platters – Add them to a mixed cookie platter for a variety of flavors, textures, and colors.
- Holiday dessert tables – Their festive appearance makes them a standout addition to Christmas parties and seasonal celebrations.
- Homemade gift boxes – Package them in decorative boxes or tins for a thoughtful homemade gift that friends and family will appreciate.
Final Thoughts
Peanut Butter Blossoms are a classic cookie for good reason, combining soft peanut butter cookies and rich chocolate in every bite while remaining simple enough for bakers of any skill level.
Don’t be afraid to try different chocolates, fillings, or festive decorations to make the recipe your own and create new family favorites.
Once you’ve baked a batch, share your results and favorite variations with family, friends, or fellow bakers because you might inspire someone else to make these delicious cookies too!
FAQs
Why are my Peanut Butter Blossoms cracking?
Small cracks are normal and part of the classic look. Excessive cracking is often caused by dry dough, too much flour, or overbaking.
Can I make the dough ahead of time?
Yes. The dough can be covered and refrigerated for up to 3 days before baking.
Can I use crunchy peanut butter?
Yes. Crunchy peanut butter works well and adds small pieces of peanuts for extra texture.
Why did my chocolate kisses melt too much?
This usually happens when the cookies are extremely hot or the kitchen is warm. Let the cookies cool for 1 to 2 minutes before adding the chocolate if needed.
Can I freeze the cookie dough?
Yes. Rolled dough balls can be frozen for up to 3 months and baked directly from frozen with a slight increase in baking time.
How long do Peanut Butter Blossoms stay fresh?
When stored in an airtight container, they stay fresh for about 5 days at room temperature or up to 10 days in the refrigerator.

The Best Peanut Butter Blossoms – Soft, Chewy & Irresistible
Difficulty: Easy36
Cookies15
minutes10
minutes25
minutesThese soft and chewy Peanut Butter Blossoms are made with a classic peanut butter cookie base and topped with a chocolate kiss for the perfect sweet treat.
Ingredients
1 cup creamy peanut butter
½ cup unsalted butter, softened
½ cup granulated sugar
½ cup packed light brown sugar
1 large egg
1 teaspoon vanilla extract
1½ cups all-purpose flour
1 teaspoon baking soda
¼ teaspoon salt
¼ cup granulated sugar (for rolling)
36 chocolate kisses, unwrapped
Directions
- Preheat oven to 375°F (190°C) and line baking sheets with parchment paper.
- Beat the peanut butter, butter, granulated sugar, and brown sugar until creamy.
- Mix in the egg and vanilla extract.
- Add the flour, baking soda, and salt, then mix until a soft dough forms.
- Roll the dough into 1-inch balls and coat each one in the extra sugar.
- Place on the prepared baking sheets and bake for 8–10 minutes.
- Immediately press a chocolate kiss into the center of each warm cookie.
- Cool for 5 minutes on the baking sheet, then transfer to a wire rack to cool completely.
Notes
- Do not overbake if you want soft and chewy cookies.
- Add the chocolate kisses immediately after baking for the best results.
- Store in an airtight container for up to 5 days.
- Cookie dough can be frozen for up to 3 months.


Hi, I’m Sorenna Blythe, the baker and writer behind Mix Whisk Bake. I share simple, reliable recipes and honest kitchen moments to help home bakers bake with confidence and joy. When I’m not testing new treats, you’ll find me sipping coffee and dreaming up my next bake.


