Some days, you just want dessert without turning on the oven.
That’s exactly why these vegan no-bake desserts are so good to have on hand.
They’re quick, easy, and perfect for warm days or late-night sweet cravings.
And yes, vegan desserts can still be rich, creamy, and seriously satisfying without any dairy or eggs.
From chocolate peanut butter bars to strawberry cheesecake cups and creamy mousse, these treats are full of flavor and simple to make.
Most of these recipes come together with basic ingredients and minimal prep, so they’re great for beginners too.
If you can mix, blend, or chill, you can make these desserts with confidence.
1. Vegan Chocolate Peanut Butter Bars
Why You’ll Love This Recipe
These vegan chocolate peanut butter bars are rich, creamy, and packed with chocolate flavor.
The soft peanut butter layer paired with a smooth chocolate topping tastes just like a homemade candy bar, but with simple pantry ingredients and no baking required.
Ingredients
Peanut Butter Base
- 1 cup creamy peanut butter
- 1/4 cup maple syrup
- 2 cups almond flour
- 2 tablespoons melted coconut oil
- 1 teaspoon vanilla extract
- Pinch of salt
Chocolate Topping
- 1 1/2 cups dark vegan chocolate chips
- 1 tablespoon coconut oil
Instructions
Step 1: Prepare the Pan
Line an 8×8-inch baking dish or container with parchment paper. This makes the bars much easier to remove and slice later.
Step 2: Make the Peanut Butter Layer
In a large mixing bowl, stir together the peanut butter, maple syrup, melted coconut oil, vanilla extract, and salt until smooth.
Add the almond flour and mix until a soft dough forms. The mixture should hold together when pressed between your fingers.
Step 3: Press Into the Pan
Transfer the mixture to the prepared pan. Press it down evenly using the back of a spoon or your hands.
Try to smooth the top as much as possible so the chocolate layer spreads evenly.
Step 4: Melt the Chocolate
Add the chocolate chips and coconut oil to a microwave-safe bowl. Microwave in 20-second intervals, stirring between each one, until smooth and glossy.
You can also melt the chocolate using a double boiler on the stove.
Step 5: Add the Chocolate Layer
Pour the melted chocolate over the peanut butter base and spread evenly with a spatula.
Gently tap the pan on the counter to smooth out the top.
Step 6: Chill and Slice
Place the pan in the refrigerator for about 1 to 2 hours, or until fully firm.
Lift the bars out using the parchment paper and slice into squares before serving.
Helpful Tips
- Let the bars sit at room temperature for 5 minutes before slicing for cleaner cuts.
- Store leftovers in the fridge to keep the chocolate firm.
- Use natural peanut butter for a softer texture or regular creamy peanut butter for firmer bars.
Optional Variations
- Sprinkle crushed peanuts over the chocolate before chilling.
- Swap peanut butter for cashew butter or almond butter.
- Add a pinch of flaky sea salt on top for extra flavor.
2. Strawberry Cheesecake Cups
Why You’ll Love This Recipe
These strawberry cheesecake cups are creamy, fresh, and incredibly easy to make.
They have a smooth cheesecake filling with sweet strawberry flavor and a simple crumb base that gives each bite the perfect texture.
They’re great for parties, meal prep, or quick summer desserts.
Ingredients
Crust Layer
- 1 cup graham cracker crumbs or crushed vegan cookies
- 2 tablespoons melted coconut oil
- 1 tablespoon maple syrup
Cheesecake Filling
- 1 1/2 cups raw cashews, soaked for at least 4 hours
- 3/4 cup coconut cream
- 1 cup fresh strawberries
- 1/4 cup maple syrup
- 2 tablespoons lemon juice
- 1 teaspoon vanilla extract
Optional Toppings
- Sliced strawberries
- Crushed cookies
- Coconut whipped cream
Instructions
Step 1: Prepare the Crust
In a small bowl, mix together the graham cracker crumbs, melted coconut oil, and maple syrup until the texture resembles wet sand.
Spoon the mixture evenly into small serving cups or jars and gently press down.
Step 2: Blend the Cheesecake Filling
Drain the soaked cashews and add them to a blender along with the coconut cream, strawberries, maple syrup, lemon juice, and vanilla extract.
Blend until completely smooth and creamy. Scrape down the sides as needed to make sure everything blends evenly.
Step 3: Assemble the Cups
Spoon or pipe the cheesecake filling over the crust layer in each cup.
Smooth the tops with the back of a spoon.
Step 4: Chill Before Serving
Place the cups in the refrigerator for at least 2 hours so the filling can firm up.
Serve chilled with your favorite toppings.
Helpful Tips
- Soaking the cashews helps create a silky smooth filling.
- Use ripe strawberries for the best flavor and natural sweetness.
- If the filling feels too thick, blend in a small splash of plant milk.
Optional Variations
- Replace strawberries with raspberries or blueberries.
- Add extra lemon zest for a brighter flavor.
- Layer with strawberry jam for extra sweetness.
3. No-Bake Oreo Truffles
Why You’ll Love This Recipe
These no-bake Oreo truffles are one of the easiest desserts you can make.
They’re rich, chocolatey, and perfect for sharing.
With only a few ingredients, they come together quickly and look impressive on any dessert table.
Ingredients
- 36 vegan chocolate sandwich cookies
- 8 ounces dairy-free cream cheese, softened
- 2 cups vegan chocolate chips
- 1 tablespoon coconut oil
Optional Toppings
- Crushed cookies
- Melted vegan white chocolate
- Sprinkles
Instructions
Step 1: Crush the Cookies
Add the cookies to a food processor and blend until fine crumbs form.
Set aside about 2 tablespoons of crumbs if you want to use them for decoration later.
Step 2: Make the Truffle Mixture
Add the dairy-free cream cheese to the cookie crumbs and blend until the mixture becomes smooth and sticky.
If you do not have a food processor, you can mix everything in a bowl using a spoon or a hand mixer.
Step 3: Roll Into Balls
Scoop out small portions of the mixture and roll into bite-sized balls using your hands.
Place them on a parchment-lined tray or plate.
Step 4: Chill the Truffles
Transfer the tray to the freezer for about 20 minutes. This helps the truffles firm up before dipping them in chocolate.
Step 5: Melt the Chocolate
Melt the vegan chocolate chips and coconut oil together until smooth.
Dip each truffle into the melted chocolate using a fork or spoon. Let the extra chocolate drip off before placing the truffles back onto the tray.
Step 6: Decorate and Set
Top with crushed cookies, sprinkles, or a drizzle of white chocolate before the coating hardens.
Refrigerate for about 30 minutes, or until fully set.
Helpful Tips
- Keep the truffles cold while dipping for easier handling.
- Use a cookie scoop for evenly sized truffles.
- Store in an airtight container in the refrigerator for up to 1 week.
Optional Variations
- Sprinkle crushed cookies over the top.
- Drizzle melted vegan white chocolate for a bakery-style finish.
- Use flavored sandwich cookies for different variations.
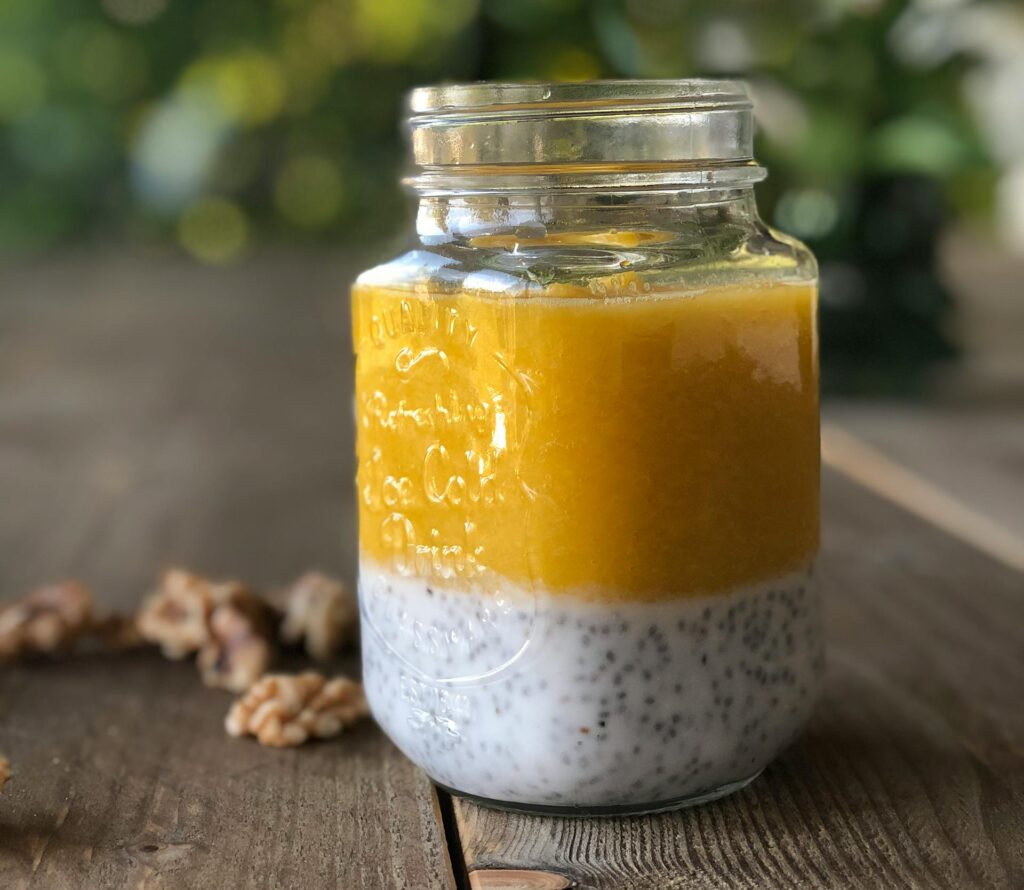
4. Coconut Mango Chia Pudding
Why You’ll Love This Recipe
This coconut mango chia pudding is light, creamy, and full of tropical flavor.
It’s the kind of dessert that feels refreshing while still satisfying your sweet tooth.
Since it’s made ahead of time, it’s also perfect for busy days when you want something ready in the fridge.
Ingredients
- 1/2 cup chia seeds
- 2 cups canned coconut milk
- 3 tablespoons maple syrup
- 1 teaspoon vanilla extract
- 1 large ripe mango, diced
- Pinch of salt
Optional Toppings
- Toasted coconut flakes
- Extra mango slices
- Fresh mint leaves
Instructions
Step 1: Mix the Chia Pudding
In a medium bowl or large jar, whisk together the coconut milk, maple syrup, vanilla extract, and salt.
Add the chia seeds and stir well until fully combined.
Step 2: Let the Mixture Rest
Allow the mixture to sit for about 5 minutes, then stir again. This helps prevent the chia seeds from clumping together.
Step 3: Refrigerate Overnight
Cover the bowl or jar and place it in the refrigerator for at least 4 hours, though overnight is best for the thickest texture.
The pudding should become thick and creamy once chilled.
Step 4: Prepare the Mango
Dice the fresh mango into small cubes. For a smoother topping, you can blend half of the mango into a puree.
Step 5: Assemble and Serve
Spoon the chia pudding into serving glasses or bowls and top with the diced mango.
Finish with toasted coconut flakes or fresh mint if desired.
Helpful Tips
- Stirring the pudding twice during the first few minutes helps create a smoother texture.
- Use full-fat coconut milk for the creamiest result.
- If the pudding becomes too thick, stir in a splash of plant milk before serving.
Optional Variations
- Swap the mango for fresh pineapple or peaches.
- Add toasted coconut for extra crunch and flavor.
- Mix in a little lime zest for a brighter tropical taste.
5. Vegan Lemon Icebox Pie
Why You’ll Love This Recipe
This vegan lemon icebox pie is cool, creamy, and packed with fresh citrus flavor.
The smooth lemon filling paired with the crunchy cookie crust makes it the perfect warm-weather dessert.
It’s simple to prepare and tastes even better after chilling.
Ingredients
Crust
- 2 cups crushed vegan cookies or graham crackers
- 5 tablespoons melted coconut oil
- 2 tablespoons maple syrup
Lemon Filling
- 1 1/2 cups coconut cream
- 1/2 cup fresh lemon juice
- 1/3 cup maple syrup
- 1 tablespoon lemon zest
- 1 teaspoon vanilla extract
Optional Toppings
- Lemon slices
- Fresh berries
- Coconut whipped cream
Instructions
Step 1: Prepare the Crust
In a mixing bowl, combine the crushed cookies, melted coconut oil, and maple syrup.
Mix until the crumbs resemble wet sand.
Press the mixture firmly into a pie dish or tart pan, covering the bottom and sides evenly.
Place the crust in the refrigerator while preparing the filling.
Step 2: Make the Lemon Filling
In a blender or mixing bowl, combine the coconut cream, lemon juice, maple syrup, lemon zest, and vanilla extract.
Blend or whisk until smooth and creamy.
Taste the filling and adjust the sweetness if needed.
Step 3: Fill the Pie
Pour the lemon filling into the chilled crust and smooth the top with a spatula.
Step 4: Chill Until Firm
Refrigerate the pie for at least 6 hours, or overnight for the best texture.
The filling should feel firm and slice cleanly once chilled.
Step 5: Slice and Serve
Top with fresh berries, lemon slices, or coconut whipped cream before serving.
Serve chilled.
Helpful Tips
- Fresh lemon juice gives the best flavor.
- Chill the coconut cream beforehand for a thicker filling.
- Use parchment paper under the crust for easier removal.
Optional Variations
- Replace lemon juice with lime juice for a lime icebox pie.
- Add fresh raspberries or blueberries on top.
- Sprinkle extra lemon zest over the finished pie.
6. Chocolate Avocado Mousse
Why You’ll Love This Recipe
This chocolate avocado mousse is rich, silky, and deeply chocolatey while still being naturally dairy-free.
The avocado creates an incredibly smooth texture without overpowering the flavor.
It’s quick to make and feels surprisingly indulgent for such a simple dessert.
Ingredients
- 2 ripe avocados
- 1/4 cup cocoa powder
- 1/4 cup maple syrup
- 1/4 cup plant milk
- 1 teaspoon vanilla extract
- Pinch of salt
Optional Toppings
- Coconut whipped cream
- Chocolate shavings
- Fresh berries
- Chopped nuts
Instructions
Step 1: Prepare the Avocados
Cut the avocados in half, remove the pits, and scoop the flesh into a blender or food processor.
Make sure the avocados are fully ripe for the smoothest texture.
Step 2: Blend the Ingredients
Add the cocoa powder, maple syrup, plant milk, vanilla extract, and salt.
Blend until completely smooth and creamy.
Stop and scrape down the sides as needed so everything blends evenly.
Step 3: Taste and Adjust
Taste the mousse and add extra maple syrup if you prefer a sweeter dessert.
If the mousse feels too thick, blend in another small splash of plant milk.
Step 4: Chill Before Serving
Transfer the mousse into serving bowls or glasses.
Refrigerate for at least 30 minutes before serving to help the texture firm up and the flavors develop.
Step 5: Add Toppings
Top with coconut whipped cream, chocolate shavings, berries, or nuts just before serving.
Helpful Tips
- Use high-quality cocoa powder for the richest chocolate flavor.
- Chill the mousse well for a thicker, more dessert-like texture.
- A food processor creates the smoothest consistency.
Optional Variations
- Add 1 teaspoon espresso powder for a deeper chocolate flavor.
- Top with coconut whipped cream for extra richness.
- Blend in a spoonful of peanut butter for a chocolate peanut butter version.
7. Peanut Butter Banana Freezer Bites
Why You’ll Love This Recipe
These peanut butter banana freezer bites are creamy, chocolatey, and incredibly easy to make.
They taste like mini frozen ice cream sandwiches and are perfect for warm days or quick sweet cravings.
Kids love them, and they’re great to keep stored in the freezer for an easy snack.
Ingredients
- 2 ripe bananas
- 1/2 cup creamy peanut butter
- 1 1/2 cups vegan chocolate chips
- 1 tablespoon coconut oil
Optional Toppings
- Chopped peanuts
- Shredded coconut
- Mini vegan chocolate chips
Instructions
Step 1: Slice the Bananas
Peel the bananas and slice them into thick rounds, about 1/2 inch thick.
Place half of the banana slices on a parchment-lined tray or plate.
Step 2: Add the Peanut Butter
Spread or spoon a small amount of peanut butter onto each banana slice.
Top with another banana slice to create small banana sandwiches.
Step 3: Freeze the Banana Bites
Place the tray in the freezer for about 1 hour, or until the banana sandwiches are firm.
This makes them easier to dip into the melted chocolate later.
Step 4: Melt the Chocolate
Add the vegan chocolate chips and coconut oil to a microwave-safe bowl.
Heat in short intervals, stirring each time, until smooth and melted.
Step 5: Dip in Chocolate
Using a fork or spoon, dip each frozen banana bite into the melted chocolate.
Let the extra chocolate drip off before placing the bites back onto the parchment paper.
Step 6: Add Toppings and Freeze Again
Sprinkle with chopped peanuts, coconut, or chocolate chips before the coating hardens.
Freeze for another 15 to 20 minutes until fully set.
Serve straight from the freezer.
Helpful Tips
- Use ripe bananas for the sweetest flavor.
- Keep the bites frozen until serving so they stay firm.
- Line the tray with parchment paper to prevent sticking.
Optional Variations
- Swap peanut butter for almond butter or cashew butter.
- Roll the chocolate coating in chopped nuts for extra crunch.
- Drizzle extra melted chocolate over the top before freezing.
8. Vegan Tiramisu Cups
Why You’ll Love This Recipe
These vegan tiramisu cups are creamy, rich, and packed with coffee flavor.
They look elegant enough for special occasions but are surprisingly simple to put together.
The layers of coffee-soaked cookies and fluffy cream make every bite deliciously smooth and satisfying.
Ingredients
- 1 1/2 cups dairy-free whipped topping or coconut whipped cream
- 1 cup brewed espresso or strong coffee, cooled
- 20 vegan cookies or ladyfinger-style biscuits
- 2 tablespoons cocoa powder
- 2 tablespoons maple syrup
- 1 teaspoon vanilla extract
Optional Toppings
- Chocolate shavings
- Cocoa powder dusting
- Dairy-free chocolate chips
Instructions
Step 1: Prepare the Coffee Mixture
In a shallow bowl, combine the cooled espresso, maple syrup, and vanilla extract.
Stir until fully mixed.
Step 2: Prepare the Cream Layer
Add the dairy-free whipped topping to a bowl and gently stir until smooth and fluffy.
Step 3: Dip the Cookies
Quickly dip each cookie into the coffee mixture. Do not soak them too long, or they may become too soft.
Break the cookies into smaller pieces if needed to fit your serving cups.
Step 4: Assemble the Layers
Place a layer of dipped cookies into the bottom of each serving cup.
Add a layer of whipped topping over the cookies.
Repeat the layers until the cups are filled, finishing with the cream layer on top.
Step 5: Chill Before Serving
Cover and refrigerate the tiramisu cups for at least 2 hours so the flavors can develop.
Step 6: Add the Final Toppings
Dust the tops with cocoa powder just before serving.
Add chocolate shavings or chocolate chips if desired.
Helpful Tips
- Chill the cups overnight for the best flavor and texture.
- Use strong coffee for a richer tiramisu taste.
- Pipe the cream layer for a cleaner presentation.
Optional Variations
- Use decaf coffee for a caffeine-free version.
- Add chocolate shavings between the layers.
- Mix a little cinnamon into the cocoa topping.
9. Raspberry Coconut Bars
Why You’ll Love This Recipe
These raspberry coconut bars are fruity, naturally sweet, and beautifully layered.
The soft coconut base pairs perfectly with the bright raspberry filling, making them refreshing and satisfying at the same time.
They’re also easy to make with simple wholesome ingredients.
Ingredients
Coconut Crust
- 1 1/2 cups almonds
- 1 cup soft dates, pitted
- 1 cup shredded coconut
- 1 tablespoon coconut oil
- Pinch of salt
Raspberry Filling
- 2 cups fresh or frozen raspberries
- 2 tablespoons maple syrup
- 1 tablespoon lemon juice
- 1/2 cup shredded coconut
Optional Toppings
- Extra raspberries
- White chocolate drizzle
- Coconut flakes
Instructions
Step 1: Make the Crust
Add the almonds, dates, shredded coconut, coconut oil, and salt to a food processor.
Blend until the mixture becomes sticky and holds together when pressed.
Step 2: Press Into the Pan
Line a small baking dish or loaf pan with parchment paper.
Press the crust mixture firmly into the bottom of the pan in an even layer.
Step 3: Prepare the Raspberry Filling
Add the raspberries, maple syrup, lemon juice, and shredded coconut to the food processor.
Blend until mostly smooth.
Step 4: Layer the Filling
Spread the raspberry mixture evenly over the coconut crust.
Smooth the top with a spoon or spatula.
Step 5: Chill Until Firm
Place the bars in the refrigerator for at least 2 hours or freeze for about 1 hour until firm enough to slice.
Step 6: Slice and Serve
Lift the bars from the pan using the parchment paper and slice into squares or rectangles.
Serve chilled.
Helpful Tips
- Wet your hands slightly when pressing the crust to prevent sticking.
- Frozen raspberries work well if fresh berries are not available.
- Keep the bars refrigerated for the best texture.
Optional Variations
- Swap raspberries for strawberries or blueberries.
- Drizzle melted vegan white chocolate over the top.
- Add chopped nuts for extra crunch.
10. Vegan Cookie Dough Bites
Why You’ll Love This Recipe
These vegan cookie dough bites are soft, sweet, and completely safe to eat since there are no eggs involved.
They come together quickly and make a perfect snack, dessert, or freezer treat whenever you want a little something sweet.
Ingredients
- 1 1/2 cups heat-treated flour
- 1/2 cup peanut butter or almond butter
- 1/4 cup maple syrup
- 1/4 cup plant milk
- 1 teaspoon vanilla extract
- 1/2 cup vegan chocolate chips
- Pinch of salt
Instructions
Step 1: Heat-Treat the Flour
If your flour is not already heat-treated, spread it onto a baking tray and bake at 350°F (175°C) for about 5 minutes.
Allow it to cool completely before using.
Step 2: Mix the Wet Ingredients
In a mixing bowl, stir together the peanut butter, maple syrup, plant milk, vanilla extract, and salt until smooth.
Step 3: Add the Flour
Gradually add the heat-treated flour and mix until a soft dough forms.
The dough should be soft but easy to roll.
Step 4: Fold in the Chocolate Chips
Stir in the vegan chocolate chips until evenly distributed throughout the dough.
Step 5: Roll Into Bites
Scoop out small portions of dough and roll into bite-sized balls using your hands.
Place the bites onto a parchment-lined tray or plate.
Step 6: Chill Before Serving
Refrigerate the cookie dough bites for about 20 to 30 minutes so they firm up slightly.
Serve chilled or store in the refrigerator for later.
Helpful Tips
- Add a splash of plant milk if the dough feels too dry.
- Chill the dough before rolling if it feels sticky.
- Store the bites in the freezer for a firmer texture.
Optional Variations
- Add crushed pretzels for a sweet-and-salty flavor.
- Replace regular flour with oat flour for a softer texture.
- Mix in chopped nuts or shredded coconut for extra texture.
Tips For Making The Best Vegan No-Bake Desserts
Use High-Quality Ingredients
With no-bake desserts, every ingredient stands out more because nothing gets baked or cooked down.
That means good ingredients really do make a difference in both flavor and texture.
Full-fat coconut milk is one of the best ingredients to keep on hand for creamy vegan desserts.
It adds richness to cheesecakes, mousses, puddings, and pie fillings without needing dairy.
Try to use canned full-fat coconut milk instead of light versions, since the thicker texture helps desserts set properly.
Fresh, ripe fruit also matters more than you might think.
Sweet strawberries, soft bananas, juicy mangoes, and ripe avocados naturally add flavor and creaminess without needing extra sugar.
If the fruit tastes good on its own, your dessert will taste even better.
Chocolate is another ingredient worth choosing carefully.
A good-quality vegan dark chocolate melts more smoothly and gives desserts a richer flavor.
It can completely change the final result, especially in recipes like truffles, bars, and mousse.
Nuts, nut butters, vanilla extract, and maple syrup also play a big role in no-bake recipes.
Simple ingredients create most of the flavor here, so using fresh and high-quality versions helps every bite taste better.
Chill Long Enough
One of the biggest secrets to successful no-bake desserts is patience.
It can feel tempting to slice into bars or dig into pie filling early, but chilling time is what helps everything firm up properly.
Ingredients like coconut cream, chocolate, peanut butter, chia seeds, and blended cashews all need time to set.
As the dessert chills, the texture becomes thicker, creamier, and easier to serve.
If desserts are removed from the fridge too early, they can turn soft, messy, or difficult to slice cleanly.
Even an extra hour in the refrigerator can make a big difference.
For best results, follow the recommended chill times in each recipe.
Overnight chilling is often even better for flavors like chocolate, coffee, lemon, and berry desserts because the flavors deepen as they rest.
If you want cleaner slices for bars or pies, try placing the dessert in the freezer for 15 to 20 minutes before cutting.
A warm knife also helps create smoother slices.
Taste As You Go
One of the best parts about making no-bake desserts is how easy it is to adjust the flavor before chilling.
Since most fillings and mixtures are safe to taste while preparing, you can make small changes along the way.
If you like desserts a little sweeter, add an extra drizzle of maple syrup.
Want a brighter flavor? A splash of lemon juice or a little citrus zest can help balance richer ingredients like coconut cream or chocolate.
Tasting as you go also helps when working with fruit. Some strawberries are sweeter than others, and bananas can vary in ripeness.
A quick taste lets you decide whether your dessert needs a little extra sweetness or flavor before it sets.
Small adjustments can make homemade desserts taste even more personal and balanced.
Don’t be afraid to trust your taste buds. That’s part of what makes baking and dessert-making so fun.
Final Thoughts
Vegan no-bake desserts are proof that making something sweet doesn’t have to be complicated.
With simple ingredients, easy steps, and no oven needed, these recipes are perfect for busy days, warm weather, or anytime you want a quick homemade treat.
Don’t be afraid to try a few favorites and make them your own along the way.
FAQs
Are no-bake vegan desserts healthy?
Many no-bake vegan desserts are made with wholesome ingredients like fruit, nuts, seeds, and natural sweeteners. They can still taste rich and indulgent while using simple plant-based ingredients.
How long do no-bake desserts last?
Most no-bake desserts stay fresh in the refrigerator for about 4 to 7 days when stored in an airtight container. Frozen desserts and bars can usually be kept in the freezer for up to 2 months.
Can I freeze these desserts?
Yes, many of these desserts freeze very well. Chocolate peanut butter bars, freezer bites, cookie dough bites, truffles, and raspberry coconut bars are especially great for freezing.
What can I use instead of coconut milk?
You can use oat cream, cashew cream, almond milk, or other dairy-free alternatives, depending on the recipe. Cashew cream works especially well for creamy fillings and cheesecakes.

Hi, I’m Sorenna Blythe, the baker and writer behind Mix Whisk Bake. I share simple, reliable recipes and honest kitchen moments to help home bakers bake with confidence and joy. When I’m not testing new treats, you’ll find me sipping coffee and dreaming up my next bake.